
Dana 44 TTB Axle Swap Into a Ford Ranger
Quick Summary: This article documents a Dana 44 TTB (Twin Traction Beam) axle swap into a Ford Ranger 4×4 by narrowing the axle beams 3 inches per side. It covers the fabrication process, alignment considerations, Dana 35 vs Dana 44 differences, steering and radius arm issues, and long-term observations.

Introduction
Many Ford Ranger 4×4 owners have dreamed of replacing their front axle with a Dana 44 TTB. In this article, the Dana 44 TTB is being swapped in by narrowing the axle beams by 3-inches on both ends.
The Process
The Dana 44 TTB (Twin Traction Beam) will bolt right in after narrowing it 3″ on each side. I cut the section out between the diff and radius arm mount on the driver side beam, and 3″ on the same area (behind the radius arm mount) on the passenger side beam. You can (re)use the passenger side main shaft from the Dana 35 TTB with the Dana 44 TTB. It is the correct length for use with the 44 after narrowing it and has the same slip-spline size.
There is a 2″ difference in the spacing of the pivots on the F-150 that the Dana 44 comes from, and the Ford Ranger / Ford Bronco II. This, combined with the 3″ sections cut from each side will result in a total narrowing of 8″.
Brake line attachment is the same (you can use Ranger lines).
Differences Between The D35 And D44 Include:
1) The steering knuckles have the tie rod attached to the bottom on the Dana 44. I recommend redrilling the knuckles to accept the tie rod on top like the Dana 35. Stock (Ranger) steering linkage can be used.
2) The radius arm attachment on the Dana 44 is about 1/8″ smaller. A washer or shim will need to be used under the top radius arm ear. (The bolts are the same) The radius arm is also canted inward about 10 degrees or so. An angled shim can be made out of a coil spacer. (I cut some aluminum ones with a hacksaw. A bandsaw will work wonders on these. I didn’t have one, though.) This will ensure the coil spring doesn’t rub on the truck’s frame.
3) The Dana 44 has a 5 X 5.5 wheel bolt pattern. You will want to modify your rear axle to match it. Adaptors can be used but better is new shafts with the correct studs on it. Going with new shafts will allow you to upgrade to 31 spline shafts as well. These are much stronger than the stock 28 spline ones and will better handle those big tires with a locking diff. (It also may be possible to have your existing rear shafts redrilled for the 5 X 5.5 pattern. The flange is just large enough (a 4×4 shop with a machinist must do this, though). In either case, you redrill the stock brake drum with the new bolt pattern. (The drums aren’t that critical. you could do that yourself. The drum is centered by the center bore, not the studs.)
WARNING:
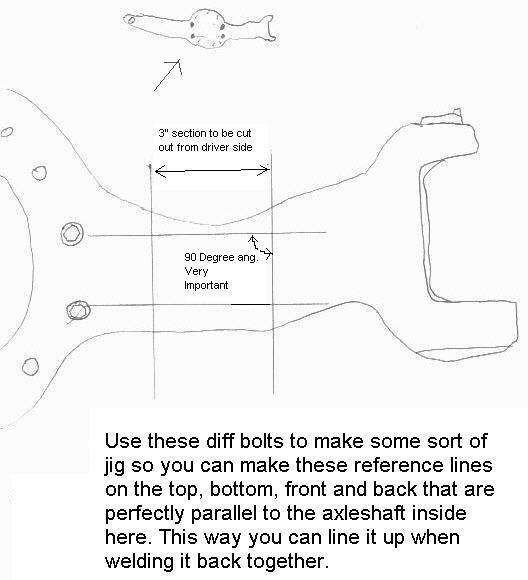
If you don’t have good fabricating skill, I might suggest having someone cut the sections out of the beams for you. It is EXTREMELY critical the whole thing is kept in alignment when welding it back together. Otherwise, the axle shaft can get cocked in the differential and create a whole mess of problems.
Photos:
These are some pics of the Dana44 TTB axle modified for my Ranger.
I included a couple diagrams outlining some reference points I used to cut the 3″ sections out from the beams. It is extremely important to make sure you line up the knuckle yoke when you weld it back together.
I used reference lines made using the differential cover holes in the front of the axle beam to line it back up. These holes are pretty much the only real (straight) reference point on the irregularly shaped beam that are parallel to the axle shaft. I used lines on all four sides of the beam so as to line them all up after cutting out the section. I used small tack welds to get it into position and hold it before fully welding it back up. I also used some plates to weld over the first weld bead to further reinforce it. They should be visible in the D35 vs. D44 pics, beam-shim detail, and a couple others.
Keep in mind the entire rotation torque is supported by the driver side radius arm. Make sure when cutting the beam that the support tab (2 bolts) is not cut off or compromised.
The brace on the diff (visible in some pics) was to combat breakage (fatigue) of the Superlift extended radius arm. It should not be needed on say, a Skyjacker (or quality homebuilt) radius arm. A stock arm also can be used, but travel won’t be as great.
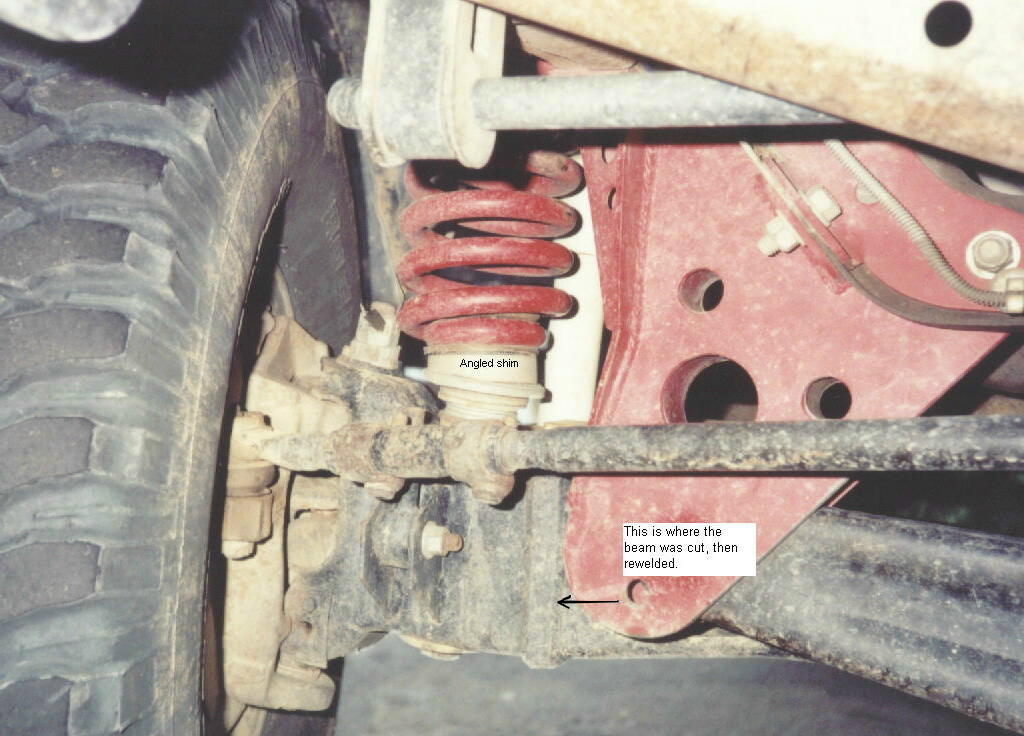
Beam Cut / Angled Shim
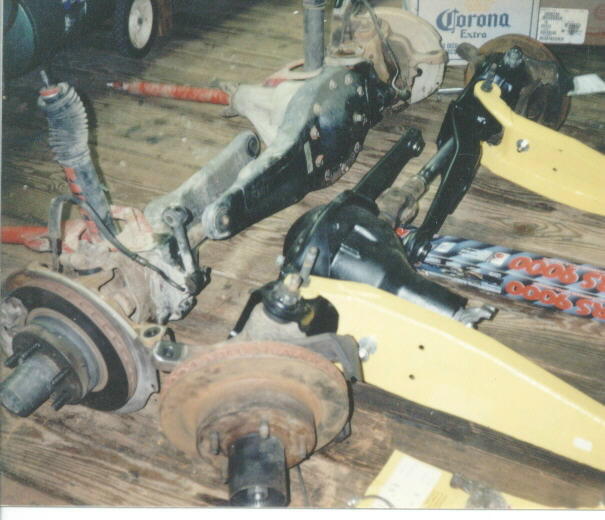
Dana 35 & Dana 44 side by side
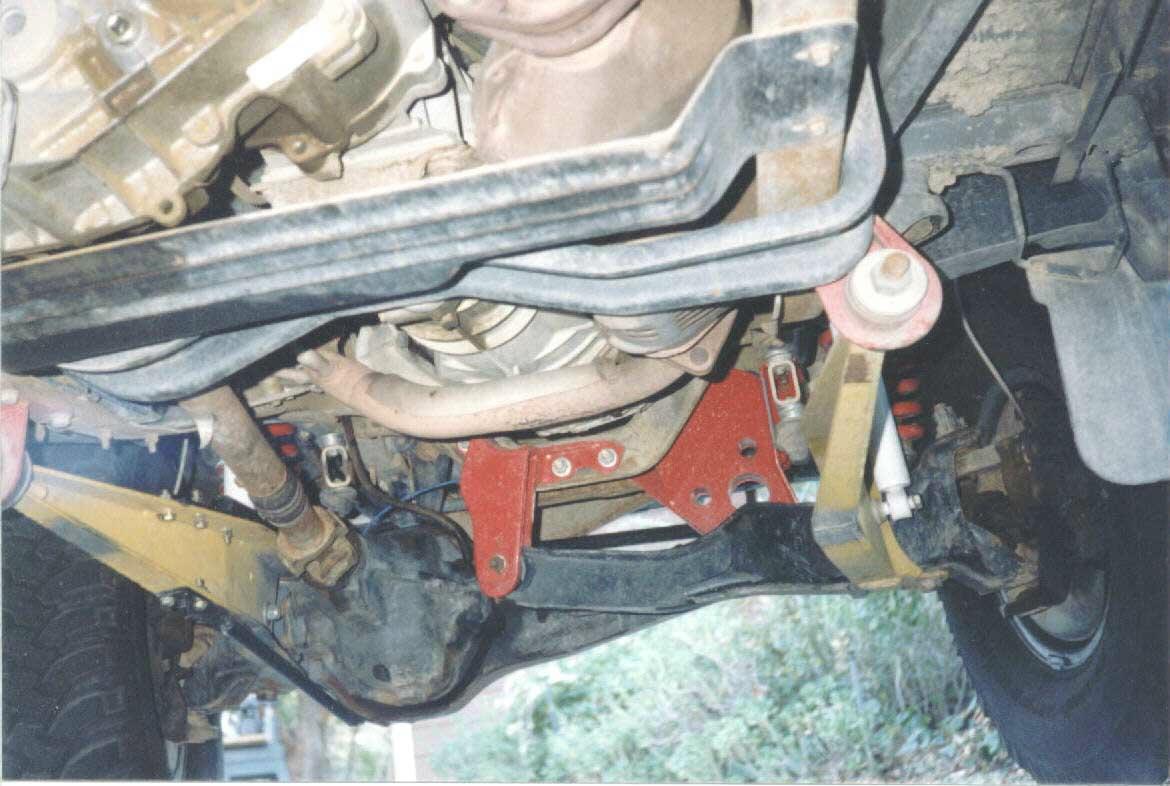
Rear view of brackets
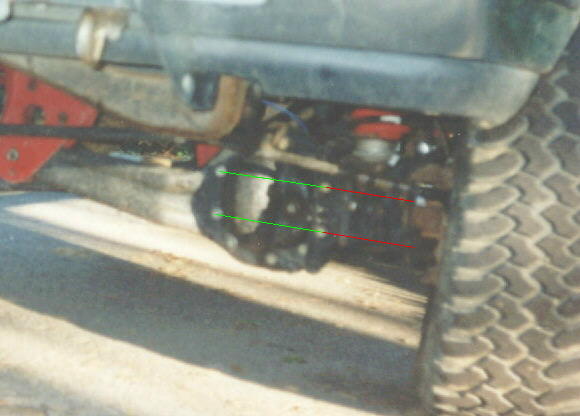
Alignment for welding
Cutting diagram
Conclusion:
This modification was done several years ago, and the biggest advantage is the stronger locking hubs and better wheel bearing spacing. Over time we have learned that you can swap the Dana 44 TTB knuckles and hubs onto a Dana 35 TTB. You can find that information in the links below. But if you want to swap the entire Dana 44 TTB into your Ford Ranger, this is an option. There’s also a page linked below that provides more Dana 44 TTB conversion FAQ’s.
Frequently Asked Questions
Can a Dana 44 TTB be swapped into a Ford Ranger?
Yes. This article documents a Dana 44 TTB axle swap into a Ford Ranger by narrowing the axle beams and addressing steering, radius arm, and bolt pattern differences.
How much does a Dana 44 TTB need to be narrowed?
In this swap, 3 inches were removed from each axle beam. Combined with pivot spacing differences, this results in approximately 8 inches of total narrowing.
Can Dana 35 TTB parts be reused with a Dana 44 TTB?
Yes. The Dana 35 TTB passenger-side main axle shaft can be reused, and Ranger brake lines are compatible.
Is fabrication skill required for a Dana 44 TTB swap?
Yes. Proper alignment during cutting and welding is critical to avoid axle shaft and differential damage.
Related Articles:
Should You Replace A Dana 35 TTB With A Dana 44?
Ford Ranger Dana 44 TTB Conversion FAQ’s
Dana 44 Spindle & Hub Conversion On Dana 35 TTB
Dana 44 Knuckle Swap On To Dana 35
The Mappyjack Dana 44 Spindle & Hub Conversion
Beefing Up The Ford Ranger Dana 35 TTB
Last Updated:
About The Author
Shawn “4x4junkie” has been part of The Ranger Station since 2001 and brings decades of hands-on mechanical experience to the community. A lifelong tinkerer from the San Fernando Valley, he’s largely self-taught, learning by working on his own vehicles, reading service manuals for fun, and tackling everything from suspensions and axles to transmissions. He currently owns and maintains a 1994 Ford Ranger XLT 4x4 and a 1990 Ford Bronco II XLT 4x4.
Shawn has contributed multiple technical articles and countless forum insights, most notably in the Suspensions and Axles sections. He’s known for practical, experience-based problem solving—often cutting through online folklore with real-world fixes. Whether helping diagnose issues or sharing fabrication knowledge, he’s committed to keeping TRS the best Ford Ranger resource available.