
Introduction
FORscan is a software scanner for Ford, Mazda, Lincoln and Mercury vehicles that will allow you to use your computer to change settings in your Fords computer. This article discussed how to use it.
WARNING: The mods you see here are only for the North American Ford Ranger. Use this information at your own risk.
NOTICE: You should keep a record of any changes you make with FORScan.
Quick Menu
If you already know how to use FORScan you can use this menu to jump ahead.
Make Driving Lights Stay On With High Beams (Bambi Mode)
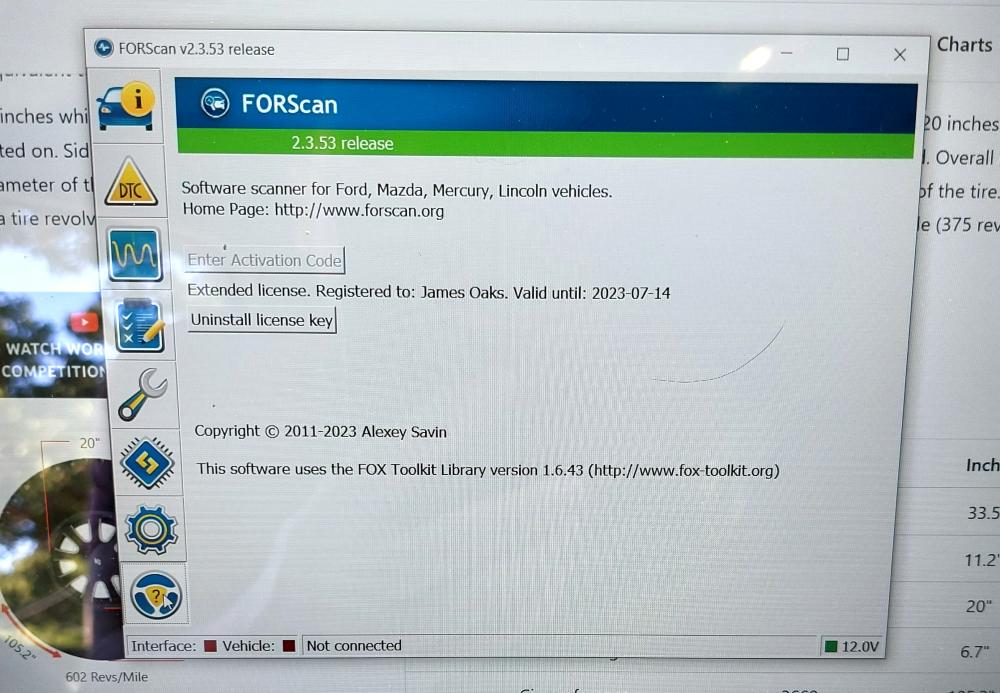
About FORscan
FORScan is a software scanner for Ford, Mazda, Lincoln and Mercury vehicles, designed to all you to connect with your Ford’s computer using a cable or Bluetooth adapter.
There are many OBD2 scanners, but does FORScan somehow differ? Yes, because it is designed especially for Ford, Mazda, Lincoln and Mercury vehicles. So supports specific features of the manufacturer protocols, making the FORScan more powerful in work with these models than any regular OBD2 scanner.
For example, FORScan can detect modules which are not visible for regular OBD2 scanners, it can show you and reset trouble codes which are never displayed by OBD2 scanners. FORScan can show you PIDs which are not supported by any OBD2 scanner, and also run specific tests and service procedures. Version of FORScan for Windows can also perform configuration and programming functions. In other words, FORScan can do things that regular OBD2 scanners cannot do.
Supported Platforms:
- Windows 2000/XP/Vista/7/8/8.1/10 (ELM327-compatible adapters with COM, USB, Bluetooth and WiFi interfaces, J2534 PassThru adapters). Note: only x86/x64 architecture is supported for Windows. ARM architecture is not supported!
- iOS v9.0 and higher (OBDLink MX+, ELM327 BLE and WiFi adapters)
- Android v4.0 and higher (ELM327 Bluetooth and WiFi adapters)
NOTE: This information could change. Always check the FORscan Website for the latest information on the supported platforms and adapters.
Main Features:
- Detect vehicle on-board network configuration.
- Read and reset Diagnostic Trouble Codes from all modules (see list of supported modules)
- Reading of modules’ sensors’ data.
- Run test diagnostic procedures.
- Run service procedures.
- Configuration and programming functions (only in FORScan for Windows, require Extended License).
Supported Vehicles:
- Ford, Lincoln, Mercury models of 1996 – 2022MY (some models of 1994-1995MY are also supported). Attention: FORScan may support limited set of functions and configuration parameters for brand new 2021-2022MY models (we work on it).
- Mazda models of 1996 – 2022MY up to 6G (inclusively). Attention: Mazda 7G models (new Mazda 3, CX-30, MX-30, CX-50 etc) are supported partially or not supported at all!
- Vehicles other than Ford, Mazda, Lincoln, Mercury are not supported!
- Please check for availability of necessary function before purchasing anything.
Required Adapter
You will need an adapter to connect between your laptop and the truck Here are some that are recommended:
- OBDLink EX USB, recommended USB adapter for Windows version of FORScan, also for configuration and programming functions
- OBDLink MX+ BT, recommended Bluetooth adapter for Lite versions of FORScan (iOS, Android)
- vLinker FS USB, recommended USB adapter for Windows version of FORScan, also for configuration and programming functions
- vLinker FD BT, recommended Bluetooth adapter for FORScan Lite for Android
NOTE: This information could change. Always check the FORscan Website for the latest information on the supported platforms and adapters.
The Adapter I Use

You’ll need an adapter to connect the device you’re running FORScan on to your Ford Ranger. I use FORScan on my laptop and use this OBDLink EX FORScan OBD Adapter that I got off of Amazon.
Download & Using FORScan:
Download
First go Forscan and download Forscan for your computer: Download FORScan
Then sign up for a 2-month free extended license key: Support Request (forscan.org)
When you run FORscan on your computer click the ‘about’ icon on the lower left that looks like a steering wheel with a question mark. This is where you’ll enter the license key that Forscan will email you. The key will be a file that you download. To install the key you’ll click a button which will bring up a window where you’ll click on the file you downloaded.
Setting Up FORScan
When you get the adapter and plug it in to your laptop (I have Windows) it will load the necessary driver into your computer.
Now you just plug it in to your computers USB port and the OBD port on your Ranger.
Turn the key to the on position and click the ‘Connect to Vehicle’ icon in the lower left part of the screen.
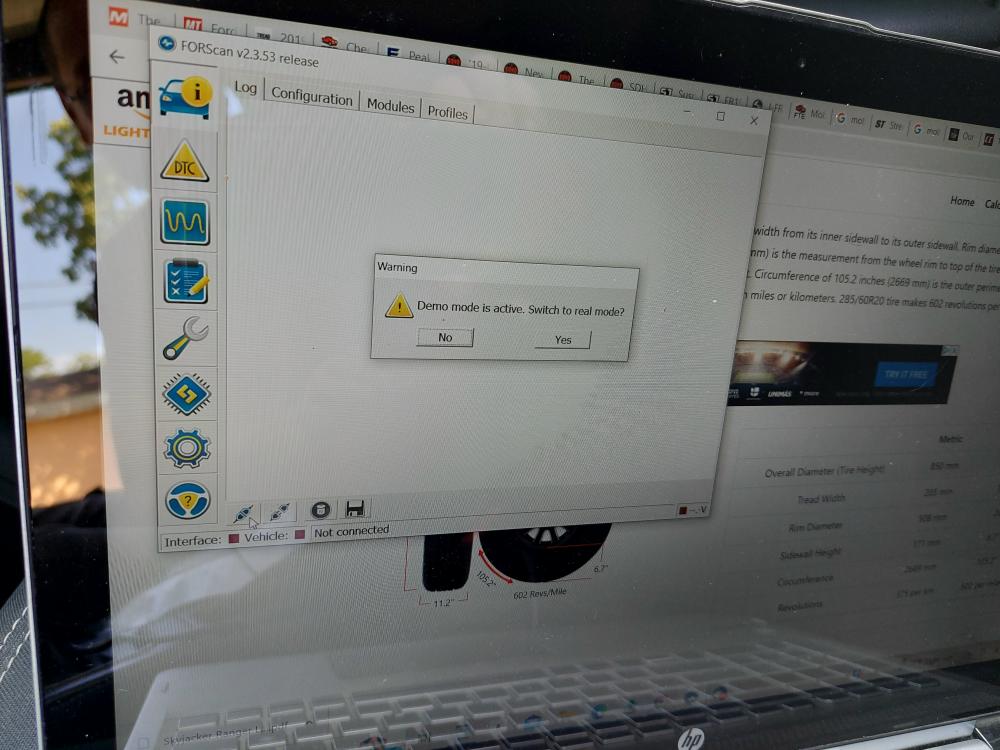
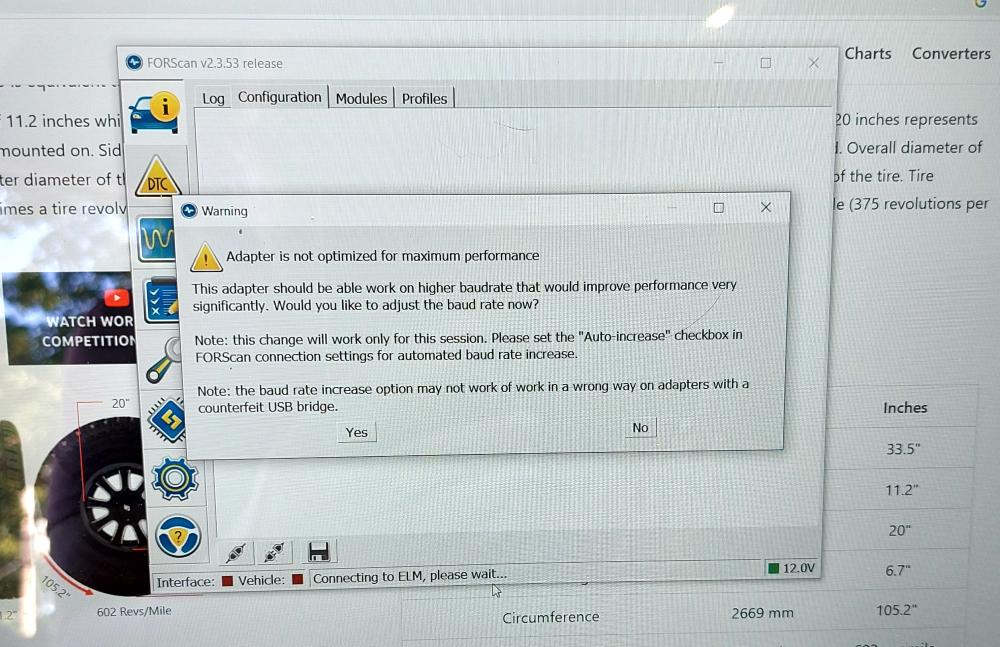
I don’t remember where I got this when I first used it, but you’ll see a message about switching to real mode. Click Yes.
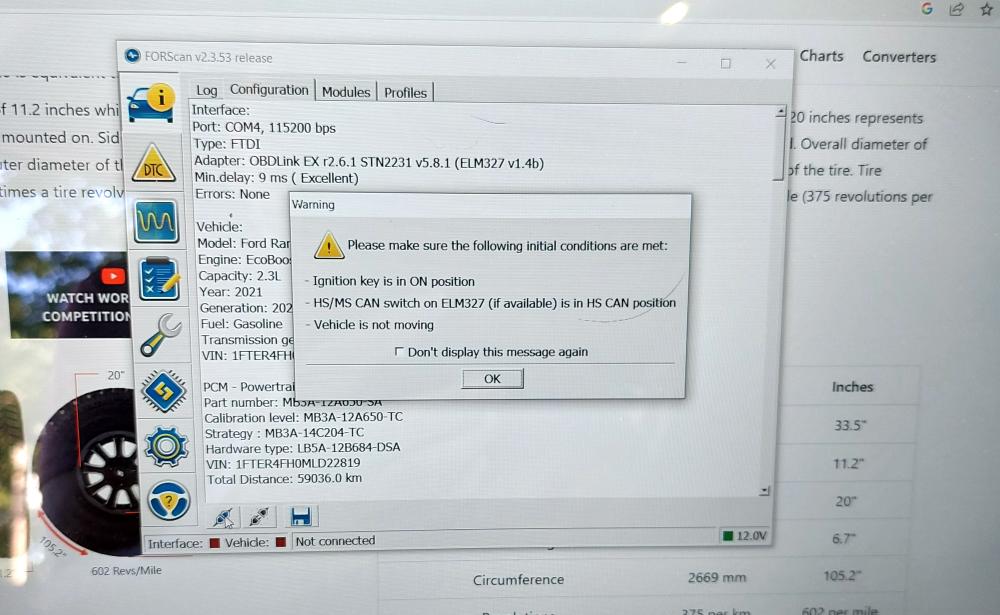
You’ll get a window pop up telling you to make sure your key is in the ON position. Click OK.
You may also get a message telling you that the software in your adapter isn’t up to date and it will update it. Click to allow it to update and make sure you have an internet connection to do so.
While connecting to the truck I got this warning message telling me that my adapter was not optimized for maximum performance and asked me if I wanted to improve the baud rate. I chose No since there was a warning that it may not work on some adapters. I may check Yes in the future.
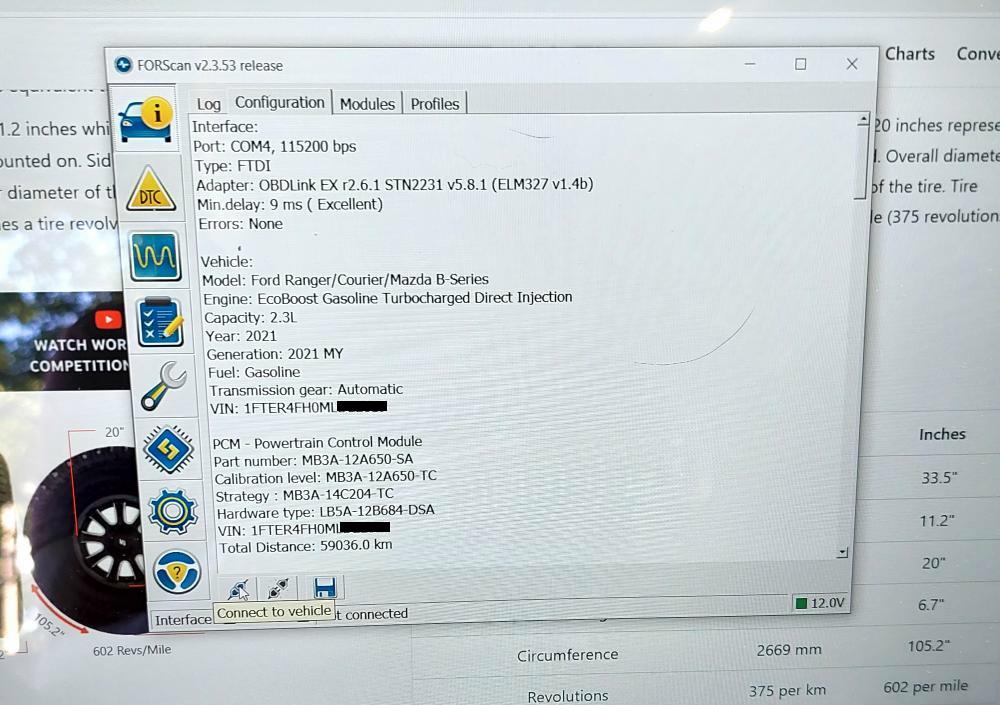
When the vehicle is connected the ‘Interface’ and ‘Vehicle’ indicators in the bottom left will glow green instead of red.
Changing Settings In Forscan
Here are a few of the settings that you can change.
Changing Tire Size
After adding a 3.5-inch Skyjacker lift on my 2021 Ford Ranger I needed to change the tire size that’s programmed into the Ranger.
After completing the above steps under ‘Setting Up FORScan’;
Click the ‘Configuration and Programming’ button (3rd button from the bottom in the left column). This will load up the modules.
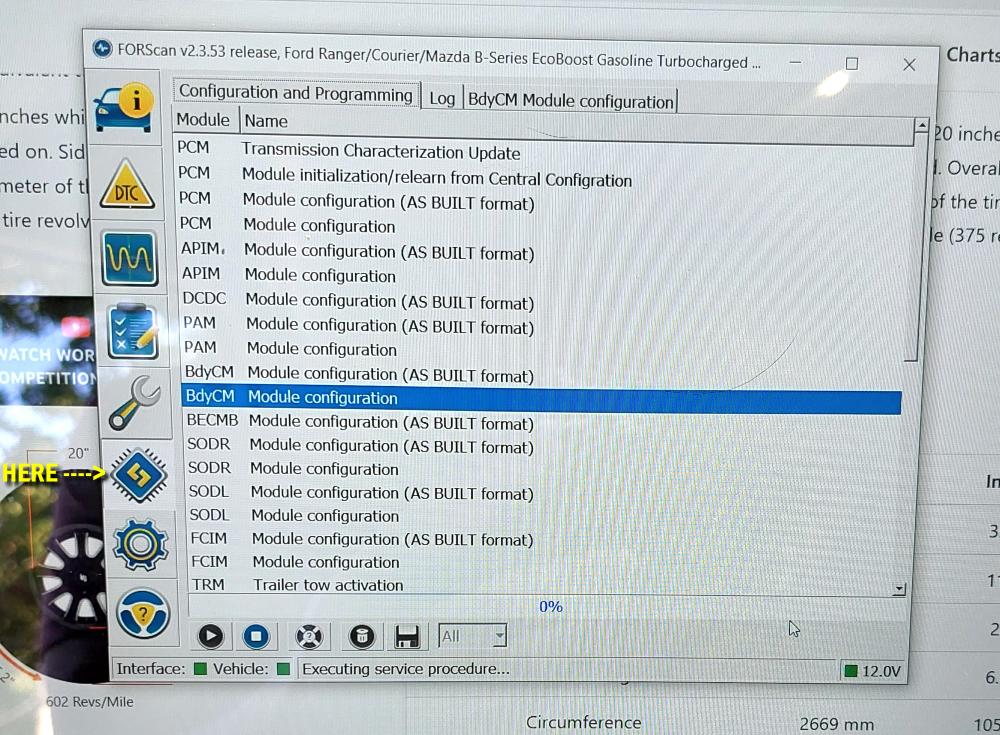
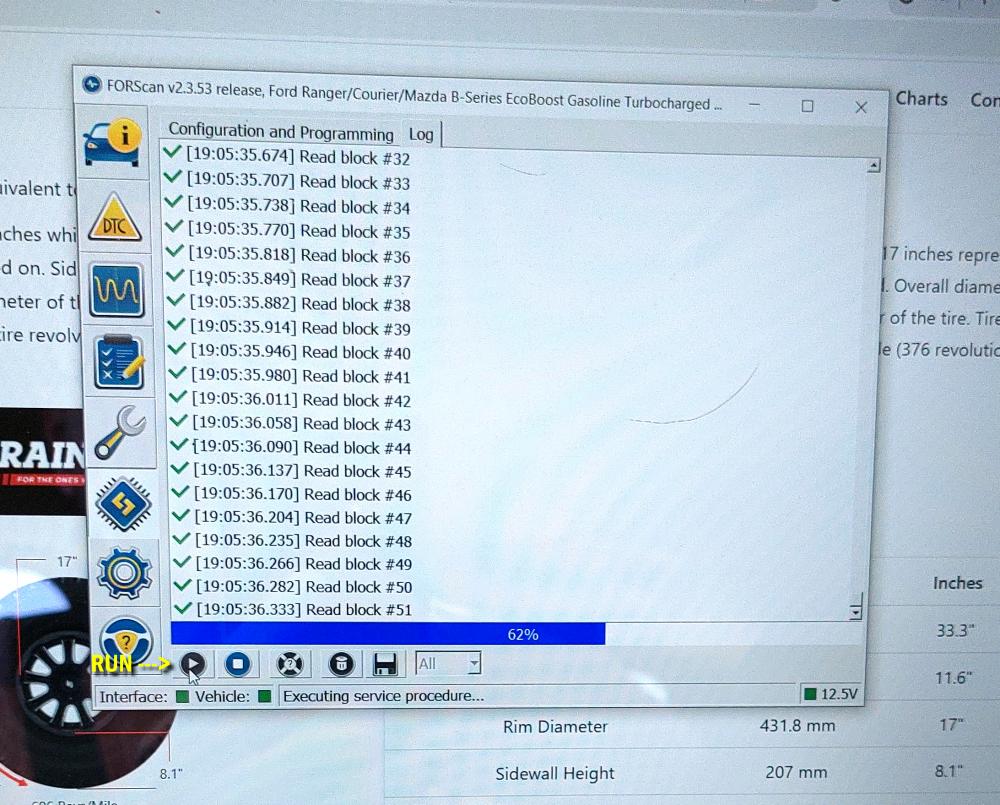
Scroll down to the BdyCM Body Control Module and click on it. Then click the ‘Run’ arrow button at the bottom left. That will load the module.
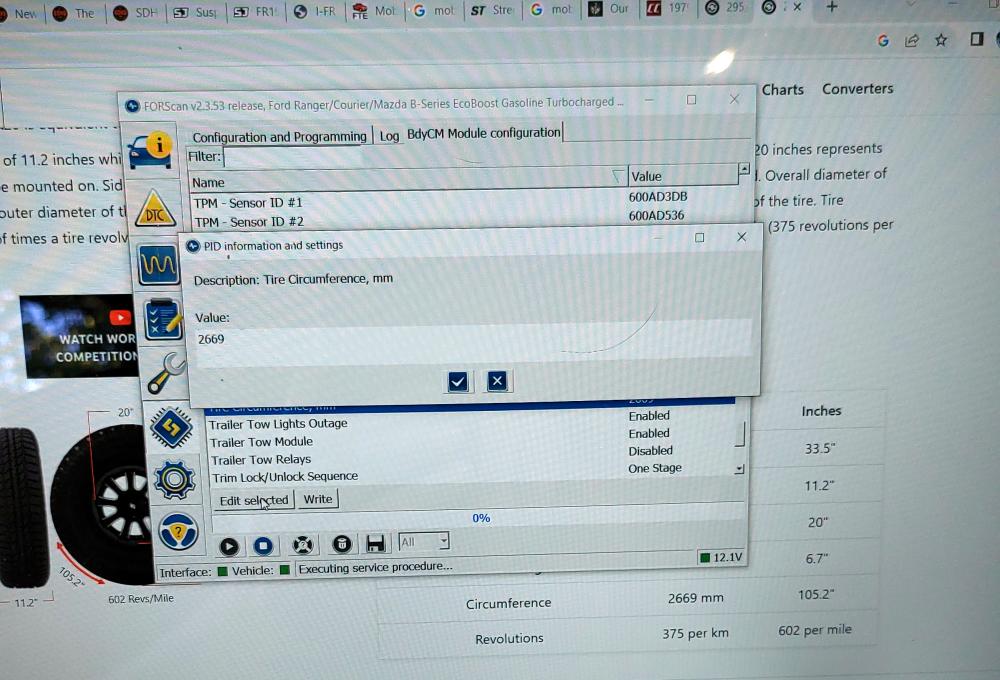
Scroll down to ‘Tire Circumference mm’ and then click the ‘Edit Selected’ button.
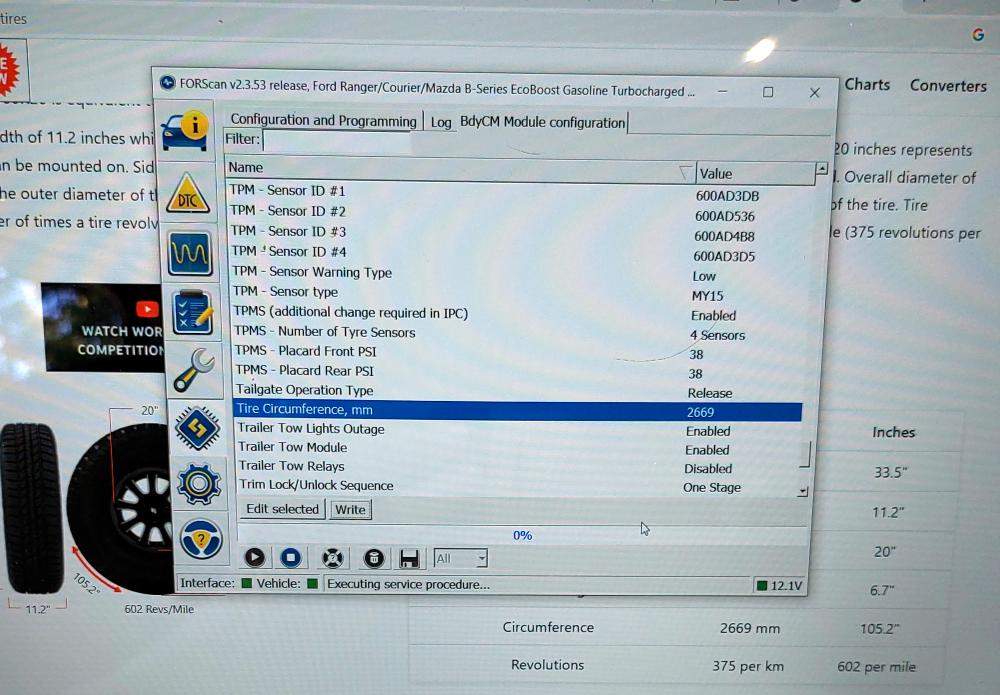
A window will open and allow you to change the tire size in mm (millimeters).
If you need to know your tire size in millimeters, go to Tire Size Calculator (tirecalculator.com)
For me, https://tirecalculator.com/295-70r17-tires tells me that my 295/70/17 tires have a 2656 mm circumference. However that site says that tire size is 33.3-inches in diameter and Thunderer says that my tires are 33.5 inches in diameter, so I used https://tirecalculator.com/285-60r20-tires because that tire is 33.5-inches which has a circumference of 2669, but the speedometer read 3 miles an hour too fast, so I tweaked that number down lower.
Anyway, you can see where I had already changed it to 2669. I’m going to change it to 2656. Once you change it click the check mark button.
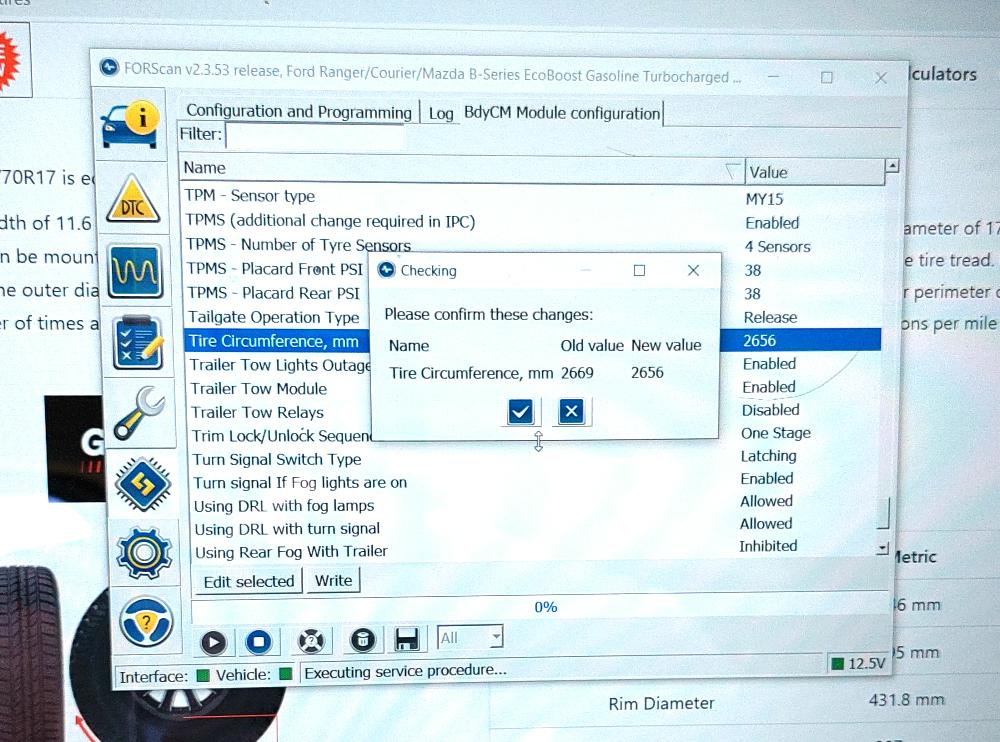
To get it to actually save you need to click the ‘Write’ button that’s next to the ‘Edit selected’ button. It will ask you to confirm your changes. In the pic below you can see that I’m changing from 2669 to 2656. Click the check mark button.
When you do this you’ll hear a click in the dash and you’ll see the radio display screen blink.
A new window will pop up and tell you that the block has been programmed successfully and to turn your ignition off and then back on. Click the Ok button after you’ve done so.
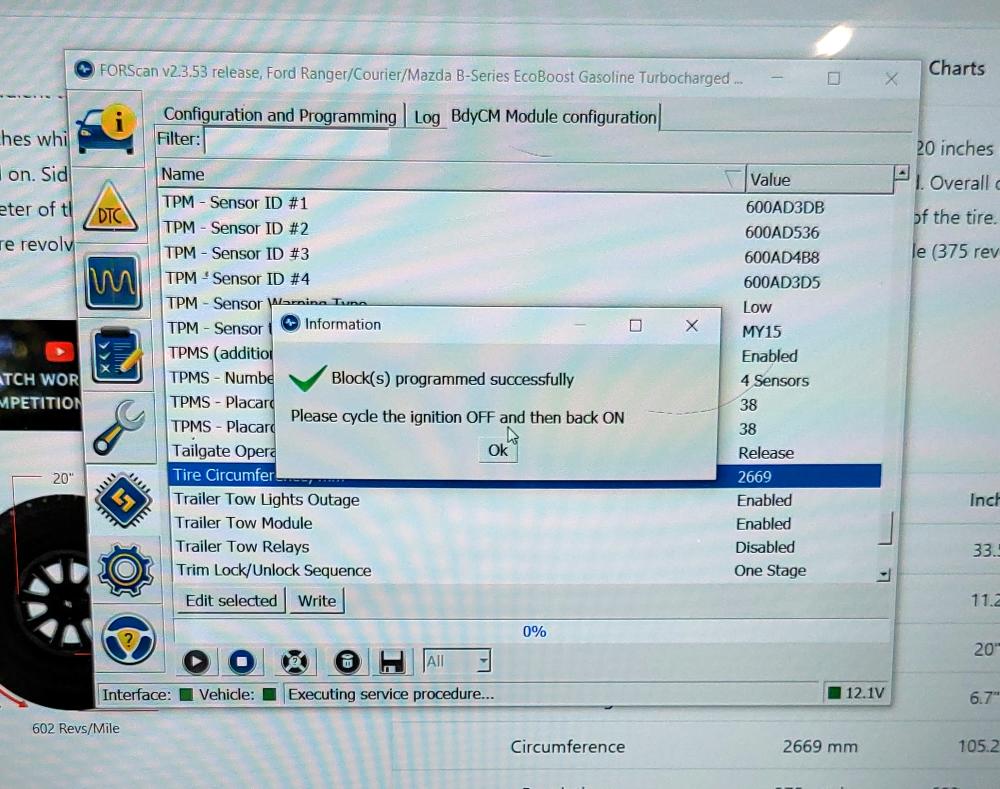
That’s it. The tire size has been changed. Take the vehicle for a drive and check the speedometer against a GPS. If the speed is off, you can adjust the tire size. If your speedometer is reading to high, make the tire size smaller. If the speedometer is too low, make the tire size larger.
Make Driving Lights Stay on With High Beams (Bambi Mode):
Some people call this Bambi mode. I have no idea why.
Again you’ll want to be in the BdyCM Body Control Module.
After completing the above steps under ‘Setting Up FORScan’;
Click the ‘Configuration and Programming’ button (3rd button from the bottom in the left column). This will load up the modules.
Scroll down to the BdyCM Body Control Module and click on it. Then click the ‘Run’ arrow button at the bottom left. That will load the module.
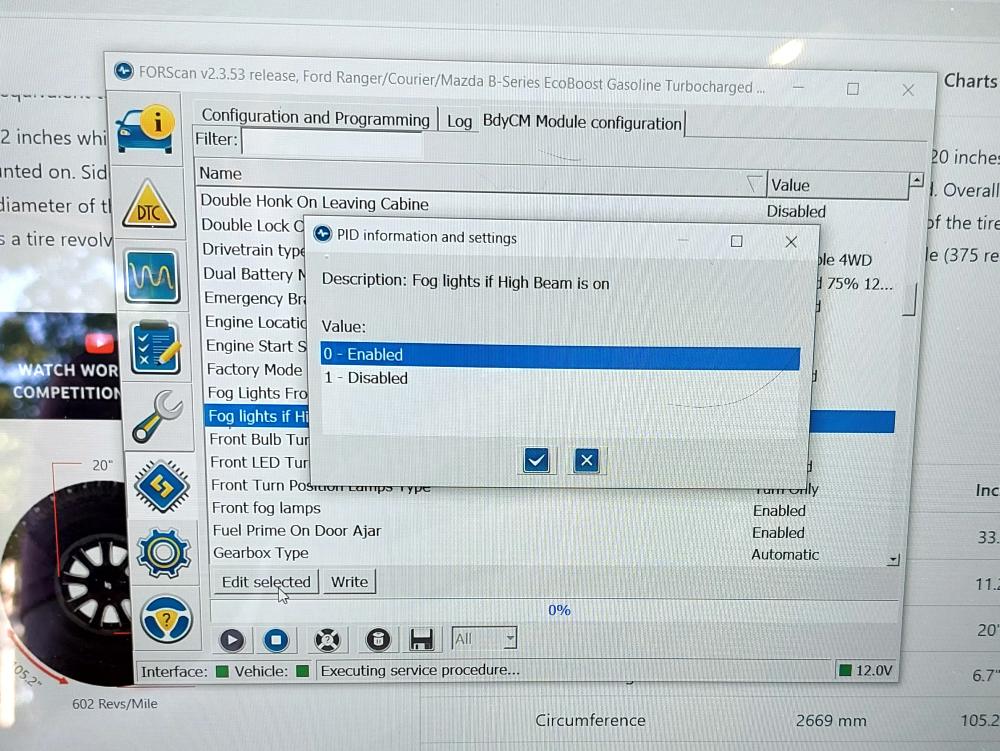
Scroll down and look for ‘Fog lights if High Beam is on’. The factory default is Disabled but you’ll see where I have already enabled it in the pic below.
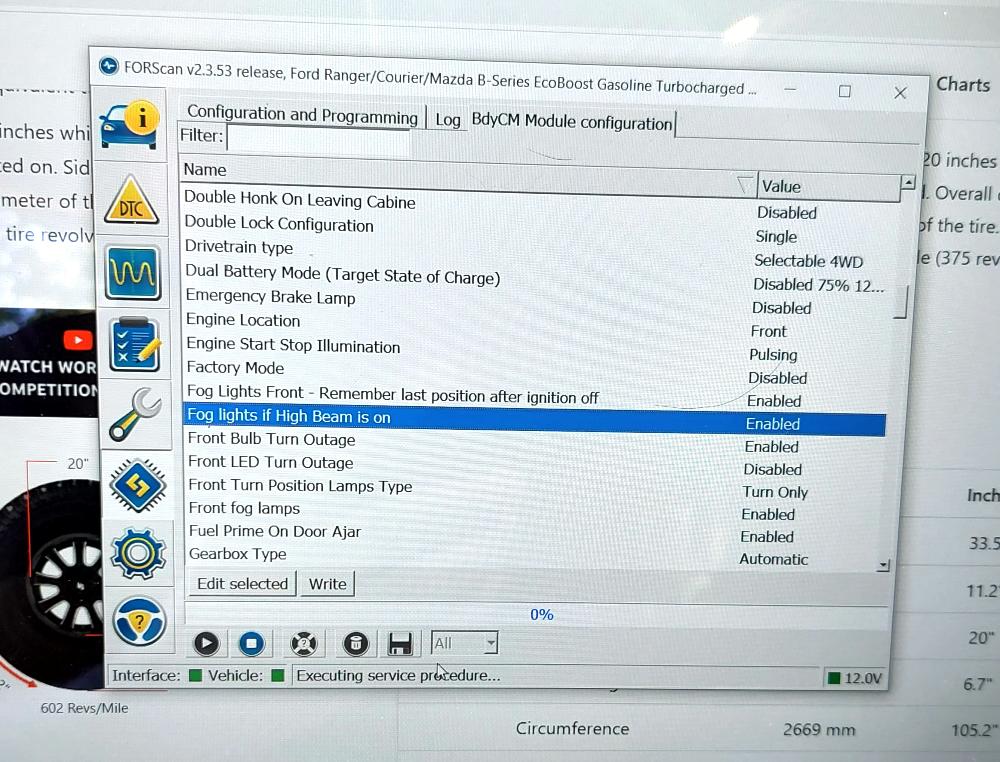
Click ‘Edit selected’ and a window will pop up to choose 0 – Enabled. Once you’ve chosen that click the check mark button.
Once you’ve done that you’ll have to click the ‘Write’ button to save it. A window will pop up asking you to confirm your changes. Click the check mark button.
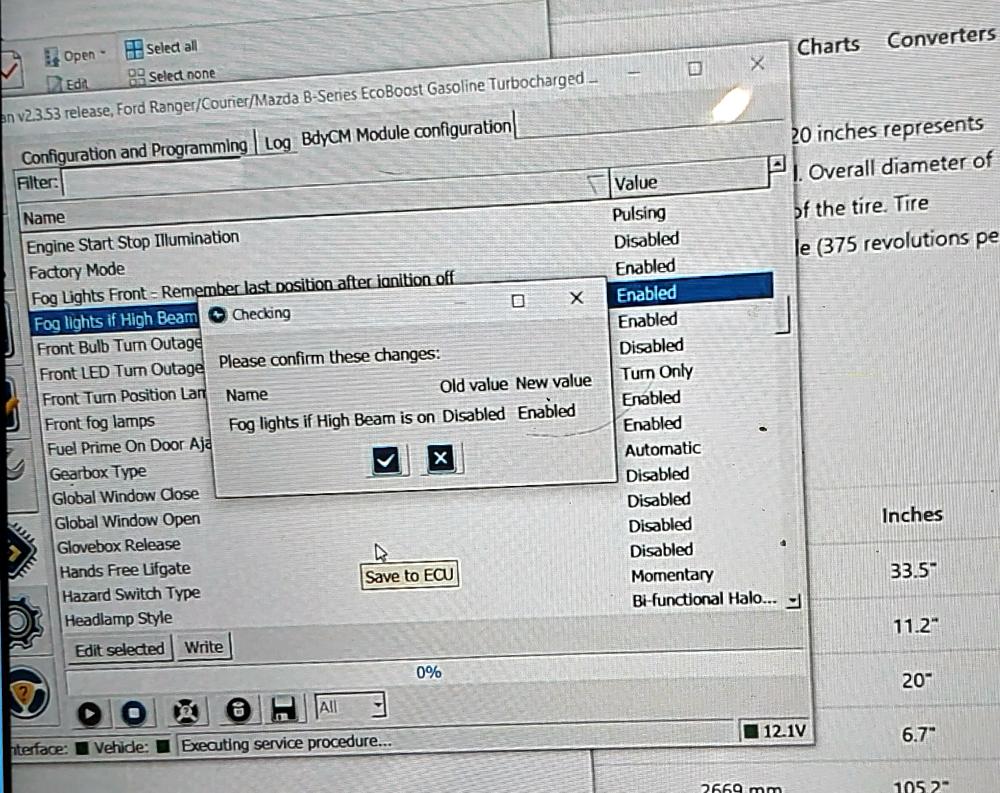
You’ll hear a click noise in the dash, and the radio display screen will blink on and off. You’ll get a message asking you to turn the ignition off and back on. Then click the ‘Ok’ button.

That’s it, you’re done.
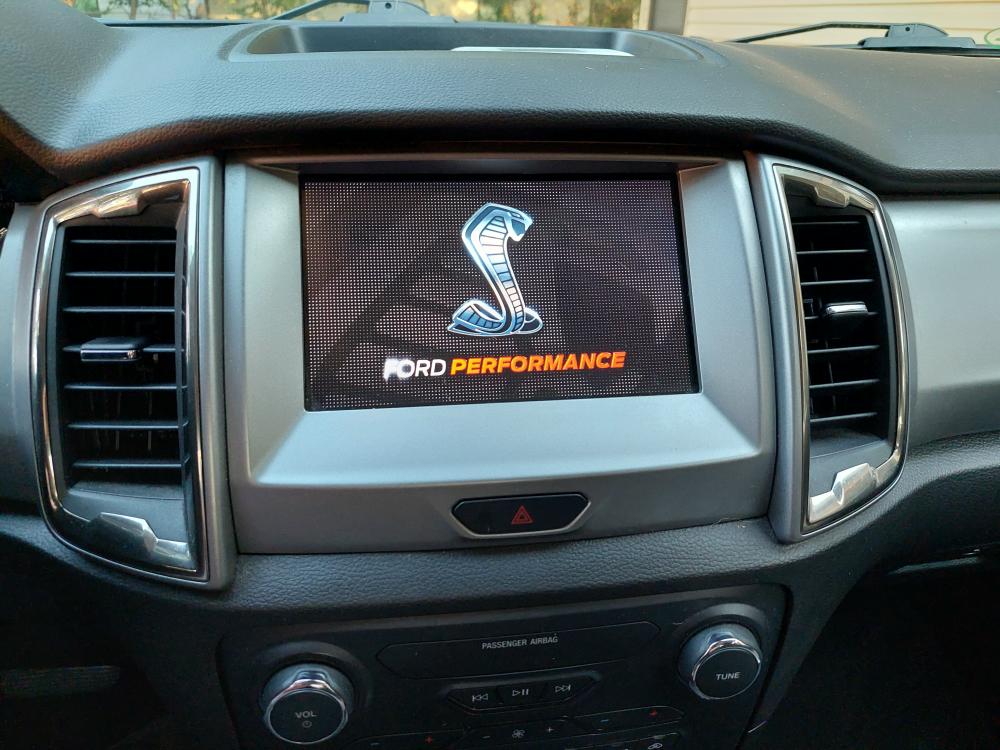
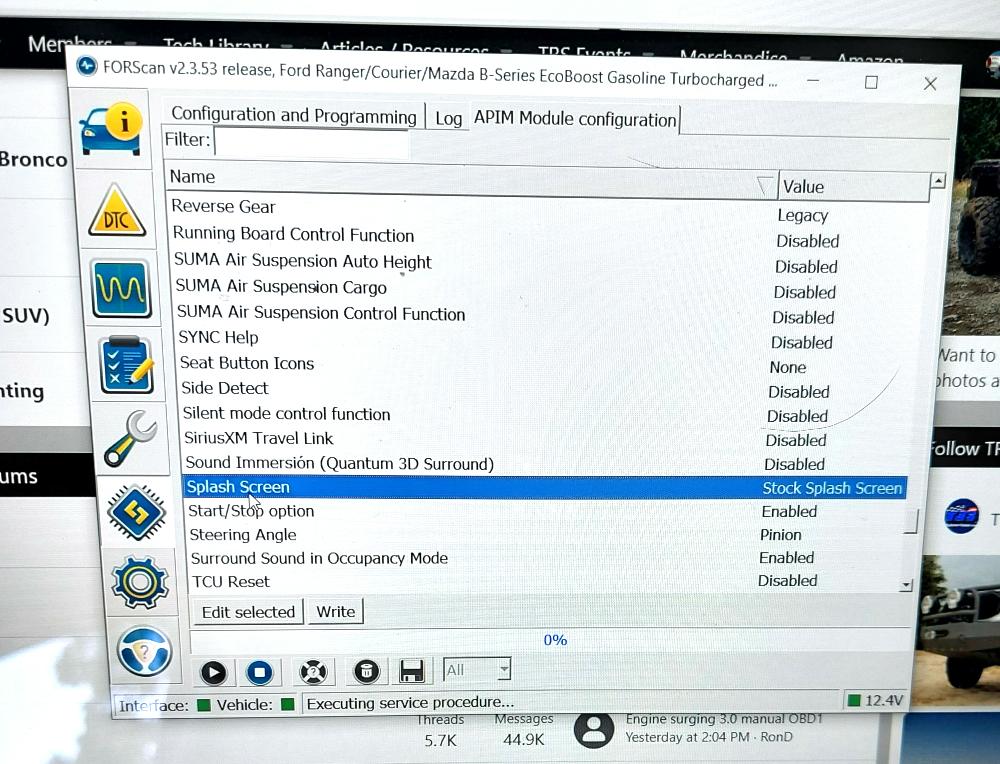
Change The Splash Screen:
This is the screen that comes up when you first turn the truck on. The default is the Ford logo.
I changed mine to the Ford Performance splash screen.
After completing the above steps under ‘Setting Up FORScan’;
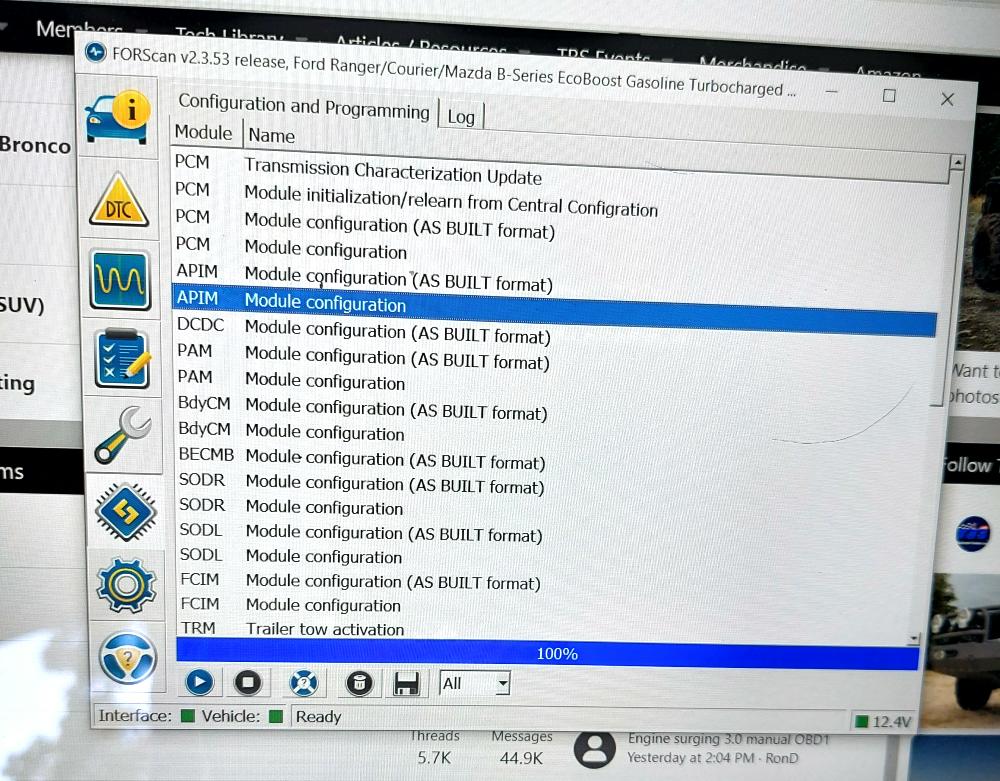
Click the ‘Configuration and Programming’ button (3rd button from the bottom in the left column). This will load up the modules.
Click the APIM module and then click the Run icon in the bottom left of the screen.
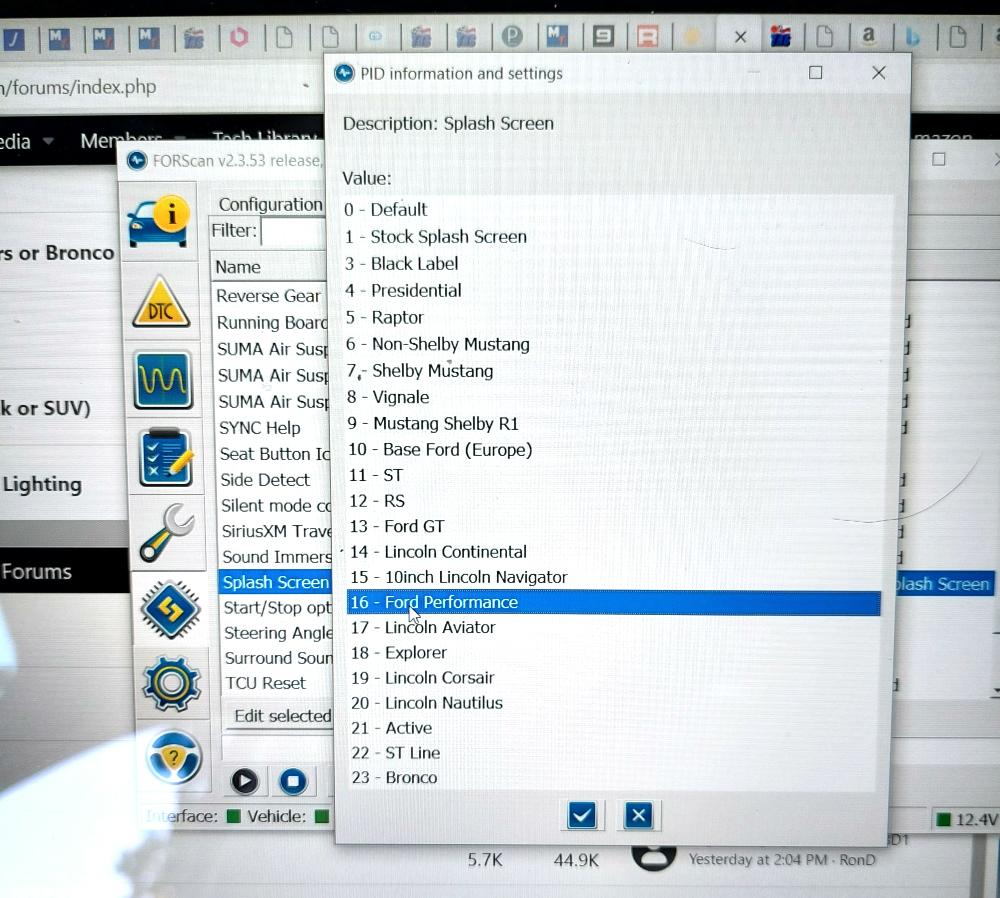
Once it loads, scroll down to ‘Splash screen’ and click ‘Edit selected’.
You can scroll down through the options. I did not want to be a poser and choose the Raptor splash screen. I went on down and clicked ‘Ford Performance’.
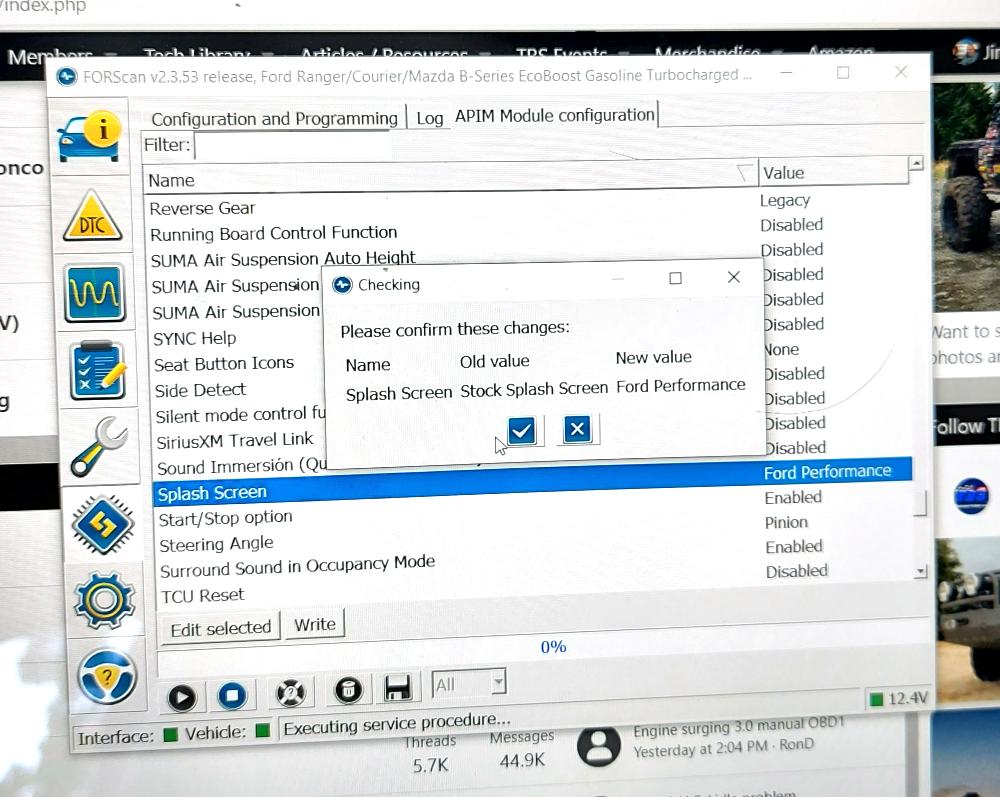
Then clicked the ‘Write’ button to save it. A window will pop up asking you to confirm your selection. Click the check mark button to save your choice.
You’ll hear a click noise in the dash, and the radio display screen will blink on and off. You’ll get a message asking you to turn the ignition off and back on. Then click the ‘Ok’ button.
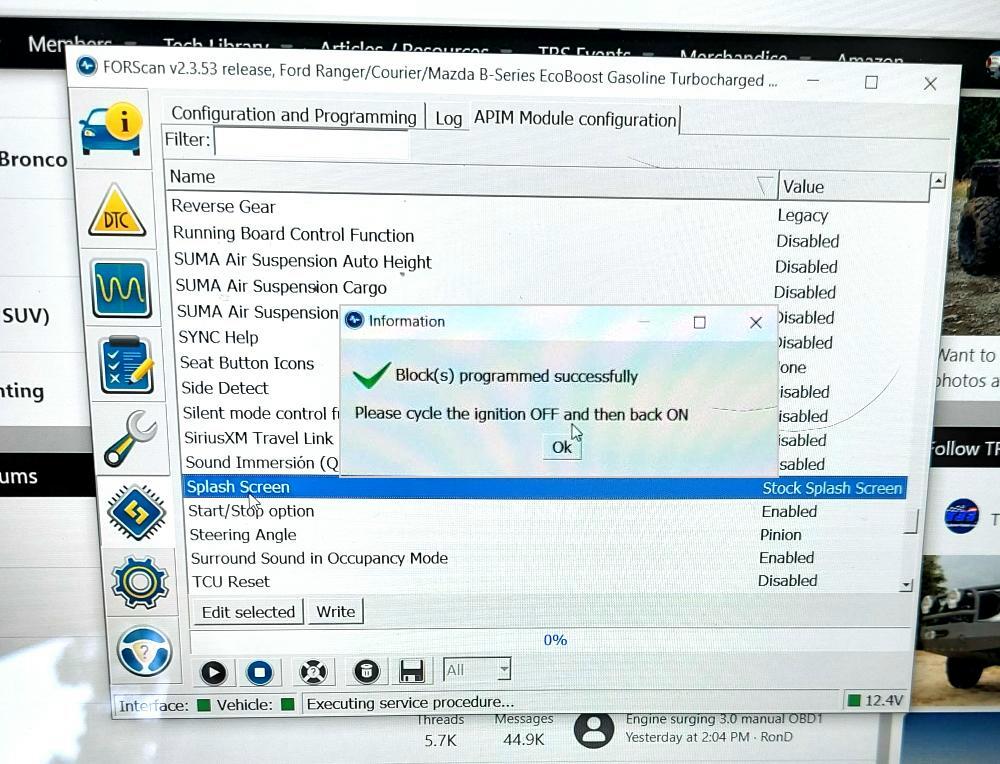
That’s it, you’re done.
Other FORscan Settings:
Above are the changes I have made. Once you understand how to make changes there are other things you can consider.
For Example: Some people have purchased the Terrain Management switch for their Ford Ranger 4×4 (Non FX4) and then activated it under ‘Selectable Drive Mode’ with FORScan.
| Setting Name | Description | Module |
|---|---|---|
| AM FM Menu | Disables AM/FM Menu in Entertainment Screen (Lariat Only) | IPC |
| Auto Relock Time Duration | Enables 30 or 45 second auto relock if doors unlocked with keyfob but are not opened. Works with double-honk disabled | BdyCM (BCM) |
| Average Speed Display | Display average speed | IPC |
| Average Speed RPM | Display average RPM | IPC |
| BMS / Auto Stop Start System | Disables the Auto- Start/Stop system NOTE: The button and dash indicators still function but do not do anything. |
BdyCM (BCM) |
| Chimes – [Driver/Passenger] Belt Minder | Disables seat belt reminder charms (Two settings in non-AS-BUILT) | IPC |
| Chimes – Vehicle Running Door Open | Disables chime when door opens with engine running | IPC |
| Chimes – Primary Source | Selects the primary source for chimes. Defaults to speakers. | IPC |
| Climate Menu | Climate View on Lariat right side instrument screen (Cannot change climate, only for view.) | IPC |
| Corner Light Mode for Fog Lights | Triggers fog light based on steering input (left vs right illuminated) | BdyCM (BCM) |
| Dark Car | Police option (Enable in conjunction with Silent Mode Control Menu) | BdyCM (BCM) |
| Daytime Running Lights Includes Parklamps | Enables parking lights when DRLs are on (useful for raptor style lights in grille) | BdyCM (BCM) |
| Disable Front Turn Signal Hyperblink (No GUI setting as of 2.3.37) – update: now can be disabled under BdyCM “Front Bulb Turn Outage” setting | Disables the hyperblink indicator when a bulb is out or LEDs (without resistors) are used in front turn signals | BdyCM (BCM) |
| Disable Rear Turn Signal Hyberblink (XL Trim) (No GUI setting as of 2.3.37) | Disables the hyperblink indicator when a bulb is out or LEDs (without resistors) are used in rear turn signals on XL models only | BdyCM (BCM) |
| Disable Startup Chimes (3x doo-doo-doo) | IPC | |
| Double Honk on Leaving Cabine | Disables the double-honk when closing door with key in. | BdyCM (BCM) |
| DTE Calculation option in Productivity Screen | IPC | |
| Fog lights if High Beam is on (AKA – Bambi Mode) | Allows the fog lamps to stay on when the high-beams are used. | BdyCM (BCM) |
| Front Bulb Turn Outage | Can be used to disable instrument cluster hyperblink if switching to LED bulbs | BdyCM (BCM) |
| Frost Telltale (Below 5°C) | IPC | |
| Fuel Consumed Per Hour Display | Show fuel consumed per hour instead of instant MPG | IPC |
| Instant Fuel Economy Display | Changes instant MPG display between bar and numeric display | IPC |
| Intelligent 4WD Gauge | (Partially works (shows trail mode option selected) but does not show individual wheel response) (enable in conjunction with Intelligent 4WD Gauge Mode Feature) | IPC |
| Intelligent 4WD Gauge Mode Feature | (Partially works (shows trail mode option selected) but does not show individual wheel response) (enable in conjunction with Intelligen 4WD Gauge) | IPC |
| Low Beam Outage | BdyCM (BCM) | |
| Navigation in Motion | Speed limit signs will look European and FM radio stations will be 2 decimals (101.70 vs 101.7). 911 Assist will be disabled | APIM |
| Off Road Gauge | Enables Off-road gauges (enable in conjunction with Off-road Screen) | IPC |
| Off-road Screen | Enables off-road gauges (enable in conjunction with Off Road Gauge) | IPC |
| Panic Activate | Changes behavior of Panic Button behavior on KeyFOB | BdyCM (BCM) |
| Park Aid Control Front | IPC | |
| Park Aid Control Rear | IPC | |
| Power Point Timeout, s | The timeout period for the power point in seconds | BdyCM (BCM) |
| Radio Without Ignition Switch | Allows radio use without the ignition (Enabled by default) | APIM |
| Radio Without Ignition Switch play time | Time (in minutes) to allow the radio to run without shutting down or ignition on. (20, 30, 40, and 60 minute options) | APIM |
| Rear Bulb/LED Turn Outage | (Bulb or LED option depending on model) | BdyCM (BCM) |
| Secure Idle | To idle the car with the key not in vehicle, cannot shift from park) | BdyCM (BCM) |
| Selectable Drive Mode | Enables the Terrain Management selectable drive modes (requires TM enabled 4×4 control knob) | IPC |
| Silent Mode Control Menu | IPC | |
| Software Engine Sound Enhancement | Disables the “piped in” sound through the speakers | ACM |
| Splash Screen | Sync 3 Boot/splash screen | APIM |
| Steering Wheel Switch Packs | SCCM | |
| TPMS Placard Pressure Display | Displays the factory placard tire pressure in the Tire pressure display. | IPC |
| Trailer Tow Lights Outage | BdyCM (BCM) | |
| Variable Line Level Audio | Enables variable line level audio output on the non-B&) radio | ACM |
| Vehicle Cluster Images | Changes vehicle image between Truck and SUV (Utility / SUV) | IPC |
| Welcome Goodbye Backlighting | No Blue Sky Background on IPC when getting into vehicle | IPC |
About The Author
Jim Oaks is the founder of TheRangerStation.com, the longest-running Ford Ranger resource online since 1999. With over 25 years of hands-on experience building and modifying Ford Rangers — including magazine-featured builds like Project Transformer — Jim has become one of the most trusted authorities in the Ford Ranger off-road and enthusiast space.
Since launching TheRangerStation.com, Jim has documented thousands of real-world Ranger builds, technical repairs, drivetrain swaps, suspension modifications, and off-road adventures contributed by owners worldwide. TheRangerStation.com has been referenced in print, video and online by enthusiasts, mechanics, and off-road builders looking for practical, and experience-based information.