• Welcome Visitor! Please take a few seconds and Register for our forum. Even if you don't want to post, you can still 'Like' and react to posts.

The Abaddon update


ogretheeternal

Member
U.S. Military - Veteran
Joined
Apr 17, 2025
Messages
16
City
Rural
State - Country
AZ - USA
Vehicle Year
1995
Vehicle
Ford Ranger
Drive
2WD
Engine
2.3 (4 Cylinder)
Transmission
Manual
Total Lift
factory - 30 years of abuse
Total Drop
none. but it dropped four inches with uniform size tires
Tire Size
205 65 15
My credo
too jaded and cynical to display here.
So, as you may have seen from my previous threads, I acquired a 95 XL extended cab from a tow yard at the beginning of April. It' needs attention...a LOT of it. Had I known what I was getting into, I probably should have passed on it, especially what I've discovered since. I plugged the VIN into Carfax. (That's when I realized the last 3 is 666. Carfax said the manufacture date was April 1 of "95. But, it has a sound engine, and I was thinking it would be mostly cosmetic. Oh boy, was I wrong.
This thing has been neglected big time. In the last two months, I've had a clutch failure, catastrophic transmission failure, and have discovered the extent of the neglect and modification.
I can truly say, this thing seems to be held together by drywall screws and gutter hangars.
Hence, it has been dubbed Abaddon, which is an ancient Hebrew name for the devil.

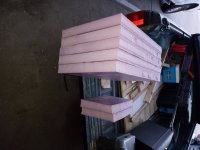
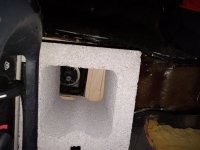
The first improvement was to replace the lights. All lenses were broken, and the headlights were so yellowed one could barely tell they were on. After that, I removed the sound system. It had a decent head in the dash (more drywall screws) a 3800 watt amp drywall screwed to the floor, and then the old tower home theater speakers, held in with (yup) more screws And gutter hangars. The speakers were completely blown, the head and amp were wired hit so they couldn't be turned off. And the speaker wire was brown household extension cords that had the plugs removed.

I'll post pics the brakes when I do them. The drums are trashed. One could stack three quarters in the grooves. Pads are on the river heads and rears don't even make contact.

I'll post a list of the project so far. Pics as I can. I think a couple thousand more, and I'll have something I can trust.
 
My 1998 was like that. I feel for you. I know the owner and that it wasn't maintained the best, but I didn't realize how much he used and abused the thing. I would never buy another vehicle from him as a result.
 
Another fun discovery: it originally came with 14" rims, (tire size 215/70/14).Previous owner put two different sizes of rims on it, then smaller tires on front than on the back (295/95/17 on back, 235/75/16 in front.). This effectively wore out the ball joints and drag link, as well as tie rod ends.
Since one can't get 14" 5x4.5 rims any more, I found an online size calculator that computes closest tire size to original, and now running 15" rims with uniform size tires. HUGE difference in handling.

Now, I know this isn't going to be in chronological order, but getting up to date... Well, you get it....
The first day I had it, I was driving it home and at 60 mph the hood latch broke. Not just lost screws but actually BROKE, and the hood flew up and buckled, cracking the windshield and destroying the hinges and the attachment points in the firewall. So, after getting lucky and finding a hood in the local junkyard, it is noeheld in place by hood pins. Looking pretty cool, actually.
More later...
 
What I've done to the old boy so far:

Purchase date: , March 28, 2025
for $500 from a tow yard.

Headlights, clearance lights
and taillight lenses replaced
and aligned (car parts.com, $110)

Grille replaced (car parts.com, $48)

Hood latch and cable rework (u-pick-it-, $5)

Replacement hood (u-pick-it- $60)

Crazy rig Radio, amp and speakers Removed, wiring removed ($0)

Transmission replacement
5/23/25 with used tranny from
u-pick-it- new clutch, slave
Cylinder (u-pick-it- $160, O'Reilly Auto, $120,
Mechanic that knew what he was doing-$600

Engine oil & filter change 5/23/25

New transmission fluid 5/23/25

Replaced sun visors 5/28/25
(U-pick-it- $5 each)

R/S window regulator replaced
5/29/25 (u-pick-it- $10)

Reattach accelerator pedal 5/31/25 (2 screws on hand, $0)

Clutch finally bled out; replaced
Slave cylinder again. 6/2/25
(O'Reilly Auto $65,)

June 7 - turn signal arm replaced,
All functions ok (u-pick-it- $12)

June 20 - hood finished, pins
Installed on back corners
Instead of hinges due to
firewall damage (permanent?)
(O'Reilly Auto $18)

Jump seats, all replacement trim for back seat area, assorted screws, hood bumpers acquired (U-pick-it- $30, in storage until ready)

New tires (205/65/15)) and rims installed
6/25/25
By the time the repairs are done, I'll be halfway to restoration. Might as well, it'll be cheaper than buying a newer pickup. Today's project, I hope is order new tie rod and ends, ball joints and pads and rotors for the front. Might even continue alteration of seats to allow for a new center console. I haven't found narrow enough seats that aren't the racing style to put in. It's surprising that one can't get traditional buckets no more than 18.5" (47cm) wide...

So, I cut out the center foam, and need to remove the part of the driver seat that covers the transmission tunnel. I then plan to build a center console that will extend from just below the dash, incorporate the shifter, and have storage, a phone and charger slot, drink holder of course, and a large storage box. Might also include a lower chamber with flip up door to store a jack and tire iron.
 
For seats since you seem to go to junkyards a fair amount keep an eye on Explorers, all the seats will bolt to your current seat tracks through about '02 and the ones with the movable front section are pretty comfortable.

Sounds like a solid amount of work but like you said it's no where near what you'd have in something newer... it's why I got my '97, I'm not afraid of anything and in 90k miles I think I have $2500 in it including tires and all the tinkering stuff I've done...
 
Hard to beat Rangers for cheap transportation. I'm about $5000 into mine if I put the lift on it. Maybe $7000 if I did gears and larger tires too. I've driven it nearly every day for ~14 years and 350,000 miles now. 70 miles per dollar or $358 per year. Less than one months payment on anything else.
 
I tell people if you buy a used truck, even if you get for $1, be prepared to spend $1000 and that is if you are doing it yourself, just to get the basic maintenance up to where it needs to be. I have seen some first class shade tree mechanic work over the years. People neglect their cars and trucks but still cheaper to go thru one for what they want now a days for new cars and trucks and you know it has been done correctly.
 
Still waiting on a couple parts, so I can't do the steering and alignment yet. Wednesday I have a guy going to help with all that, plus replace the rear brakes and all components.


But today I started on construction of the center console. After removing the center portion of the drivers seat and the frame (doesn't matter, it's getting redone anyway), I decided to use sone old knowledge from my Halloween prop making days. First, I laid some plastic drop cloth cut to basically the shape I need, then after figuring out seat travel, I used a self adhesive rubber seal from home Depot to lay out the basic shape of what I plan to build. Then, using fiberglass mat, I applied resin to get a good shape of the contour if the transmission tunnel. I'll be reinforcing this base after a couple days with wood strips and more resin.
To shspe the actual console, I'll use that pink 1'3)2":insulation board. I plan to glue it into a large block, then using my hor knifebasnd a normal knife, l carve it to it's final.design.
Once this is done, the entire thing will be costed with fiberglass then sanded and ultimately wrapped with what I have chosen for the new interior color scheme. More pics as the project progresses...
The shift boot us not attacked, but will be shaped better using body putty and incorporated as a drop in unit into the front portion of the console. That way it can be easily removed if necessary without pulling the whole unit
 

Attachments

  • IMG_20250706_212249365.jpg
    IMG_20250706_212249365.jpg
    143.1 KB · Views: 15
Still waiting on a couple parts, so I can't do the steering and alignment yet. Wednesday I have a guy going to help with all that, plus replace the rear brakes and all components.


But today I started on construction of the center console. After removing the center portion of the drivers seat and the frame (doesn't matter, it's getting redone anyway), I decided to use sone old knowledge from my Halloween prop making days. First, I laid some plastic drop cloth cut to basically the shape I need, then after figuring out seat travel, I used a self adhesive rubber seal from home Depot to lay out the basic shape of what I plan to build. Then, using fiberglass mat, I applied resin to get a good shape of the contour if the transmission tunnel. I'll be reinforcing this base after a couple days with wood strips and more resin.
To shspe the actual console, I'll use that pink 1'3)2":insulation board. I plan to glue it into a large block, then using my hor knifebasnd a normal knife, l carve it to it's final.design.
Once this is done, the entire thing will be costed with fiberglass then sanded and ultimately wrapped with what I have chosen for the new interior color scheme. More pics as the project progresses...
The shift boot us not attacked, but will be shaped better using body putty and incorporated as a drop in unit into the front portion of the console. That way it can be easily removed if necessary without pulling the whole unit
This sounds really interesting. Please take lots of pics of the process.
PS, you should look at your spelling before posting, I think you may have fat fingers... :)
 
This sounds really interesting. Please take lots of pics of the process.
PS, you should look at your spelling before posting, I think you may have fat fingers... :)
I halve a spelling check her, it works sow wonder flea, and checks two sea each word eye spell is purr fixed, absolute lee. And sew aye right this note too ewe, no know missed steaks eye maid. Ewe ask me how eye know aye no? My cheque her tolled me sew.
 
Anyway, got the brakes done and surprise, the parking brake works again! It is amazing what can happen when the shoes can make contact with the drums lol

Also, replaced all 4 ball joints and the entire tie rod. Come payday, it'll get an alignment. Already i can tell a major difference in handling. Also, a surprise, with the steering at least tracking straighter and the uniform size tires, it actually has acceleration again!
Now, while I wait for payday, I'm just piddling, removing the crappy el cheapo paint job and putting down a better quality primer as I go. Eventually, it'll be prepped for the final paint, but that's a wAys off...
In the meantime, I need some advice .. being as the firewall is too far gone to replace the traditional hinges, and I've already installed pins to secure the hood, I am wondering if anyone has advice about forward opening hinges... What works, what doesn't? A forward tilt hood would be a cool feature, and if I can make it work, it'll save paint.

Anybody have ideas?
 
I don't remember the name of the thread, but someone is building a drift truck and has made a forward hinged hood. Pretty recently too.
 

Sponsored Ad


Sponsored Ad

TRS Events

Member & Vendor Upgrades

For a small yearly donation, you can support this forum and receive a 'Supporting Member' banner, or become a 'Supporting Vendor' and promote your products here. Click the banner to find out how.

Recently Featured

Want to see your truck here? Share your photos and details in the forum.

Ranger Adventure Video

TRS Merchandise

Follow TRS On Instagram

TRS Sponsors


Sponsored Ad


Sponsored Ad


Amazon Deals

Sponsored Ad

Back
Top