• Welcome Visitor! Please take a few seconds and Register for our forum. Even if you don't want to post, you can still 'Like' and react to posts.

Scott B.'s Sleeping Platform Build


Scott B.

Well-Known Member
EMT / Paramedic
V8 Engine Swap
Joined
Sep 5, 2008
Messages
202
City
Georgia
Vehicle Year
'93
Transmission
Automatic
I have owned my truck since new (1993) and put an ARE Series 7 shell on it in 2000 - but to date, I have never slept in the truck. All my camping has been in a tent.

I planned a 2-week trip to the desert in the spring of 2011. We planned to run the Mojave Road for 3 days, then spend 6 days in Death Valley. I ran the Mojave Road in 1988, and had never been to Death Valley, even though I had lived in SoCal for 18 years. This was going to be quite a trip, since I live in Georgia now!

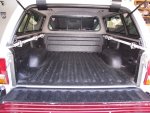
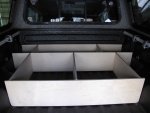
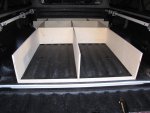
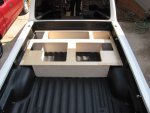
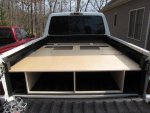
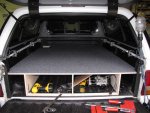
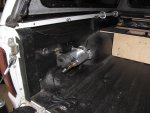
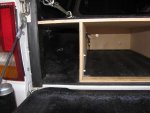
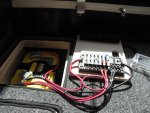
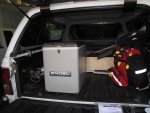
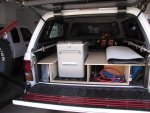
As part of my trip preparation, I decided to build a sleeping platform in the truck, to camp/sleep in. I brought my tent just in case, but the plan was to sleep in the truck.

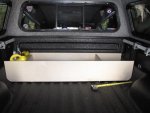
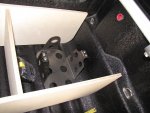
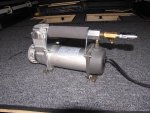
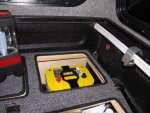
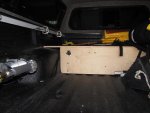
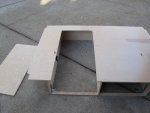
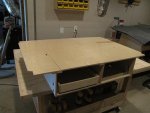
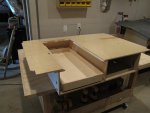
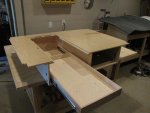
In this thread, I will explain what I built (in words and pictures). I built this in 2 phases, but I will talk about it as one.
 
Starting Point

Here is the starting point.

I used to carry the spare tire in the bed, and it took up a lot of space. I also removed my Hi-Lift mounts and shovel mount.
 

Attachments

  • SP1.jpg
    SP1.jpg
    216 KB · Views: 916
The Plan

For building materials, I decided to use 1/2" plywood. I found some cabinet grade wood, varnished on one side. I cut 1/8" deep dados, and used glue to hold it all together.

I decided to build the platform in 2 sections. Since it was going over the top of the wheelwells, I could build it wider than 4'. Seeing as plywood sheets are only 4' wide, I had to turn them to get the needed length.

The forward section would contain storage compartments, including a compartment for a second battery.

With a general idea in mind, I went to work. Most of the dimensions were determined in place.
 

Attachments

  • SP2.jpg
    SP2.jpg
    160.4 KB · Views: 897
  • sp3.jpg
    sp3.jpg
    181.2 KB · Views: 882
  • sp4.jpg
    sp4.jpg
    133.8 KB · Views: 893
The second section would be accessible from the tailgate - no need for small compartments.
 

Attachments

  • sp5.jpg
    sp5.jpg
    160.7 KB · Views: 843
Installation

Since the sleeping platform is so wide, I had to remove the shell to install it.

Here you can see the forward section installed, the rear section installed, and the carpet cut (but not trimmed).
 

Attachments

  • sp6.jpg
    sp6.jpg
    152 KB · Views: 2,795
  • sp7.jpg
    sp7.jpg
    169.4 KB · Views: 900
  • sp8.jpg
    sp8.jpg
    194 KB · Views: 2,445
To be continued...
 
Looks pretty interesting....
 
I've done something similar with mine, but not NEARLY as sophisticated as yours. Just a plywood platform supported on 2x4s with a pull-out drawer underneath to store tools/camping gear. While I have slept in it, it's mainly for my contracting business. A quicky build.
 
That's pretty cool, I'll have to try something like that once I get a shell for my truck. Do you know roughly how much it cost for the supplies?
 
Last edited:
That's pretty cool, I'll have to try something like that once I get a shell for my truck. Do you know roughly how much it cost for the supplies?

IIRC, I used 3 4x8 sheets of 1/2" cabinet grade plywood - check your local lumberyard (not Home Depot or Lowe's) for a price.

The through-bed hold downs were about $7/pair. Add L-brackets and bolts.

All in all, it was not that expensive.
 
Nice build, although I would have made the back half a slide out/pull out storage bin. Looks great!

SVT
 
Time to continue this thread...

I mounted a Viair air compressor under a corner of the platform. I also mounted an air tank under the bed - link
 

Attachments

  • AirComp3.jpg
    AirComp3.jpg
    100.4 KB · Views: 550
  • AirComp2.jpg
    AirComp2.jpg
    85.3 KB · Views: 562
  • AirComp1.jpg
    AirComp1.jpg
    148.4 KB · Views: 537
I installed a 2nd battery in the front right compartment. I put it on the right side for counterbalance weight, and forward to keep the charging wire as short as possible.

I put a Blue Sea Systems 12 point fuse block on a removable mount. There is room for 6 relays also.
Here, you an also see the bias tape edging I put on the carpet.
 

Attachments

  • Bat1.jpg
    Bat1.jpg
    125.6 KB · Views: 538
  • Bat2.jpg
    Bat2.jpg
    117.2 KB · Views: 550
Last edited:
Next up is the refrigerator. For the longest time, I though a frig was a waste of money. I have changed my mind. It is expensive, but the convenience factor is huge. Really huge.

No ice to buy, no soggy food, no ice water with who knows what mixed in it. No having to hit town after a few days camping/exploring.

It's even great to have when you go out for the day. All in all, expensive but worth it.

The only negative is the size and how much room it takes up in the bed.

Here, you can see the process I went through to mount it.

First, where to locate it.

Mark and cut the platform.

Run power from the second battery.
 

Attachments

  • Frig4.jpg
    Frig4.jpg
    71.5 KB · Views: 515
  • frig3.jpg
    frig3.jpg
    68.4 KB · Views: 527
  • Frig2.jpg
    Frig2.jpg
    62.7 KB · Views: 536
  • Frig1.jpg
    Frig1.jpg
    71.5 KB · Views: 533
Another test fit.

I built a sliding tray to mount the frig.
 

Attachments

  • Frig5.jpg
    Frig5.jpg
    87.2 KB · Views: 549
  • Frig6.jpg
    Frig6.jpg
    72.4 KB · Views: 540
  • Frig7.jpg
    Frig7.jpg
    73.3 KB · Views: 531
  • Frig8.jpg
    Frig8.jpg
    71.3 KB · Views: 538

Sponsored Ad


Sponsored Ad

TRS Events

Member & Vendor Upgrades

For a small yearly donation, you can support this forum and receive a 'Supporting Member' banner, or become a 'Supporting Vendor' and promote your products here. Click the banner to find out how.

Recently Featured

Want to see your truck here? Share your photos and details in the forum.

Ranger Adventure Video

TRS Merchandise

Follow TRS On Instagram

TRS Sponsors


Sponsored Ad


Sponsored Ad


Amazon Deals

Sponsored Ad

Back
Top