• Welcome Visitor! Please take a few seconds and Register for our forum. Even if you don't want to post, you can still 'Like' and react to posts.

Restoring '99 4X4


Grubber Green

New Member
Joined
Jan 7, 2020
Messages
4
City
Sharon, PA
Vehicle Year
1999
Transmission
Automatic
My pops passed about a year ago from dementia and his truck sat in my sisters garage for almost two years. No one wanted his truck, and then I decided I'll eventually restore it, so I got it running and drove it out to my land/farm in Hartford, OH. I installed manual locking hubs, new brakes, flushed the radiator, changed the fluids and eventually got it inspected (I live in PA) and insured. About two weeks ago, I decided it time for the restoration project, something my pops would be happy to see if he were here. The only problem, I never did anything like this before, but I'm mechanically inclined and figured, why not.
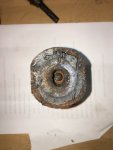
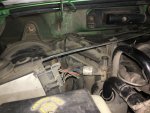
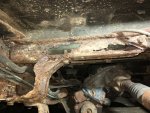
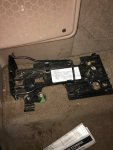
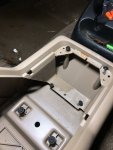
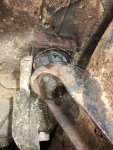
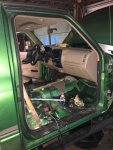
He oiled the frame often so it's not as bad as most, but after carefully inspecting the frame under the cab, I decided that the project would be half-assed at best if I don't remove the cab. I'm searching for instructions, but can't find anything related to Cab Removal. It doesn't appear to be too hard, just time consuming. Also, It's hard to find frame cross members and I may fabricate my own. Heck, I may even think about trying to produce enough to sell, since there seems to be a demand b/c a lot of parts are discontinued. Nonetheless, I added some pics and will continue to add pics along the way. Anyone that removed a cab and can give advice, I'd appreciate the guidance.

Lastly, I found a great product called Rust-Grip. Google it, it's an amazing product and I'll be applying it to all metal. Chlor-rid is used first (after surface prep) that removes all salt molecules. I spoke with Warren at superiorcoatingsolutions.com and he provided the spec sheets and walked me through the process, which is pretty easy in comparison to any other product I was considering so far.
 

Attachments

  • NWNP8934[1].JPG
    NWNP8934[1].JPG
    186.1 KB · Views: 212
  • IMG_0076[1].JPG
    IMG_0076[1].JPG
    232.8 KB · Views: 207
  • IMG_0079[1].JPG
    IMG_0079[1].JPG
    166.6 KB · Views: 216
  • IMG_0068[1].JPG
    IMG_0068[1].JPG
    303 KB · Views: 215
Cool truck, I have always liked that pretty rare color.
 
It has a Limited Slip rear axle, AXLE Code F7 = 7.5" L/S 4.10 ratio

So a 3.0l V6?
I think the 4.0l all got 8.8" rear axles
 
Sorry about your father Grubber. Mine went the same way about 2008. It's great you're fixing up his truck, I'm sure he'd be happy for that.
Good luck with it, looking forward to seeing your progress and maybe learn a few things too. The how to tech has a wealth of information, as does the forum.
Welcome to TRS :)
 
Love the step side and the color.

Sorry about your Pop. I got my Grandad's BII from his estate and am fixing it up. Makes me smile every time I fix something on it and think of him.

It wonderful how a vehicle can do that isn't it??
 
4.0's did get the 8.8 all the time from what i've seen. That was one of the best factory colors imo.
 
Okay, sorry for the delay - Here’s my current status and some info to pass along.
Gas Tank - Removed
Rear Axel - Removed
Cab Mount Bolts - Removed
Cab Interior - Removed seats, center arm rest, cup tray, and carpet
Hood - Removed
I found that propane is a waste, get MAP gas or use a torch if you own one. I found that it’s much easier to remove bolts after heating them. Im dealing with a lot of rusted bolts due to road salt. So far, the Cab Mounts bolts were the biggest pain. I couldn’t find a tool for the bottom washer, but large channel locks worked. Note, the bottom washer is flat on the sides and can usually be spun by turning the bolt, which will allow to get a good bite on the flat side of the washer. My channel locks were large enough that they wedged against the side of the bracket mount as I slowly turned the break bar. By the way, I used PB Blaster on all bolts for two days prior and got them red hot before removal.
I mentioned Rust-Grip above, we’ll my drivers side cab floor is slightly rusted with a few small holes. Here’s going to be my fix:
If the link didn’t work, just search You Tube for Rust Grip Meshing video.
More pics and details will follow as I disconnect wires from cab.
 

Attachments

  • B282825C-0D29-4266-AED8-59D5534E6B4F.jpeg
    B282825C-0D29-4266-AED8-59D5534E6B4F.jpeg
    92.9 KB · Views: 188
  • A5D2DD84-6D79-4CBF-8051-A6C724DEBE8B.jpeg
    A5D2DD84-6D79-4CBF-8051-A6C724DEBE8B.jpeg
    171.1 KB · Views: 194
  • 70C79F1B-5562-4C24-8D7C-47CEF1137B6F.jpeg
    70C79F1B-5562-4C24-8D7C-47CEF1137B6F.jpeg
    249.3 KB · Views: 190
  • 25CF2CAE-C217-4DB2-A3E0-64110D3FBF24.jpeg
    25CF2CAE-C217-4DB2-A3E0-64110D3FBF24.jpeg
    152.6 KB · Views: 194
  • 7D355923-3DB5-41DB-9534-F983897F3F5D.jpeg
    7D355923-3DB5-41DB-9534-F983897F3F5D.jpeg
    106.8 KB · Views: 194
  • 02A8B812-E172-482E-B4A4-AF2F80D66655.jpeg
    02A8B812-E172-482E-B4A4-AF2F80D66655.jpeg
    266.9 KB · Views: 194
  • 34FBD919-2C1B-4BC8-8F9A-EBD20B1C1DA8.jpeg
    34FBD919-2C1B-4BC8-8F9A-EBD20B1C1DA8.jpeg
    135.9 KB · Views: 188
Dang! That is some serious rust. I'll stick with acetylene myself, gets hotter on less gas and can be fine tuned better. I think places that use propane are more like into extreme heavy use, it takes a bigger torch and a lot more gas(although it's cheaper by volume, maybe also not as explosive)
Looks like you're making some notable headway though :)
 
I just did a cab swap- huge pain in the ass. We ran eyelets through where the bolts for the cab mounts went, threw on washers and nuts. Hooked chains up to the eyelets and lifted from the center of the cab. We had fenders, bumper, and grille stripped but it was still extremely nose-heavy.

I'm sure there are better ways, but all we had was an engine hoist and a driveway.. lol
 
Dang! That is some serious rust. I'll stick with acetylene myself, gets hotter on less gas and can be fine tuned better. I think places that use propane are more like into extreme heavy use, it takes a bigger torch and a lot more gas(although it's cheaper by volume, maybe also not as explosive)
Looks like you're making some notable headway though :)
It's been a fun project so far, but I know once I yank the cab that I'll start spending more money on the engine, for instance the manifolds, blower motor, sensors, etc.. I have my father's acetylene torches and tanks, just bought a new hose and anxious to use it this week. I'm hooking-up Argon/CO2 to his Lincoln mig welder and look forward to practicing. It's harder than it looks to lay-down dimes, but I'm starting to get the hand of it.
 
Great to see people who fix em up like this. You may put a bit of money into it, but it will be well worth it. It looks like a well kept truck that you will get years of use and enjoyment out of when you are done.

Sadly my grandfather sold his 85 Bronco II when I was younger, but I have his Grand Marquis that I always enjoy driving, brings a smile to my face.
 

Sponsored Ad


Sponsored Ad

TRS Events

Member & Vendor Upgrades

For a small yearly donation, you can support this forum and receive a 'Supporting Member' banner, or become a 'Supporting Vendor' and promote your products here. Click the banner to find out how.

Recently Featured

Want to see your truck here? Share your photos and details in the forum.

Ranger Adventure Video

TRS Merchandise

Follow TRS On Instagram

TRS Sponsors


Sponsored Ad


Sponsored Ad


Amazon Deals

Sponsored Ad

Back
Top