Do you have a busted armrest in your 3rd-gen Ranger? Unfortunately it's mostly plastic, and is prone to breaking. Most 2004-2011 Rangers I see have a broken/missing armrest.
Luckily there is a relatively cheap, easily installable and reliable aftermarket solution. Dorman, an aftermarket parts company makes a solid replacement part that is completely metal.
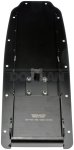
Dorman 924-834 is the part number, and is a solid metal welded baseplate for your armrest. It also comes with all hardware, good instructions, and replaces the odd square pin with regular bolts.

Here is the quick and simple process for upgrading your armrest and (hopefully) fixing the problem, permanently.
Items Required:
-Armrest with broken plastic base but good condition top
-Dorman 924-834 ($40-100$ depending on retailer, as of 2/25 Amazon is mid range at $55, AutoZone at $78)
-Standard Phillips Screwdriver
-Long 6mm allen key (Rounded ball head preferred)
-Standard wrench or pliers.
Step 1:
Remove the square pin from the current armrest bracket. Twist the plastic square to line up with the square notch, then grab the metal squared end and pull out. You may have to move your seat forward and/or press into the seat slightly. Pliers may be required if it's old and/or stubborn. No need for excessive force. Its a square hole with square nuts.

-Insert the square plastic bushings into the square slots from the Dorman hardware kit on each side. They will lightly click into place.

Step 2:
Remove the broken plastic base from your armrest, by removing the phillips screws.

Notice that my 2 most rearward and closest to hinge screws, are completely broken. Fortunately because of how stiff the replacement is, and the bolted hinge design, this won't be an issue.
-Open the new Dorman kit, and install the new metal baseplate with the included screws. Don't hog down too hard on these, the armrest padding just has simple speednuts and dont need alot of torque.


Notice here, that I removed the plastic notch mechanism from the new armrest that prevents the armrest being lifted if the cupholder is open. (My cupholder is either missing or did not come installed).
You may not have to do this if you do have a cupholder, or may to choose to remove it anyways. It's function is to lock the armrest if the rear cupholder is open.
-Install the new baseplate and prep the mounting bolts. They come with hardware, x4 plastic washers and x2 metal spring washers. They screw through the plastic bushings into the new Dorman metal baseplate.
Be sure to stack the hardware as follows; Bolt -> Plastic Washer - Metal Spring Washer - Plastic Washer -

Step 3:
Install the new metal baseplate armrest onto the old bracket. If you're like me, you won't bother removing the bracket from the console. While it is easy to via 2 access ports, I didn't think it was necessary.
Here is where you definitely will hope you have a long handled 6mm allen, preferably with a rounded ball end. You press the armrest over the plastic bushings, then from the backseat, line up and install the bolts.

-Tighten the bolts down as desired for resistance. The plastic bushings and spring washers allow for some slip while snugging down. I preferred mine on the snugger side with some resistance of lifting/lowering armrest.
It's a tight fit down here. Certainly easier to remove the bracket if desired, but luckily I had a long handled allen and while not comfortable, was easy enough. A mini-ratchet could work with 6mm bit, doesn't need cranking down.
Step 4:
Enjoy the new armrest! It took me abit of time to actually fully lean into it out of instinct, but its certainly much more solid than the factory, and doesn't feel cheap in the least.


Make sure before you leave the truck to do the customary slap and repeat "That thing's not goin anywhere"!
While this tech article is a simple one, I've been looking for one similar and was ecstatic when I discovered a metal off-shelf replacement for the stock plastic! I hope this info helps any other Ranger lovers out there!
-86_FX4
Luckily there is a relatively cheap, easily installable and reliable aftermarket solution. Dorman, an aftermarket parts company makes a solid replacement part that is completely metal.
Dorman 924-834 is the part number, and is a solid metal welded baseplate for your armrest. It also comes with all hardware, good instructions, and replaces the odd square pin with regular bolts.
Here is the quick and simple process for upgrading your armrest and (hopefully) fixing the problem, permanently.
Items Required:
-Armrest with broken plastic base but good condition top
-Dorman 924-834 ($40-100$ depending on retailer, as of 2/25 Amazon is mid range at $55, AutoZone at $78)
-Standard Phillips Screwdriver
-Long 6mm allen key (Rounded ball head preferred)
-Standard wrench or pliers.
Step 1:
Remove the square pin from the current armrest bracket. Twist the plastic square to line up with the square notch, then grab the metal squared end and pull out. You may have to move your seat forward and/or press into the seat slightly. Pliers may be required if it's old and/or stubborn. No need for excessive force. Its a square hole with square nuts.
-Insert the square plastic bushings into the square slots from the Dorman hardware kit on each side. They will lightly click into place.
Step 2:
Remove the broken plastic base from your armrest, by removing the phillips screws.
Notice that my 2 most rearward and closest to hinge screws, are completely broken. Fortunately because of how stiff the replacement is, and the bolted hinge design, this won't be an issue.
-Open the new Dorman kit, and install the new metal baseplate with the included screws. Don't hog down too hard on these, the armrest padding just has simple speednuts and dont need alot of torque.
Notice here, that I removed the plastic notch mechanism from the new armrest that prevents the armrest being lifted if the cupholder is open. (My cupholder is either missing or did not come installed).
You may not have to do this if you do have a cupholder, or may to choose to remove it anyways. It's function is to lock the armrest if the rear cupholder is open.
-Install the new baseplate and prep the mounting bolts. They come with hardware, x4 plastic washers and x2 metal spring washers. They screw through the plastic bushings into the new Dorman metal baseplate.
Be sure to stack the hardware as follows; Bolt -> Plastic Washer - Metal Spring Washer - Plastic Washer -
Step 3:
Install the new metal baseplate armrest onto the old bracket. If you're like me, you won't bother removing the bracket from the console. While it is easy to via 2 access ports, I didn't think it was necessary.
Here is where you definitely will hope you have a long handled 6mm allen, preferably with a rounded ball end. You press the armrest over the plastic bushings, then from the backseat, line up and install the bolts.
-Tighten the bolts down as desired for resistance. The plastic bushings and spring washers allow for some slip while snugging down. I preferred mine on the snugger side with some resistance of lifting/lowering armrest.
It's a tight fit down here. Certainly easier to remove the bracket if desired, but luckily I had a long handled allen and while not comfortable, was easy enough. A mini-ratchet could work with 6mm bit, doesn't need cranking down.
Step 4:
Enjoy the new armrest! It took me abit of time to actually fully lean into it out of instinct, but its certainly much more solid than the factory, and doesn't feel cheap in the least.
Make sure before you leave the truck to do the customary slap and repeat "That thing's not goin anywhere"!
While this tech article is a simple one, I've been looking for one similar and was ecstatic when I discovered a metal off-shelf replacement for the stock plastic! I hope this info helps any other Ranger lovers out there!
-86_FX4