• Welcome Visitor! Please take a few seconds and Register for our forum. Even if you don't want to post, you can still 'Like' and react to posts.

my 2000 ranger build


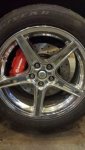
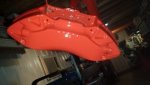
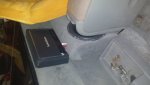
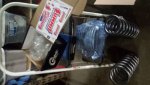
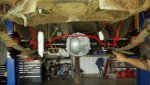
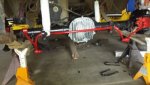
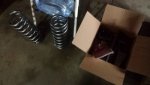
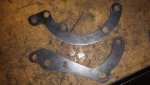
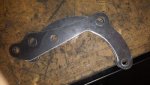
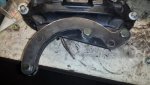
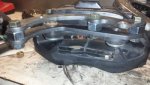
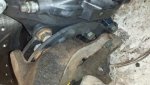
Now to mount the caliper to the spindle. This one took a little time. Not really my time tho. My dad actually use to do this stuff for a living for 15+ years. So i kinda told him what i wanted and was thinking. We went through and made a bunch of test pieces and this is our final product. They are made out of 1/4 in steel and they may not look like much they should do just fine.

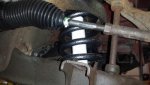
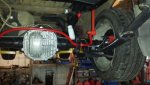
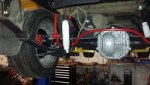
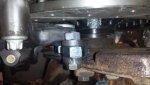
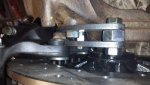
Now the idea is to bolt one onto the caliper and one onto the spindle. with the two factory locations on each. then then bolt them together with the 3 holes that line up it then later pictures when they are stacked. When they bolt together i can adjust the caliper over the rotor by shimming it if needed. But we ended up finding some nuts that worked just perfect and centered everything.

Everything in the pics is not final. We ordered grade 8 hardware for everything i just did not have it for these pics.
 

Attachments

  • 20151216_202430 (500x281) (400x225).jpg
    20151216_202430 (500x281) (400x225).jpg
    46 KB · Views: 480
  • 20151216_202401 (500x281) (400x225).jpg
    20151216_202401 (500x281) (400x225).jpg
    45.8 KB · Views: 481
  • 20151216_201931 (400x225).jpg
    20151216_201931 (400x225).jpg
    73.6 KB · Views: 473
  • 20151216_201814 (500x281) (225x400).jpg
    20151216_201814 (500x281) (225x400).jpg
    44.5 KB · Views: 473
  • 20151216_201757 (500x281) (225x400).jpg
    20151216_201757 (500x281) (225x400).jpg
    46.6 KB · Views: 471
  • 20151216_201940 (500x281) (400x225).jpg
    20151216_201940 (500x281) (400x225).jpg
    48.3 KB · Views: 484
  • 20151216_201746 (500x281) (225x400).jpg
    20151216_201746 (500x281) (225x400).jpg
    48.5 KB · Views: 480
Last edited:
So after some clean up of the calipers and brackets. Some paint and some decals. We bolted it all up and this is how it turned out. As you can see it looks real nice.

And in case you were wondering in i used the stock ranger brake lines. I did order new ones because it thought with the new location of the brakes i did not want a new fatigue spot on the lines. I got the stock lines to work by drilling out the hole in line to the same size as the fittings for the Caddi brakes. This totaled to be about 1/16 of an in. So not much. And then bolted it on with the caddi bolt and copper washers.

I have full clearance around the caliper and the wheel. There is a chance that the master cylinder might be to small but ill find out later, when i can drive it again. If it does not feel just right i may try the 4wd master cylinder which is a little bigger bore.

I did end up putting in longer wheel studs. I do not know if i needed to or not. but with the rotor sandwiched in there now i did not think it would hurt. I ended up putting in a 2 in stud.

As far as Price goes i think this upgrade was not to bad.
calipers shipped - 234.46
rotors shipped - 124.99
new pads (good ones) - 49.02
hub seals - 5.10
wheel studs - 20.72
brake lines - 22.54
brembo decal - 5.59
total 462.42

Now i know there is no metal cost in there but i got a place that lets us take scraps. And paint... we have enough laying around.

But there ya have it my 4 piston brembo brake upgrade with 13 in cobra rotors.
 

Attachments

  • 20151221_192104 (281x500) (225x400).jpg
    20151221_192104 (281x500) (225x400).jpg
    46.9 KB · Views: 466
  • 20151217_201423 (500x281) (400x225).jpg
    20151217_201423 (500x281) (400x225).jpg
    39.1 KB · Views: 482
Last edited:
wow you really changed the looks a lot. great work can't wait for updates..
 
Man thank you for the hub idea . Really . I'm stealing that one [emoji106]?[emoji482]. Calipers at the jy are cheap and just gotta look for the right calipers .


I just wanna go fast [emoji48]
 
New head lights

Decided that the old stock head light on my ranger were starting to become an eye sore. So i ordered some new ones. I kinda liked the light output of the stock headlights and i was worried about the aftermarket crystal clears would not be as good. But i decided if they do suck then ill just modify them to be a HID projection light. And they do look a lot nicer.
 

Attachments

  • 20160111_180013 (500x281).jpg
    20160111_180013 (500x281).jpg
    70.9 KB · Views: 521
Sound system upgrade

I wanted a sub in the pickup. And i could not find one i liked, that fit how i wanted. So i decided to build my own. And i wanted a factory look. So i decided to use that carpet off the back of my seats to cover the sub box. The seats are shot anyway. The sub i used in the pictures i used because it was lying around. Its actually out of one of the infinity Basslink sub and amp all in one boxes. It was my sisters but she fried the the amp section of it so i had a good 10 in sub lying around. I ordered an Rockford Fosgate amp that was well matched to the sub. I mounted it right in between the seats against the back of the cab and hid all of the wires behind that back panel. The carpet off the back of the seat was not quite long enough. So i built a tray on the other side of the box to cover up the place where the carpet did not cover, but also gives me a place to put stuff.
 

Attachments

  • 20160118_184108 (500x281).jpg
    20160118_184108 (500x281).jpg
    49.5 KB · Views: 631
  • 20160120_205540 (281x500).jpg
    20160120_205540 (281x500).jpg
    51.9 KB · Views: 633
I haven't been on this site in awhile. You've done some nice upgrades.
 
lowering and rear end swap

Now its time for my lowering kit and 8.8 swap. I decided to do a 2/3 drop because the roads around here are not always the best. With a lot of steep drive ways and pot holes. And i live on a gravel road...

So it started with a 8.8 rear end that i got from a junk yard for a whole $20. I think this rear end came out a 95 explorer. It had the disc brakes, posi rear end, 3.73 gears and, a sway bar.

So it started by bringing in the rear end and striping it of all the hard parts. Then i used are power washer with a sand blasting attachment. This did a good job of removing all the rust scale that was built up over the diff housing.

All the little parts were sandblasted later on their own.

Then came primer and then paint.

I had purchased a ford racing aluminium diff cover for a 8.8. But one of the cooling fins contacted the pick up wheel on the ring gear so clearance had to be made.

Then i assembled the unit.
 

Attachments

  • 20150606_171209 (400x225).jpg
    20150606_171209 (400x225).jpg
    53.3 KB · Views: 556
  • 20150605_170531 (400x225).jpg
    20150605_170531 (400x225).jpg
    60.2 KB · Views: 562
  • 20150603_180711 (400x225).jpg
    20150603_180711 (400x225).jpg
    55.7 KB · Views: 557
  • 20150530_142902 (400x225).jpg
    20150530_142902 (400x225).jpg
    63.3 KB · Views: 550
  • 20150725_154740 (400x225).jpg
    20150725_154740 (400x225).jpg
    42 KB · Views: 562
  • 20150618_170959 (400x225).jpg
    20150618_170959 (400x225).jpg
    62.1 KB · Views: 568
  • 20150604_215250 (400x225).jpg
    20150604_215250 (400x225).jpg
    71.9 KB · Views: 552
  • 20150608_182714 (400x225).jpg
    20150608_182714 (400x225).jpg
    53 KB · Views: 564
  • 20150727_183822 (400x225).jpg
    20150727_183822 (400x225).jpg
    47.8 KB · Views: 563
time for the removal of the old rear 7.5 rear end. After 200k + miles i was able to spin off the u bolt nuts and get the rear end loose. But the rear leaf bolts i was not so lucky on. The bolts were stuck in the leaf. No big surprise there. After getting those loose i found my rear shackle brackets to be rotted to they were removed and replaced.

I used a DJM 2/3 drop kit. I did not need the axle flip brackets because i went to a 8.8 that moved the axle on top anyway. Using the DJM rear brackets on the highest setting to give me right around that 3in drop.

Front drop spring were done in the front. I already had a camber kit on the truck. And then DJM drop spring all the way around.
 

Attachments

  • 20150825_203324 (400x225).jpg
    20150825_203324 (400x225).jpg
    54 KB · Views: 547
  • 20150825_184427 (400x225).jpg
    20150825_184427 (400x225).jpg
    102.1 KB · Views: 545
  • 20150825_184416 (400x225).jpg
    20150825_184416 (400x225).jpg
    66 KB · Views: 545
  • 20150825_180328 (400x225).jpg
    20150825_180328 (400x225).jpg
    77.4 KB · Views: 541
  • 20150605_170520 (225x400).jpg
    20150605_170520 (225x400).jpg
    67.3 KB · Views: 545
  • 20150829_155359 (400x225).jpg
    20150829_155359 (400x225).jpg
    69.2 KB · Views: 540
  • 20150826_191649 (400x225).jpg
    20150826_191649 (400x225).jpg
    68.5 KB · Views: 575
  • 20150826_182156 (400x225).jpg
    20150826_182156 (400x225).jpg
    66.8 KB · Views: 545
  • 20150605_170515 (400x225).jpg
    20150605_170515 (400x225).jpg
    51.5 KB · Views: 541
  • 20150827_171110 (400x225).jpg
    20150827_171110 (400x225).jpg
    64.9 KB · Views: 548
  • 20150831_171338 (400x225).jpg
    20150831_171338 (400x225).jpg
    64.4 KB · Views: 557
  • 20150907_152408 (400x225) (2).jpg
    20150907_152408 (400x225) (2).jpg
    72.5 KB · Views: 544
  • 20150907_152402 (400x225).jpg
    20150907_152402 (400x225).jpg
    72.9 KB · Views: 544
time for the removal of the old rear 7.5 rear end. After 200k + miles i was able to spin off the u bolt nuts and get the rear end loose. But the rear leaf bolts i was not so lucky on. The bolts were stuck in the leaf. No big surprise there. After getting those loose i found my rear shackle brackets to be rotted to they were removed and replaced.

I used a DJM 2/3 drop kit. I did not need the axle flip brackets because i went to a 8.8 that moved the axle on top anyway. Using the DJM rear brackets on the highest setting to give me right around that 3in drop.

Front drop spring were done in the front. I already had a camber kit on the truck. And then DJM drop spring all the way around.

You are lucky you are going with a lowered look. I have a 2000 Trailhead, which is a 2wd ranger with the 4wd lift and suspension. I want to keep it up where it is, so I have to find a ranger rear end and have the mounts welded on the other side of the axle. I heard the shock mounts have to be moved too, but will have to wait and see. Nice job on all the work. You should see about making some more of those brackets for the front brakes and selling them along with a list of parts to get to make it all work. They look awesome and bet they perform.
 
Thanks!

I have not had a chance to push the brakes to their limit yet, so i don't know how they perform under heavy usage. The do change the feel of the pedal quite a bit tho. I'm going to have to look into getting a larger bore master cylinder. To compensate for all the extra fluid that has to be moved with theses four piston calipers.

As far as a kit. I am not sure on that yet i will have to drive what I got around for a while to make sure i feel safe with them first. There is a lot of liability with making a part like that.

But they do look sweet!
 
I didn't realize that i have not given an update on my interior of the truck. I have since got different seats.
I have some cool connections in the auto salvage business. So i told him what i wanted and he delivered. I told him that i needed two passenger seats with a JT interior code. There was some questioning of my motives but he got the idea. It took a little bit to get them in because they came out of an extended cab truck and they use different seat tracks. so i had to rip the ones off of my old seats. But they look good in there.

I also added a AFR gauge so i can keep an eye on it when i comes time to tune the truck. I got a housing for a mustang and made it work. Its not pretty and i may redo it in the future but it will work for now.

And last but not least some shots of the truck out side in the sun. With a new heart and a little lower to the ground.
 

Attachments

  • 20160301_193839 (400x225).jpg
    20160301_193839 (400x225).jpg
    58.6 KB · Views: 452
  • 20160301_193858 (400x225).jpg
    20160301_193858 (400x225).jpg
    57.6 KB · Views: 461
  • 20160302_190902 (400x225).jpg
    20160302_190902 (400x225).jpg
    55.5 KB · Views: 467
  • 20160307_182532 (400x225).jpg
    20160307_182532 (400x225).jpg
    62.1 KB · Views: 449
  • 20160529_133436 (400x225).jpg
    20160529_133436 (400x225).jpg
    67.4 KB · Views: 450

Sponsored Ad


Sponsored Ad

TRS Events

Member & Vendor Upgrades

For a small yearly donation, you can support this forum and receive a 'Supporting Member' banner, or become a 'Supporting Vendor' and promote your products here. Click the banner to find out how.

Latest posts

Recently Featured

Want to see your truck here? Share your photos and details in the forum.

Our Latest Video

TRS Merchandise

Follow TRS On Instagram

TRS Sponsors


Sponsored Ad


Sponsored Ad


Amazon Deals

Sponsored Ad

Back
Top