- Joined
- Sep 11, 2008
- Messages
- 20
- Points
- 3,101
- Transmission
- Automatic
Hey guys,
Was doing this for a ranger friend with a Vortech supercharger before I tune it on the dyno. Just thought I’d pass it along so if anyone was looking to do the same you could.
First the reason to do this is that he has a EEC4/OBD1 93’ Ranger splash with a Vortech supercharger kit on it. Tuning is very hard to accomplish being obd1 and the limitations from the datalogging on the computer. The original Vortech kit come with a FMU and it used the stock injectors and using the FMU would close off the return line to increase fuel pressure a therefor add fuel under boost. Where this is a acceptable way to do things back then today we have a a full array of injectors and complete control of the PCM, using SCT software, so instead of bandaid fuel fixes we can adjust this perfectly within the pcm.
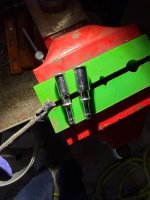
So first things first, get a set of Bosch 24lbs injectors. 24lbs injectors will support well into the low 300hp range which is well more then ANY 4.0 OHV will ever make. No need for stupid big 42’s or even 30’s as that will do nothing but make drivability and tune ability much more difficult. I got a set of 8 for $55 off eBay and have 2 left over. lol
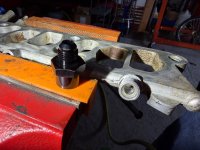
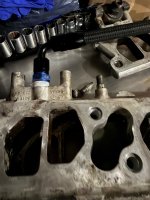
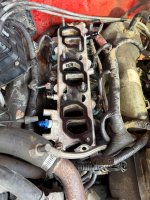
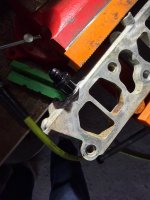
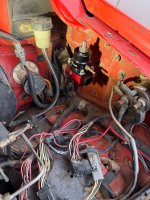
Next we remove the 4.0 fuel rail and the steel braided lines going to the connection down near the frame rail behind the power steering pump. Clean it up the best you can.
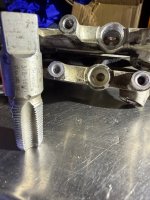
Remove the fuel pressure regulator and throw it away. Chuck the rail in a vise, with plastic pads, and drill a hole in the regulator hole using a 37/64 drill bit. Then using a 3/8 npt tap, cut new threads into the hole.
I used a 1/2 drill bit first to open the hole up into the fuel rail to get full flow and little restriction that way I can adjust the fuel pressure fully and not have it raised due to a restriction in the fuel rail. I also drilled the inside of the threaded line on the other end of the rail.
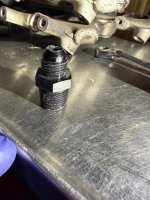
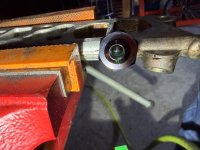
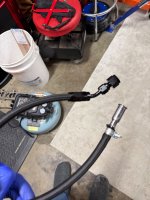
From there I use a -6an to 3/8npt aluminum fitting and pipe tape on the threads and screwed it into the hole.
On the threaded end of the rail I used a 16mmx1.5 female to -6an male fitting. I put a new o-ring inside the threaded portion before tightening the fitting in place.
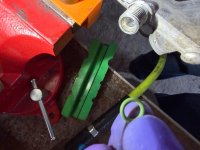
Tech tip, you can use green a/c orings in place of fuel orings as they will hold up to the fuel. Done this for years. And they’re easier to find. Put the wrong type black oring and you’ll be digging it out of the fuel system when it melts.
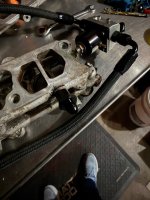
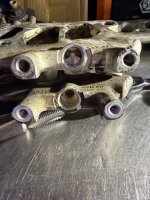
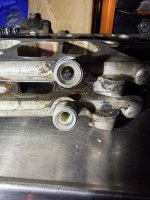
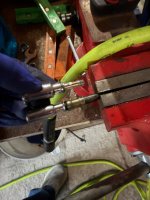
That’s all the mods to the fuel rail needed. Bolt it back in place and when you’re tightening it down turn the injectors as they should freely turn in the bores even when the rail is fully down. To tighten the studs you’ll need a E7 inverted torx socket.
Next take both stainless lines you pulled and cut the crimps where it connects to the fuel line couplers. Don’t go too deep! Just cut the bands and pull the female fittings out.
One is 3/8 and the other is 5/16th is size. The 3/8 is the feed line from the pump. Measure from the line at the frame rail to the fitting on the rear of the fuel rail(the one with the threaded adapter on it). Cut some -6 braided hose and push the female fitting in the hose and secure it with a 3/8 fuel injection clamp on one end. On the other end install a -6 90 degree hose end and then install the hose on the rail and snap in on the factory lines. Place the 5/16 female fitting to the side for now.
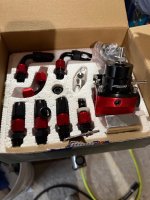
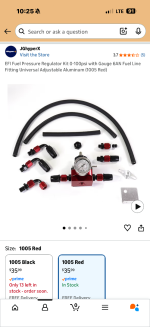
Now figure out where you are going to mount the adjustable fuel pressure regulator. I used an Evil Energy kit I bought from Amazon. It’s a very nice regulator kit with a liquid filled gauge. It includes all the fittings needed as well to set it up. For the price it’s great.
I mounted this one to the inside of the drivers fender. Then I installed one -6 an 90 to a hose end and ran it across the back of the engine bay and down to the -6 fitting I replaced the regulator at the rail in. Cut it and put another -6 90 on the hose.
Finally the line off the bottom of the regulator, the return line, was a -6 fitting so I had to get a reducer to a -4 and made up a -4 45 degree fitting at the regulator and measured to the factory line. Then I installed the 5/16 female fitting I earlier cut out and used a 5/16 fuel line clamp on the -4 hose. Connected it and it’s done.
Before I put it all back together I keyed on the fuel pump and checked for leaks. Thank goodness as I did have to tighten the adapter fitting at the back of the rail alittle more as it was leaking. Other than that it was great.
I set the key on fuel pressure to 40 psi and put it back together. At idle with vacuum on the regulator it’s at 32 psi just like oem.
This is something I’d only do if needed for a forced Induction set up. Naturally Aspirated don’t need anything like this.
Just thought I’d pass this along. Thanks!
Doug

Was doing this for a ranger friend with a Vortech supercharger before I tune it on the dyno. Just thought I’d pass it along so if anyone was looking to do the same you could.
First the reason to do this is that he has a EEC4/OBD1 93’ Ranger splash with a Vortech supercharger kit on it. Tuning is very hard to accomplish being obd1 and the limitations from the datalogging on the computer. The original Vortech kit come with a FMU and it used the stock injectors and using the FMU would close off the return line to increase fuel pressure a therefor add fuel under boost. Where this is a acceptable way to do things back then today we have a a full array of injectors and complete control of the PCM, using SCT software, so instead of bandaid fuel fixes we can adjust this perfectly within the pcm.
So first things first, get a set of Bosch 24lbs injectors. 24lbs injectors will support well into the low 300hp range which is well more then ANY 4.0 OHV will ever make. No need for stupid big 42’s or even 30’s as that will do nothing but make drivability and tune ability much more difficult. I got a set of 8 for $55 off eBay and have 2 left over. lol
Next we remove the 4.0 fuel rail and the steel braided lines going to the connection down near the frame rail behind the power steering pump. Clean it up the best you can.
Remove the fuel pressure regulator and throw it away. Chuck the rail in a vise, with plastic pads, and drill a hole in the regulator hole using a 37/64 drill bit. Then using a 3/8 npt tap, cut new threads into the hole.
I used a 1/2 drill bit first to open the hole up into the fuel rail to get full flow and little restriction that way I can adjust the fuel pressure fully and not have it raised due to a restriction in the fuel rail. I also drilled the inside of the threaded line on the other end of the rail.
From there I use a -6an to 3/8npt aluminum fitting and pipe tape on the threads and screwed it into the hole.
On the threaded end of the rail I used a 16mmx1.5 female to -6an male fitting. I put a new o-ring inside the threaded portion before tightening the fitting in place.
Tech tip, you can use green a/c orings in place of fuel orings as they will hold up to the fuel. Done this for years. And they’re easier to find. Put the wrong type black oring and you’ll be digging it out of the fuel system when it melts.
That’s all the mods to the fuel rail needed. Bolt it back in place and when you’re tightening it down turn the injectors as they should freely turn in the bores even when the rail is fully down. To tighten the studs you’ll need a E7 inverted torx socket.
Next take both stainless lines you pulled and cut the crimps where it connects to the fuel line couplers. Don’t go too deep! Just cut the bands and pull the female fittings out.
One is 3/8 and the other is 5/16th is size. The 3/8 is the feed line from the pump. Measure from the line at the frame rail to the fitting on the rear of the fuel rail(the one with the threaded adapter on it). Cut some -6 braided hose and push the female fitting in the hose and secure it with a 3/8 fuel injection clamp on one end. On the other end install a -6 90 degree hose end and then install the hose on the rail and snap in on the factory lines. Place the 5/16 female fitting to the side for now.
Now figure out where you are going to mount the adjustable fuel pressure regulator. I used an Evil Energy kit I bought from Amazon. It’s a very nice regulator kit with a liquid filled gauge. It includes all the fittings needed as well to set it up. For the price it’s great.
I mounted this one to the inside of the drivers fender. Then I installed one -6 an 90 to a hose end and ran it across the back of the engine bay and down to the -6 fitting I replaced the regulator at the rail in. Cut it and put another -6 90 on the hose.
Finally the line off the bottom of the regulator, the return line, was a -6 fitting so I had to get a reducer to a -4 and made up a -4 45 degree fitting at the regulator and measured to the factory line. Then I installed the 5/16 female fitting I earlier cut out and used a 5/16 fuel line clamp on the -4 hose. Connected it and it’s done.
Before I put it all back together I keyed on the fuel pump and checked for leaks. Thank goodness as I did have to tighten the adapter fitting at the back of the rail alittle more as it was leaking. Other than that it was great.
I set the key on fuel pressure to 40 psi and put it back together. At idle with vacuum on the regulator it’s at 32 psi just like oem.
This is something I’d only do if needed for a forced Induction set up. Naturally Aspirated don’t need anything like this.
Just thought I’d pass this along. Thanks!
Doug
Attachments
-
 IMG_0454.jpeg388.7 KB · Views: 31
 -
 IMG_0447.jpeg370 KB · Views: 35
 -
 IMG_0448.jpeg303 KB · Views: 24
 -
 IMG_0435.jpeg453.5 KB · Views: 29
 -
 IMG_0456.jpeg358.9 KB · Views: 29
 -
 IMG_0439.jpeg386 KB · Views: 26
 -
 IMG_0440.jpeg393.3 KB · Views: 29
 -
 IMG_0437.jpeg366.5 KB · Views: 31
 -
 IMG_0455.jpeg332 KB · Views: 28
 -
 IMG_0463.jpeg348.1 KB · Views: 29
 -
 IMG_0460.jpeg451.6 KB · Views: 34
 -
 IMG_0457.jpeg327.6 KB · Views: 30
 -
 IMG_0458.jpeg347.5 KB · Views: 26
 -
 IMG_0464.jpeg285.9 KB · Views: 32
 -
 IMG_0466.jpeg278.3 KB · Views: 32
 -
 IMG_0469.jpeg415.6 KB · Views: 29
 -
 IMG_0546.jpeg257.6 KB · Views: 32
 -
 IMG_0578.png297.3 KB · Views: 32