Headliner success...UPDATED
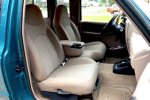
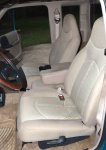
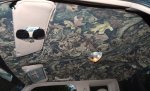
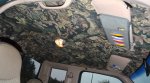
Okay, here are some shots of the new-to-me 60/40 seats that I got last weekend for little Green...my 93 Ranger XLT. Took me 3 years of making do with others and watching and waiting, primarily CL, to find these at the right price...and they turned out to be the right color, too. Then there's two shots of the foam-backed camo fabric that I got online from Albrights (albrightssupply.com) installed on my old headliner board. When I got the truck a few years ago the tan cloth headliner had been vandalized or sliced repeatedly by a bored kid with a pocket knife and some of the fabric delaminated and started to dangle and come off. Time for an update...2 yards of the fabric cost me about $50, a can of 3M 90 spray adhesive from the Home Despot added $14 (used it all), and couple of Chrysler...yeah Chrysler interior body fasteners from ABC Auto Parts ($3) put the total around $70. Plus about 2 hours removal and re-installation time, and about four hours labor spread over 2 or 3 evenings after work. The hardest part was getting the interior trim out to pull the headliner, and the waiting for the damp back piece of the headliner board to dry out (leaky third brake light...now repaired) so I could do this. The old foam-back cloth peeled off in chunks/strips, then I started rubbing the old foam off the board. About 30 minutes later I realized I could pull the fabric backing off in larger pieces by taking my time and going at angles. This left the orange pressboard that I glued the new camo fabric to. If you do this, try to work at waist level on a solid table, follow the label directions on the adhesive/glue, and make sure the fabric is just laying loose on the liner board when you start. I did half at a time, just like in the tutorial in the Tech Articles...starting in the center near the dome light hole and working out to the edges. Then I trimmed the excess, made some relief cuts along the edges every 3 or 4 inches and then folded the edges over and glued them down. Use an exacto knife to cut out the holes (use X shapes) and pull the fabric through and glue it down, too. The 3M adhesive cures in about 30 minutes, and it's best to use light coats when you're applying it...the nozzle turns to give different spray coverage patterns. Now I'm trolling online for a rear window shade/deflector to go over my sliding back glass...I hate tailgaters at night, even though I spit...a lot.