• Welcome Visitor! Please take a few seconds and Register for our forum. Even if you don't want to post, you can still 'Like' and react to posts.

Headlight Assembly Replacement - How Adjust Plastic 'Nut"?


KENH999

New Member
U.S. Military - Veteran
Joined
Apr 20, 2022
Messages
2
City
SC
Vehicle Year
2001
Transmission
Automatic
Trying to replace headlight assemblies on an 01 XLT. Prior to starting I watched a few YT vids. Looked simple in the videos when the new ones slid right in and locked down. Not for me though.

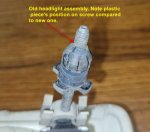
The bottom right & left threaded post's black plastic 'nuts' on both of new assemblies are nowhere near where the old ones are located. They do not even pass far enough through the mounting hole for the locking bar to properly engage the locking bar. I'm guessing they weren't properly positioned on the threaded shaft during manufacture???

See attached pics.

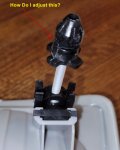
Please, how do I adjust these things??? The entire shaft just spins on the ball joint when turned. I tried holding the threaded shaft tight with padded pliers and turning the plastic nut but it would not budge and didn't want to force it.

If it matters, I bought Left & Right TYC 20601400/20601300 CAPA Certified from Rock Auto.

Appreciate any help.
 

Attachments

  • old-headlight-2.jpg
    old-headlight-2.jpg
    69.9 KB · Views: 117
  • new headlight-2.jpg
    new headlight-2.jpg
    67.4 KB · Views: 104
Don't you just grab those nubs sticking out and turn it? I would get it in the ballpark, and then it looks like you reach down in and turn those nubs sticking out to aim the headlight after it's installed.
 
the new plastic doesn't have threads in it, it looks like. you might have to just twist it on a little and then back a little. then on some more and back a little. you are going to cut threads into it that way
 
the new plastic doesn't have threads in it, it looks like. you might have to just twist it on a little and then back a little. then on some more and back a little. you are going to cut threads into it that way
I bet you are right, they did not cut the threads in the plastic very good.
 
Don't you just grab those nubs sticking out and turn it? I would get it in the ballpark, and then it looks like you reach down in and turn those nubs sticking out to aim the headlight after it's installed.


the new plastic doesn't have threads in it, it looks like. you might have to just twist it on a little and then back a little. then on some more and back a little. you are going to cut threads into it that way

Thanks SuperJ. It seems that was the case. I wrapped part of the shaft with a piece of latex glove to protect threads and locked vise-grips onto it. Then used pliers to turn the 'nub'. Took alot of force, both holding the shaft and turning the nub. I only had big vise grips so when the nub got farther down had to use needle-nose to hold the shaft. My old arthritic hand is screaming now after gripping that so hard. LOL Worked it back and forth as you said. Finally it started threading down the shaft. Got both of them close to where the old ones are. Don't have time right now to install but will in the morning. Hopefully they'll go in easy.
 

Sponsored Ad


Sponsored Ad

TRS Events

Member & Vendor Upgrades

For a small yearly donation, you can support this forum and receive a 'Supporting Member' banner, or become a 'Supporting Vendor' and promote your products here. Click the banner to find out how.

Recently Featured

Want to see your truck here? Share your photos and details in the forum.

Ranger Adventure Video

TRS Merchandise

Follow TRS On Instagram

TRS Sponsors


Sponsored Ad


Sponsored Ad


Amazon Deals

Sponsored Ad

Back
Top