• Welcome Visitor! Please take a few seconds and Register for our forum. Even if you don't want to post, you can still 'Like' and react to posts.

axle truss?


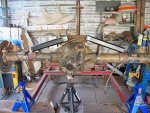
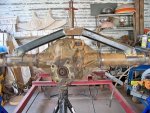
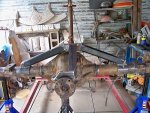
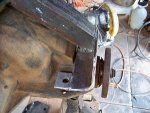
59bisquick, I appreciate the help. I saw the shock mount rotation, looks like a great idea. I noticed on my original axle that the shocks are actually at a (6 deg. ?) angle as well. Did you maintain that, or do something different?
Also I can see new bolts on the frame at the shock mount, did you change that? If so, how and why?
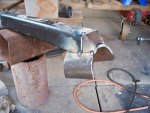
Oh, and What did you do about your breather vent tube? Couldn't see it in the pics.
Thanks for the response!
 
As for the lower shock mounts, I just rotated them up until they were parallel with the ground. When they hung down, I used to catch them on rocks.

The reason you see bolts on the frame instead of the the rivets, to use Fox shocks, I had to modify the upper shock mount. The Fox shock uses 1/2" bolts to mount them and the upper mounts on the bronco are bigger. I cut them off, added 1/2" bolts and spacers. Once you get into valvable/rebuildable shocks like Fox and King, you will never use standard shocks again!

The axle vent is still there, its just longer and still ran like stock. I am going to try the Toyota style breathers instead of the hoses when I get a chance.
 
Thanks for the quick response, 59bisquik. I have been looking around in my scrap metal piles, and I think I've desided to do something similar to your setup. Originally I planned to use some 4" round tubing I had, but It didn't seam to be thick enough. I have some thick square tubing about the size you used, but I think I'm going to take it out to just next to the u bolts. Instead of welding directly to the tube with that, though, I've got some round stock that will fit onto the axle tube with a bit of tweaking (4 1/2") . (Been thinking about doubling the tube underneath, haven't decided yet). So, I'll weld the square stock onto it, and then weld that onto the axle tube, about half round. That way, I'm distributing the stresses more. That's the current plan, anyway. I ran out of welding wire while welding the tubes, so what I thought I'd finish today, will continue tomorrow.
 
Post up some pics once your done. Im having trouble picturing what your gonna do.

As for the truss, i put mine right next to the pumpkin since my only concern was to stop the tubes from spinning. I wasnt worried about stiffening the whole housing.

Also, with it in the middle, I have been toying with an idea of adding an airbag to the top of it. I have seen buggies with them, you can lift the vehicle when extra ground clearance is needed or you have a little cargo. With it in the center, you dont have to worry about flex.
 
I'll do my best to get pics all the way through the project. I forgot to take a "before" picture when I started, but I think most people don't care what an 8.8 looks like when just pulled from the doner. I'm having trouble with my camera turning on, Had it repaired twice and still just won't turn on for about 15 min of trying. When it finely does, it works fine. That was $350 that could've been spent better.

I got a mock up pic yesterday, I'll try to post it after I get back from my welding wire trip in a little bit.

Air bags sounds cool, but probably outside of my range for now.
 
damn, you spent $350 to get a camera repaired???? why not just buy a new one? unless it was a fancy digital SLR or something
 
No, I spent $350 on the camera, then sent it in for repairs twice.:bawling: I am (sometimes) a full time sculptor, (stone, cast stone, bronze, ect.) and needed it for my work.

OK, so here is the basic mock-up, I just kinda set the rough pieces in place to see if It's what I want, ect. You can see at the point where the square tubing sits on the axle tube I have a half tube "plate" ( I piece of pipe cut in half, whose ID is 3 1/2"). It will be connected with square tubing, not left as is. I also think I may put a "brace" of 1/4" x 1 1/2" at about the axle tube joint up to the square tubing.
 

Attachments

  • 8.8 truss mock-up 1.jpg
    8.8 truss mock-up 1.jpg
    260.5 KB · Views: 206
Here it is tacked, and a detail of the mount plate. I'll probably weld it up in the morning.
 

Attachments

  • truss tac welded.JPG
    truss tac welded.JPG
    185.3 KB · Views: 189
  • truss mount detail tac.JPG
    truss mount detail tac.JPG
    144.3 KB · Views: 187
Looks like a good start! :icon_welder:
 
Ok, so here is the whole truss fully welded and sitting in place, with a couple of detail shots of the forward brace and mount. I still have a hole to drill, then I will bolt the forward brace to the pinion support, and tac the bolts so no chance of them coming loose. Then weld the tube support plates, and it's ready for rattle canning.
 

Attachments

  • truss welded and sitting in place.JPG
    truss welded and sitting in place.JPG
    202.4 KB · Views: 176
  • detail truss mount forward.JPG
    detail truss mount forward.JPG
    162.9 KB · Views: 185
  • Detail truss forward brace.JPG
    Detail truss forward brace.JPG
    156.6 KB · Views: 183
Good job! That will work!
 
OK. All that is done. The finished product looks the same, but simi-gloss black. I'll show that soon. What have you guys done about remounting the brake lines? The brackets are now exactly backwards, and I'm thinking I need to make an extension bar, downwards to stay with existing stuff. Any ideas?
 
Nutty Cool!
Looks like I'll have to see you for help om my rig.

FrankBoss
 
I just bent up all new brake lines and used the Bronco center flex line to the body.
061.jpg


What are you talking about with brackets that are upside down??
 

Sponsored Ad


Sponsored Ad

TRS Events

Member & Vendor Upgrades

For a small yearly donation, you can support this forum and receive a 'Supporting Member' banner, or become a 'Supporting Vendor' and promote your products here. Click the banner to find out how.

Recently Featured

Want to see your truck here? Share your photos and details in the forum.

Ranger Adventure Video

TRS Merchandise

Follow TRS On Instagram

TRS Sponsors


Sponsored Ad


Sponsored Ad


Amazon Deals

Sponsored Ad

Back
Top