Auto to Manual Swap - Electronics & Wiring


button_pusher

Forum Member

Ham Radio Operator
Joined
Feb 4, 2026
Messages
15
Points
101
City
Prescott
State - Country
AZ - USA
Other
1969 Volvo P1800S
Vehicle Year
2007
Vehicle
Ford Ranger
Drive
4WD
Engine
4.0 V6
Transmission
Manual
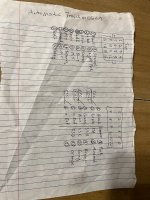
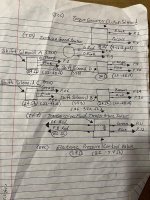
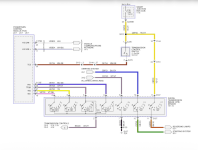
Finishing up the mechanical bits of my 2007 auto to manual swap, and now focusing on the electrical. I thought this would be a little more straightforward than it is, basically no one is willing to touch the PCM. What have you guys done? Right now it just throws the solenoid and TC codes, and puts it into limp mode at around 3k rpm, from what I know having it wired to see "park" all the time is also going to cause issues with carbon buildup over time with the different fuel map for idle/park vs drive.

I've been trying to buy a manual PCM (if anyone with a 2007 4.0 five speed wants to bless me with their VIN I would be eternally thankful), but it also seems a lot of people change the whole wiring harness - is that really necessary? Trying to avoid that at all costs, especially with PATs.

Any thoughts or guidance would be appreciated!
 
Would it be possible to wire it so it thinks it's in drive all the time? I've heard of people using resistors to make the PCM think the shift solenoids are still there. I have no idea if it also monitors line pressure or something by that year...
 
I wired the gear position sensor to the clutch pedal switch. When the pedal is out, it’s in drive, when it’s depressed, it’s in neutral. This gets past the starting/ 3000rpm limit.


I wired resistors to the wiring for the shift solenoids to get rid of the codes for those.

The code I have left is for the turbine speed sensor.

I may try and wire the tss wiring to the oss and see if that helps.


The other main issue I have is that with the oss wired into harness the speed is about 40% high. The only way I can think to fix this (without changing the tone wheel) is to reprogram the ecu.
Woah! that's a great idea. Do you have any diagram for the resistor wiring? I already junked the auto so I cant play around with a multimeter.

I actually saw one guy use a Dakota Digital SGI-100BT, cost $130 bucks:

Credit to RonD on Ranger Forums!

"These allow you to convert Ford Speed Signals up or down

Since it's a 4x4 I would see if you can use it between the OSS and computer, i.e. change the manual transmission OSS PPM (pulse per mile) output to Automatic PPM output, that way computer will speed correct in 4 low.

Worst case is you can use it with the OSS directly to speedo/odo and cruise, that's it's normal configuration."
 
I took the wiring harness out of the auto and measured the resistance on all connections.

I have a wiring diagram, I just need to find it and I can send you a picture.

I’ll need to look into that Dakota Digital tac converter. @RonD suggested
 
I took the wiring harness out of the auto and measured the resistance on all connections.

I have a wiring diagram, I just need to find it and I can send you a picture.

I’ll need to look into that Dakota Digital tac converter. @RonD suggested
That would be sweet!

One thing I've been thinking about, if I wire the drive position sensor to the clutch switch, it will have the 3k limit when I push clutch in, making rev matching a lot harder. I may just wire it to a manual switch I can flip for starting/driving.
 
Found them.

First one is the pin out on the connector, second one is a diagram of the automatic transmission wiring harness.
 

Attachments

  • Auto to Manual Swap - Electronics & Wiring
    IMG_3626.jpeg
    469.2 KB · Views: 59
  • Auto to Manual Swap - Electronics & Wiring
    IMG_3627.jpeg
    485.4 KB · Views: 59
I thought about the switch/ clutch thing in relation to the rpm’s.

It hasn’t caused me any real issues. I’ve got about a 1000 miles on it since the swap. Maybe I’m just not noticing it.
 
Did you happen to record which wires were necessary for neutral/drive? Based off the wiring diagram it looks like pin 10 (GN-OG) to pin 12 (BU-GY) would enable starting (i assume this means it's either in neutral or park) and one of pins 3 (GY-VT), 4 (VT-WT), 5 (YE), or 6 (BU-OG) connected to pin 2 would be Drive. Unfortunately my grand idea of multi-metering the DTR did not go as planned. This is what I've been referencing.
 

Attachments

  • Auto to Manual Swap - Electronics & Wiring
    Screenshot 2026-05-07 at 3.24.36 PM.png
    485.1 KB · Views: 16
I believe I wired the GY-VT and BLK-VT wires to the clutch pedal, when it’s pressed in it connects the two wires.

I cut them off the connection.

Left the DTRS plugged into the harness with the dial rotated to the Drive position.


I’ll have to check later to confirm, but I know for sure I still have the DTRS connected and set to drive all the time.
 
Holy cow that was unpleasent. But I have it figured out. If anyone else is reading this, here's how I did it:

Clip every wire from the DTR sensor, but make note of the three Purple-Grey wires and their pin location (on the DTR plug, but it's not critical if you don't).

Strip the BU-GY and GN-OG wires. Connect these together with a single pole single throw (on/off) switch. This is enables you to crank.

Next, measure the voltage between every single Grey/Violet (GY-VT) wire and ground (you just need the ignition on for this).

Next, strip the 0V and 5V wire - you will need to wire in a 270 ohm resistor here, alternatively you could wire back in your DTR. The 12V GY-VT wire does something, I'm sure, but I haven't figured that out yet - most likely something tied to the 4x4.

I will update on the 4x4 when I get to it.

Side note: The switch needs to be in the correct position (closed) to crank. After cranking once and leaving the ignition on, it's position is irrelevant, and there is no rev limiter in either position.
 
@Roert42 A few questions when you have the chance - I'm ordering resistors to now deal with the transmission codes - I assume the circled resistances are the "valid" values for the PCM?

Just hoping to double check I'm reading it all right:

TCC: 9 Ohms, P1 -> P5
TSS: (a problem for later) P2 -> P3
SSA: 24 Ohms, P7 -> P10
SSB: 24 Ohms, P14 -> P10
SSC: 24 Ohms, P16 -> P10
SSD: 24 Ohms, P9 -> P10

TFT: Not sure here, there's a resistor between P4 and P8, but then a "0 Ohms" next to it, is the EPC also a part of this?

EPC: 3.9 Ohms - not sure what pins, part of TFT?

And a big thank you once again, you've been extremely helpful with getting this swap finished up.


The resistances that are circled are what I measured. The resistances that are in brackets are what the computer will recognize as an acceptable range.


The TFT is inside the EPC, that’s why they are combined in the drawing. The wires for the EPC go to pins 11-12.


The TFT read Open Line (OL) when I measured it. The acceptable range is between 16 ohms and 37k ohms.
 
I also have these notes saved on my computer, incase it helps. Description of sensors, ect.


Transmission Electronic Control System


The powertrain control module (PCM) (12A650) and its input/output network control the following transmission operations:

- Shift timing.

- Line pressure (shift feel).

- Torque converter clutch.

The transmission control is separate from the engine control strategy in the PCM, although some of the input signals are shared. When determining the best operating strategy for transmission operation, the PCM uses input information from certain engine-related and driver-demand related sensors and switches.

In addition, the PCM receives input signals from certain transmission-related sensors and switches. The PCM also uses these signals when determining transmission operating strategy.

Using all of these inputs signals, the PCM can determine when the time and conditions are right for a shift, or when to apply or release the torque converter clutch. It will also determine the best line pressure needed to optimize shift feel. To accomplish this the PCM uses six output solenoids to control transmission operation.


The following provides a brief description of each of the sensors and actuators used to control transmission operation:

Intake Air Temperature (IAT) Sensor

The intake air temperature (IAT) sensor provides the sequential fuel injection (SFI) system mixture temperature information. The IAT sensor is used both as a density corrector for air flow calculation and to proportion cold enrichment fuel flow. The IAT sensor is installed in the air cleaner outlet tube. The IAT sensor is also used in determining electronic pressure control (EPC) pressures.

Throttle Position (TP) Sensor

The throttle position (TP) sensor is a potentiometer mounted on the throttle body. The TP sensor detects the position of the throttle plate and sends this information to the powertrain control module. The TP sensor is used for shift scheduling, electronic pressure control and torque converter clutch (TCC) control.

Engine Coolant Temperature (ECT) Sensor

The engine coolant temperature (ECT) sensor detects temperature of engine coolant and supplies the information to the powertrain control module (PCM). The ECT sensor is used to control torque converter clutch (TCC) operation.

Anti-Lock Brake Speed Sensor

The programmable speedometer/odometer module (PSOM) receives input from the rear brake anti-lock sensor. After processing the signal, the PSOM relays it to the powertrain control module and the speed control module. Information from the PSOM is used to help determine shift scheduling, torque converter clutch operation and electronic pressure control (EPC).

Mass Air Flow (MAF) Sensor

The mass air flow sensor measures the mass of air flowing into the engine. The MAF sensor output signal is used by the powertrain control module (PCM) to calculate injector pulse width. For transmission strategies the MAF sensor is used to regulate electronic pressure control, shift and torque converter clutch scheduling.

Air Conditioning (A/C) Clutch

An electromagnetic clutch is energized when the clutch cycling pressure switch closes. The switch is located on the suction accumulator/drier. The closing of the switch completes the circuit to the clutch and draws it into engagement with the compressor driveshaft. When the A/C is engaged, electronic pressure control (EPC) pressure is adjusted to compensate for additional load on the engine.

Electronic Ignition (EI) System

The electronic ignition consists of a crankshaft position sensor, two four tower ignition coils and the powertrain control module. The ignition control module operates by sending crankshaft position information from the crankshaft position sensor to the ignition control module. The ignition control module generates a profile ignition pickup (PIP) signal (engine rpm) and sends it to the PCM. The PCM uses PIP signal in the transmission strategy, wide-open throttle (WOT) shift control, torque converter clutch control and EPC pressure.

Brake Pedal Position (BPP) Switch

The brake pedal position (BPP) switch tells the powertrain control module when the brakes are applied. The torque converter clutch disengages when the brakes are applied. The BPP switch closes when the brakes are applied and opens when they are released.

Transmission Control Switch (TCS) and Transmission Control Indicator Lamp (TCIL)

The transmission control switch (TCS) is a momentary contact switch that allows the driver to cancel operation of 5th (overdrive) gear. The TCS is located on the end of the selector lever. When the driver initially presses the TCS a signal is sent to the powertrain control module. The PCM uses the shift solenoids to disengage/disable 5th gear operation and activate the coast clutch. At the same time the PCM illuminates the transmission control indicator lamp (TCIL), to notify the driver that 5th gear is canceled. When the TCS is pressed again, 5th gear operation is enabled, the coast clutch is released and the TCIL is turned off.

Whenever the ignition is cycled (vehicle shut off then started again) the TCS is turned off and 5th gear will be enabled, even if the TCS had been on when the ignition was shut off.

Turbine Shaft Speed (TSS) Sensor

The turbine shaft speed (TSS) sensor is a magnetic pickup that sends the powertrain control module torque converter turbine speed information. The PCM uses TSS information to help determine electronic pressure control (EPC) and torque converter clutch (TCC) operation. The TSS sensor is mounted internally on the center support.

4x4 Low (4x4L) Switch

The 4x4 low (4x4L) range switch is located on the transfer case cover. It provides an indication of when the 4x4 transfer case gear system is in the low range. The PCM then modifies the shift schedule for 4x4L transfer case gear ratio.

Output Shaft Speed (OSS) Sensor

The output shaft speed (OSS) sensor is a magnetic pickup, located at the output shaft ring gear, that sends a signal to the powertrain control module to indicate transmission output shaft speed. The OSS is used for torque converter clutch control, speed scheduling and to determine electronic pressure control.

Digital Transmission Range (TR) Sensor

The digital transmission range (TR) sensor is located on the outside of the transmission at the manual lever. The digital TR sensor completes the start circuit in Park and Neutral, the back-up lamp circuit in Reverse and the neutral sense circuit (4x4 only) in Neutral. The digital TR sensor also opens and closes a set of four switches that are monitored by the powertrain control module to determine the position of the manual lever (P, R, N, D, 2, 1).

Transmission Fluid Temperature (TFT) Sensor

- The transmission fluid temperature (TFT) sensor is a thermistor-type sensor that varies a reference voltage signal. The resistance in the TFT varies with temperature. The powertrain control module (PCM) monitors the voltage signal across the TFT, and uses this information to determine the transmission fluid temperature.

- The TFT is located on the main control body wiring harness assembly.

- The PCM uses the TFT signal to help determine shift scheduling, torque converter clutch operation and electronic pressure control (EPC).

It sends a voltage signal to the powertrain control module. The voltage signal varies with transmission fluid temperature. The PCM uses this signal to determine whether a cold start shift schedule is necessary. The shift schedule is compensated when the transmission fluid temperature is cold. The PCM also inhibits torque converter clutch (TCC) operation at low transmission fluid temperatures and corrects electronic pressure control.

Electronic Pressure Control (EPC) Solenoid

The electronic pressure control (EPC) solenoid is a variable force style (VFS) solenoid. The VFS type solenoid is an electro-hydraulic actuator combining a solenoid and a regulating valve.

The powertrain control module varies the current to the EPC solenoid.This action causes the solenoid to regulate transmission line pressure and line modulator pressure. This is done by producing resisting forces to the main regulator and line modulator circuits. These two solenoids control clutch application pressures.

Shift Solenoids — A, B, C, and D

Four On/Off shift solenoids allow the powertrain control module to control shift scheduling.

- The solenoids are two-way, normally open style.

- The shift solenoids (SSA, SSB, SSC, and SSD provide gear selection of 1st through 5th gears by controlling the pressures of the shift valves.

- SSD is also used to apply and release the coast clutch.

Torque Converter Clutch (TCC) Solenoid

The torque converter clutch (TCC) solenoid is used to control the apply and release of the TCC.
 

Sponsored Ad

TRS Events & Gatherings

Featured Rangers

Want to see your truck here? Share your photos and details in the forum.

TRS Latest Video

Official TRS Merchandise

Follow TRS On Instagram

TRS Ranger Sponsors


Product Suggestions

Back
Top