• Welcome Visitor! Please take a few seconds and Register for our forum. Even if you don't want to post, you can still 'Like' and react to posts.

4x4 SAS 5.0 dump truck build


I'm interested to see what you did to mount the piston for the bed to get it to work. I've been toying with the idea of installing one on my utility trailer for it's tilt bed so that the tilt can be controlled instead of being at the mercy of gravity and where the weight on the bed is at the time. I want to make it a manual pump system instead of a powered system though. So, I'm more interested in the piston setup than the pump and tank.

Sure thing, I’ll get some pictures of it. I know you said you aren’t interested in the wiring but I plan on doing a post about how I did the wiring for anyone else interested
 
Sure thing, I’ll get some pictures of it. I know you said you aren’t interested in the wiring but I plan on doing a post about how I did the wiring for anyone else interested

Understandable and thank you.
 
I finished up the Dana 44 axle shortening tonight. I followed the narrowing guide on this site. I took 6 inches off the housing so I can go with the 71-77 bronco axle shaft on the passenger side. I also welded up the diff spider gears. I’m waiting on the new ring and pinion to show up in the mail so I can start reassembly.

I welded up the corners of the spider gears and then laid a piece of flat stock in there and welded it on all sides. I think it will hold lol. My plan is to use the manual hubs unlocked for street driving and lock the hubs for off-road use.
1438922C-AF13-4901-9B92-8EB2E76F19BC.jpeg878C0CAC-6428-4B3E-B34B-35E380098AD4.jpeg1B51B52C-716B-43BF-BBA3-6B1C2D8E0A6F.jpeg
 
I welded up the front end of my rig. I recommend getting a ratcheting locker for the front and timing the shafts. I was able to turn just fine when I had a D44 and a lockrite. Now that I’ve got the D60 and I welded the diff, I can’t hardly turn and I feel the U-Joints in the wheel as it turns. I’m also running a saginaw pump for higher pressure.
 
I'm interested to see what you did to mount the piston for the bed to get it to work. I've been toying with the idea of installing one on my utility trailer for it's tilt bed so that the tilt can be controlled instead of being at the mercy of gravity and where the weight on the bed is at the time. I want to make it a manual pump system instead of a powered system though. So, I'm more interested in the piston setup than the pump and tank.
Some hydraulics 101:
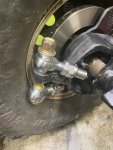
Liquids, i.e. water, hydraulic fluid, are incompressible, but they will turn into gas which will both expand and compress. So, if you don't want a hydraulic cylinder to be able to expand uncontrolled, you need to have a dual acting one - i.e. one with both input and exhaust ports. Then, of course, you need input and output hoses, and a double acting control valve. In most cases, i.e. assuming proper design, the risk of uncontrolled lift is minimal, so single acting is used, which it appears to be case for @Aeroflex truck - only one line to cylinder.​
In a trailer or dump truck, where >60% of the weight is ahead of the axle, and pivot point is very close to the rear of the box, you usually don't have an issue.​
But I have seen a couple spectacular failures, where the box was mounted 50/50 and pivot point was moved forward a few feet. (4 ton truck being stuck in grain elevator, with front wheels >6' in air and box wedged in rafters, being the most vivid)*.​
Note: a pickup box is mounted ~50/50 and if loaded with heavy material e.g. sticky, wet clay, you can get into similar situation.​

The portion of 
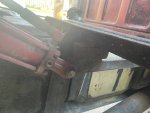
@Aeroflex solution I am most interested in, is the reinforcement of both the pickup bed and the rear frame. A pickup frame being designed to collapse in event of accident has been known to do so when overloaded by dump box/the pickup box counts on the truck frame for much of its strength.

*Thereafter the individual used jack stands a rear end of frame to prevent a reoccurrence & unloaded slower. That was less expense than the extra cost of all the extra components for a double acting solution.

p.s. On farm, our solution to the air compressor not being able to keep up with paint sprayer, was a couple expired 100lb propane cylinders. While they might not have been legal for holding propane anymore, they held enough compressed air for what we needed and cost was right. Something similar with handful of 20lb ex-barbeque tanks is probably easier for most people. Compressor would run for quite a while while we got ready. And you knew when it cut back in, it was time to stop.
 
@don4331 I posted a reply in my trailer thread instead of hijacking the OP's thread. You should get a bell notification from it.

 
Understandable and thank you.
Here are the photos of the hydraulic mounting. I bought the truck this way so I did not install it. Let me know if you guys see anything concerning I should address. I can get different angles or closer up if there is anything of particular interest to anyone.

View from the drivers side D1D0F386-395D-4C5A-AC9C-FC11FCBC87A8.jpeg85FC94F7-8880-4F66-85B6-4CE013138977.jpegDD66E507-B64F-4DFB-818B-1C5512F71AA5.jpegD3C2CEC8-E454-41DC-AECC-7354A5E22633.jpeg

the pivot point in the back 4B5ABC0A-E285-4F92-BA3E-8672388F5720.jpeg

View from the passengers side

ED19AA16-AB8F-431C-926A-336937A86337.jpeg3686D960-FB5C-40D4-9A3B-6EEDE235B565.jpegF41181E3-BBC2-4DF9-9CAF-9CC30B4B11B6.jpeg9B01F260-F103-42C9-811A-DA58A0A4ACC1.jpeg87B3ACDE-B2AB-4072-975E-B682546D8456.jpeg0326D4F9-5004-4E7F-A05F-27BFA7AD79C6.jpeg67B60939-2DB6-4676-B10B-E6B60FFFB995.jpeg
 

Attachments

  • E472B87F-ABA3-4FE6-A7CE-55B4F936365F.jpeg
    E472B87F-ABA3-4FE6-A7CE-55B4F936365F.jpeg
    152.6 KB · Views: 192
The only thing I’m not super sure on is the strength of the attachment to the cross brace for the base of the cylinder.
 
The base of the cylinder attachment was one of the portions I was most comfortable with - the most extreme force on that cross member is when the box is just starting to lift so almost horizontal - and there is a hefty brace to the next brace forward.

I have some minor concerns about the hinge connection to the rear frame - it looks like they are welded to the frame - there's just not a lot of material there.

My major concern is the box floor. The usual failure is the cylinder pushes through the floor/the box folds just ahead of the mount as it is no longer sitting on frame being supported. The commercial kits place 4 pieces of angle iron from the bed stiffener just behind the cylinder to the next one forward. And they similarly brace the hinges on the box to the next bed stiffener forward. As seen in this example: https://www.piercearrowinc.com/wp-content/uploads/834000893.jpg. Pierce Arrow used 3 pieces of rectangular tubing but you get the idea. The flat bars just don't have same strength, The one thing I don't like about the PA solution is they trust end user not to get carried away with tightening the bolts to the sheet metal of the bed. I think I would have included spacers to prevent crushing like Ford did for the OEM mounts.
 
That scissor action arm is neat.
 
Progress update...
As I mentioned in previous posts I wasn’t happy with the texture of painting it so put 3 compressors in parallel and resprayed it. I got a lot better results this time, it’s not car show quality but I’m happy with it for a backyard paint job.

B5998E63-2DB8-43DB-9F56-D25268F4D4D6.jpeg

D8670362-9E2C-40CC-9C24-86EDAAA86E29.jpeg


I also am finishing up a lot of the work on the narrowed Dana 44 front axle. I regeared it to 5.13 to match the rear end. The 9 inch build up was way easier then the Dana 44 btw. I also reamed out the knuckles to 3/4” for the heim joint cross over steering I will converting to.

1663451E-2325-4E6B-866D-6E430559DDE8.jpeg


Once I finish up cleaning a few more parts like the old radius arms and such, I plan on parking the ranger in the garage and blocking up the front end to do all the front SAS.
 

Attachments

  • E61EE0A2-F207-4DCE-976C-2EFBD151B1BA.jpeg
    E61EE0A2-F207-4DCE-976C-2EFBD151B1BA.jpeg
    159.7 KB · Views: 149
It’s been a little bit since I’ve posted so I wanted to check in with a status update.

I sprayed the bed with rattle can bed liner and installed a tailgate net. Pretty happy with how it turned out.

4777BC35-E5D4-4675-9930-B0F189401C46.jpeg


I backed the truck into my single car garage so when it’s time to work I just open the garage door and the front end is right there. I did this because I wanted decently level surface to work on. got started on the IFS tear down. I took an oxy acetylene torch to all the brackets I no longer needed and modified the cross member under the oil pan to create more clearance. I am still working through how exactly I want to set everything up for the front end I expect it to take some time.

527F3F5B-0B9A-40F4-96FD-C73C5369B506.jpeg
869D12BC-CB2C-469F-BD09-0369EFD155A4.jpeg
EB0CD4BD-D431-4904-947B-B225D2851E8A.jpeg
68BCD071-7DF3-475D-8402-087506D523E7.jpeg
 
Last edited:
The front end suspension has been harder to do but things are slowly coming together. Here’s a few progress pics. This is the first time sitting on its own weight with the new front suspension. Also shown is the offset bracket I made for the spring buckets. Since I narrowed the axle the mounting location needed to be moved outwards and have enough height to clear the knuckle. 18FEEE70-9ED9-4170-8404-BDF7C7038969.jpeg

21A61117-8300-4A11-A4B0-C8A20E012485.jpeg
 

Sponsored Ad


Sponsored Ad

TRS Events

Member & Vendor Upgrades

For a small yearly donation, you can support this forum and receive a 'Supporting Member' banner, or become a 'Supporting Vendor' and promote your products here. Click the banner to find out how.

Recently Featured

Want to see your truck here? Share your photos and details in the forum.

Ranger Adventure Video

TRS Merchandise

Follow TRS On Instagram

TRS Sponsors


Sponsored Ad


Sponsored Ad


Amazon Deals

Sponsored Ad

Back
Top