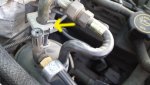
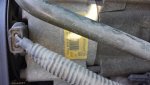
Thanks for the reply ..The first photo is where the 132 is pushing out...looked like an expansion valve (it is on the back of the compress) ...who knows!
That is actually a
low-side pressure relief valve. My Ranger had issues with that valve also (factory R-134a), so maybe this is a common issue (I'm not even sure what it's purpose is... the low side is never pressurized by the compressor, it's pressure actually
drops during operation.

My BII has no such valve at all on it's low side).
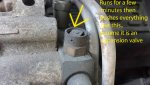
My issue was when running the engine in hot ambient temps with the A/C
OFF (especially at high elevation), that valve would release the freon to the atmosphere (defective in that it's pressure point was set too low). Unfortunately it didn't become obvious this is what was happening until after the warranty ran out I noticed the A/C was no longer cooling as well.
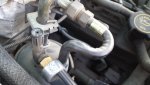
While fixing/recharging the system I blocked it off entirely (leaving the high-side relief valve & cutout switch in place for obvious reasons). Since then I've not had any further issues with it.
My suggestion would be to do the same, replace the orifice tube with a new one (they're $10, replace it), replace the accumulator (new desiccant), replace all the o-rings in the stsyem, then button it up and do a full evacuation and recharge on it (22 oz R-134a and 7 oz PAG46 oil IIRC).
Your old orifice tube looks relatively free of debris, however watch out for presence of thick black sludge (Black Death) when you pull the lines off the compressor and condenser for your o-rings. Black Death = replacement of those latter two items is required as well (in addition to replacing the discharge line too if it's got one of those muffler thingies on it).
Hope that helps.

")