• Welcome Visitor! Please take a few seconds and Register for our forum. Even if you don't want to post, you can still 'Like' and react to posts.

08 FX4 SAS


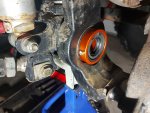
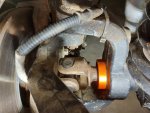
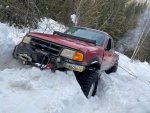
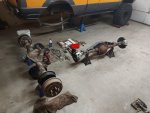
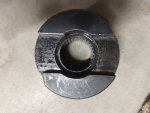
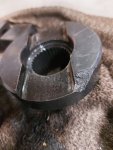
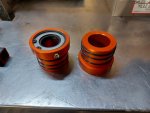
So the truck has been parked for the past couple of weeks. My front axle u joints and driver side hub were toast after my last trip out. So I got those replaced sometime last week. And I ordered some RCV outer axle tube seals which just arrived yesterday. It wasn't fun scraping the mud out from inside the axle so we'll have no more of that. I'll be putting those in this weekend.

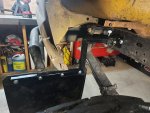
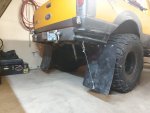
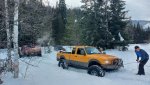
Also this weekend I'll be building some simple removable mud flaps. Something I can throw on for the highway then quickly remove while I'm airing down at the trail. I had to do a decent amount of fender trimming a little bit ago so I had to remove the long john flaps I had on there before. Now I just have my tires sticking out like 4 inches so I gotta get those covered up a bit. I do have some universal Pacer flexy flares to put on as well eventually.

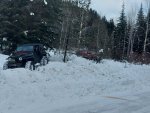
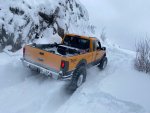
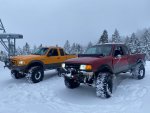
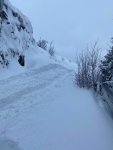
All of this is in preparation for next weekend. We will be heading back out to the Kootenays to stay with a buddy for a few days and do some decent snow wheeling. Its about a 4 hour trip each way so the truck needed some attention.

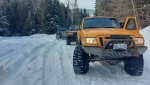
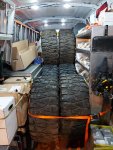
Oh and I found a good deal on some used 38" Nittos. Same tires I have now almost brand new. So I had to pick those up. I had no choice lol. I shouldn't have to buy tires for 3 or 4 years now.
 

Attachments

  • 269620343_675838500491902_7411375356126598815_n - Copy.jpg
    269620343_675838500491902_7411375356126598815_n - Copy.jpg
    171.5 KB · Views: 182
  • 270191745_645940969871172_3684901303535755068_n - Copy.jpg
    270191745_645940969871172_3684901303535755068_n - Copy.jpg
    171.2 KB · Views: 194
  • 271159137_192377486377486_31811268990608485_n - Copy.jpg
    271159137_192377486377486_31811268990608485_n - Copy.jpg
    98.2 KB · Views: 185
  • 271712131_909439032969865_24894171474840114_n.jpg
    271712131_909439032969865_24894171474840114_n.jpg
    95.1 KB · Views: 189
  • 270841198_646018219879298_4330483263625493623_n.jpg
    270841198_646018219879298_4330483263625493623_n.jpg
    134.3 KB · Views: 193
  • 270190229_663362151525201_8538618228922955466_n.jpg
    270190229_663362151525201_8538618228922955466_n.jpg
    152.2 KB · Views: 192
Tube seals are in and mud flaps are done. Ready for our trip next week (y)
 

Attachments

  • 271331860_453937562861939_5330140197770587065_n.jpg
    271331860_453937562861939_5330140197770587065_n.jpg
    129.3 KB · Views: 184
  • 271476793_904358976937993_1190161927252092144_n.jpg
    271476793_904358976937993_1190161927252092144_n.jpg
    114.9 KB · Views: 186
  • 271713230_4748201968579346_4167672731670592979_n.jpg
    271713230_4748201968579346_4167672731670592979_n.jpg
    128.3 KB · Views: 214
  • 271882818_4535603459884160_1446643146650776969_n.jpg
    271882818_4535603459884160_1446643146650776969_n.jpg
    76.1 KB · Views: 202
That's an interesting route on mud flaps with the cables... almost exactly what I did bracket wise (you added a set screw which I'm not sure is necessary but other than that...) but mine only go down just past half way down the tire... The only time I got pulled over for mud flaps I had forgot to put them back on... the cop gave me a REALLY GOOFY look when I asked if he wanted me to put them back on since I had them with me... he even told me no...
 
That's an interesting route on mud flaps with the cables... almost exactly what I did bracket wise (you added a set screw which I'm not sure is necessary but other than that...) but mine only go down just past half way down the tire... The only time I got pulled over for mud flaps I had forgot to put them back on... the cop gave me a REALLY GOOFY look when I asked if he wanted me to put them back on since I had them with me... he even told me no...

Ya the 1" tube I used didn't fit that tight so I added the set screw to hopefully prevent them from rattling too much. And I was considering cutting them shorter and getting rid of the cables but I'm gonna leave them for now. We'll see how it goes. They look tacky but if they prevent me from getting pulled over it's worth it.
 
You Canadians sure do take "Ranger" to an entire different level. @ericbphoto maybe a calendar shot for future use?

71263


Nice stack of spare tires you snagged too. I cringe a bit and don't even bother to see what ones of those cost new.

Enjoy your trip... stay safe and share the adventure when you get back.
 
You Canadians sure do take "Ranger" to an entire different level. @ericbphoto maybe a calendar shot for future use?

View attachment 71263

Nice stack of spare tires you snagged too. I cringe a bit and don't even bother to see what ones of those cost new.

Enjoy your trip... stay safe and share the adventure when you get back.
I always enjoy Bossley's snow pix.
 
What's the specs on the red Ranger?
 
What's the specs on the red Ranger?
Thats my buddies truck he calls Rodney. Front is a fully built Dana 30 with a true trac. Rear is a stock 28 spline 8.8 with a mini spool. 5.13 gears. 37" Toyo MTs. And a stock 4.0 with a 75 shot of Nitrous.
 
The sliders are finally done! I've been talking about doing these for almost two years lol. But I'm happy with the way they turned out. Bolt on was so much more work but worth it I think. Now I just gotta get out and beat them up.

As for the leaf springs, I've driven the truck around town a few times and they ride well. Pretty sure I'm going to do an Add-a-leaf to bring the rear end up a little bit though.
How did you manage to drill the holes for the sliders? I have already welded mounts with bolt plates to my sliders but have only been able to get like one or 2 holes drilled with a step bit being that it is so awkward to fit a drill and my hands up in between the cab and the frame. Let alone getting them in the exact spot lol
 
How did you manage to drill the holes for the sliders? I have already welded mounts with bolt plates to my sliders but have only been able to get like one or 2 holes drilled with a step bit being that it is so awkward to fit a drill and my hands up in between the cab and the frame. Let alone getting them in the exact spot lol

I managed to drill all my holes with a regular 18v milwaukee drill and some good hss bits. There was just enough room in there. My arms were sore after but I got it done.

I always start with a 1/8" pilot and go up a few sizes at a time from there. Makes it easier to stay on your mark and you don't have to work as hard. If you can't get the regular drill in there for whatever reason you can get a right angle drill instead. Or once you have your pilot holes drilled you can go from the inside of the frame. And don't over heat the bits or you'll just kill them and each hole will get harder as you go lol
 
Another helpful hint.

Put a small piece of pipe or tubing over your drill bit so that when it breaks through, it doesn't go too far and drill into something important like fuel tank, exhaust pipe, etc. This is a short piece of electrical conduit. PVC would work fine, too.

20220227_172241.jpg
 
Last edited:
Well nothing much is new but I realized I haven't been on here in a while. It's a bit late but the Kootenays trip back in January went pretty well. Got to check out an old mine site. The snow was shit but still fun of course. Lots of shoveling and even some winching.

Only thing I've done to the truck since is put in a new battery. The old Optima yellow top finally quit on me after 10 years. So I got another one. (y)

I dont have many plans for trips in the near future. Just some camping this summer which will most likely be in the wifes Jeep. And I still walk past the half finished explorer axle everyday lol. I get around to it one of these days...
 

Attachments

  • 271936928_609796736761214_8460774636434342848_n.jpg
    271936928_609796736761214_8460774636434342848_n.jpg
    134.7 KB · Views: 150
  • 272070551_756452805745475_5040947974653959225_n.jpg
    272070551_756452805745475_5040947974653959225_n.jpg
    203 KB · Views: 151
  • 272073007_360533945516345_373866124914647758_n.jpg
    272073007_360533945516345_373866124914647758_n.jpg
    267.5 KB · Views: 139
  • 272176655_304680261622344_6352897976035273020_n.jpg
    272176655_304680261622344_6352897976035273020_n.jpg
    273.8 KB · Views: 141
  • 279592990_529792295519087_6476865987553512734_n.jpg
    279592990_529792295519087_6476865987553512734_n.jpg
    131.8 KB · Views: 142
The Explorer axle swap is finally under way. So far so good.

Also here's what my mini spool looks like after 3 years of abuse. I'm honestly impressed. Not bad for $150.
 

Attachments

  • 20220625_143056.jpg
    20220625_143056.jpg
    181 KB · Views: 156
  • 20220625_193413.jpg
    20220625_193413.jpg
    174.7 KB · Views: 162
  • 20220625_195526.jpg
    20220625_195526.jpg
    137 KB · Views: 144
  • 20220625_195513.jpg
    20220625_195513.jpg
    109.8 KB · Views: 157

Sponsored Ad


Sponsored Ad

TRS Events

Member & Vendor Upgrades

For a small yearly donation, you can support this forum and receive a 'Supporting Member' banner, or become a 'Supporting Vendor' and promote your products here. Click the banner to find out how.

Latest posts

Recently Featured

Want to see your truck here? Share your photos and details in the forum.

Ranger Adventure Video

TRS Merchandise

Follow TRS On Instagram

TRS Sponsors


Sponsored Ad


Sponsored Ad


Amazon Deals

Sponsored Ad

Back
Top