
Introduction
Ford started building the Cologne 2.8L V6 in 1974 and offered it in the United States from 1974 until 1986. The 2.8L received fuel injection for the European market, but it never saw a fuel injection in the U.S. This article covers how you can add the Holley Sniper EFI 2300 Electronic Fuel Injection to your Ford 2.8L V6.
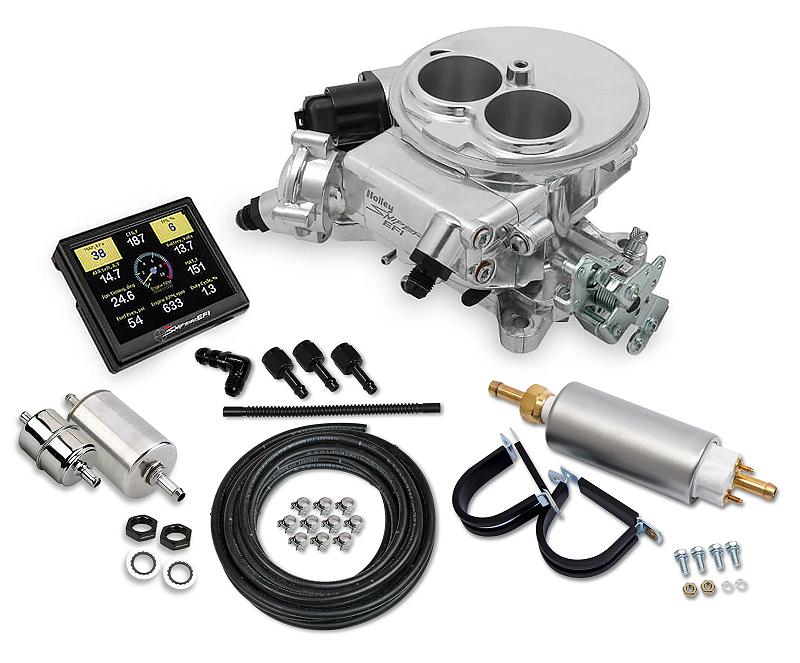
Holley Sniper EFI 2300
With the Holley Sniper EFI 2300, you can put an end to cold start issues, hesitations, vapor lock, and engine flooding on many vehicle applications. Our kit is the easiest way to upgrade to EFI in a cost-efficient package with just four connections to get started. This kit is capable of supporting up to 350 HP naturally aspirated or 285 HP forced induction with (2) 100 lb./hr. fuel injectors. Sniper 2300 was designed to be installed at home in your garage with minimal tools and the support of Holley’s comprehensive installation manuals and online videos. The high resolution 3.5” LCD touchscreen user-friendly setup wizard has you answer a few simple questions about your engine and the system will begin self-tuning with no laptop or tuning experience required. This kit also includes 20 ft. of 3/8″ Earl’s Vapor Guard fuel hoses, fuel pump, fuel filters, and all necessary hardware for installation to return fuel into your fuel tank. For a more comprehensive installation and maximizing performance, check out our HyperSpark Ignition, air cleaners, and digital dashes.
You can purchase this as a Master Kit which includes the fuel pump, filters, and fuel line, or with just the O2 sensor, coolant temp sensor, throttle body assembly, harnesses, and 3.5″ touch screen controller.
Features:
- Self-tuning ECU with intuitive setup calibration wizard creating a base tune
- Supports up to 350 HP naturally aspirated or 285 HP forced induction
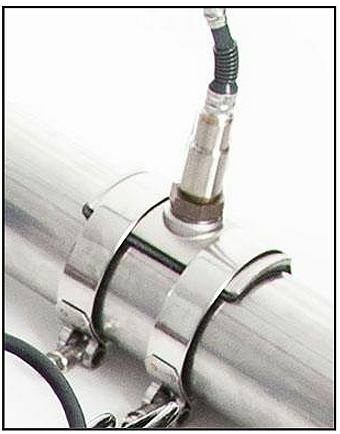
- Bosch LSU 4.9 Wideband O2 Sensor provides real time fuel map learning, with a no welding stainless steel O2 flange and T-bolt clamps
- Accepts many common 5 1/8″ OEM or aftermarket air cleaner assemblies
- Bolt on 2300 Flange Carburetor Replacement
- (2) 100 lb./hr. fuel injectors with complete fuel system consisting of 20 ft. of 3/8″ Earl’s Vapor Guard fuel hoses, fuel pump, fuel filters, and all necessary hardware
- 3.5” LCD touchscreen handheld for real time data logging, initial setup, tuning, and gauge displays to view and monitor parameters with SD card to save key information
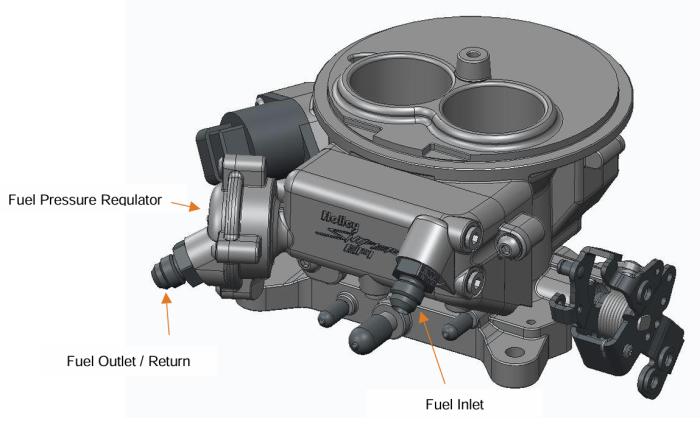
- Internal fuel pressure regulator eliminates the hassle of plumbing an external fuel pressure regulator (Preset to 58.5 PSI)
- Equipped with C4 / C6 Ford transmission kickdown lever along with TH350, TH400, and 700R4 provisions
- (4) wiring connections required for throttle body installation (battery+, battery-, switched ignition, and RPM)
- ECU mounted to throttle body removing extra mounting and reducing RF noise
Specifications
- Flange Style: 2300
- Fuel Pressure: 58.5 PSI
- Fuel Pump Flow Rating: 240 LPH
- Height: 3.28″
- CFM: 580
- Injector Size: 2x 100 lb/hr @ 58.5 PSI
- Inlet / Outlet Size: 9/16-18 Female O-Ring (AN 6)
- MAP Sensor: 2 Bar
Mounting It To Your Stock Intake
1974 Ford Mustang II 2.8L – This engine used a Holley 5200 carburetor with a 92x45mm mounting flange bolt pattern. You have to convert it to a Holley 2300 5.16×3.46″ mounting flange bolt pattern. It does NOT have the proper carburetor flange bolt pattern to mount the Holley Sniper.
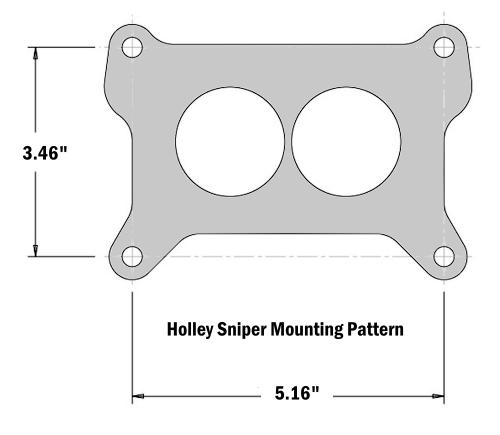
You’ll need the two-barrel carb spacer used for the 1975-1979 Ford Mustang and Pinto, or the carb spacer used on the 1983-1985 Ford Ranger, 1984-1985 Ford Bronco II, and 1986 Ford Aerostar as shown below. Plug any openings in the spacer that were once used for vacuum & emissions. You can also get a Weber to Holley 2300 adapter if you can’t find a factory spacer. In addition to the factory spacer to adapt the bolt pattern, you’ll need a Holley 2BBL Carb Spacer to make sure that the Sniper EFI clears the valve covers.
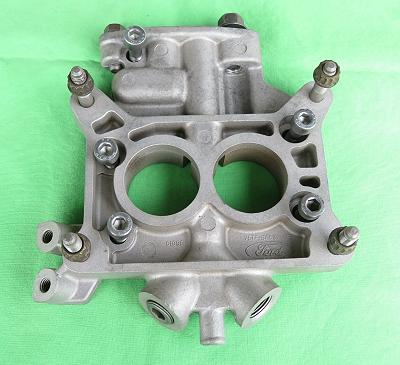
1975-1979 Ford Mustang and Pinto carburetor spacer
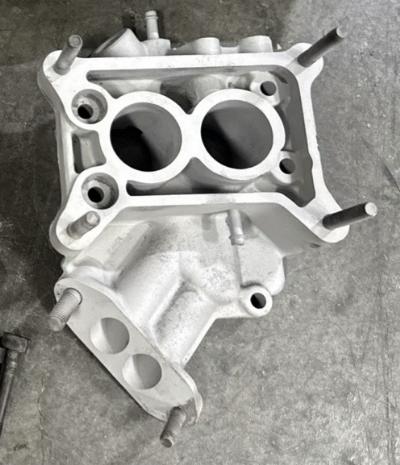
1983-1985 Ford Ranger, 1984-1985 Bronco II, or 1986 Ford Aerostar carburetor spacer

Weber to Holley 2300 carburetor adapter base – Converts 92x45mm to Holley 2300
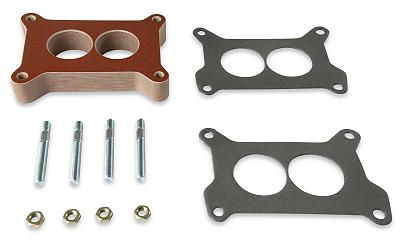
All Other 1975-1986 Ford 2.8’s – The Holley Sniper EFI will bolt to your factory spacer, but you’re going to need to add the Holley 2BBL Manifold Spacer to make sure that the Sniper EFI clears the valve covers.
Installation Overview
There is a link to a pdf of the entire directions. This is just going to be an overview.
Remove Carb & Mount Throttle Body
1. Start by labeling all vacuum lines for easy identification, i.e. brake booster & vacuum advance for distributor. If any lines appear damaged, now is the time to replace them. Next, remove the carburetor, clean the gasket mating surface, and install the provided intake flange gasket on the intake manifold.
2. Place the Sniper EFI throttle body on top of the new flange gasket on the manifold. Install the hold down nuts and snug down progressively in a “criss-cross” pattern (60-80 in./lbs.). Depending on your application, this is also the time to install your throttle bracket and transmission kickdown brackets. You may be able to re-use the stock style throttle stud or transmission studs from your carburetor.
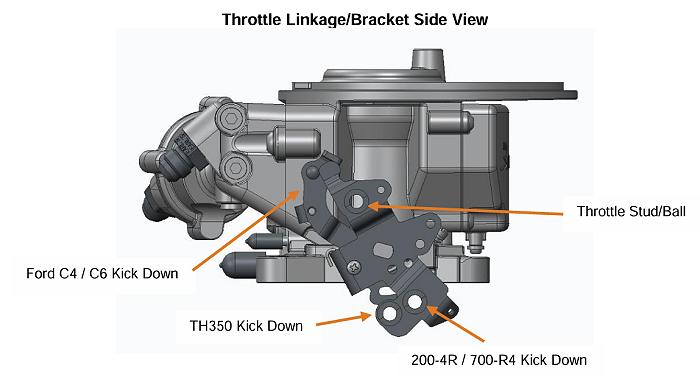
3. Reconnect the throttle and if applicable transmission kick-down linkage. Be sure to check for any binding conditions and correct before proceeding. Poorly routed throttle cables & linkages can cause throttle pedal issues.
4. Reconnect the appropriate vacuum hoses to the Sniper EFI throttle body. Be sure to plug any vacuum sources not used on both the Sniper EFI Throttle Body and on the Engine.

O2 Sensor
You’ll have to install the O2 sensor that comes with the kit. The kit comes with a mount so all you have to do is drill a hole in the exhaust, clamp on the mount, and install the sensor.
Coolant Temperature Sensor
Install the Coolant Temperature Sensor into a 3/8” NPT coolant passage in either the intake manifold or cylinder head. Do not overtighten or damage to the cylinder head or intake may occur. It is best to drain the some of the coolant before the sensor is installed. Use thread sealer or a small amount of thread tape. Do not install the sensor in the thermostat housing, or in an area that will not see a constant flow of coolant.

Fuel System
Connect fuel feed and return hose. It is mandatory that the fuel outlet/return comes from the fuel pressure regulator and the fuel inlet must go to the inlet fitting on the 2300 Sniper EFI. The inlet and outlet are indicated in Fuel Fitting Overview below. The Sniper EFI System comes with a built-in fuel pressure regulator, factory set at 58.5psi. We recommend at least a 3/8” feed line and 3/8” return line.
Note: Fuel pressure should be checked on the inlet fuel line before initial start-up during the fuel pump prime. We recommend Earl’s Part number 100187ERL (0-100 psi Liquid filled gauge) & AT100199ERL (-6AN Gauge Adapter) to check fuel pressure.
DANGER! Take precautions to ensure that all fuel components are away from heat sources, such as the engine or exhaust pipes. A fire or explosion hazard could cause serious injury or death!
DANGER! Before disconnecting or removing fuel lines, ensure the engine is cold. Do not smoke. Extinguish all open flames. An open flame, spark, or extreme heat near gasoline can result in a fire or explosion causing property damage, serious injury, and/or death.
DANGER! Never get under a vehicle supported only by a jack. Serious injury or death can result from vehicles falling off of jacks. Before working underneath a vehicle, support it solidly with jack stands.
Follow the instructions and make sure that you install the fuel system properly.
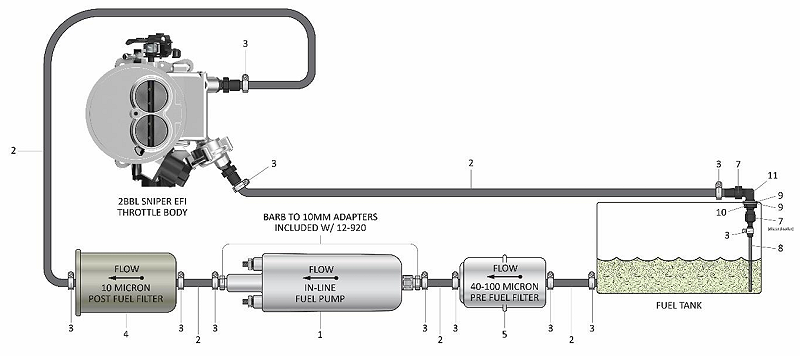
The Sniper EFI system requires a return fuel line to the fuel tank. The “Master Kit” includes the hose and fittings necessary for a return line installation on most vehicles.
ECU Wiring Overview
The Sniper EFI throttle body comes with sensors pre-wired for easy installation. The illustrated diagram below is intended as an overview of how the system should be wired. Remember, the main ECU power and ground must be connected directly to the battery AFTER all other wiring installation has been performed. The 8-pin connector applies to part numbers 550-852, 550-853 & 550-854.
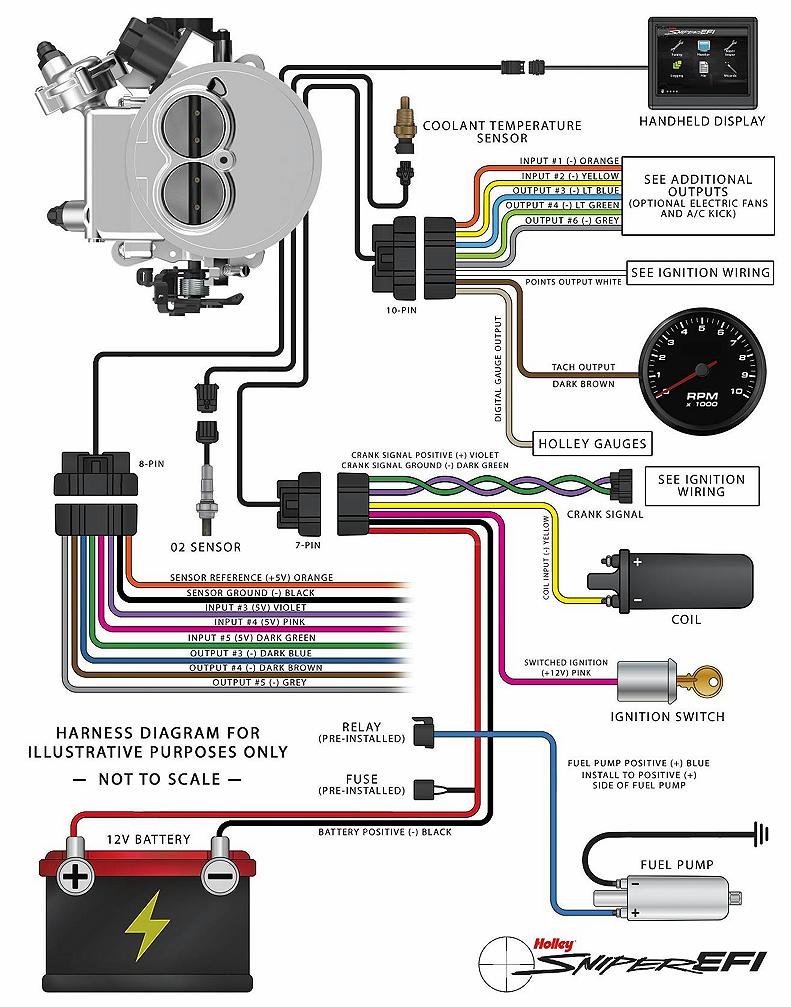
Pigtail & Loose Wire Connections
1. Pink Wire = 12V Switched – Should be connected to a switched +12 volt power source. Power source should only be active when the ignition is on. Make sure source has power when engine is cranking as well (check with voltmeter). Not all sources apply power when the ignition switch is in “cranking” position. DO NOT connect to a “DIRTY” source like an ignition coil!
2. Red Wire = Battery Positive – Connect directly to the battery post. This powers the Sniper EFI system.
3. Black Wire = Battery Negative – Connects directly to battery negative post.
4. Blue Wire (Optional) = +12v Fuel Pump Relay Power Output – Used to directly power a fuel pump (max current 15A). Make sure to terminate blue wire properly if not utilizing blue wire to provide power to the fuel pump.
The instructions are very detailed and cover all of the connections and includes photos.
The instructions cover a variety of ignition systems to cover your application.
There’s also detail instructions on how to setup the EFI with the included touchscreen.
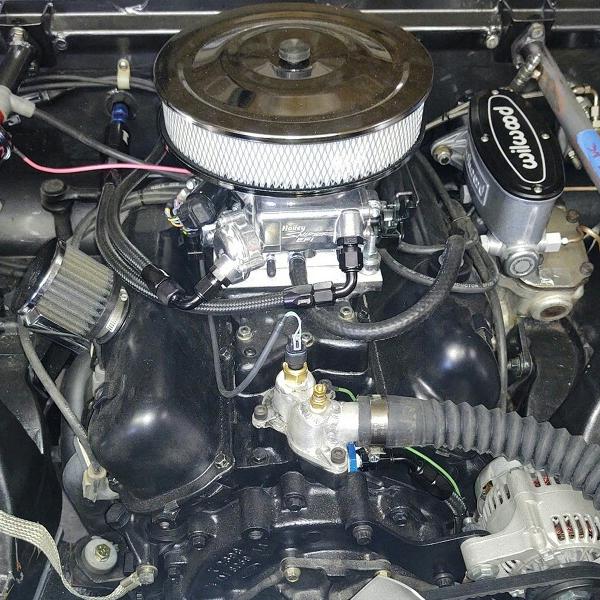
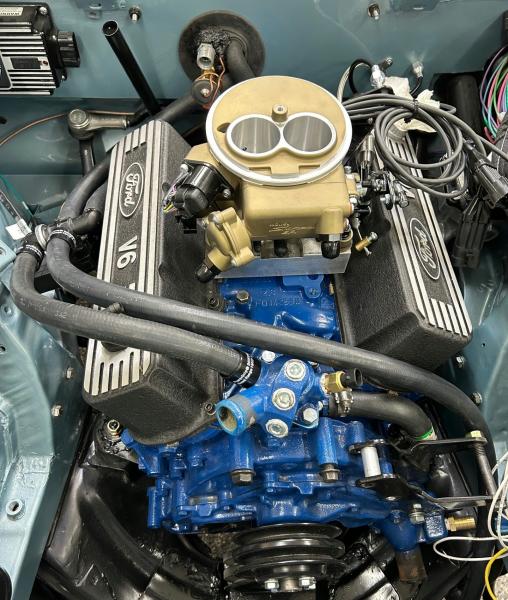
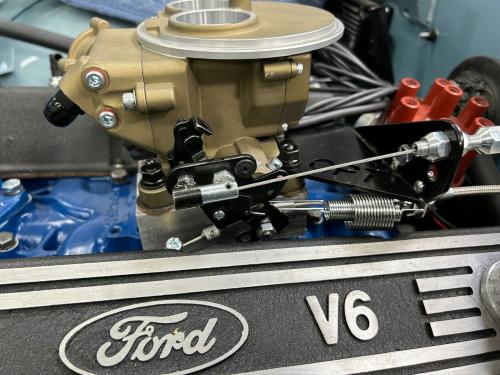
Installed photos
These next two are a ‘work in progress’.
Videos
Links
Holley Sniper EFI Installation Instructions
Summary
Holley has put together a well thought out electronic fuel injection system with detailed instructions that’s not difficult to install.
Related Articles
200 Horsepower From Ford 2.8 Liter V6
2.8L Chevy TBI Swap on to Ford 2.8
Fuel Injection For Your 2.8L Ford Ranger
About The Author
Jim Oaks is the founder of TheRangerStation.com, the longest-running Ford Ranger resource online since 1999. With over 25 years of hands-on experience building and modifying Ford Rangers — including magazine-featured builds like Project Transformer — Jim has become one of the most trusted authorities in the Ford Ranger off-road and enthusiast space.
Since launching TheRangerStation.com, Jim has documented thousands of real-world Ranger builds, technical repairs, drivetrain swaps, suspension modifications, and off-road adventures contributed by owners worldwide. TheRangerStation.com has been referenced in print, video and online by enthusiasts, mechanics, and off-road builders looking for practical, and experience-based information.