
By colinrmitchell:
For 1993-1997 Ford Rangers
Well, I just got done fixing my heat in my 1997 2.3L. My heat had randomly and suddenly went out on me.
This is my first time working on heaters, but here’s a few things that may supplement a straight-forward heater core swap.
First, I made sure to track down all electrical and vacuum connections after I lowered the dashboard, to make sure that it was nothing mechanical or electrical. When I messed around with my intake earlier in the season, I may have accidentally disconnected the vacuum supply for the coolant valve for the heater core. This was located by the header on my 2.3L (passenger side probably, on others). It’s grey with a black 90 degree boot on the end, and it plugs into the bottom of the vacuum valve. Gotta have this to even get heat in the heater case.
Also, the different vents are operated by vacuum connections. There’s two behind the dash, just to the left of the radio. These work the vent/defrost and floor, respectively. There’s also one behind the glove compartment that operates the in-cab air recirculation. If you open the glovebox and lower it down (with the dash installed), you can see a rubbery, transparent blue connector and a white socket, that connects the vacuum tubes from the firewall/heater box to the dash. These allow you to switch where the air/heat comes from.
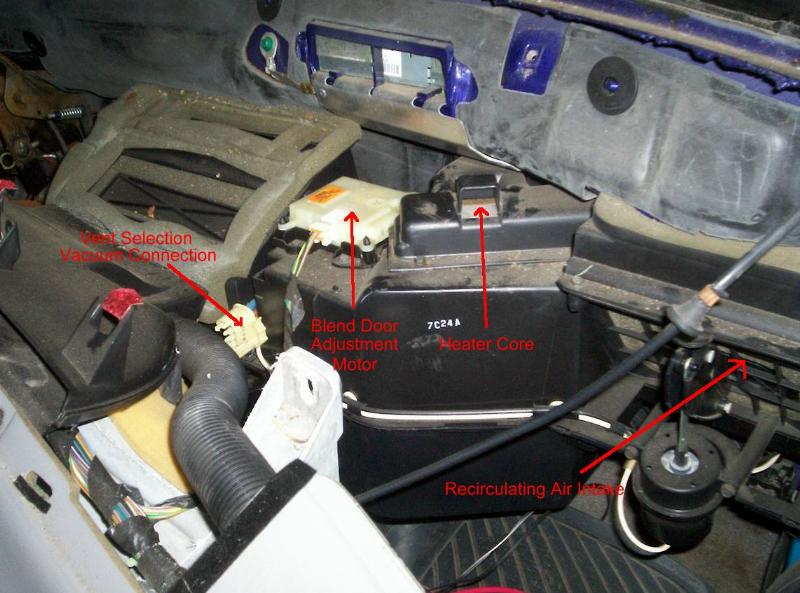
I replaced the heater core in my truck, but that didn’t turn out to be the problem. What may be the problem (and maybe you should check before ordering a new heater core, just in case) is if the blend door is functioning properly.
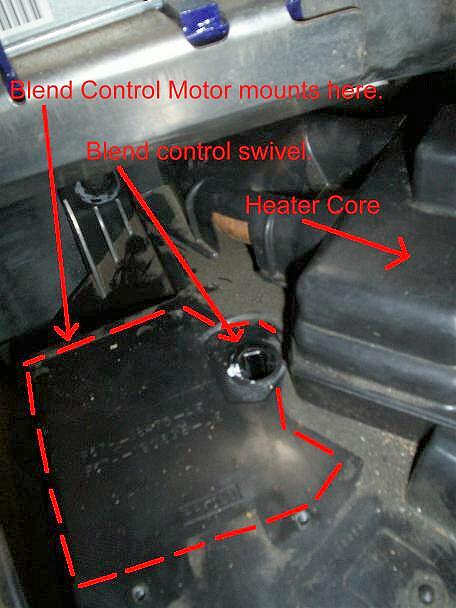
There is a white case that houses a motor and some gears, that operates the blend door according to the blend fader on the dashboard. A “key” comes out of the bottom, and connects into a socket in the blend door, where it swivels to control the levels of heated and unheated air entering the cab. My “socket” was broken, and the motor would turn, but would slip through the socket and not turn the door. This left my blend door stuck in all-cool mode. Mine was pretty broken and would’ve taken a while to fix, so I just glued the door in the all-hot position, since I only use the air system for heat.
To aid the above narration, here’s a picture of “plugmonster” from the engine bay:
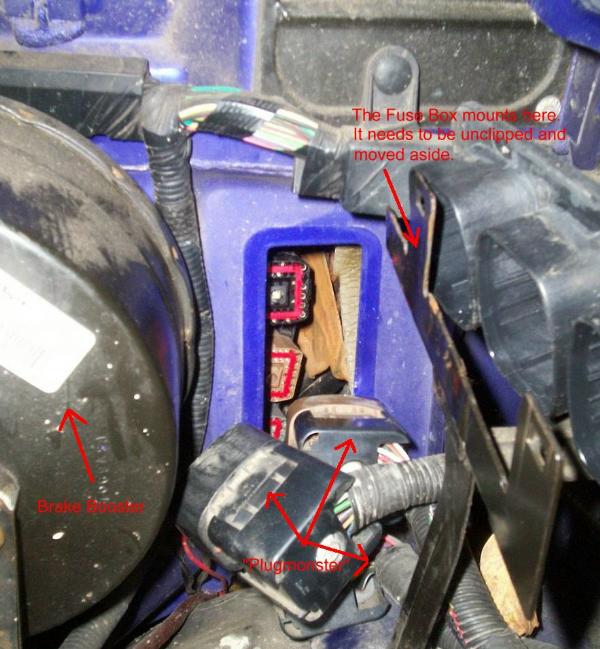
The in-dash heater case is held on with four bolts. Two are on the blower-motor case in the engine bay. These have double-nuts: there’s a nut, then the plastic blower motor case, then another nut, then the firewall. Make sure to take both of these bolts off! It took me a while to figure that out! There is another bolt in the very center of the firewall, just behind the engine block. It was a big pain to get to. There is also one in the passenger compartment, under the dashboard.

When you reinstall the dash, lower the glove compartment all the way, and make sure the blue vacuum plug and the connector for the blend door motor are installed. It wouldn’t hurt to recheck the coolant vacuum valve in the engine bay one more time, since it may get knocked out while messing with bolts.
I hope this helps a little. Wish I would’ve known this sooner before I blew $60 on a brand new heater core!!
Regards,
Colin.
Supplement:
By: Jim Oaks:
As Colin found out, the reason he wasn’t getting any heat wasn’t due to a bad heater core, it was from a broken blend door.
The blend door problem is common on the 1993-1997 Ford Ranger as well as some of the other Fords.
Understanding The Blend Door Problem:
The Ranger is built with a Blend Door to control the heater and AC function. The blend door controls air flowing through AC evaporator and diverts it into the vent system or through the heater coil, or any combination in between. The doors are controlled by a stepper motor. The issue with the system is that the system has to calibrate itself and find the end points of movement before the computer can understand the two closed positions and regulate the temperature. The photograph shows the blend door actuator motor for the Ranger. The fan gear is connected to the blend door and the motor is capable of moving the fan between the constraints of stopping against the motor case. The fan is a 90 degree fan. When it moves between the two stop points, it has 90 degrees of movement capability. The motor is capable of moving the door through a 90 degree arc, but the door hits the extents of movement at 50 degrees. The net effect is that the plastic doors have to absorb the force of the motor driving to a stall point. The motor is geared to move the doors slowly and with a good amount of force. The door has to withstand the force of stopping the motor, and like bending a coat hanger back and forth, will eventually break.
Getting To It:
You can access the actuator motor by fully opening the glove box (squeeze the sides of the box and pull out). The motor is located on top of the heater box behind the glove box door. There are two motor attachment schemes used on Ford. The older models used screws mounting the motor directly to the plenum box. With the screw attachment, you will see two 8mm head screws (note that a 5/16 socket will also work) in the front of the motor. These are easy to remove. There is a third screw that is directly behind the white connector socket that has to be removed with a thin profile ratchet. Remove the three screws and pry up on the motor to remove it. The second attachment method used on later models is a plastic housing that is screwed to the heater box with a plastic pinch attachment that the motor fits on to. The motor is removed by prying up first on the front of the motor and when the front connector releases, pry up on the back connector directly under and behind the white electrical connector. The motor will just pop out.
The picture of two blend doors shows the two most common fail modes. In one the motor connector splits, leaving half of the axle connector. In the other failure, the motor connector breaks completely off. The split failure is shown from the top. Once you have removed the motor, you can check by feel or with a mirror to see if the axle is completely broken off or has half remaining. Either fail mode indicates a broken blend door.
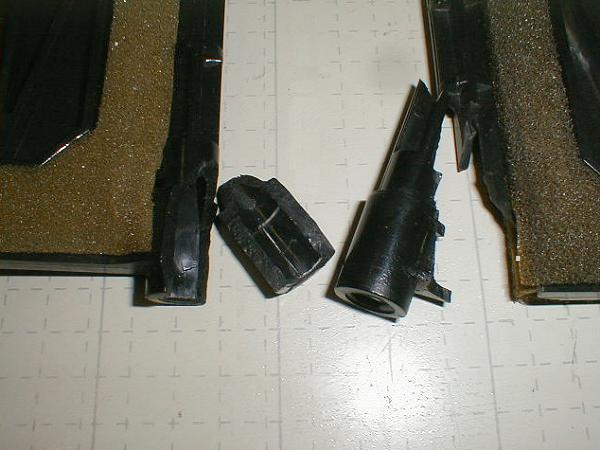
If either of the fail modes is evident, this is a conclusive diagnosis that the blend door needs to be replaced.
An alternative that has circulated on the internet is the ‘nail fix’. This can only be attempted with the split axle fail mode.
Another reported fail symptom is a clicking sound coming from behind the glove box. This occurs when the motor gears get out of alignment and are slipping against each other, making the noise. Sometimes you can make it stop by pushing down on the back of the motor and getting the gears to catch. The failure usually occurs with a broken blend door that allows the motor to get out of alignment and twist slightly, causing the gears to disengage.
The Nail Fix:
The first step is to remove the actuator motor and check to see if you have a split or broken connector (or no problem at all). There are two motor attachment schemes used on Ford. The older models used screws mounting the motor directly to the plenum box. Access the motor by fully opening the glove box and looking for the motor on top of the heater box in the upper left hand corner of the glove box opening. With the screw attachment, you will see two 8mm head screws (note that a 5/16 socket will also work) in the front of the motor. These are easy to remove. There is a third screw that is directly behind the white connector socket that has to be removed with a thin profile ratchet. Remove the three screws and pry up on the motor to remove it.
The second attachment method used on later models is a plastic housing that is screwed to the heater box with a plastic pinch attachment that the motor fits on to. The motor is removed by prying up first on the front of the motor and when the front connector releases, pry up on the back connector directly under and behind the white electrical connector. The motor will just pop out.
Refer to Fig.2 for the next step. Note that the photo is taken on a box that has been removed from an Explorer to get a clear view of the axle. You can use a small mirror or just feel the hole in the top of the box where the motor axle extends into the box. Fig.2 shows what the top of the blend door looks like with the split connector fail mode. The “V” shaped remainder of the axle will protrude slightly through the axle hole. If the axle is completely broken, there will be no remnants of the door connector visible.

Fig. 2
If the blend door connection looks like Fig. 2, the nail fix can be attempted. For a completely broken axle, the blend door needs to be replaced.
The motor connector( shown in Fig. 3) is a “dog house door” shaped axle. Looking down at the connector, the right angle of the remaining portion of the connector in Fig. 2 would align with the lower right hand corner of the dog house.
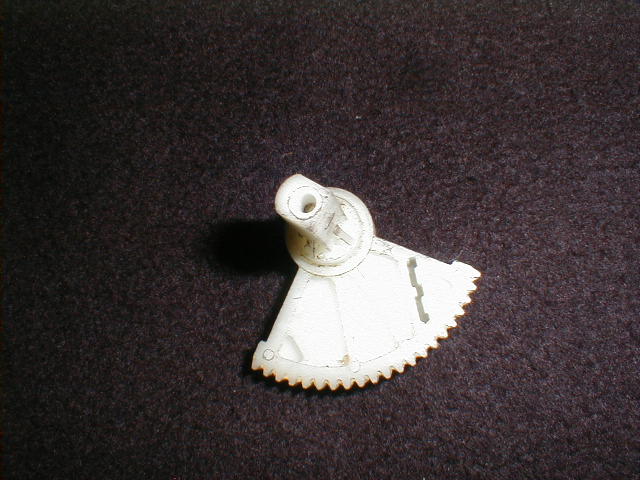
Fig. 3
The end of the axle protruding from the motor will look like this:

The trick is to get a nail through the axle to contact the two edges of the remaining half connector as shown below
The nail is placed through the axle, contacting the two sides of the remainder of the connector. Rotation is achieved by constraining the broken axle against the heater box opening and turning the motor axle. Note that the nail is shown going through the axle from the lower left to upper right of the dog house. This forces the lower right corner into the connector as it was originally positioned before the connector broke. The standard fix found on the internet positions the nail as shown below.


Our best estimation is that this fix will kinda-sorta-almost-sometimes work. We have no way to conduct long term reliability assessments, so cannot make any statements about the life or potential damage that could be done by the nail fix. One concern is that the axle is not held securely in the center of the blend door connector. This will allow the axle to have some deflection from rotating about a constrained center point. The motor gears are designed to provide rotational force to the axle. If the axle moves out of alignment, this will produce a “twisting” force in the interface between the plastic gears. This could cause stripped gears or a meshing problem that could cause an unconstrained movement of the gears resulting in a “clicking” noise. In our best estimation, the forces generated by the motor during the calibration cycle that caused the original problem of a broken axle will most likely also cause this fix to fail over time. We would consider this to be a temporary fix at best.
There is someone making a metal replacement door. They can be found at http://www.heatertreater.net/
About The Author
Jim Oaks is the founder of TheRangerStation.com, the longest-running Ford Ranger resource online since 1999. With over 25 years of hands-on experience building and modifying Ford Rangers — including magazine-featured builds like Project Transformer — Jim has become one of the most trusted authorities in the Ford Ranger off-road and enthusiast space.
Since launching TheRangerStation.com, Jim has documented thousands of real-world Ranger builds, technical repairs, drivetrain swaps, suspension modifications, and off-road adventures contributed by owners worldwide. TheRangerStation.com has been referenced in print, video and online by enthusiasts, mechanics, and off-road builders looking for practical, and experience-based information.