
Dana 28 to Dana 35 TTB Axle Swap – Ford Ranger 4×4 (1983–1997)
Quick Answer: Swapping a Dana 28 TTB to a Dana 35 TTB in a 1983–1997 Ford Ranger 4×4 is a straightforward upgrade that significantly improves axle strength, parts availability, and compatibility with lower gears, lockers, and larger tires.
Jump to Strength Comparison
Introduction
After several years of running a Dana 28 TTB front axle in my 1983 Ford Ranger 4×4, I finally decided to replace it with a Dana 35 TTB. This is what’s involved in doing the swap.
Why You Should Swap
The Dana 28 is a much weaker axle then the Dana 35, and parts are much harder to find for a Dana 28. If you’re still using a stock tire size or at least not exceeding a 31-inch tire, and you’re not using the 4WD for any serious off-roading, then you’ll probably be fine with the Dana 28. But if you want to add larger tires, change the gear ratios, or add a locker, then you need to swap in a Dana 35
For me personally, I wanted to add a locker and 4.56 gears to run 33-inch tires, so I needed to make this swap.
What’s Involved In The Swap?
The swap to the Dana 35 is pretty straightforward. I replaced the Dana 28 in my 1983 Ranger 4×4 with a Dana 35 out of a 1994 Ford Explorer. You can use your existing radius arms and suspension brackets.
Brake Upgrade
The 1995–1997 Ford Ranger Dana 35 uses a dual piston caliper and is a brake upgrade over your Dana 28 single piston brakes.
The 1990–1994 Ford Ranger & Ford Explorer Dana 35 use the single piston brake caliper.
Using a Dana 35 from a 1995–1997 Ford Ranger will give you the best factory brake setup.
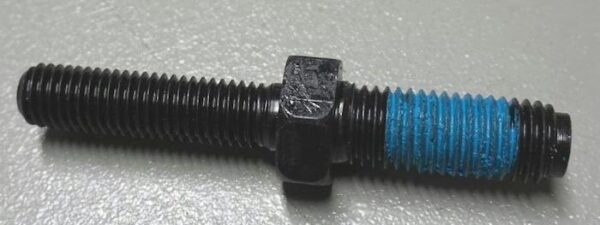
Radius Arm Stud Bolts
The Dana 28 upper radius arm stud (bolt) uses a small lower thread and large upper threaded stud. The Dana 35 uses a large lower thread and small upper thread retaining stud.
Sounds weird, but the Dana 35 and Dana 28 upper axle beam studs are the same diameters—just flipped over. Make sure you get the Dana 35 studs. If not, you can turn over the Dana 28 studs and cut off the excess thread to clear the axle shafts in the axle beam. You’ll have to get the right size nuts though.
The easiest thing to do (what I did) was buy two (2) new studs from a Ford dealer. They come in a set of two (2) with retaining nuts for the coil spring.
The Ford P/N is 390678-S100.
The 1980–1996 Ford F-150 4×4 and the 1980–1996 Ford Bronco use this same stud. You can get a replacement through Ford using that part number, or from Bronco Graveyard.
You may find that you have to increase the size of the hole in your radius arm and sway bar mounting bracket if you use the Dana 28 radius arms. I was already using Skyjacker Extended Radius Arms, so this didn’t apply to me.
Removing the Coil Spring Stud
When I remove a coil spring, I jack up the truck, place heavy-duty jack stands under the frame rails, remove the tires, remove the brake calipers, remove the front shocks and then lower the jack from under the axle beam to remove the tension from the coil spring.
Disconnect the sway bar if you have one. The spring will usually stay stuck in the upper coil mount, but some pressure on the top of the rotor from my foot usually gets it to pop out. The spring is held in at the bottom by the retaining stud, so it’s not going to launch out.
The nut on the stud takes a 1-1/8″ deep socket, a breaker bar, and some strength to get it loose. I typically slide a long pipe over my breaker bar for more leverage. I don’t use an extension to reach down through the coil. You lose too much leverage with the extension. I drop the socket down though the top of the coil spring, position it onto the nut, and then slide my breaker bar between the coils and put it on the socket. Once you get it lose you can revert to a long extension or a wrench.
TIP: A propane torch will soften and release the Loctite Ford puts on the studs.
The bolt on the bottom of the axle beam / radius arm takes a 1-1/8″ socket. The radius arm pivot bolts take 21mm and 22mm sockets or wrenches. The nut on the stud at the rear of the radius arm takes a 28mm socket or wrench.
You’ll have to remove the steering linkage from the steering knuckle before you can remove the axle beam.
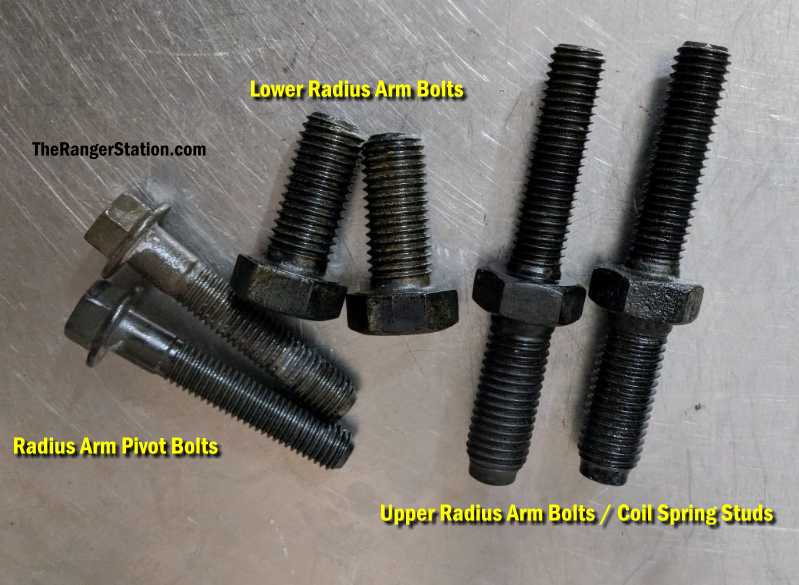
Below is a photo of:
- (2) 14mm axle pivot bolts
- (2) 3/4″ lower radius arm bolts
- (2) 3/4″ / 5/8″ upper radius arm bolts / coil spring studs
Front Driveshaft
The Dana 35 differential is larger than the Dana 28, so you’ll need to shorten the front driveshaft about 1 to 1-1/2 inches. This will require a reputable driveshaft shop.
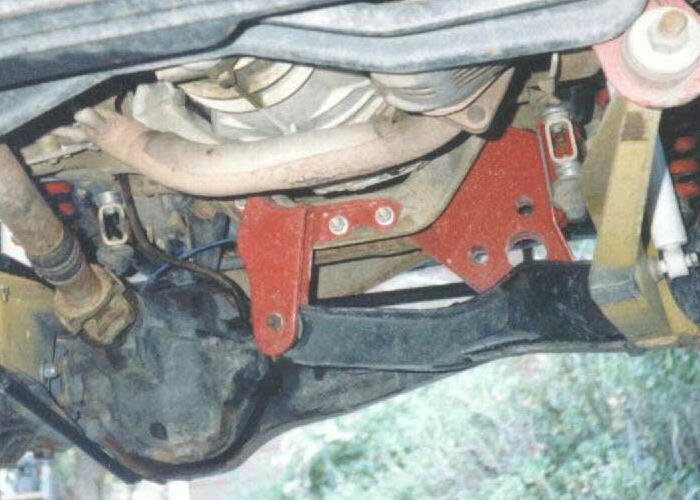
Suspension Bracket Warning
If you are using plate-style drop brackets (Rough Country & BDS) for the factory axle beam mount under the crossmember, check clearance between the Dana 35 carrier and the bracket. Failing to have a proper bump stop could cause the differential housing to strike the bracket and rupture the housing during suspension compression.
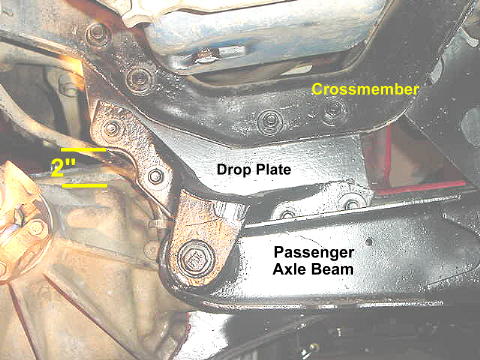
The photo above shows a plate-style drop bracket resulting in approximately 2-inches of clearance between the bracket and differential housing. The photo below shows the plate-style drop bracket compared to a Skyjacker replacement bracket that is not only strong but provides more clearance.
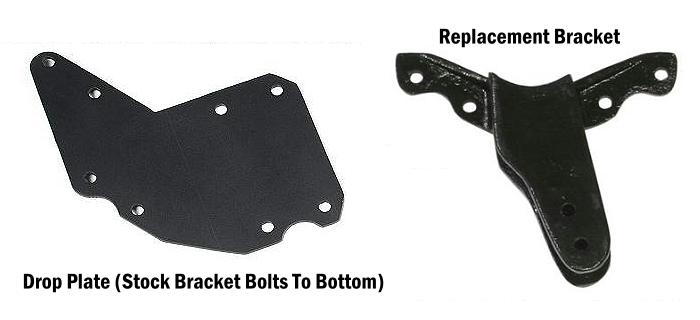
As a comparison, you can see in the photo below that the Skyjacker replacement bracket provides far greater space that not only prevents the differential from hitting it but gives you more room when removing the differential.
Mounting Tip
Place the radius arms in the rear mounting brackets and install the nuts loosely. This allows easier beam alignment. I waited to tighten the pivot bolts until everything was installed.
Torque Specifications
- Axle pivot Bracket Bolts
- Left axle arm ——————————- 83 to 113 ft. lbs.
- Right axle arm —————————– 155 ft. lbs.
- Axle Pivot bolt ———————————– 111 to 148 ft. lbs.
- Radius arm front bracket lower Bolt ——- 190 to 255 ft. lbs.
- Radius arm to front bracket upper Stud — 190 to 255 ft. lbs.
- Radius arm to front bracket front Bolts —- 15 to 27 ft. lbs.
- Radius arm to rear bracket Nut ————– 83 to 113 ft. lbs.
- Stabilizer bar link nuts ————————– 30 to 40 ft. lbs.
- Stabilizer bar bracket bolts ——————– 22 to 30 ft. lbs.
- Spring retainer nut ——————————- 70 to 100 ft. lbs.
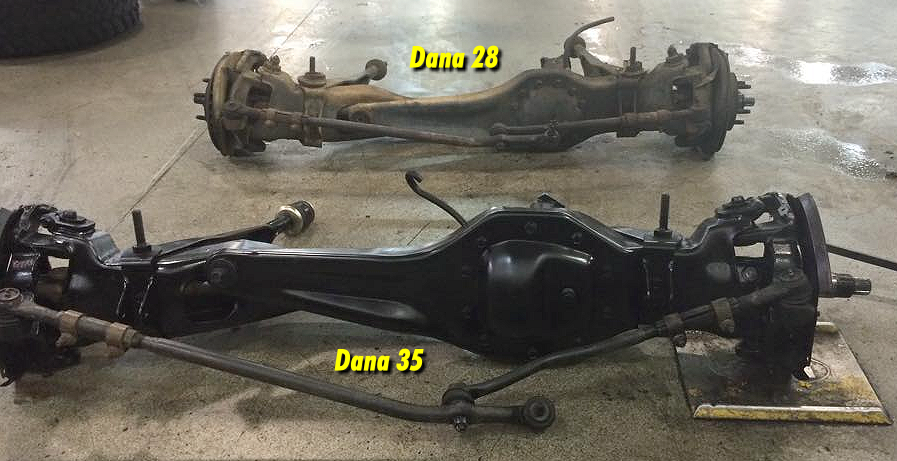
Dana 35 vs Dana 28 Size & Strength Comparisons
The photos below show the size difference between the Dana 35 and Dana 28 differentials.
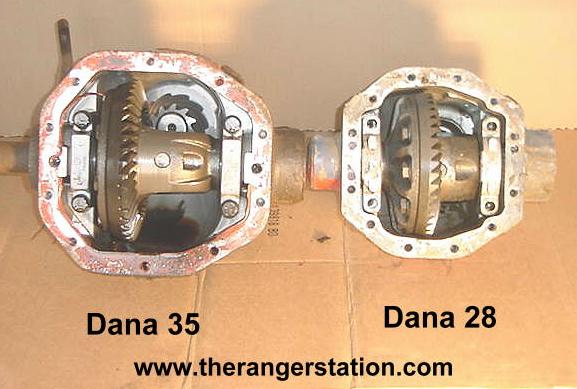
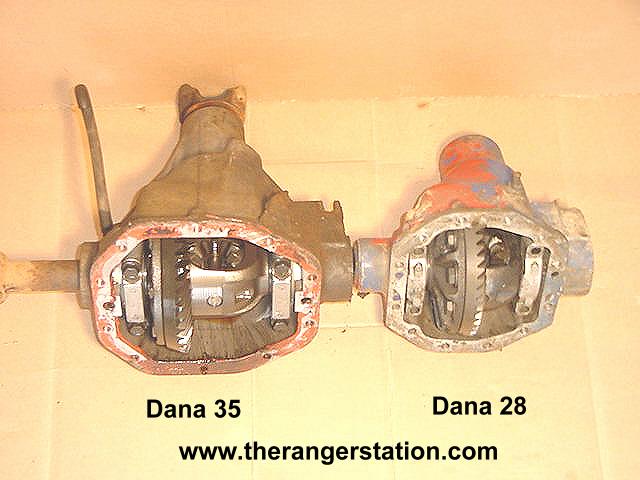
The following comparison shows why the Dana 35 is a significantly stronger axle than the Dana 28 and better suited for lockers, lower gears, and larger tires.
| Component | Dana 28 TTB | Dana 35 TTB | Why It Matters |
|---|---|---|---|
| Left Axle Shaft | 1.00″
23-spline |
1.16″
27-spline |
Thicker shafts and more splines increase torsional strength. |
| Right Axle Shaft | Outer: 1.00″
23-spline Inner: 1.19″ 28-spline |
Outer: 1.16″
Inner: 1.36″ 31-spline |
Stronger inner shafts handle locker and low-gear loads. |
| Axle Shaft & Slip Yoke | 1.00″
23-spline shaft 1.21″ 28-spline yoke |
1.16″
27-spline shaft 1.39″ 31-spline yoke |
Larger yokes resist wear and failure under suspension travel. |
| U-Joint Size | 5-456 | 5-760 | The 5-760 U-joint is significantly stronger and widely supported. |
| Spindle Bearing Surface | 1-5/8″ | 1-3/4″ | Larger bearing surfaces increase durability with larger tires. |
| Ring Gear Diameter | 6.625″ | 7.56″ | More tooth contact area equals higher torque capacity. |
| Pinion Stem Diameter | 1.312″ | 1.406″ | Thicker pinion resists deflection and breakage. |
| Wheel Mount Surface Width | 58″ | 59.5″ | Wider track improves stability, especially in Bronco II swaps. |
Frequently Asked Questions
Is the Dana 35 TTB a direct bolt-in replacement for the Dana 28?
Yes. The Dana 35 TTB bolts into the factory TTB suspension using the same radius arms and brackets.
The primary differences involve axle shaft strength, brakes, and front driveshaft length.
Do I need to replace my radius arms when swapping to a Dana 35?
No. Factory Dana 28 radius arms can be reused, though the coil spring stud and mounting hole sizes may need to be addressed depending on your setup.
Will a Dana 35 TTB handle lockers and 33-inch tires?
Yes. The Dana 35 TTB is significantly stronger than the Dana 28 and is well suited for lockers, lower gears, and 33-inch tires when properly built.
Conclusion
The 1995–1997 Dana 35 TTB is a great upgrade for the Dana 28 TTB. It’s not a difficult swap, but it does require shortening the front driveshaft.
Related Articles
1983–1997 Ford Ranger Dana 28 & Dana 35 TTB Front Axles
Dana 28 Parts Catalog / Exploded View
Dana 35 Parts Catalog / Exploded View
Dana 28 / Dana 35 Repair & Rebuild
1983-2011 Ford Ranger 4×4 Locking Hubs
Dana 44 Spindle & Hub Conversion On Dana 35 TTB
The Ford Ranger Front Suspension
Should You Replace A Dana 35 TTB With A Dana 44?
Beefing Up The Ford Ranger Dana 35 TTB
1983–1997 Ford Ranger TTB Suspension Modification Guide
1983-2011 Ford Ranger Off-Road Builders Guide
Last Updated:
About The Author
Jim Oaks is the founder of TheRangerStation.com, the longest-running Ford Ranger resource online since 1999. With over 25 years of hands-on experience building and modifying Ford Rangers — including magazine-featured builds like Project Transformer — Jim has become one of the most trusted authorities in the Ford Ranger off-road and enthusiast space.
Since launching TheRangerStation.com, Jim has documented thousands of real-world Ranger builds, technical repairs, drivetrain swaps, suspension modifications, and off-road adventures contributed by owners worldwide. TheRangerStation.com has been referenced in print, video and online by enthusiasts, mechanics, and off-road builders looking for practical, and experience-based information.