
Introduction
After purchasing an Explorer Bear 12V refrigerator I decided that I wanted to add an auxiliary battery to the toolbox in the bed of my 2021 Ford Ranger FX4. The Ford Ranger has an optional 12V outlet in the bed, and the wiring is there to add one if your Ranger didn’t come with it, but that circuit is controlled by a Battery Monitoring System (BMS). The Ford battery monitoring system is a smart power management setup that tracks battery usage, charging levels, and health in real-time. It debuted around 2011 and has become increasingly sophisticated—especially in start/stop-equipped vehicles. Your 2019+ Ford Ranger is programmed to shut off the power to the outlets after 1 hour and 15 minutes (4,500 seconds). You can extend the time to stay on longer through FORScan, but the BMS will shut the power off if it sees the battery getting low. You really don’t want to drain your starter battery running a refrigerator at your campsite.
DC to DC Charger ~ VS ~ Isolators / Solenoids
Back when I had my 1983 Ford Ranger 4×4 (TRS-1) I had a dual battery setup mounted in the bed. The setup was controlled by a Painless Wiring kit that used a solenoid. That’s still a reliable system to use on a 1983-2011 Ford Ranger, but you can’t use that system on the 2019 and newer Ford Rangers because they use a Smart Alternator.
Smart Alternators
A smart alternator is a modern type of vehicle alternator controlled by the engine’s Electronic Control Unit (ECU) to improve fuel efficiency and emissions. Unlike traditional alternators that constantly generate electricity at a fixed rate, smart alternators adjust their output based on the vehicle’s real-time electrical demands and battery condition.
Most modern vehicles post-2015 come with a Smart Alternator.
How a Smart Alternator Works
Smart alternators:
- Vary their output voltage depending on:
- Engine load
- Vehicle speed
- Battery state of charge
- Power demands from electrical components
- Often use regenerative charging, meaning:
- They charge the battery more during braking or deceleration (to recover energy that would otherwise be lost)
- They reduce or pause charging during acceleration to lower engine load and fuel consumption
Key Features
| Feature | Traditional Alternator | Smart Alternator |
|---|---|---|
| Charging Control | Fixed voltage (usually ~14V) | Variable voltage (typically 12.5–15V) |
| Controlled By | Internal voltage regulator | ECU (via LIN/CAN bus) |
| Charging Strategy | Constant | Adaptive / regenerative |
| Fuel Efficiency Impact | None | Improved (less engine drag) |
| Battery Management | Basic | Advanced (can protect or extend life) |
Pros and Cons
Pros:
- Better fuel economy (due to reduced engine load)
- Lower CO₂ emissions
- Smarter battery management
- Can prioritize charging from regenerative braking
Cons:
- Not ideal for auxiliary battery charging (e.g., camper vans, overlanding setups) unless a DC-DC charger is used
- More complex and expensive to replace or repair
- May not fully charge the battery under certain conditions
Important for Modifiers & Overlanders
If you’re adding a second (auxiliary) battery or using gear like a fridge or winch:
-
Smart alternators may not supply consistent voltage
- A DC-DC battery charger (like a Redarc, Renogy, or Victron unit) is often needed to ensure proper charging
Why Can’t I Use A Solenoid / Battery Isolator With A Smart Alternator?
You can’t reliably use a traditional dual battery solenoid (voltage-sensing relay, VSR) with a smart alternator because the charging voltage is inconsistent and often too low to trigger the solenoid properly.
The Core Problem
Traditional dual battery isolators/solenoids work like this:
- They detect when the main battery voltage rises above ~13.3–13.7V (indicating the alternator is charging)
- Then they connect the auxiliary battery to charge it
- When voltage drops (engine off or low charge), they disconnect to protect the main battery
Smart alternators, however:
- May limit charging voltage to ~12.4–12.8V under certain driving conditions
- Frequently vary output based on fuel economy strategies
- Don’t maintain the consistent high voltage a solenoid needs to stay closed
Result: Your solenoid may never close—or might open and close erratically—causing the second battery to stay uncharged or only partially charge.
Better Alternative: DC-DC Battery Charger
A DC-DC charger (also called a battery-to-battery or B2B charger):
- Actively regulates voltage to charge the second battery properly
- Are designed to work effectively with Smart Alternators, ensuring optimal charging even with fluctuating alternator output.
- Offer features like over-voltage, over-temperature, and reverse polarity protection, safeguarding both the batteries and the vehicle’s electrical system.
- Works with smart alternators, regenerative braking systems, and variable voltage
- Often includes MPPT solar input, battery chemistry settings (AGM, lithium, etc.), and protections
Popular DC-DC Chargers:
- Redarc BCDC1225D / 1240D (common for overlanders)
- Renogy DCC50S
- Victron Orion-Tr Smart
- CTEK D250SE
Real-World Example
If your 2023 Ford Ranger (with a smart alternator) only produces 12.6V at cruising speed, a solenoid won’t engage. But a DC-DC charger will still:
- Detect alternator input
- Boost voltage to 14.4V for proper charging
- Keep your fridge and accessories running reliably off the auxiliary battery
Installing An Auxiliary Battery In My 2021 Ford Ranger FX4
As mentioned in the introduction, I wanted to add an auxiliary battery to the toolbox in the bed of my Ford Ranger to power my 12V refrigerator when I’m camping and the truck isn’t running. The Battery Monitoring System (BMS) isn’t going to let the 12V outlet run all night, and the older dual battery setups like I had on my 1983 Ford Ranger won’t work on a modern system with a Smart Alternator. So, the obvious choice was to go with a Victron DC-to-DC charger.
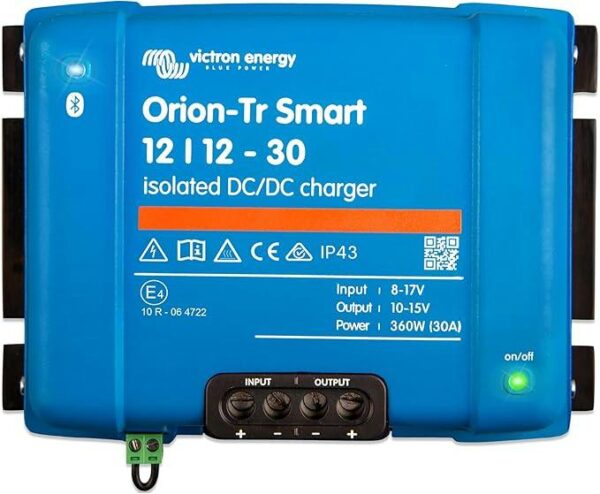
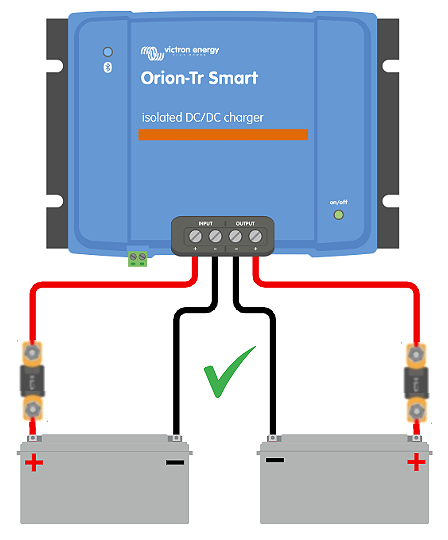
I’m using the Victron Isolated DC to DC Charger that’s rated at 30-amps. You can tell the difference between the isolated from the non-isolated because it has two ground cable connections instead of one.
The Victron charger requires a 60-amp fuse / breaker coming off the positive terminal of both batteries. I made a bracket to hold a 60-amp circuit breaker and attached it to the bracket next to the fuse box. Then I mounted the circuit breaker on top of it.
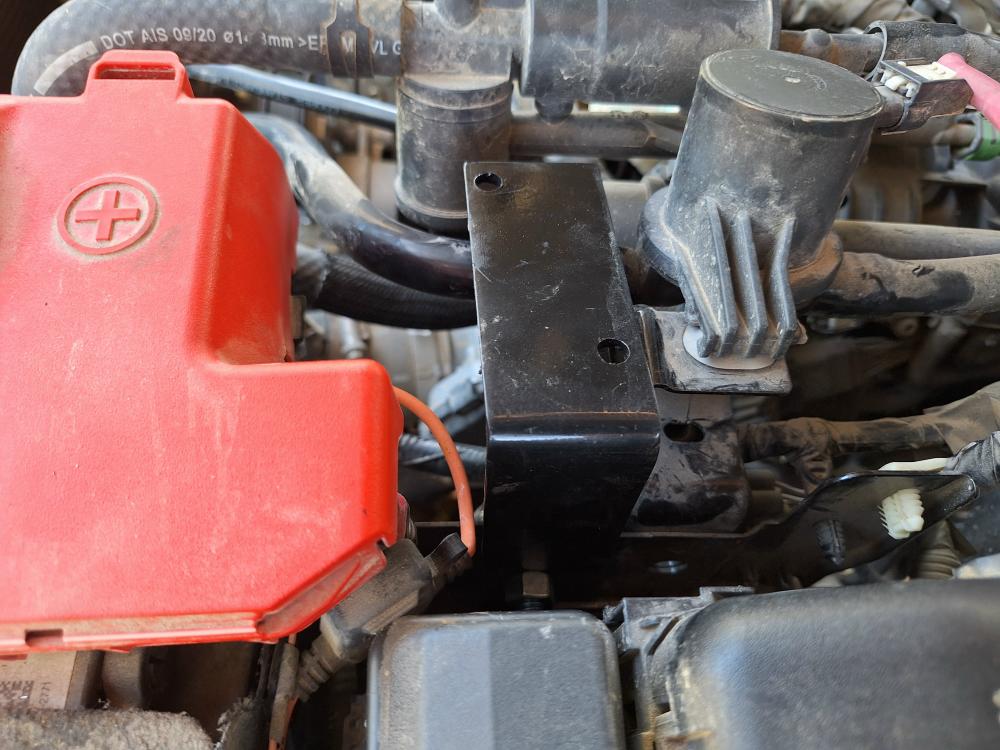
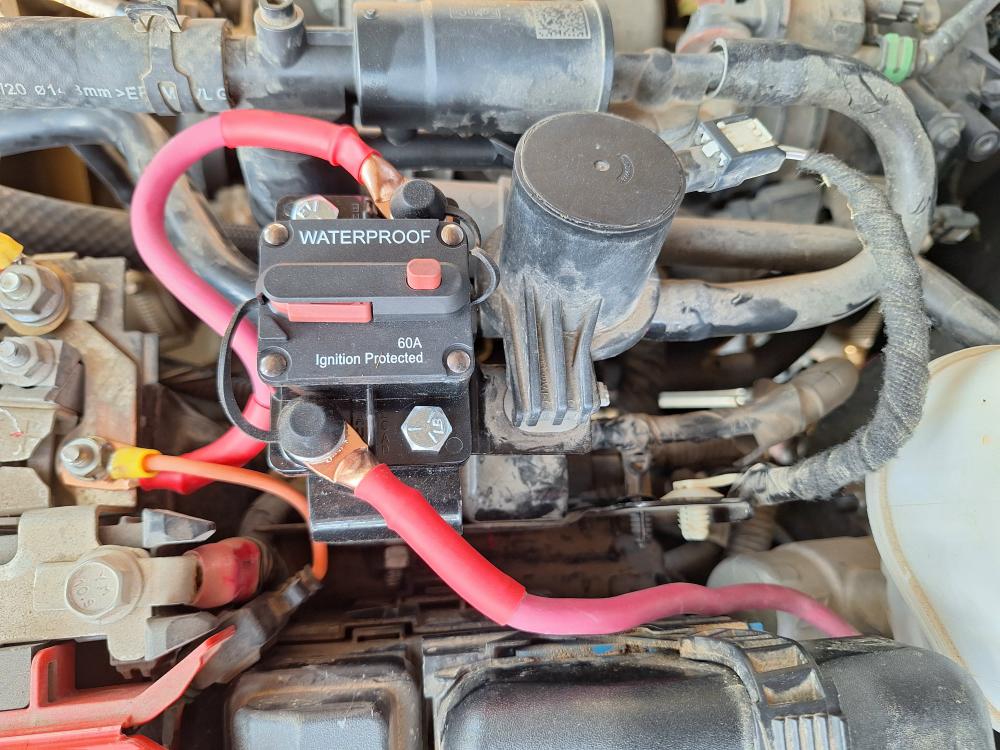
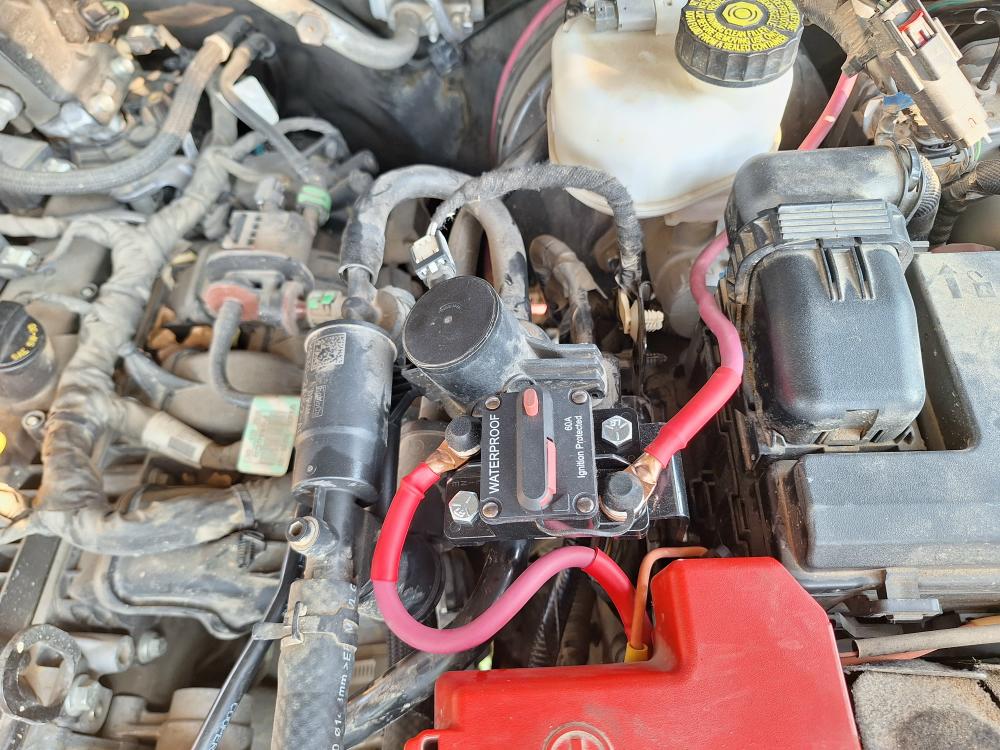
NOTE: DO NOT connect the power from your main battery to your Victron DC to DC charger yet. I took the photo above after my setup was complete.
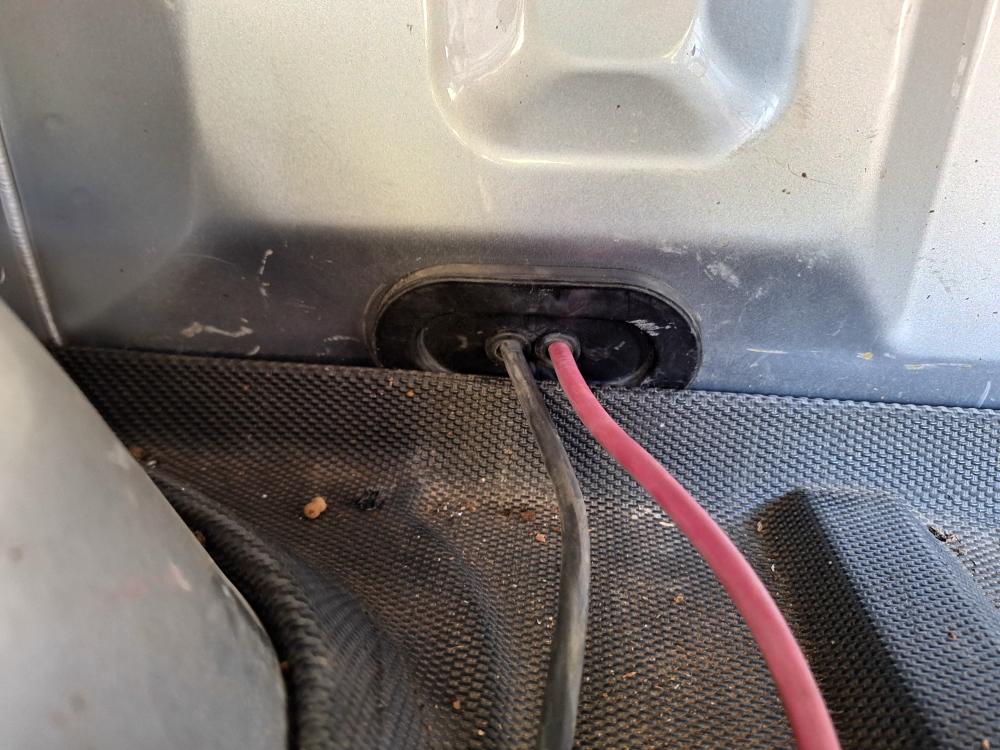
I ran a 6-gauge wire from the circuit breaker to the main battery, and another one back to the DC to DC charger in the bed. I ran the wire through the plastic plug in the bulkhead of the bed making sure that I installed a rubber grommet to protect it.
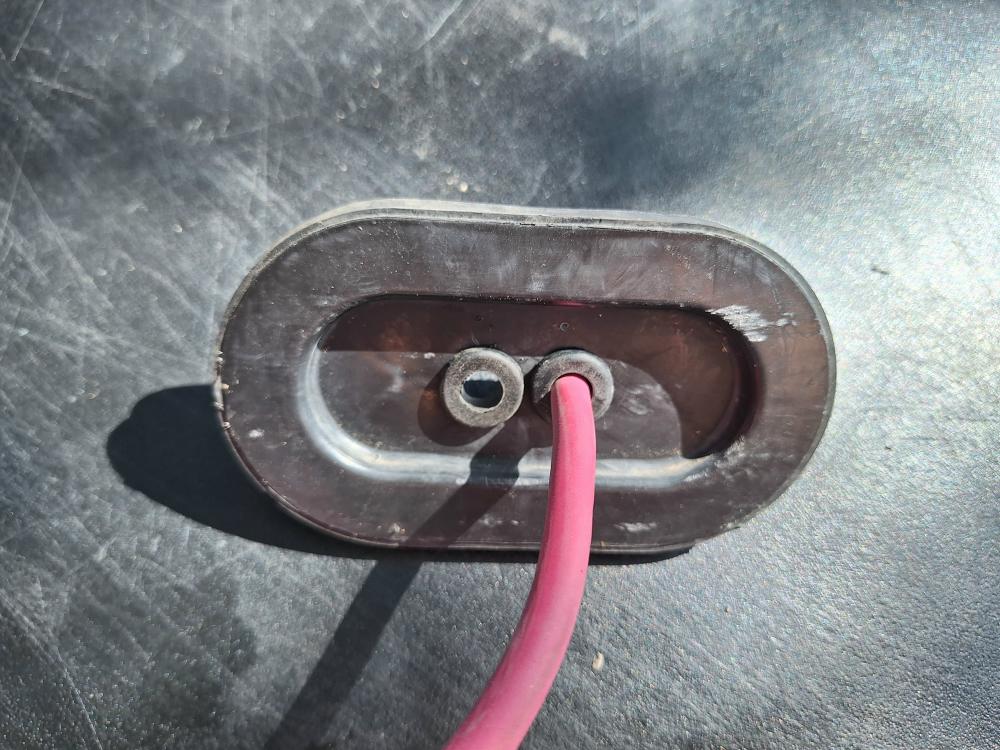
I also ran a ground wire from the driver’s side rear cab mount bracket up through the bed as well. There’s already a hole in the cab mount that you can bolt a wire to.
The DC to DC charger will get secured to the toolbox on my bed, and I added an Anderson 50-amp quick disconnect in case I should ever need to remove the toolbox from the bed.
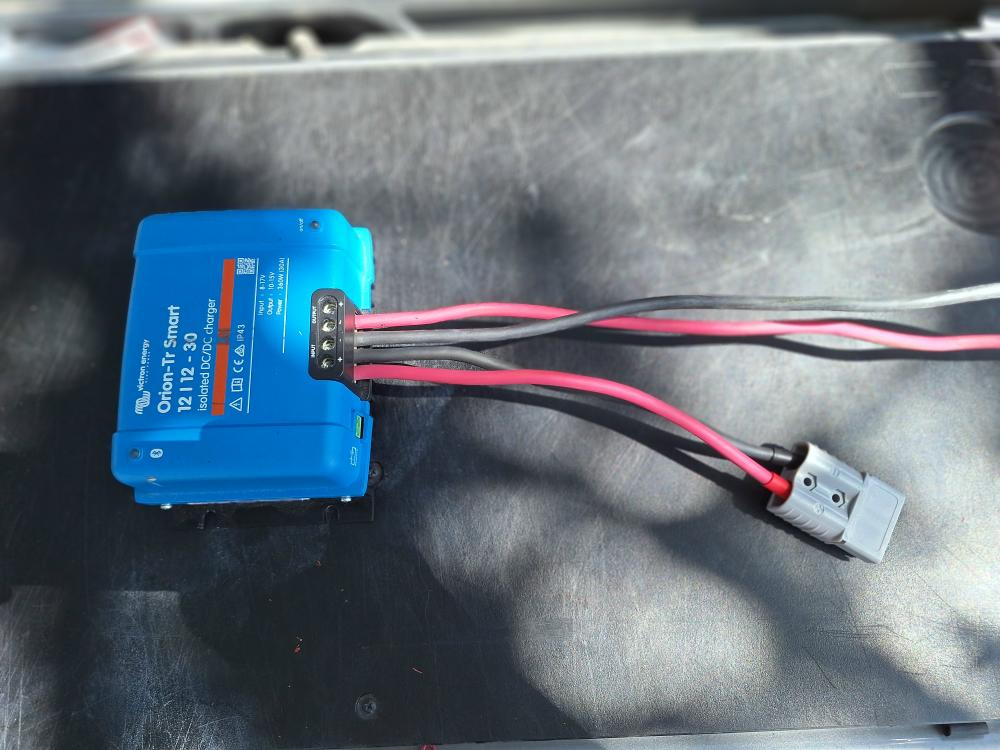
Below you can see the Victron DC to DC charger mounted on the side of my toolbox. You can’t mount it above the battery, and I was trying to not take up any more space in the toolbox than necessary, so I mounted it here. You’re supposed to be able to mount it under your hood and it has a protection rating of IP43 which means it’s protected from splashes of water, so it should be ok.
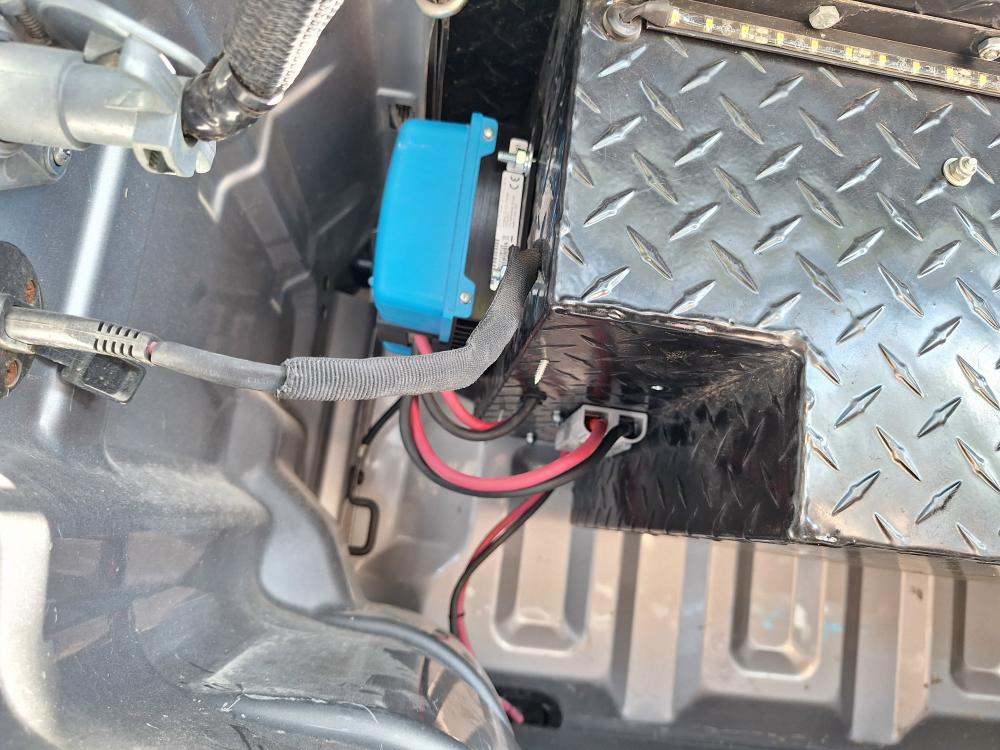
You can see where I attached to quick disconnect to the toolbox and the positive and ground cable run through rubber grommets into the toolbox to the battery.
DO NOT HOOK UP THE BATTERY YET / PROGRAMMING
Once the Victron DC to DC charger is mounted and wired, remove the green plug and connect the power from your main battery to the charger. You’ll have to connect to the charger using the ‘Victron Connect’ app.
This is an overview. Download the Victron manual for complete instructions.
You’ll be checking with the app to make sure the Victron is set to ‘Charger’. With newer vehicles you’ll want to make sure the ‘Alternator Type’ is set to ‘Smart Alternator’ and set your battery to the type of battery you’ll be charging.
Once you’ve followed the directions in the manual and the charger is programmed, you can connect to the battery you’re going to be charging and then reinstall the green plug.
The Victron can sense when your truck is running and charging, and when it shuts off.
The battery I’m using is a 100Ah Lifepo4 lithium battery held in place by a steel battery holder that mounts to the back of the toolbox. This allows me to set it on top of the ledge at the end of the toolbox to maximize my space and offers some side protection from anything sliding into it. You definitely want to make sure you don’t have anything loose that can hit and damage it.
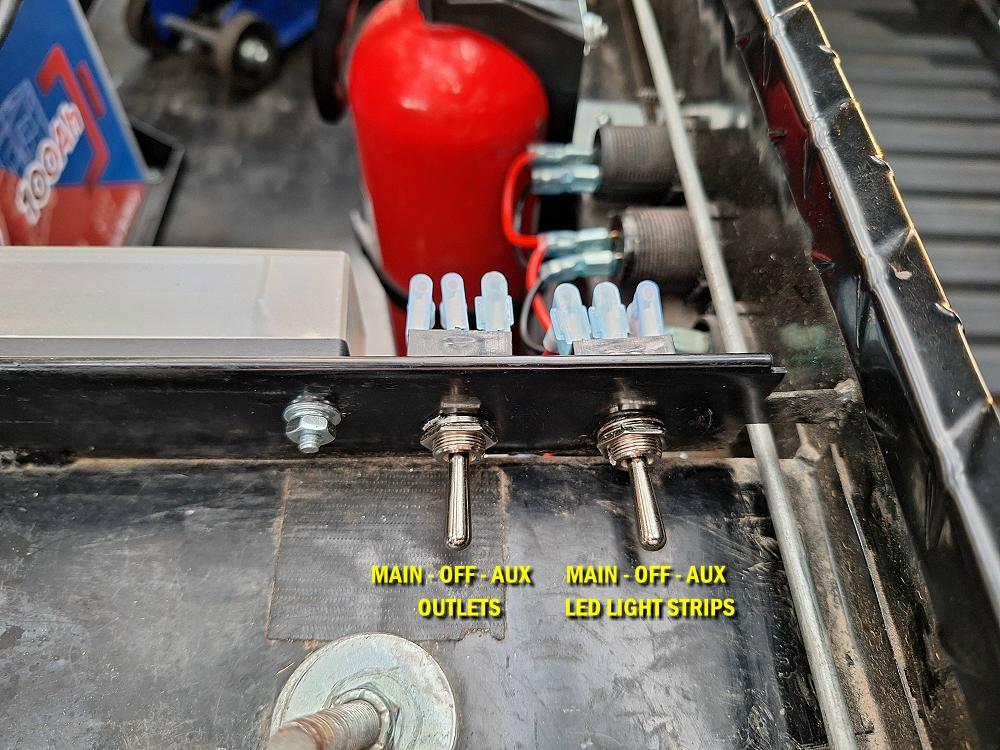
The positive cable from the charger goes to another 60-amp circuit breaker, and then to the auxiliary battery. There’s also a wire coming off of the battery to a fuse block that powers some LED light strips and a 12V and USB outlet on the front of the toolbox. There’s also a dual 12-volt outlet under the fuse block that I installed to plug a 110V inverter into.

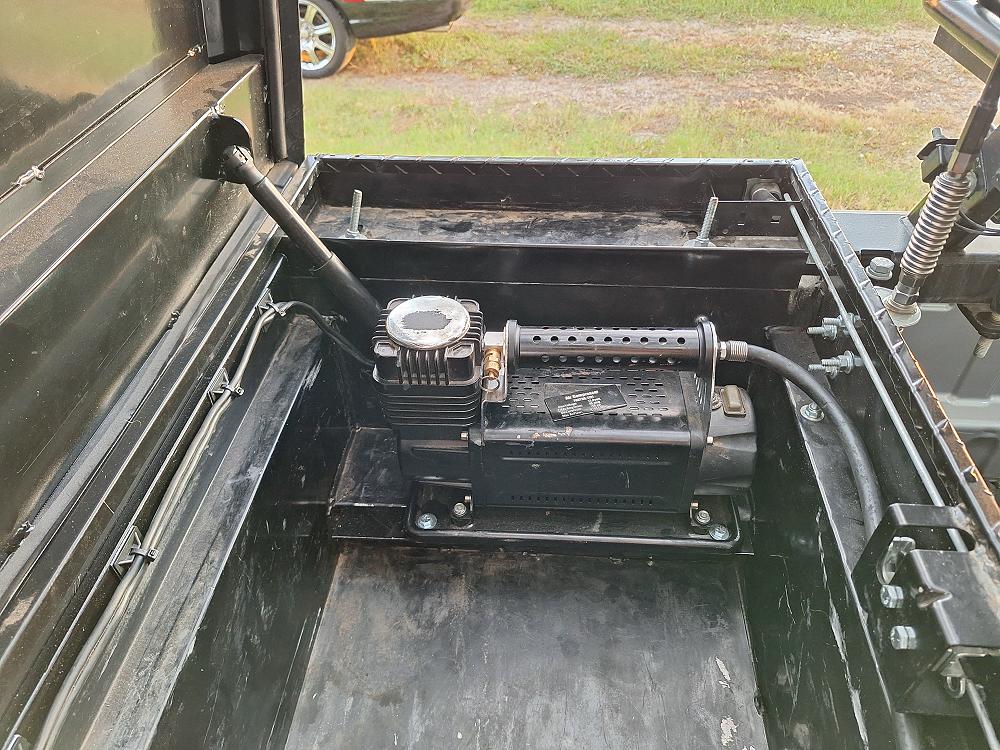
You may have noticed the other circuit breaker on the near side of the battery. The power from that goes to my Smittybilt air compressor mounted at the other end of the toolbox. I didn’t like having to lug it to the front of the truck, pop the hood, and then hook it up to my battery, so I hard mounted it and wired to the auxiliary battery with a 50-amp circuit breaker. It has its own built in circuit breaker, but I added my own.
The compressor looks like it’s hanging off of the ledge it’s mounted to but it’s not. What you’re actually seeing is a piece of angle that’s been bolted on to the side of that little ledge to make it wider and give all four feet a surface to bolt to, I bolted it down through its original rubber feet.
I installed (2) SPDT ON-OFF-ON toggle switches inside of the toolbox. In the photo below they’re in the off position.
The one on the left powers the 12V and USB outlets on the front of the toolbox. This is where my fridge plugs in. If the switch is flipped to the left towards the front of the vehicle, the fridge is running off the battery in the front. If the switch is flipped to the rear, the fridge is running off the battery in the rear of the truck. While traveling the fridge will run off of the main truck battery. When I stop to camp for the night, I’ll flip the switch and run it off the auxiliary lithium battery. With this setup there’s nothing to unplug. The next day I’ll switch back to the main battery and let the lithium battery charge back up while I’m driving. Between this and my Jackery 500 Power Station I should be able to run my fridge for at least a few days without starting my truck.
The other switch is for the LED light strips in the lid and on the front of my toolbox and is wired to work the same way.
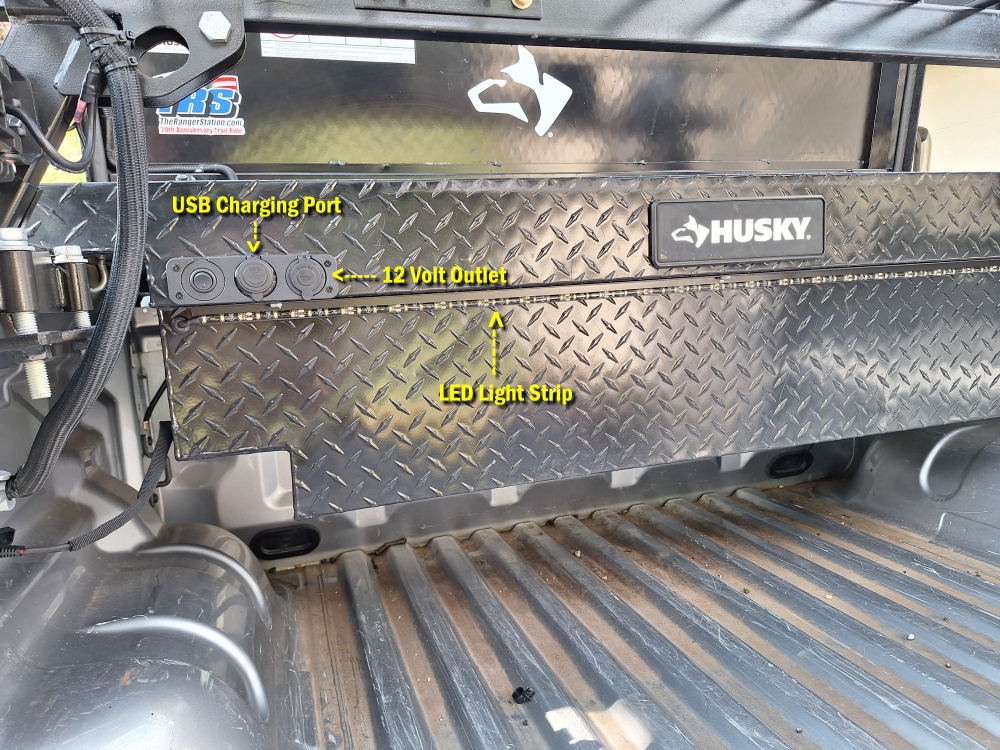
Below is a photo of the front of my toolbox before he auxiliary battery installation. Here you can see the USB charging port and 12V outlet that I added to the front of the toolbox. This is where my refrigerator will plug into. My Ranger did not come with an outlet in the side of the bed, so I added my own outlet using the factory wiring that was already there but ran it up here instead. I didn’t want to put it down in the bedside and then have it blocked by stuff being carried in the bed.
Helpful Links:
Victron Orion-Tr Smart DC-DC Charger Isolated Manual
Victron Orion-Tr Smart DC-DC Charger Isolated Manual PDF
About The Author
Jim Oaks is the founder of TheRangerStation.com, the longest-running Ford Ranger resource online since 1999. With over 25 years of hands-on experience building and modifying Ford Rangers — including magazine-featured builds like Project Transformer — Jim has become one of the most trusted authorities in the Ford Ranger off-road and enthusiast space.
Since launching TheRangerStation.com, Jim has documented thousands of real-world Ranger builds, technical repairs, drivetrain swaps, suspension modifications, and off-road adventures contributed by owners worldwide. TheRangerStation.com has been referenced in print, video and online by enthusiasts, mechanics, and off-road builders looking for practical, and experience-based information.