• Welcome Visitor! Please take a few seconds and Register for our forum. Even if you don't want to post, you can still 'Like' and react to posts.

My 87 Ranger I will be restoring soon I want to keep track of my progress and add information as I find it.


img_1490_a042eb82a058456d5c189bd50ea86d89441ee4f8.jpeg
 
87Rangerrestore;2223771 said:
img_1525_3e68f19bb436ddec90411b583ad480ee966b9c2a.jpeg

I need a Windshield Wiper Motor. I ran some test. Switch is fine.
img_1526_d1b9018290d8cc74f1396a34be1c2d44bd2149f8.jpeg

Prior owner cut some wires to Fuel Tank. Probably trying to figure out Fuel Gauge. I have had gauge working at times. I had ave a Fuel Pump coming from Rockauto this week. Hoping it is bad connection or float. Will trouble shoot once Fuel Pump is replaced. I did solder, heat shrink, and electrical tape and got back into loom.
img_1527_78bc9075df565f9d29cb09630f70b125bf8b9b01.jpeg

Freebie fix…. I have run into this before. Washer Pump frozen . Run some jumper wires from battery straight to the pumps terminals. Reverse polarity several times to make motor go forward and backwards. It usually will free the motor up.
img_1528_49f8c7f17591b67cc94da2f456465950741a77f6.jpeg

Proof Washer Pump is working.
img_1529_6734b666e3f6bfd2ceee6d58f4ddcea4c56d0fa3.jpeg

Maybe a better picture of Washer Pump is working
 
img_2040_b6e51fdc22d1a3734b775756cc7603ff0eae6970.jpeg

This is just temporary as I plan on buying another set of door panels off of a 91 truck. These panels do require some work to make fit
img_2038_1c176ca496912a6cc95656e7772c8f3be7298c8a.jpeg

The newer doors require a little bracket to support the inside door handle. I used some Anti Seize to locate where I needed to mark where to mount the support.
img_2039_8ee0685004fa6fd6e5a4ca835fb476fc7dd352a4.jpeg

Antisieze on screw holes
img_2036_da7881c9aa349ef97b64c1c5351983343fa050ae.jpeg

The 3rd hole needs drilled a slight bit larger to let this pin go in.
img_2037_841cea6e51c234aa2d4c5a72cd4c5a96a8f2963a.jpeg

A Step bit and first size hole worked great.
 
Got my seat belts and passenger seat in. I found a website that is supposed to have Ford Interior Paint it is a Mustang site. lmr.com. I will look into it.
Notes for myself

https://lmr.com/products/79-93-Musta...aint-Spray-Dye


Rear Axle Codes / Determine Gear Ratio - Ford Ranger Forum

how to read door jam sticker... - Ford Ranger Forum

Coverlay 12-112-DBL Coverlay Manufacturing Dash Covers | Summit Racing

Cutpile Flooring for your 1983-1995 Ford Ranger Reg Cab 2 & 4WD Cutpile | Car & Truck Interior Carpet (ocautocarpets.com)

Inner & Outer Window Belt Felt Sweep Kit without vent windows 83-88 Ford Ranger | eBay

The last year or so I have had problems with the electrical system in my BII, no big surprise, but frustrating. On cold starts the truck would stumble and hesitate and you could make it go if you floored it and stayed on it, but ran rough, especially we you got over 35-40 mph. After much checking of the basics many times, I found all the problems were ground related. The main battery cable runs down towards the block, but stops at the frame where it was clamped to the frame and then continued on to the bolt on the side of the block. Where the bare ground wire was clamped to the frame, the wire was corroded and about half it's normal size. I replaced the clamp on the frame with a bolt and ran two new ground wires, one directly from the battery to the block and then one from the block to the new bolt on the frame. Two of the problems I was having went away.

The next bad ground was the ground from the computer to the body behind the kick panel on the passenger side. The ground appeared to be good with no corrosion, but with the age of the truck the ground path back to the battery had deteriorated. I ran a temporary jumper from the ground bolt by the computer to the battery and took the truck for a drive and miraculously the rest of the driving problems vanished......except for one. I ran a new 16ga wire back to ground point on the front frame by the battery and started working on the last problem.

If you turned on the fan control to medium or high you could see the lights dim and the truck would stumble under load. I took the dash apart and found there is a large ground wire that leaves the fan controller and disappears towards the fuse block, but could not find where it landed but I'm betting it terminated on the firewall sheet metal. I cut the black wire on the fan control and replaced it with a #10ga wire from the controller to the front frame ground point and replaced the spade connectors with a ground lug and re-terminated all the grounds. This solved the fan problem.

Every ground wire I inspected has had some type of corrosion problem, so I am in the process of replacing all of them, one at a time. The Bronco II hasn't run this good since it was new! If you are having any computer related problems that you can't explain......get grounded and see if it solves the problem!
http://www.therangerstation.com/foru...es/biggrin.gif
data:image/gif;base64,R0lGODlhAQABAIAAAAAAAP///yH5BAEAAAAALAAAAAABAAEAAAIBRAA7
Good luck!

Ford Ranger & Bronco II Electrical Diagrams at The Ranger Station

When the 2.9 Liter engine had been around for awhile, I began noticing a recurring problem, particularly on Rangers and Bronco II units with automatic transmissions. There is an orange ground wire that leads from Powertrain Control Module (PCM) pin 49 to the back of the passenger side cylinder head. It should be clamped between the dipstick tube bracket and the head. The circuit inside the PCM depends very heavily on this ground in order to properly read the Oxygen Sensor Signal, and some technicians would forget to reconnect that ground when reinstalling the transmission. Black smoke problems and odd O2 sensor voltages were common with ground loose or disconnected.
Ford Ranger Door Interchange Guide - The Ranger Station

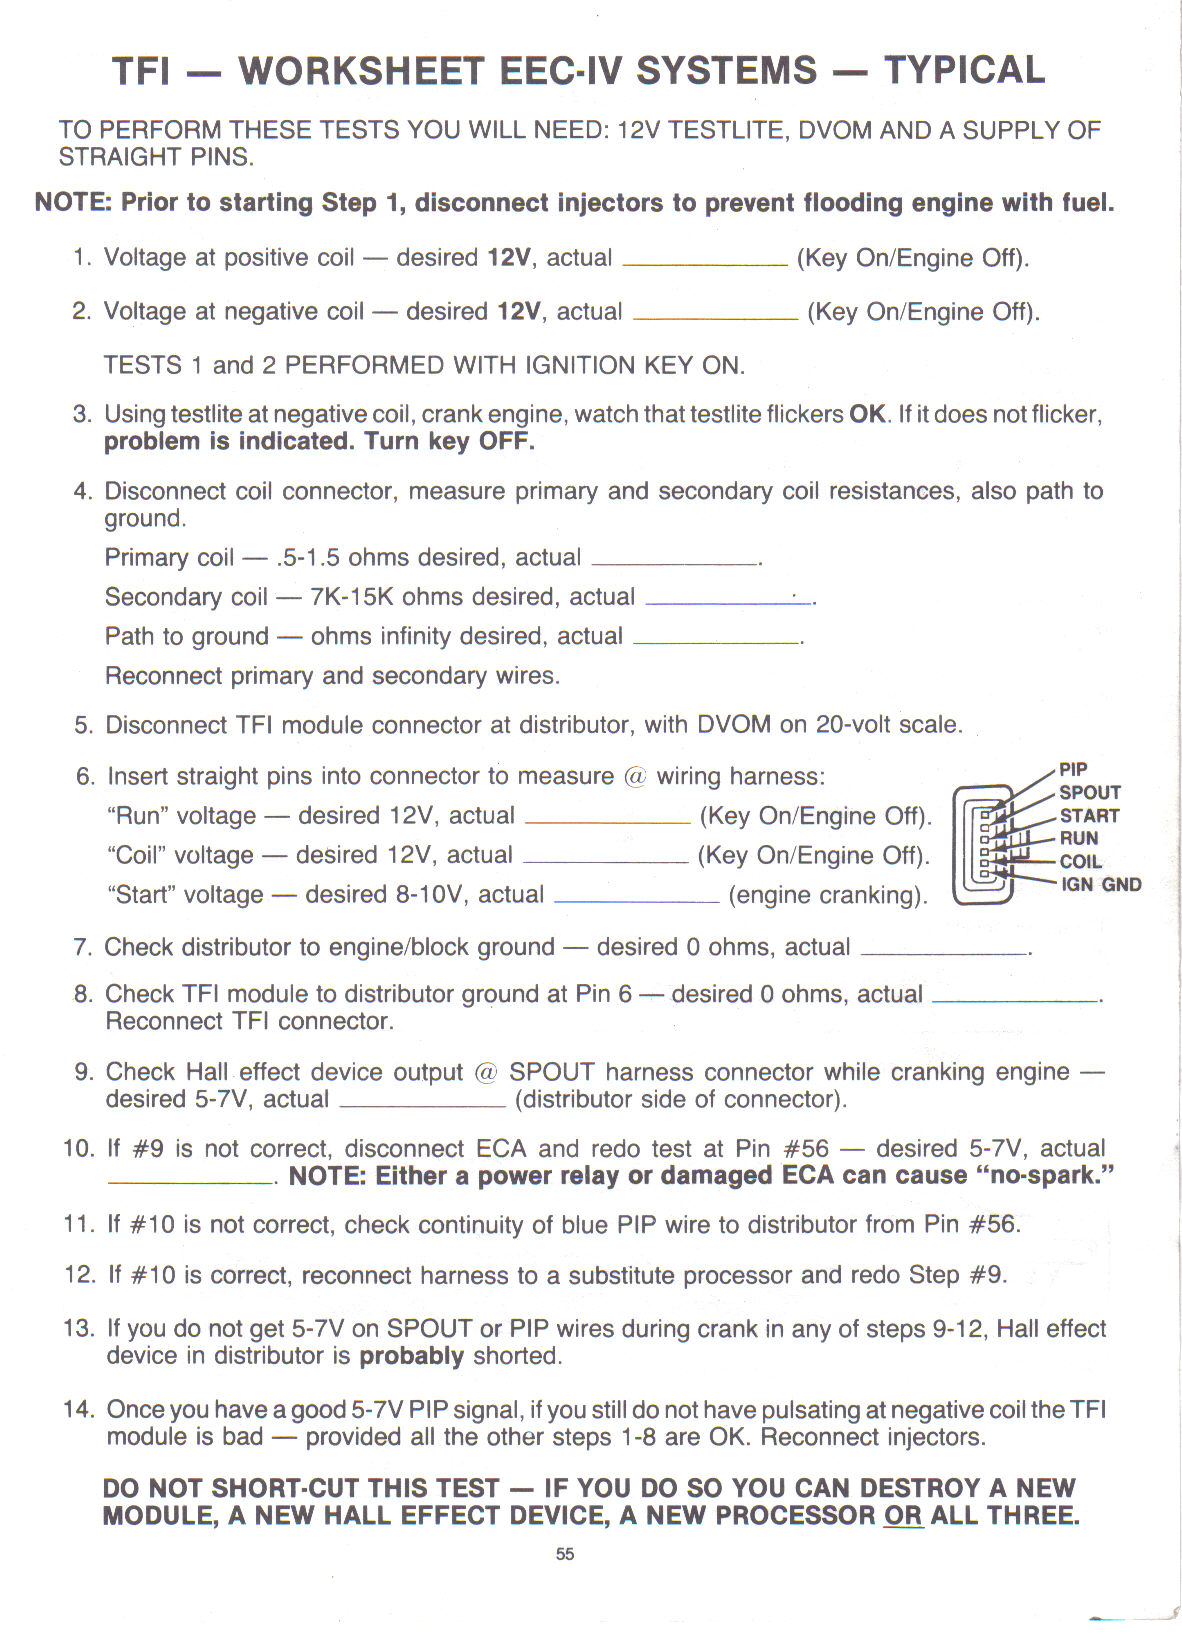
Ford Ranger Remote Mounted TFI Ignition Module (therangerstation.com)

tfi_worksheet.jpg (1182×1645) (therangerstation.com)

McCully Racing Motors- We have exactly what your over-heated TFI Module Needs!

TB from a '87 2.9L with a opening of 58mm verses the 53 mm for the '88.
An M5OD-R1(M5R1) from a 1990-1997 4.0l Ranger or Mazda B4000 would be a better choice, matching 4WD or 2WD which ever you have

There is a "Mode/Routine" in ALL fuel injected computers call "Clear Flooded Engine"
Its simple to use it
Key on
Press gas pedal down to the floor and hold it down all the way
Try to start engine
If should not start/fire at all, fuel injectors are shut off
Throttle Cable Mod - The Ranger Station
Explorer Overhead Console Upgrade - The Ranger Station
Compass / Temperature Mirror Install - The Ranger Station
Interior Electronics & Upholstery - The Ranger Station
F7 Ford Ranger Rear Axles (1983-2011) - The Ranger Station
Adding Cruise Control To Your Ford Ranger - The Ranger Station
Ford Ranger Door Interchange Guide - The Ranger Station

Radiator Early 90 Explorer Automatic Radiator Upgrade for Truck, use 4.0 Upper Radiator Hose.

Axle Upgrade
from 1983-1989 ranger or bronco 2 will have the dana 28 that you have. that will bolt right up....if you are just looking for the front pumpkin that will what you want to look for.

but if you want the whole front end ..as in axles rotors hubs i beams yada yada. you really want the dana 35 from any late 1990-1997 ranger or 91-94 or first gen exploder. some 90 bronco 2s do have a dana 35.

the dana 35 will bolt right up BUT you will need to make your front drive shaft shorter by 1 inch. and you need a new driver side inner tie rod.
 
Last edited:
87Rangerrestore;2223909 said:
img_1558_0e9711db4c3f6d3ec9c308f888371551f9a66e91.jpeg

A before shot of Throttle body. It has to draw air around butterfly at idle. Cleaning it did seem to help idle when warm.

img_1559_4e2a30fee47b8dc1621663b4ae94743f9fa75726.jpeg
 
87Rangerrestore;2225773 said:
img_1972_09127920d62d96bcbca7f81571f07878328a4ba0.jpeg

Trying my dash repair again. The tan vinyl is not long enough for the width.
img_1973_fa22fd64edd32dde205ba13b6d5541713fd030ec.jpeg

Here I cut the cracks to a deeper width for fiberglass kitty hair to get a bite.
img_1974_d69c827e443bf0f5f3dcaebd9b5b233ae2aa277d.jpeg

Waiting for it to set up. I can already feel the itching getting ready to start. I have worked with fiberglass in the past.
 
I am hoping to get some vinyl tomorrow, and start getting it looking better I have it sanded and ready for wrapping the dash pad.
 
87Rangerrestore;2225833 said:
img_1987_385033e4a71135c2de981a33937c730921f702ff.jpeg

To de activate your door chime. Lift these two tabs.
img_1988_0e40b6fc9ae91b8c531b8c67484bf116c5f72e9b.jpeg

Remove this bar by lifting.
img_1989_ac8987d7928db58ff3ad88e9a5630c9f57478100.jpeg

Lift back of board and remove at a 45 degree angle.
img_1990_78ddfb6dc66416e675d7c729de974db3ddde1739.jpeg

Board out.
img_1995_202aecaf99ef8bb81f63e6544abd26411e83a894.jpeg

Remove this disc by prying on tabs on back side of cover.
img_1992_13e1cfb31231a5468356fcae1d72586aa3aa8622.jpeg

Parts in order. Will need to remove dash cover to access assembly. Located behind cubby hole on passenger side. Could be other circuits involved so is better to just disable chime.
 
img_1914_32c988bfe7af1276c9f68a15a3225c228802162a.jpeg

img_1915_12dbda9c3c17f987026ded07f3dfa380afeef433.jpeg

Here is connection to block. It does have a connection to the frame as well all on same cable.
 
img_1880_5b276dfcc0f5f353e9c595239cb4b139ec4390af.jpeg

img_1877_c00612b5c5f34f8acab30c01777f830d5b416428.jpeg

This ground is just forward of the battery.
img_1886_74dc87d3a25f994f810b968d68ab46b51c6b21d0.jpeg

Ground Wire from Wiper motor to Intake
img_1583_b937ae8b1dd5855e16180f770714be84fdedec85.jpeg


Bat- big cable goes to framerail then on to the RH side of the block by the motor mount.

There is another ground from the head/block to the windshield wiper motor bolt.

There are chassis to frame ground straps visible from underneath, one on the PS bed to frame, don't recall one on the DS.

For systems, the grounds are on the fenders, under the hood. One by (behind) the reservoir set (DS) and another further back toward the hinge, just forward of the brake MC. The PS also has two, both very close to the solenoid, just forward of the fusebox.

There is another on the radiator support, to the DS of Rad.

I believe there are two more, maybe three, located under the cab kick panels.
I'm still taking this 90 apart, so I haven't "found" everything yet.

I have no idea where the radio ground is, but I'd guess either under the dash or kick panel. Did you look for a diagram in the Tech Library? Here's one example:
http://www.therangerstation.com/tech_library/EDiagrams/files/Diagram_radio_typical_1of2.JPG

When the 2.9 Liter engine had been around for awhile, I began noticing a recurring problem, particularly on Rangers and Bronco II units with automatic transmissions. There is an orange ground wire that leads from Powertrain Control Module (PCM) pin 49 to the back of the passenger side cylinder head. It should be clamped between the dipstick tube bracket and the head. The circuit inside the PCM depends very heavily on this ground in order to properly read the Oxygen Sensor Signal, and some technicians would forget to reconnect that ground when reinstalling the transmission. Black smoke problems and odd O2 sensor voltages were common with ground loose or disconnected.
 
Last edited:
I have been fortunate enough not to have electrical problems in my '88 long bed Ranger. I have been working out mechanical issues before I start minor body work. Rear discs using parts from a 2000 Mustang have proven to be very effective although I still haven't hooked up the E-brake cables. The TFI has been my biggest problem. Once I figured out that was why the truck would suddenly die but start an hour later, I bought a heat sink and mounted it by the battery where it gets air from around the radiator support. I installed a removable hard top kit from airbagit. kit was junk, had to replace never used clamps, instructions sucked, would not recommend them. Have to carry duct tape to seal windshield/top when it rains. But for 3 seasons a year, it is a fun truck to drive
 
Hey what did you do with the old bed?
I actually have 3 beds. Not sure if I have posted them, but the blue and red bed, I plan on keeping. I have a silver bed that I will use for patch panels. Silver has more rust then just the arches but is otherwise really straight. I am surprised at how well the bed floors are in such great condition. Not actually all beat up. I will post a picture of the beds in the the next few days.
 
I have been fortunate enough not to have electrical problems in my '88 long bed Ranger. I have been working out mechanical issues before I start minor body work. Rear discs using parts from a 2000 Mustang have proven to be very effective although I still haven't hooked up the E-brake cables. The TFI has been my biggest problem. Once I figured out that was why the truck would suddenly die but start an hour later, I bought a heat sink and mounted it by the battery where it gets air from around the radiator support. I installed a removable hard top kit from airbagit. kit was junk, had to replace never used clamps, instructions sucked, would not recommend them. Have to carry duct tape to seal windshield/top when it rains. But for 3 seasons a year, it is a fun truck to drive

I am looking into eventually extending and adding the heat sink to my TFI. Anything I can do to make it more dependable and solid I will invest in
 
. . . . I have a silver bed that I will use for patch panels. Silver has more rust then just the arches but is otherwise really straight. I am surprised at how well the bed floors are in such great condition. Not actually all beat up. I will post a picture of the beds in the the next few days.

I only ask because I'm looking for somebody who's going to be junking their bed; because I want the fuel door area. I want to graft it onto my bed and resurrect the dual fuel tank option. Since all our bed floors still have the relief for the secondary fuel tank neck in it, all I need to do is put in the fuel door and I would use a fuel cell in the area where the spare tire is.
 

Sponsored Ad


Sponsored Ad

TRS Events

Member & Vendor Upgrades

For a small yearly donation, you can support this forum and receive a 'Supporting Member' banner, or become a 'Supporting Vendor' and promote your products here. Click the banner to find out how.

Latest posts

Recently Featured

Want to see your truck here? Share your photos and details in the forum.

Ranger Adventure Video

TRS Merchandise

Follow TRS On Instagram

TRS Sponsors


Sponsored Ad


Sponsored Ad


Amazon Deals

Sponsored Ad

Back
Top