Updating this post as I was successful at the "hard way" which surprised me a little. As a reference for others in the same situation: bad fuel filler pipe and little time or space to fix it, I wanted to pass along how this job went.
First I raised the rear of the truck as I high as could get it on my jack stands and then removed the left rear wheel and the forward piece of the left rear wheel well liner so I could clearly see the fuel filler pipe from the wheel well.
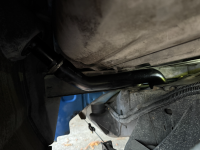
With my phone up over the frame, I snapped a pic of the hose clamp on the pipe that was sealing it to the tank inlet port.
From the pic, I could see that the screw on the hose clamp was at about the 2 o'clock position and there was a small amount of space to get a wrench in there. Using a small 1/4" ratchet and 7mm socket,

I was able to get my right hand to feel for the screw on the hose clamp and with a little trial and error, line up the ratchet on the screw and get it to turn just enough to get a few clicks on the ratchet with each swing. After maybe 20 tight swings of the ratchet, I got the hose clamp loose enough that I could feel it expanding on the hose. At this point, I was able to twist the clamp off its perch on the bottom of the hose and work it up over the wide part of the tank inlet so that it was sitting loose on the horizontal part of the fuel filler pipe. It took some force to get the hose loose off the inlet of the tank but with a little twist on the horizontal part of the fuel filler pipe it came loose. The other end that connects to the bed side came loose easily and I had the whole thing out.
With the hose out, I could were clearly signs of rotted rubber where the pipe expanded at the top and bottom -- the typical problem with these. I also compared the new and old pipes to verify a match in dimensions and screw holes for the filler part -- you never know these days...
I snapped a pic of the inlet port of the tank to get an idea of how I could install the new hose.
I could see that the tank inlet was a little wider at the top. I then slipped the new hose clamp on the horizontal part of the new filler pipe, moved the pipe in position and once again, I needed to twist the new filler pipe hose a little to get it over the inlet lip so I could push it all the way down onto the inlet neck. Then I slipped the hose clamp over the wide part of the inlet and down near the bottom of the inlet port on the tank.
The next step was the hardest. I had to use a plastic putty knife blade as a wedge to hold the loose hose clamp in position against the bottom of the fuel filler hose. Once the hose clamp was stationary, I could get the same mini ratchet on the hose clamp screw and get it to tighten a few clicks with every small swing of the ratchet. I got the hose clamp barely snug when I stopped and rotated the clamp a 1/4 way in each direction to get it set relatively true on the hose and well aligned with the axis of the inlet port. I also left the hose clamp screw in about the same 2 o'clock position as before since I knew I had good access there. I then tightened the clamp as much of my fingers would let me. The installation at the top end of the fuel filler pipe went easily and then the job was done.
With the pipe installed, I put the liner back in, the left wheel back on and lowered the truck. I drove to the gas station and added 5 gallons as a check for any leaks. Fortunately, there were none.
The following day the truck passed the evap test that had previously failed and then the whole emissions test as a result. Now my '92 is back on the road for another two years, adding more miles beyond the 300K mark.
If I would have started with all the right tools, I probably could have gotten it done in 90 minutes. If I was in my youth, maybe 60 minutes,
I was pleased with the outcome although I should mention that I have a 1992 extended cab so it you have a different year/model YMMV.
Now if only I can figure out an easy way to get my NOx readings down. I am not at the maximum yet but the the NOx reading seems to get higher with every smog test.