
The factory front sway bar link in the 2019-2023 Ford Ranger is not very durable. In our 2025 Colorado Adventure, one of our guys had one break driving across California Pass (Cinnamon Pass – Alpine Loop).
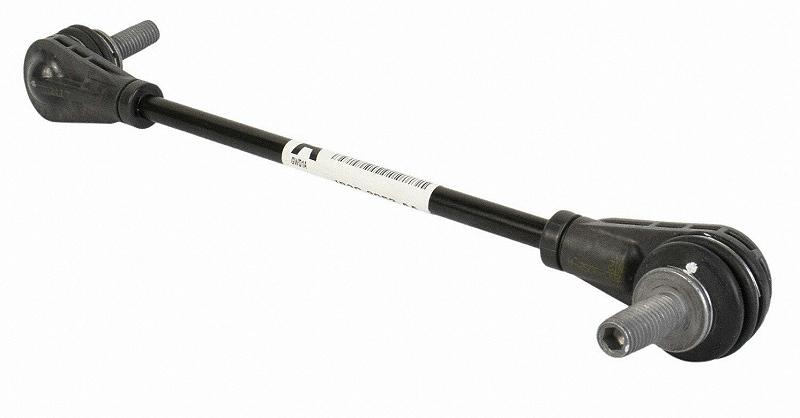
Stock Ford Sway Bar Link
Here’s the factory sway bar link:
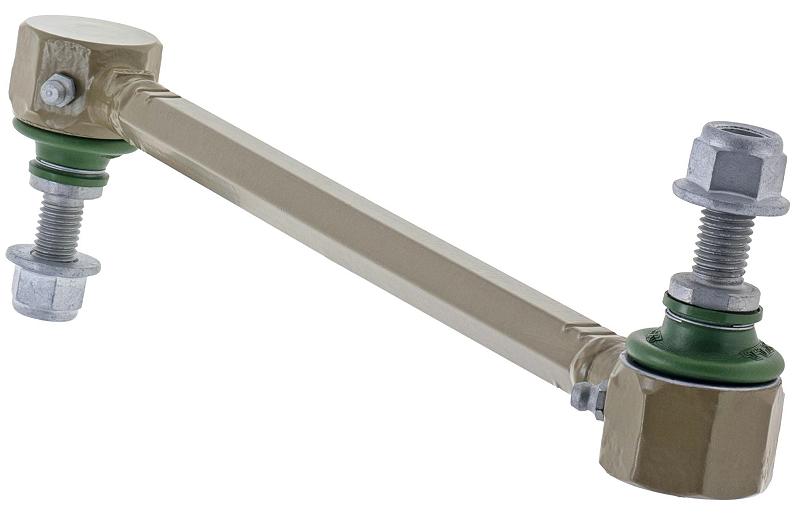
MEVOTECH TXK80252 Replacement / Upgrade
MEVOTECH offer a heavy-duty replacement under Part TXK80252.
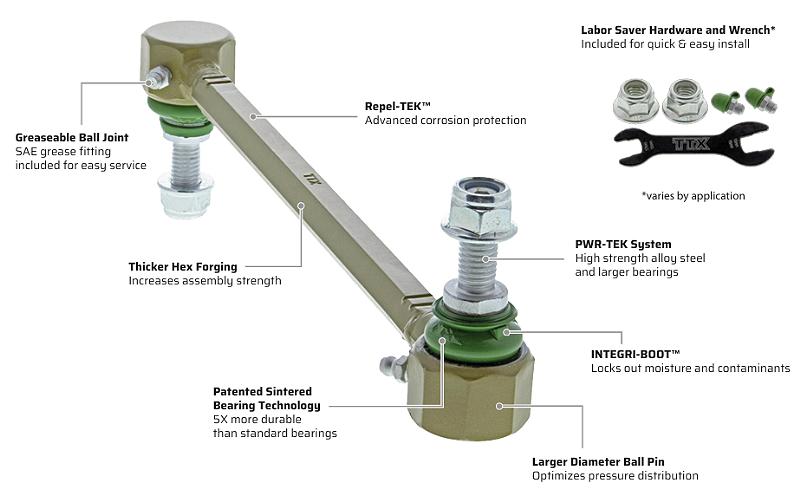
Engineered for extreme conditions, TTX stabilizer bar links deliver top-tier performance. With Repek TEK corrosion-resistant coating, high strength steel, thicker hex forging, and advanced ball joint technology, they offer maximum durability, minimal maintenance, and all-weather dependability.
Sintered Metal Strength – Get longer life and durability with patented self-lubricating greaseable sintered bearings engineered to excel under high heat and heavy loads.
Greaseable Ball Joint – SAE grease fitting included for easy service.
Keep Water and Debris Out – Patented multi-lip boot mechanically locks into housing to seal grease in and keep contaminants out.
More Material – Thicker hex forging and larger diameter ball pins provide additional rigidity for extended part life.
Look At This as an Upgrade – Not A Repair
If you use your 2019-2023 Ford Ranger off pavement you may want to consider switching to these sway bar links as an upgrade before one breaks out on a trail or back country road somewhere.
Where to Buy
I found these online at Rock Auto cheaper than on Amazon, but with Amazon’s free shipping they ended up being cheaper than ordering from Rock Auto.
Remove & Replace the Front Sway Bar Link
Tools & Parts
- New sway bar link (OEM or quality aftermarket unit for 2019–2023 Ford Ranger)
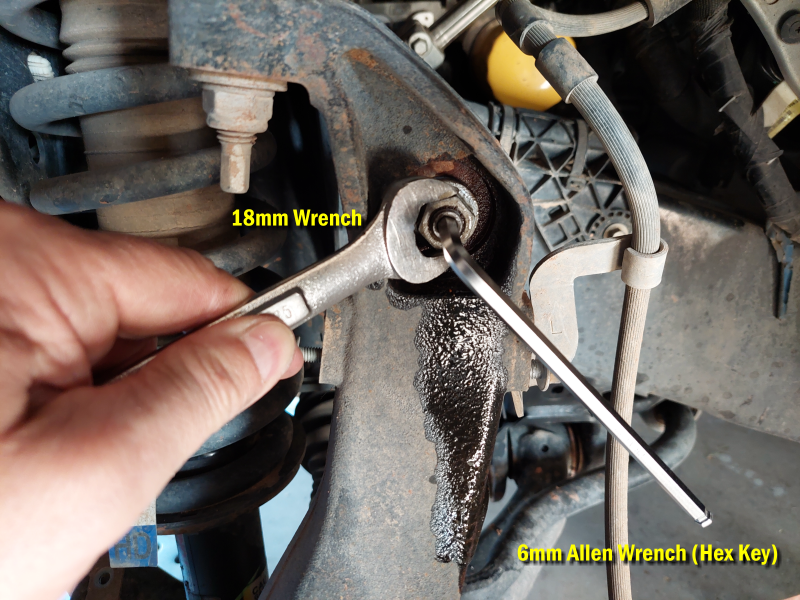
- 18 mm wrench (open-end or combination)
- 6 mm Allen wrench (hex key)
- Floor jack and jack stands (or a two-post lift)
- Torque wrench (recommended)
- Penetrating oil (if nuts/bolts look rusted)
- Breaker bar or ratchet for initial loosening (optional)
- Safety glasses and gloves
- Rag and small wire brush (clean mating surfaces)
- Thread locker (medium strength) — optional, follow new-part instructions
Important Safety Notes
- Park on level ground, engage the parking brake, chock the rear wheels.
- Never rely on a jack alone — always support the vehicle with jack stands or use a lift.
- Wear eye protection and gloves. Work with the steering straight ahead (wheels pointed forward) unless otherwise specified.
- If you are unsure about torque values or any step, consult the factory service manual or a qualified mechanic.
Step-by-step Removal & Replacement
- Prepare the vehicle. Loosen the front lug nuts slightly if you plan to remove the wheel. Raise the front of the truck with a floor jack and support it securely on jack stands. Remove the wheel for better access (recommended).
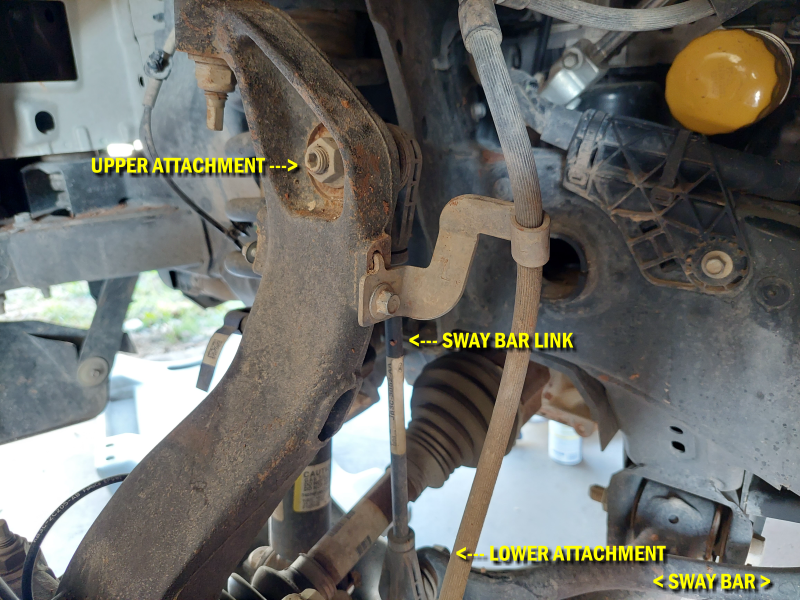
- Locate the sway bar link. The front sway bar link connects the sway bar (stabilizer bar) to the lower control arm or strut end (depending on trim). You’ll see a link with ball-joint ends and mounting hardware at both top and bottom.
- Inspect fasteners and clean if necessary. Spray penetrating oil on the nuts/bolts if they appear corroded and let sit for a few minutes. Use a wire brush or rag to remove heavy grime so tools seat properly.
- Hold the stud with the 6 mm Allen wrench. On most Ranger sway bar links the stud has an internal hex (6 mm). Insert the 6 mm Allen into the stud to prevent the stud from spinning.
- Loosen the nut with the 18 mm wrench. While holding the stud with the Allen, use the 18 mm wrench to break the nut loose. If very tight, use a breaker bar or short extension on the wrench, but do not round the nut.
- Remove the nuts and separate the link. Remove the fasteners at both ends of the link (top and bottom). Some links use a single nut; others use studs with nuts and a separate sleeve/washer. Preserve any washers or sleeves if the new part does not include replacements.
- Remove the old link. Pull the worn link out of the mounting holes. If stuck, a small tap with a hammer on the ball joint housing or a pry (careful not to damage surrounding parts) can help free it.
- Compare old vs new parts. Before installing, compare lengths, ball stud orientation, and included hardware. Ensure the new part matches the old one.
- Install the new sway bar link. Position the new link into place. If required, apply a small amount of medium-strength thread locker to the threads (only if the part instructions recommend it).
- Start the nuts by hand. Thread nuts on both ends by hand first to ensure proper alignment and avoid cross-threading. If the link design requires holding the stud, again use the 6 mm Allen to prevent it from turning while you snug the nut with the 18 mm wrench.
- Tighten to spec. Use a torque wrench to tighten the nuts to the manufacturer’s torque specification for your Ranger. Do not guess torque values — check the factory service manual, dealer, or a trusted repair manual for the correct number. If you don’t have the spec, snug the nuts securely and re-check after a short test drive.
- Reinstall wheel & lower vehicle. Reinstall the wheel (if removed) and hand-tighten lug nuts. Lower the vehicle from the jack stands and torque the lug nuts to the wheel manufacturer’s recommended torque.
- Final checks. With the vehicle on the ground, verify there is no binding at full suspension droop and full compression (if possible). Take a short test drive and listen for any clunks or squeaks. Re-check the hardware torque after 100–200 miles.
Troubleshooting & Tips
- If the stud spins while you hold the Allen, try using a longer Allen key or wedge a hex key into a socket for better leverage. Do not hammer the Allen while installed — this can round the hex.
- Rusty nuts: heat with a propane torch if you’re experienced and safe to do so (avoid plastic components), or use penetrating oil + time.
- Replace both sides if one link failed — they typically wear as a pair.
- If you hear clunks after replacement, re-check torque and inspect adjacent bushings and sway bar mounts for wear.
About The Author
Jim Oaks is the founder of TheRangerStation.com, the longest-running Ford Ranger resource online since 1999. With over 25 years of hands-on experience building and modifying Ford Rangers — including magazine-featured builds like Project Transformer — Jim has become one of the most trusted authorities in the Ford Ranger off-road and enthusiast space.
Since launching TheRangerStation.com, Jim has documented thousands of real-world Ranger builds, technical repairs, drivetrain swaps, suspension modifications, and off-road adventures contributed by owners worldwide. TheRangerStation.com has been referenced in print, video and online by enthusiasts, mechanics, and off-road builders looking for practical, and experience-based information.