|
|
|
|
Dana 35 Jeep Locknut Upgrade |
|
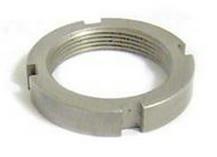
By Chris Grover Steps to upgrade the Ford Ranger Dana 35 spindle nuts that should've been stock on the Dana 35's.... Step One: Go to 4x4 store (or order on-line (Milemarker made mine)) and get a Jeep Dana 30 spindle nut tool. NOTE: You may nor may NOT need this at the junk yard, I'll explain later. Step Two: Either locate a 4x4 72-86 CJ Jeep, a 71-73 Wagoneer/Cherokee/J-Series pickup with manual hubs in the local junk yard (with either a Dana 30 or Dana 44 front axle). I have SERIOUSLY doubt if you could use any of the newer YJ/TJ/Cherokee/Grand Cherokee/Comanche Dana 30 axles. The only one slightly worth looking into would be the Comanche since it is an older vehicle. I was also thinking you could possibly use a 4x4 Scout/Scout II with Dana 44 axles. But, the only thing you get out of it is one spindle nut and one thick washer. It simply isn't worth all the work to get those two parts and not get the all important thin washer. OR, you could go to a Jeep dealer and get the following parts (far easier and probably the most practical): (2) JA000865 (thick washers)
(4) JA000866 (spindle nuts)
(2) JA000867 (thin washers)
NOTE: While it is untested, you can probably just get by using 2 spindle nuts (JA000866) and 2 thin washers (JA000867) while incorporating a stock Ford spindle nut as the inner spindle nut. If you decide to use a stock Ford inner spindle nut, the little stud must be broken off!
(Stock Ford spindle nut) If you do go and buy your parts at a Jeep dealer, go to the "Now, for the rest of the fun of the upgrade..." step and bypass steps three and four. Step Three: Get the following tools and head to said junk yard:
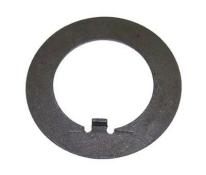
NOTE: The below steps have been tested on the 72-86 CJ Dana 30 axles (both on the drum and disc brake models) and will only cover them. I have NO idea if these directions will work on any of the other axles previously mentioned. BUT, I have heard they use the same outers. So, they should all work...in theory. BUT, they could be a waste of time much like the Scout Dana 44 axles would be for this swap. Use your best judgment on bringing tools (primarily sockets) into the local junk yard and dismantling the hubs. I would bring a stock Ford spindle nut to see if it will bolt up to the spindle of the donor vehicle...especially since this was the major step I used to verify this would work. Step Four: Go to the CJ with the Dana 30 front axle. Determine if it has Warn aftermarket hubs or the stock 5 or 6 bolt hubs. Warn hubs can be identified by 5/32" Allen bolts holding a front cover on. NOTE: You might have to use the really small (I used the smallest one I could find) Allen wrench to clean out the heads of the Allen screws. If it is indeed the Warn hub, remove the Allen screws and the front plate. Loosen the outer nuts with the hub LOCKED with the 9/16" socket/wrench/extension. Sometimes, there are some little bolt head retaining clips. These can easily be removed with the hammer and punch/screw driver. NOTE: Also, locking the hub is NOT enough. You MIGHT have to get creative and use something to hold the axle in place. Go find a spare tire iron lying around in the junk yard. Wedge it into outer axle u-joint and the ground/frame/motor/etc. Once the bolts are loosened, unlock the hub. Jack the vehicle up and support it. Remove the tire and drum. If it has the rotor, you don't have to remove the rotor or the caliper. Unless you want to....your call. If you do, you'll have to remove the 1/4" Allen screw and pound out the little clip it is holding in place. After it is removed, get the caliper off of the spindle and put it out of the way. If it is a Warn aftermarket hub, go to sub-step four alpha. Take the outer hub off and take the split ring off. There will be a small lock ring that you'll have to remove by pushing the inner part of the hub back toward the rotor and using one of the screw drivers to pop it out of it's groove. Once it is out, then wiggle the inner part of the hub off the axle. This might get tricky and require use of the hammer and screw drivers. If it does NOT come off with mild aid of the hammer and screw drivers, skip this side!!! Go to the other side and dismantle it. Obviously, if this the case, you'll have to find another CJ with a Dana 30 front diff in the yard. Go to sub-step four bravo. Sub-step four alpha: (steps for the Warn aftermarket hubs ONLY), use the 5/32" Allen wrench to take the outer cover off. Y Once all the screws are out of it, take the outer part out of the hub. Take the split ring pliers and remove the split ring. Pull the housing off the inner part of the Warn aftermarket hub. Go to sub-step four bravo. Sub-step four bravo: You'll see that there is a 2-3/32" hex nut inside the remaining hub. Look to see if the washer right behind it has been folded over the nut. If it has, simply take the hammer and chisel to semi-flatten out the washer that has been folded over the nut. Then, take the punch and hammer and lightly remove the nut. NOTE: You can TRY to use the Jeep Spindle nut tool. BUT, do NOT be surprised if it doesn't work. 99.95% of the time, they are pounded off and on with a chisel/screw driver and hammer. Removing the thin big washer is kinda "fun". I've pounded on one end until the other end pops over the threads. I suggest you do that as well. There will be another spindle nut, take it off by using the hammer and chisel (or you can try the spindle nut tool). Once taken off the spindle, take the thick, little washer off the spindle. This will require some patience and both screw drivers. Then remove the jack, and repeat step four for the other side/other vehicle. Once done, you'll end up with the following parts that you'll need to buy from the yard: (4) 2-3/32" hex spindle nuts (2) Thick, small flat washers (2) Thin, big flat washers Now, for the rest of the fun of the upgrade... These are the tools needed to complete the upgrade on your Ranger/BII/Explorer:
Loosen the lug nuts, jack up the vehicle and remove the tire. Pull the hub off, remove the little u-shaped clip, the internally splined washer, the outer spindle nut, the crush washer and inner spindle nut. Take the Ford hub, the Jeep spindle nuts (if you got them at the junk yard) and the thin large washer (no matter where you got them) over to the grinder. Grind down the spindle nut edges that have been made from taking them off by hammer and chisel (again, nullified if you bought them new). Take the bigger, thin washers and flatten the edges down in the vice (unless new). Do NOT flatten the tab!!! This will RUIN all your work so far!!! Grind down the edges (all the way around) until it fits into the Ford hub (both new or used). Make sure it is still bigger than the Jeep spindle nut! This is CRITICAL for this to work. If you grind down the thin big washers too much, it will ruin them and will have to get more of them!!! Grind off ANY rough edges that may have been created using the grinder on both the washer and spindle nuts. Last Step: Put the thick small washer on the spindle against the outer bearing. Put one of the Jeep spindle nuts on the spindle. Crank it down to 32 LBS of torque and back off to one foot lbs of torque. NOTE: Unless you are planning to use a stock Ford Spindle nut. If you do this, then put on the stock Ford spindle nut on in the fashion. You will NOT need the thick, small washer behind a stock Ford spindle nut! Just remember, if you use the inner spindle nut for this, you MUST break off the little tab!!! Put on the thin modified washer with the tab going UNDER the inner spindle nut in the grooved part of the spindle. Take the other spindle nut and crank it down to 140 LBS of torque. Take the channel locks, grab a hold of outer edge of the washer and the edge of the spindle nut (make sure you don't muff up the threads on the spindle). Then, bend one of the sides of the modified washer over one of the flat sides of nut. Make sure NOT to bend the edges over the little stud that goes under the inner spindle nut due to strength concerns. You will NOT be able to completely bend it over the spindle nut with the channel locks. BUT, you'll be able to pound the edge down against the spindle nut with the hammer and punch. Then, put the little inner splined washer back on, then the u-clip. the hub and the tire. On the other side, repeat the "Last Step" and you'll be done.
|
|
|