|
|
|
|
Using Explorer Rear Leafs To Lift The Rear Of Your Ranger / Bronco II |
|
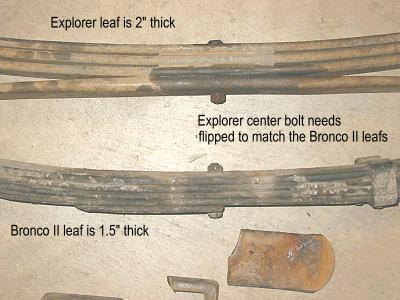
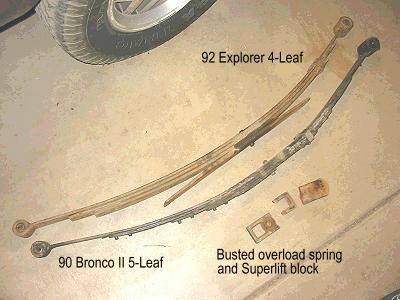
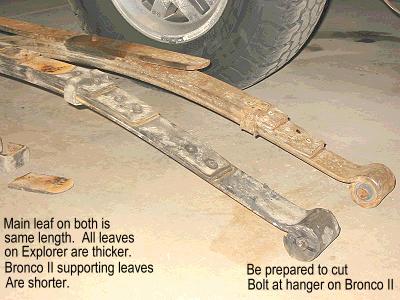
Overview: Using Ford Explorer leaf springs for 1-1/2 inches of rear lift. When I bought my 1990 Bronco II about 1.5 years ago, it had a mild case of the sagging rear end that seems to afflict all of these little rigs. Adding a small lift block compensated pretty well, but the weak leaf springs allowed frequent bottoming out over bumps or when carrying anyone in the back seat. Last weekend, as I was rotating my tires and checking my brake shoes, I noticed that one of the cast iron lift blocks had broken. So I set out to determine a cheap and effective solution to the worn-out leaf spring problem. I’m certainly not the first person to do this, and I probably wouldn’t have considered it if not for reading about similar swaps on TRS. Many thanks to AllanD and others for pointing me in this direction. What I came up with seems to work for me, but it may not be right for anyone else reading this. This is simply an account of what I did, not a recommendation for what you should do. Only you can decide what’s appropriate for you or your rig. As always, safety is the first priority. Having read on the TRS forums about several Explorer leaf swaps into Rangers, and a few mentions of Explorer leafs inserted in Bronco II spring packs, I made some measurements and went to the junkyard. As expected, I found that the length, width, and front eye to centerbolt measurements on early Explorer springs were the same as that on my stock Bronco II. There were 4-leaf and 5-leaf springs available at the yard, so I selected a pair of 4-leaf springs from a 1992 Explorer and took them home. It’s my understanding that Ford also put a fiberglass mono-leaf on some Explorers, but I didn’t see any of those. The first task with the ‘new’ Explorer springs is to flip the center bolt. This is necessary because the Explorer has a spring-under axle, and the Bronco II is spring-over. So the centering tab (the head end of the bolt, actually) on the Explorer springs is on the top, and it needs to be on the bottom to fit into the Bronco II spring perch. A strong clamp holding the leaves in place and a little heat on the nut should enable the bolt to be removed and flipped. If I had cut the bolt off, I would have used a grade 5 or grade 8 replacement. To remove the old springs, I supported the Bronco II’s frame with jackstands, took off one rear tire, and supported the free-hanging side of the axle with a floor jack. Then disconnected the shock, removed my Duff Classic traction bar, and removed the 2 U-bolts and the spring plate. Then I lowered the axle enough to remove the broken lift block and free the axle from the spring. Now the spring was only attached by two bolts – one at the shackle near the end of the frame rail, and one at the spring hanger in front of the wheel well. Let the fun begin… Fortunately, my Bronco II has very little rust and the bolts and hardware are in pretty good shape. Even so, removing the rear shackle bolt required a bunch of ‘PB Blaster’, along with a breaker bar, cheater pipe, and a few carefully chosen (but liberally applied) cuss words. The bolt seems to be metric, and a socket of about 21 mm is probably what’s needed. I have 19mm and 22mm sockets, so made do with a 7/8” socket and wrench, but it was a snug fit. The spring hanger bolt is the same size as the shackle bolt, but was much more difficult to remove. The nut is located between the spring hanger and the frame rail, and there’s no way to get a wrench on it. Fortunately, Ford was thinking ahead on this one, and welded the nut onto a rectangular plate that is too wide to turn. So if you can get the bolt turning, the nut will take care of itself. Getting that bolt to turn made the shackle bolt seem easy. After more PB Blaster, more cheater pipe, more cuss words (no careful choices this time, I used them all), and all the strength I could muster, the bolt rotated enough times to allow the nut and plate to be removed from behind the hanger and set aside. Even with the nut removed, that bolt just wasn’t coming out of the spring eye and hanger. After many failed attempts to remove the bolt, I ended up cutting it off with a grinder, being careful not to damage the spring hanger itself. I had to cut the bolt in two places (both sides of the spring) before I could finally remove the spring. Ventilation was very important during the cutting process, as that black rubber bushing doesn’t like to be massaged by a cutting wheel at 10,000 rpm. It makes a nasty mess, too. Now that the old spring is out, I’m ready to pop in the new one. But I’m one bolt short, since I cut the spring hanger bolt. Off to Lowe’s to check the Grade 8 bins. I needed to re-use the nut-welded-on-plate setup in order to tighten the spring hanger bolt, but Lowe’s had no bolts with matching threads. After a few moments of frustration, I realized that I could use the shackle bolt in the spring hanger, and buy a new bolt and nut for the shackle. Bought 2 of each, plus washers, since I now expected to have the same situation on the other spring. Putting the new spring in was cake after getting the old one out. After a couple of attempts, I found that it was easiest to bolt up the spring hanger end first, then line up the center bolt and spring perch (using the floor jack under the axle), then raise the whole assembly until the shackle end could be bolted in. A little leverage on the shackle helped line things up without too much difficulty. After that, it was just a matter of re-assembling the U-bolts and spring plate, hooking up the shock and traction bar, and double-checking everything. The first side took me about 4 hours to finish, but only half that for the second side. Had to cut the spring hanger bolt over there also. After getting it all back together and taking a short test drive, I got out the tape measure to see how the rear was sitting. With the old springs and a 1.5-inch lift block, the fender lip above the tire was 31.5 inches above the garage floor (with 235/75/15 tires). With the Explorer springs and no lift blocks, the same spot measured 32 inches above the floor. The front fender lip is about 32 inches also, and the Bronco II appears to be sitting level. Although it’s too early for a long-term report, I can say that the ride is much firmer now but not unpleasant. Potholes and bumps at highway speeds are less noticeable than before, but speed bumps in parking lots seem to have gotten much taller. I’m certain that these springs won’t flex as well on Forest Service roads, but that’s a trade-off I can live with. If I had been expecting a 2 or 3-inch lift (above original stock height) from the Explorer springs, I would be disappointed. But my goal was to get the rear end back up to stock height without using blocks, and to replace the worn-out springs with something a little beefier. As far as I can tell right now, the operation was a success.
More Feedback: Forum Member AllanD: Well after measuring several springs in place I have now re-measured them loose (as I dismantle the remains of my parts Explorer) and dimensionally they are the same as Ranger springs in the important dimensions. End to end and Front Eye to center bolt measurements are the same. The Explorer springs are three leaves and a helper, but the three leaves are thicker leaves, they should also be somewhat more resistant to fatigue than Bronco II springs because they are not as arched as Bronco II springs are. BUT!!!!! for anyone out there thinking they are going to get 3" of lift out of them prepare yourself for disappointment. The Explorer gets it's extra ride height by mounting the springs DIRECTLY under the frame rail instead of alongside the frame as on Rangers and Bronco II's. The only "mod" that must be done to the springs is the centerbolt must be reversed, the locating pilot for the axle points up for the Explorer application, it must point down for Rangers and Bronco II's. If you are someone who would buy used springs you are far better off getting used Explorer springs as they tend not to have been "whipped" in service like Ranger springs tend to be. FWIW, the Explorer gets it's lift not from the springs, but from the fact that the springs are mounted directly under the more widely spaced (in the rear) frame rails. The Ranger mounts the springs alongside the frame rails. And while the explorer springs will lift the truck some, around 1 to 1.5", they really don't ride worse, in fact I think they ride BETTER, mainly because the rear isn't bouncing all over the place. Forum Member wht89lx - Maybe this will help someone out there.... I have a 1995 X-cab 4x4 Ranger.. and anytime I hauled a load.. the rear would squat Terribly !! I headed to the local bone yard and found a 1992 Explorer 4x4 4 door and had the rear springs torched off at the shackles... tossed the top leaf and used the 2 center leafs and the longer bottom (overload) leaf... made a quick stop at NAPA for some "U" bolts that are 2 inches longer than stock and stacked the leafs together.. I now have 5 leafs under the back on both sides.. (I tossed the short stock overload (bottom) leaf)...it lifted it a total of 3.5 inches and it doesn't squat nearly as bad as it used to!! The ride isn't harsh like the add-a-leafs... just remember to use a grade 5 or better center bolt that's longer to hold the leafs together. It works great and I bet I could easily fit 32's under the rear No problem!!! I 'm not sure. I didn't use the whole spring pack because the bolts for the shackles on my truck were very rusty and I couldn't move them. I suspect they could be torched off and NEW 'urethane bushings used to replace the rubber ones. I tossed the Stock overload leaf from the Ranger. The Explorer overload was longer and thicker. I suspect its because the Explorer is heavier in the back than the Ranger. Forum Member John Deere Ranger - Well first off I got a 1987 Ranger on 39" Boggers with a 302. I had a 5-1/4" block and axle wrap was terrible. I also had 4.5" longer shackles and two add-a-leafs. So my old spring pack had 6 springs with the bottom spring being an overload leaf. I purchased a set of 4 door explorer springs and created a new spring pack using the old ranger springs as well. I interwove the explorer springs with the old ranger springs and add-a-leafs in there creating an 8 leaf spring pack. Then I got rid of my 5-1/4" block and went down to a 3" block. And on top of that I still gained 1/2 of lift in the rear.
My old spring pack:
My new spring pack: I believe you will gain someplace in the 2-3 inch range but I recommend interweaving some of your old springs in.
|
|
|