Lifting
the front of a TTB (Twin Traction Beam) coil sprung Ford any more than
2" requires new coils, lowering its 2-piece axle, and addressing
the camber and caster angles.
For
the mid size Ranger, Bronco II, and Explorer, lowering the arms
involves brackets that drop the radius arm crossmember where it
attaches at the frame rails. Replacement radius arms offer
caster correction and additional benefits. The arms, considerably
longer than stock, increase the amount of usable bind-free extension
travel. This enhances the TTB action, making it easier for the tires
to travel independently and stay in contact with the road or trail
surface. Longer arms also lessen the degree of caster change the
vehicle experiences as it goes through its suspension travel cycle.
The longer arc of travel improves vehicle wheel rate as well. All of
these factors combine to improve overall drivability and ride quality.
You'll see a noticeable difference both "on and off" road.
Even in stock form, the TTB Ford steering seems somewhat vague.
On an off-camber or less than ideal driving surface, it takes
continuous corrective steering input to keep a Ford pointed straight
ahead. These inherent tendencies are magnified when the vehicle is
raised. When addressing this on a lifted vehicle, there are two areas
of concern:
1)
Minimizing tie rod angles
2)
Keeping the tie rods arc of movement in phase with the axle halves arc
of movement.
On
the TTB Ford, these two factors "make or break" driveability.
When incorrect, it will cause excessive toe-in\toe-out variations, as
the suspension travels, resulting in the TTB Ford version of
"bump-steer".
A
"dropped" pitman arm alone which reduces some of the
additional angle created by the lift and Superunner replacement
linkage system (By Superlift)
is recommended. Using the Superunner linkage in addition to the
pitman arm addresses both problems. Use of a centerlink lowers the
pivot point of the tie rods closer to the axle halves pivot point and
allows the use of new tie rods that are proportional in length to the
axle halves. The result is steering linkage that is in almost perfect
phase with the suspension, yielding optimum steering response.
On most
lifted TTB Fords, installing dropped pitman arm will result in
satisfactory steering characteristics. With the Superunner upgrade
though, steering traits will be noticeably improved.
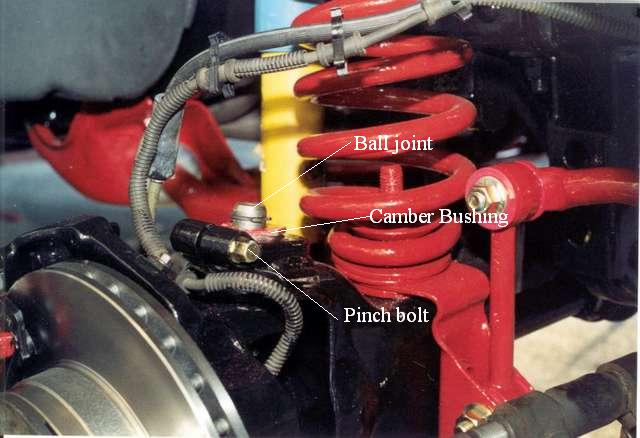
The 1983-1997 Ford
Ranger uses an alignment bushing on the upper balljoint to adjust
camber & caster.
Depending
on the vehicle, the alignment bushing is held in place by either a
castle nut or pinch bolt.
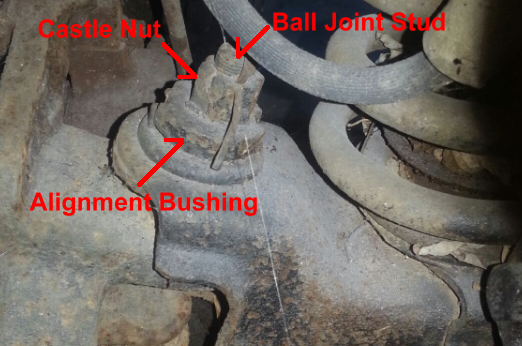
(Removing
the alignment bushing)
Alignment
(Caster / Camber / Toe):
|
|
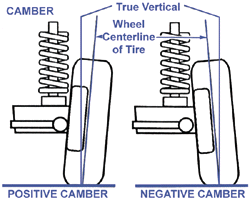
Camber
is the inward or outward tilt of the front tires as viewed from the front. Inward tilt is negative, outward tilt is positive. Camber is used to distribute load across the entire tread. Improper camber makes the tire wear on one edge, and causes the vehicle to pull to the side that has the most positive camber.
|
|
|
|
|
|
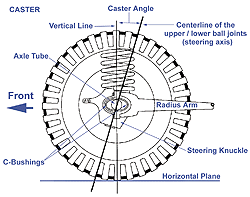
Caster is the fore or aft slope of the steering axis. The steering axis is a line drawn through the upper and lower ball joints of the knuckle. Positive caster is when the bottom of the steering axis line is in front of the tire's contact patch. Zero caster is when the steering axis is at 0o. Positive (shown)
caster ensures good stability, helps maintain straight-ahead direction and promotes steering wheel self-centering. Too much positive caster causes hard steering, excessive road shock and shimmy.
|
|
|
|
|
|
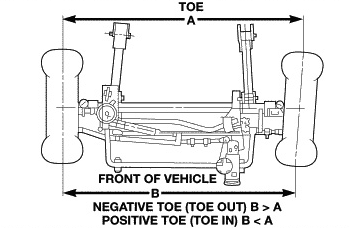
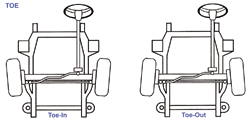
Toe is the side-to-side difference in distance between the front and rear of the front tires. If the distance is closer at the front, it's called toe-in. If the difference is closer at the rear, it's called toe-out.
|
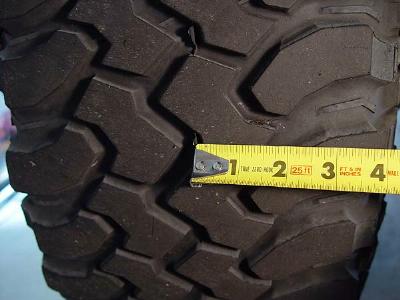
Toe
can be checked by measuring a distance between the front of the
front tires and comparing it to the same locations taken from the
rear of the front tires. One way is to measure between a
specific tread groove in the front of one tire to a specific grove
in the opposite tire, and then comparing it at the rear of the tire
in the same grooves. You want the same measurement front and
rear. You can adjust it by loosening the two bolts on the tie
rod sleeve and turning the sleeve with a pipe wrench.
So
looking at the photo and diagram, a distance is measured between the
middle sections of the front tire, and measured again from the middle
sections of the back of the front tire. If the tires are pointed
perfectly straight, the measurements will be the same.
Toe
misalignment can be caused from steering linkage damage during off-roading.
If the damage is light, you may not notice the bent tie rods or toe
misalignment. You will feel it though driving down the
roadway. The truck will want to take off in the direction the
steering wheel turns and it will feel like your constantly correcting it
to go straight.
Measuring
Camber & Caster when you put the suspension together
Note:
Early Rangers can be easy to align if you have installed adjustable
camber bushings. Below you will find some photos and descriptions
of an alignment on my 1983 Ranger.
|
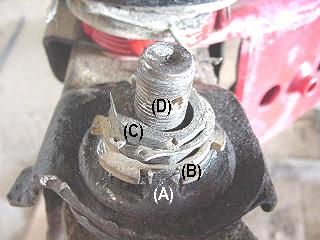 |
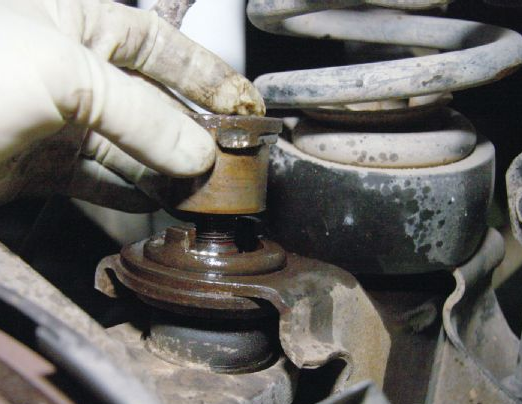
I have labeled the
bushing and ball joint in the photo to the left. They are:
(A)
Locking tab on axle beam
(B)
Adjusting Ring To Hold Bushing In Place. It's held in
position by (A) and the bushing is not able to turn.
The
snap ring between (B) & (C) keeps (B) from coming out of
position. |
|
|
|
|
|
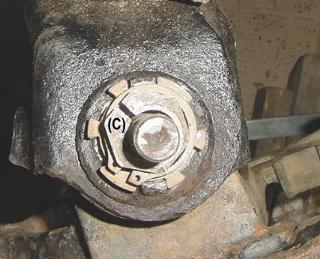
If
you look at the top of the adjustable bushing (C)
you'll notice that the hole the ball joint goes through is off
center and that the bushing gets wider and narrower as it goes
around. By turning this bushing you can adjust the camber.
The camber is the number of degrees the top of the wheel sticks
outward (positive) or inward (negative) from a vertical plane.
This bushing also adjusts caster
the same way. Caster is the number of degrees of backward
(positive) or forward (negative) tilt of the spindle. Before
checking caster and camber check the toe alignment.
|
| |
|
|
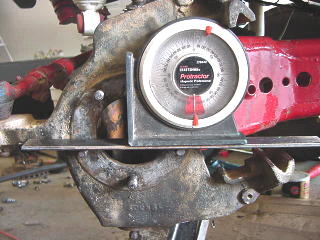
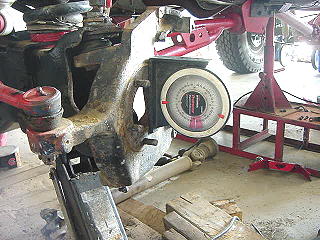
This
is how I checked my caster after replacing the driver side axle
beam. I bought this angle finder at Sears
a couple of years ago. It has a magnetic base and shows angles
in degrees. For this alignment, I placed a piece of flat stock
on two of the studs and then set the angle finder on it. I
turned the bushing until the caster was within the desired range.
I
had the front axle jacked up to where it would have been with the
tires on when I took my measurements.
|
|
|
|
|
Left
you will see how I checked the camber. All I simply did was
turn the angle finder and stick it to the steering knuckle.
Turn
the adjustable bushings until the caster and camber are as close
to the desired specification as possible.
|
The
reason for the alignment involved a tree stump on a dark trail in the
middle of the night and the need to replace the drivers side axle beam.
After hitting the stump it was difficult steering the truck home.
After replacing the beam and doing the alignments here I was able to
test drive the truck 400 miles to Kentucky, wheel it for the weekend and
then drive it home. I was able to let go of the steering wheel and the
truck would drive straight without wanting to wander all over the road.
I
used the following specifications for aligning my 1983 4x4 Ranger as
found in a 1991 copy of Chiltons Ford Ranger/Bronco II/Explorer
1983-1991 manual P/N 7338;
|
Year |
Model |
Ride
Height Min-Max |
Caster
Min-Max |
Camber
Min-Max. |
|
1983
- 1991
|
Ranger 4wd
|
4 - 4-1/4
|
2 - 5
|
1 - 2
|
| |
|
4-1/4 - 4-3/4
|
1 - 4
|
2 - 3
|
These are positive degrees. Following these guidelines should give
you a pretty good alignment if you don't want to pay for a professional
one, or need a temporary alignment after installing a lift.
Adjustable
camber/caster bushings can be purchased through most any 4x4 shop.
They are a very good investment. Remember to use anti-seize on
them so you can readjust them later if need be.
Check
your wheel bearings by raising the truck, grasping the tire and
attempting to move it inward and outward. Make sure there isn't a
lot of play here before doing the alignment.
NOTE:
The assembly plant sometimes builds vehicles with adjusters that are not
zero-degree type to control alignment. The table shows
thealignment changes that will occur if the vehicle was originally
built with zero-degree adjusters. Always check to see which adjuster has
been installed (and its orientation) before making changes.
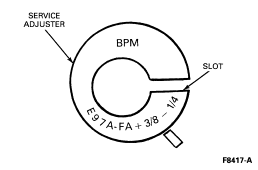
Install
the new service adjuster. Orient the slot as specified in the chart.
Ranger
Adjustable Camber / Caster Service Adjuster Selection Table:
| Service
Adjuster Type (Degrees) |
Position
Slot in Axle (Degrees) |
LH
Axle |
RH
Axle |
| Camber
Change (Degrees) |
Caster
Change (Degrees) |
Camber
Change (Degrees) |
Caster
Change (Degrees) |
| 1/2 |
0 |
-0.5 |
0 |
+0.5 |
0 |
| 1 |
0 |
-1.0 |
0 |
+1.0 |
0 |
| 1-1/2 |
0 |
-1.5 |
0 |
+1.5 |
0 |
| 1/2 |
45 |
-0.25 |
+0.25 |
+0.25 |
+0.25 |
| 1 |
45 |
-0.75 |
+0.75 |
+0.75 |
+0.75 |
| 1-1/2 |
45 |
-1.00 |
+1.00 |
+1.00 |
+1.00 |
| 1/2 |
90 |
0 |
+0.5 |
0 |
+0.5 |
| 1 |
90 |
0 |
+1.0 |
0 |
+1.0 |
| 1-1/2 |
90 |
0 |
+1.5 |
0 |
+1.5 |
| 1/2 |
135 |
+0.25 |
+0.25 |
-0.25 |
+0.25 |
| 1 |
135 |
+0.75 |
+0.75 |
-0.75 |
+0.75 |
| 1-1/2 |
135 |
+1.00 |
+1.00 |
-1.00 |
+1.00 |
| 1/2 |
180 |
+0.5 |
0 |
-0.5 |
0 |
| 1 |
180 |
+1.0 |
0 |
-1.0 |
0 |
| 1-1/2 |
180 |
+1.5 |
0 |
-1.5 |
0 |
| 1/2 |
225 |
+0.25 |
-0.25 |
-0.25 |
-0.25 |
| 1 |
225 |
+0.75 |
-0.75 |
-0.75 |
-0.75 |
| 1-1/2 |
225 |
+1.00 |
-1.00 |
-1.00 |
-1.00 |
| 1/2 |
270 |
0 |
-0.5 |
0 |
-0.5 |
| 1 |
270 |
0 |
-1.0 |
0 |
-1.0 |
| 1-1/2 |
270 |
0 |
-1.5 |
0 |
-1.5 |
| 1/2 |
315 |
-0.25 |
0.25 |
+0.25 |
-0.25 |
| 1 |
315 |
-0.75 |
-0.75 |
+0.75 |
-0.75 |
| 1-1/2 |
315 |
-1.00 |
-1.00 |
+1.00 |
-1.00 |
|