
BY DangerRanger02
I searched hours on hours to find an intake system designed for my 3.0V6. Not finding any made for my year, I decided to make my own.
The first step in completing any project is to research. I have done the dirty work and have compiled my findings here to make your life easier!
Now, you must gather all the parts needed.
First, I purchased two civic intake tubes from a local Autozone. Their website, autozone.com may carry the product also. They only carry one civic intake tube and it is a universal intake for certain year civics unknown to me. They come with two black silicone boots, hoses, plugs, and screw clamps. You will use these for the installation. However, you will also need to purchase one 3” to 3” silicone boot. I bought a blue one from summitracing.com.
You will need three metal screw clamps at the least, and six at the most if you want your intake EXTREMELY secure.
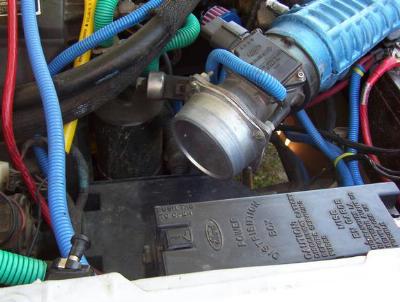
The hardest part to fabricate will be the MAF sensor adaptor. If you plan on using a cone filter like the one pictured above, you will need this adaptor. Some companies sell these, but I opted to make my own. First, I bought a shower drain adaptor with a 3” inner diameter. I then made a template on the bolt side of the sensor. Place the sensor square side down and trace it on a piece of paper; also remember to trace the holes. Cut the template out and trace it on the shower drain kit with a marker. It won’t line up perfectly so you may have to free hand a little bit. Cut the shower drain pvc with a jig saw or other cutting blade.
You will have to remove the stock air box assembly, but also have the option of leaving the stock air box base.
Now you must cut the two intakes to fit. Every truck may be close to the same measurements as mine, but I suggest custom fitment and cutting. Line up the first (#1) intake and mark it where it is 1-inch from the end of the alternator. Cut the intake at that mark. Next connect the second (#2) intake using the blue silicone boot and place your assembled filter, MAF, and MAF adaptor assembly where it would lie if installed. Now cut the #2 intake so that you will have room for the filter/sensor assembly.
There is only one more pvc piece you will have to make. I made a 45 degree bend using a 90 degree 3-inch inner diameter pvc piece and cut off the end connections.
Now comes assembly. Disconnect the battery before you begin. This will allow the computer to reset just in time to get used to the new intake.
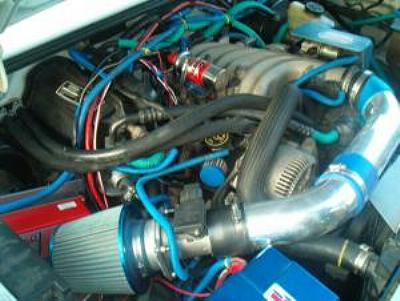
First connect the 45 degree pvc bend to the manifold using a black silicon boot and screw clamps. The black silicon boot on the manifold slides right over the 45 degree pvc piece. Then the 45 degree pvc fits snug over the first intake tube. You can use a high temp. silicone if you do not trust your connection. Next connect the #1 and #2 intake tubes using the 3” to 3” silicone boot and screw clamps. Bolt on the Maf adaptor to the Maf, and clamp down the cone filter before connecting it to the #2 intake. Now connect the #2 intake to the Maf sensor assembly using a black silicone boot and clamps.
Next connect the black hose included with the kit from the passenger’s side valve cover to the #2 intake. Using the plugs that came with the kit, plug the unused connection on the #1 tube.
Everything is finished now. Crank up the engine and let her roar! Check all connections for leaks. If you recognize a stumble or shaking in the engine that you never had before, then you may have a loose connection. You should notice a big increase in low and mid range power since the engine is breathing better. Keep in mind, regular maintenance of your open element filter is necessary to maintain performance and reliability.~TRS