
- Joined
- Aug 28, 2019
- Messages
- 568
- City
- Central Colorado
- Vehicle Year
- 2019, '31, '27
- Engine
- Transmission
- Automatic
- Total Drop
- Stock, about a foot, about a foot
- Tire Size
- LT 265/65 R17, P285/70R15 & P195/65R15, 820-15 & 500-15
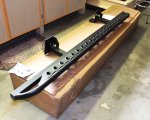
I don't know that I've ever bought any fabricated accessory that is built as well as these are.
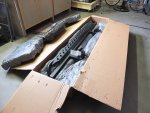
The raw materials were all nice and smooth, almost no weld splatter was on the parts, the welds look uniform and equally sized and the textured black powder coat is uniform and undamaged.
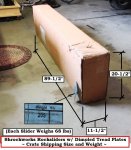
Each slider weighs about 68 lbs!
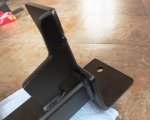
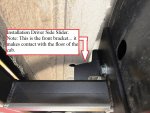
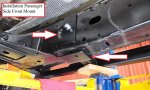
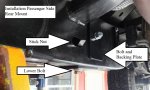
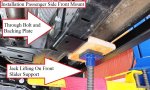
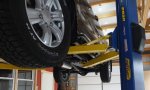
As for the installation: everything bolted up just as specified by Shrockworks. They use existing holes in the frame, except you need to drill (1) 1/2" dia. hole. Each slider has (4) 1/2" bolts holding them onto the frame.
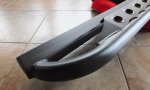
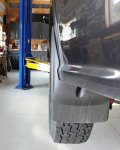
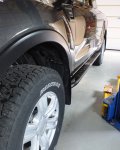
Love how they tuck up nice and tight to the rocker panels... and they don't stick out past the mudflaps or the tires (well maybe a tiny bit). We bought the optional dimpled step plates. Should help to protect the rocker panels from road rash.
The folks at Shrockworks certainly did an awesome job designing, building and finishing these.
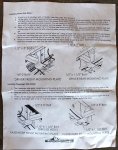
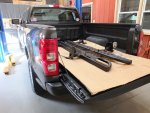
Here's some installation photo's to help anybody else that's planning to get a set of these.
The item numbers in the photo's correspond to the installation instructions
Hope this helps.
The raw materials were all nice and smooth, almost no weld splatter was on the parts, the welds look uniform and equally sized and the textured black powder coat is uniform and undamaged.
Each slider weighs about 68 lbs!
As for the installation: everything bolted up just as specified by Shrockworks. They use existing holes in the frame, except you need to drill (1) 1/2" dia. hole. Each slider has (4) 1/2" bolts holding them onto the frame.
Love how they tuck up nice and tight to the rocker panels... and they don't stick out past the mudflaps or the tires (well maybe a tiny bit). We bought the optional dimpled step plates. Should help to protect the rocker panels from road rash.
The folks at Shrockworks certainly did an awesome job designing, building and finishing these.
Here's some installation photo's to help anybody else that's planning to get a set of these.
The item numbers in the photo's correspond to the installation instructions
Hope this helps.
Attachments
-
 001.JPG212.4 KB · Views: 238
 -
 004.JPG244 KB · Views: 237
 -
 005.JPG214.4 KB · Views: 240
 -
 006.JPG283.2 KB · Views: 245
 -
 007.JPG238.3 KB · Views: 251
 -
 008.JPG212.4 KB · Views: 244
 -
 011.JPG230.8 KB · Views: 241
 -
 001.JPG261.7 KB · Views: 254
 -
 002.JPG267.2 KB · Views: 240
 -
 003.JPG218.9 KB · Views: 236
 -
 004.JPG284.4 KB · Views: 239
 -
 004A.JPG298.7 KB · Views: 250
 -
 004B.JPG292.4 KB · Views: 239
 -
 007.JPG296.7 KB · Views: 259
 -
 007B.JPG223.3 KB · Views: 245
 -
 007C.JPG234 KB · Views: 236
 -
 008.JPG276 KB · Views: 232
 -
 012.JPG241 KB · Views: 231
 -
 013.JPG185.5 KB · Views: 231
 -
 014.JPG282.3 KB · Views: 241
 -
 014A1.JPG251 KB · Views: 231
 -
 014A2.JPG266.6 KB · Views: 215
 -
 14B.JPG240.4 KB · Views: 238
 -
 015.JPG228.2 KB · Views: 224
 -
 018.JPG119.1 KB · Views: 220
 -
 018A.JPG202.8 KB · Views: 220
 -
 020.JPG213.8 KB · Views: 226
 -
 021.JPG209.5 KB · Views: 238
 -
 022.JPG214.3 KB · Views: 230
 -
 023.JPG194.3 KB · Views: 231
 -
 024.JPG198.1 KB · Views: 224
 -
 025.JPG218.9 KB · Views: 222
 -
 026.JPG227.5 KB · Views: 227
 -
 027.JPG225.3 KB · Views: 226
 -
 028.JPG230.1 KB · Views: 234
 -
 029.JPG244.7 KB · Views: 229
 -
 030.JPG212.3 KB · Views: 230


