alwaystinkering
Member
- Joined
- Oct 10, 2011
- Messages
- 15
- Vehicle Year
- 2002 Ford Range
- Transmission
- Manual
Well, I managed to put a NP435 behind my 4.0 SOHC in my Ranger. It is NOT a project for the faint of heart. I decided to go down this path when my M5OD started making those death growls in 3rd and 5th gear, so I decided that I needed to go a different route as far as transmissions are concerned. As you are all aware of, the 4.0 has no aftermarket support in regards to trans swapping, so finding Rulebreaker's adapter was just the ticket I needed-I thought.
I ordered the plate from Rulebreaker and I have to admit the plate was as close to perfect as you can get. The holes lined up perfectly on my smallblock bellhousing and appeared to line up on my motor. I said appeared because on a 4.0 SOHC motor, the exhaust manifolds protrude past the back of the engine. Once I took the exhaust manifolds off the motor, I put the plate up and it fit perfectly. Once I placed the bellhousing on the plate, that was where the "oh crap" feeling started. I am not too sure what all interchanges between the SOHC and OHV motors, but I realized that the plate would not work with my stock exhaust manifolds. Looking online, I noticed the OHV exhaust manifolds off an Aerostar would work, but then they would be in the way of my spark plugs, so changing manifolds was out of the question. Plus, I live in the socialist state of California and I'm sure the smog nazis would have had a cow with me changing manifolds. Besides my EGR would have to have been rerouted. Not to mention, there would have been no realistic way to run the exhaust pipes without them getting in the way of the starter, front drive shaft, or some other stuff (there is not much room in these rangers to work with).
Going in and telling Mama that my idea ran into snags was not a very good feeling, but she took it extremely well. So, in order to facilitate the trans swap, I already had rebuilt the NP435 and set it up for the output speed sensor (OSS), so mentally I convinced myself that I was halfway there.
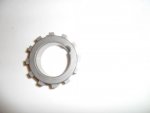
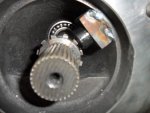
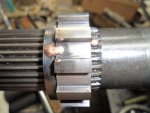
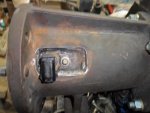
Regarding the OSS, I managed to find a gear out of another M5OD from a transmission shop. NOTE: Ford parts department was NO help at all in this endeavor. In fact, they couldn't even order the gear since they didn't know one existed. I took the gear and turned the inside on my lathe until it was the same diameter of the output shaft (forgot the measurments, but I have it written down somewhere). I then had an old input shaft for an old 208 transfer case, turned it down to the valley of the gear and cut it about 3/16" thick. Brazing it to the gear (brazing, not welding because brazing is non-ferrous and the OSS works of magnetic pickup), it slid on my output shaft perfectly. Then I added 2 spot welds as stops on the end of the shaft so the gear wouldn't slide all the way down the output shaft, I measured the distance the transfer case slides in, so basically the gear is sandwiched between the transfer case input and the spot welds on the other side. I then machined a hole in my tailshaft housing, made a plate with a hole big enough for the sensor, placed the tip of the sensor .02" away, and welded it all in place.
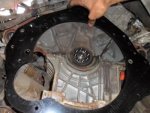
Getting back to the trans swap, I decided to build a bellhousing instead. I took a 12" pipe, 1/4" thick, cut it to 6 inches. Had a 1/4" plate with the hole in the center turned to the size of the bearing retainer. As reluctant as I was, I decided to cut up the adapter I got off Rulebreaker. I traced my M5OD on the adapter plate and basically cut off all the small block stuff, retaining all the 4.0l template. Placed the ring on there and welded it down. Took some 1/8" x 2" stock and built me a starter nose cone and then put on my old flywheel and dial indicator and centered the back plate. I got the plate centered to .004 of between the 12 and 6 o'clock position and .006 on the 3 to 9 position. Had my 12 year old son turn the engine over by hand to do this. I was lazy and left the spark plugs in, so he gained a few muscles helping me on this project.
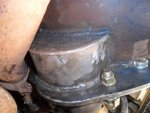
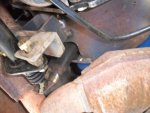
Once the bellhousing was built, I had to decide where I was going to put my clutch arm. Since there wasn't much room, it was easiest for me to place the arm on the passenger side at the 4 o'clock position. Makes for a plumbing nightmare, but I have the hose temporarily run for right now. The slave cylinder is NAPA part # 73118, which is off a Chevy stepvan. I snagged a couple hoses from the junkyard and just spliced them together with compression fittings and it works perfectly. Best of all, I have an external slave cylinder!
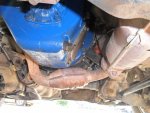
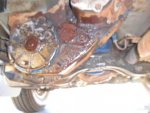
The crossmember is butchered right now, but I have to build another one, so it's just temporary. Origionally, I was going to go with a 208 transfer case but ran into some severe clearance issues. It hit the frame and I didn't feel comfortable hacking up my frame. I cut some ears off the transfer case, but it started leaking on me, so I had that "oh crap" feeling again. Then I remembered I had an old 205 sitting in the barn. Grabbed that and it's the same driveshaft orientation as the BW1345, meaning that the front driveshaft is going to be in the same parallel as origional. With the 208, I was worried because of the size, the front driveshaft would be at an angle and I wasn't really that comfortable with that idea. So, 205 was the perfect thing. The only other issue I ran into was going with the 208, I could use my stock driveshaft. With the 205, I had to build me a longer driveshaft-about 6 inches longer.
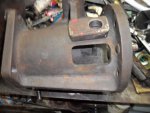
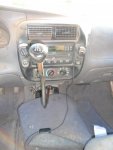
Things I ran into in the cab. Well, the shifter location is right under the dash. I had to pull out the airbag computer, cut a hole, remove my heater baffle and that little pocket at the bottom of the dash. The shifter would not go in the trans, so I cut it off leaving a 3" stub and drilled a couple holes. Modified my shifter and right now it's held on with a couple bolts. This too, is strictly temporary. I intend on fabbing up a better shifter, but was in a rush to get it going tonight.
My thoughts on this. Well, it was a lot more involved that I anticipated. Right now, until I build a better shifter, 1st gear hits the dash and the shifter is extremely sloppy. The plastic clutch hoses are strictly temporary and will be changed to a better routed hose/metal tube system in a day or two. The stock exhaust is in place and no exhaust modifications were needed. Gotta fix that hole in the floor. Need to mount the airbag computer somewhere. Ford had their head up their butts when they designed the clutch master cylinder and the top bolt on the starter (how the hell do you get to it?). Ford dealerships suck and are the most unhelpful people on the face of the earth. Thank God for NAPA. If it wasn't for NAPA and their employees, a lot of hunting for parts and making this work would have taken a lot longer (no, I don't work for NAPA).
My driving impression with the new trans is very positive. I never liked the M5OD and felt that the gear spread was all wrong with the SOHC motor. With this trans, the truck feels like it was made for it. The gear spread seems perfect with this motor. Best of all, I have a decent reverse now. Of course this trans is quite a bit louder, but after being in Afghanistan for a year, I hardly notice it-haha. Oh, and my speedometer works with the OSS, so that's a success! Loosing 5th gear isn't a concern with me. For the past month I was driving in 4th since 5th made too much noise. My gas mileage didn't go down much at all. In fact it appeared to remain the same. Not sure if I was just driving slower, but I didn't notice a decrease unless I went over 70. Besides, I think the engine was working a bit harder in 5th, so it negated the perceived fuel savings.
I have some pictures of the various stages in the build and will post them tomorrow. My camera is in the barn and I don't feel like going out there right now (scared of the dark and that whole thing). Well, any questions, just ask.
I ordered the plate from Rulebreaker and I have to admit the plate was as close to perfect as you can get. The holes lined up perfectly on my smallblock bellhousing and appeared to line up on my motor. I said appeared because on a 4.0 SOHC motor, the exhaust manifolds protrude past the back of the engine. Once I took the exhaust manifolds off the motor, I put the plate up and it fit perfectly. Once I placed the bellhousing on the plate, that was where the "oh crap" feeling started. I am not too sure what all interchanges between the SOHC and OHV motors, but I realized that the plate would not work with my stock exhaust manifolds. Looking online, I noticed the OHV exhaust manifolds off an Aerostar would work, but then they would be in the way of my spark plugs, so changing manifolds was out of the question. Plus, I live in the socialist state of California and I'm sure the smog nazis would have had a cow with me changing manifolds. Besides my EGR would have to have been rerouted. Not to mention, there would have been no realistic way to run the exhaust pipes without them getting in the way of the starter, front drive shaft, or some other stuff (there is not much room in these rangers to work with).
Going in and telling Mama that my idea ran into snags was not a very good feeling, but she took it extremely well. So, in order to facilitate the trans swap, I already had rebuilt the NP435 and set it up for the output speed sensor (OSS), so mentally I convinced myself that I was halfway there.
Regarding the OSS, I managed to find a gear out of another M5OD from a transmission shop. NOTE: Ford parts department was NO help at all in this endeavor. In fact, they couldn't even order the gear since they didn't know one existed. I took the gear and turned the inside on my lathe until it was the same diameter of the output shaft (forgot the measurments, but I have it written down somewhere). I then had an old input shaft for an old 208 transfer case, turned it down to the valley of the gear and cut it about 3/16" thick. Brazing it to the gear (brazing, not welding because brazing is non-ferrous and the OSS works of magnetic pickup), it slid on my output shaft perfectly. Then I added 2 spot welds as stops on the end of the shaft so the gear wouldn't slide all the way down the output shaft, I measured the distance the transfer case slides in, so basically the gear is sandwiched between the transfer case input and the spot welds on the other side. I then machined a hole in my tailshaft housing, made a plate with a hole big enough for the sensor, placed the tip of the sensor .02" away, and welded it all in place.
Getting back to the trans swap, I decided to build a bellhousing instead. I took a 12" pipe, 1/4" thick, cut it to 6 inches. Had a 1/4" plate with the hole in the center turned to the size of the bearing retainer. As reluctant as I was, I decided to cut up the adapter I got off Rulebreaker. I traced my M5OD on the adapter plate and basically cut off all the small block stuff, retaining all the 4.0l template. Placed the ring on there and welded it down. Took some 1/8" x 2" stock and built me a starter nose cone and then put on my old flywheel and dial indicator and centered the back plate. I got the plate centered to .004 of between the 12 and 6 o'clock position and .006 on the 3 to 9 position. Had my 12 year old son turn the engine over by hand to do this. I was lazy and left the spark plugs in, so he gained a few muscles helping me on this project.
Once the bellhousing was built, I had to decide where I was going to put my clutch arm. Since there wasn't much room, it was easiest for me to place the arm on the passenger side at the 4 o'clock position. Makes for a plumbing nightmare, but I have the hose temporarily run for right now. The slave cylinder is NAPA part # 73118, which is off a Chevy stepvan. I snagged a couple hoses from the junkyard and just spliced them together with compression fittings and it works perfectly. Best of all, I have an external slave cylinder!
The crossmember is butchered right now, but I have to build another one, so it's just temporary. Origionally, I was going to go with a 208 transfer case but ran into some severe clearance issues. It hit the frame and I didn't feel comfortable hacking up my frame. I cut some ears off the transfer case, but it started leaking on me, so I had that "oh crap" feeling again. Then I remembered I had an old 205 sitting in the barn. Grabbed that and it's the same driveshaft orientation as the BW1345, meaning that the front driveshaft is going to be in the same parallel as origional. With the 208, I was worried because of the size, the front driveshaft would be at an angle and I wasn't really that comfortable with that idea. So, 205 was the perfect thing. The only other issue I ran into was going with the 208, I could use my stock driveshaft. With the 205, I had to build me a longer driveshaft-about 6 inches longer.
Things I ran into in the cab. Well, the shifter location is right under the dash. I had to pull out the airbag computer, cut a hole, remove my heater baffle and that little pocket at the bottom of the dash. The shifter would not go in the trans, so I cut it off leaving a 3" stub and drilled a couple holes. Modified my shifter and right now it's held on with a couple bolts. This too, is strictly temporary. I intend on fabbing up a better shifter, but was in a rush to get it going tonight.
My thoughts on this. Well, it was a lot more involved that I anticipated. Right now, until I build a better shifter, 1st gear hits the dash and the shifter is extremely sloppy. The plastic clutch hoses are strictly temporary and will be changed to a better routed hose/metal tube system in a day or two. The stock exhaust is in place and no exhaust modifications were needed. Gotta fix that hole in the floor. Need to mount the airbag computer somewhere. Ford had their head up their butts when they designed the clutch master cylinder and the top bolt on the starter (how the hell do you get to it?). Ford dealerships suck and are the most unhelpful people on the face of the earth. Thank God for NAPA. If it wasn't for NAPA and their employees, a lot of hunting for parts and making this work would have taken a lot longer (no, I don't work for NAPA).
My driving impression with the new trans is very positive. I never liked the M5OD and felt that the gear spread was all wrong with the SOHC motor. With this trans, the truck feels like it was made for it. The gear spread seems perfect with this motor. Best of all, I have a decent reverse now. Of course this trans is quite a bit louder, but after being in Afghanistan for a year, I hardly notice it-haha. Oh, and my speedometer works with the OSS, so that's a success! Loosing 5th gear isn't a concern with me. For the past month I was driving in 4th since 5th made too much noise. My gas mileage didn't go down much at all. In fact it appeared to remain the same. Not sure if I was just driving slower, but I didn't notice a decrease unless I went over 70. Besides, I think the engine was working a bit harder in 5th, so it negated the perceived fuel savings.
I have some pictures of the various stages in the build and will post them tomorrow. My camera is in the barn and I don't feel like going out there right now (scared of the dark and that whole thing). Well, any questions, just ask.