• Welcome Visitor! Please take a few seconds and Register for our forum. Even if you don't want to post, you can still 'Like' and react to posts.

Hello with a question


PNWcossack

Member
Supporting Member
Joined
Jan 15, 2025
Messages
10
Age
27
City
Bellingham WA
Vehicle Year
1997
Engine
4.0 V6
Transmission
Automatic
Hello Friends,

My buddy gave me his 97 ranger that was destined for the junkyard, until he offered me to take it from him. It comes with a canopy and I plan on getting it running for truck camping this summer. I look forward in getting involved with the forum and sharing on what im doing with the truck.

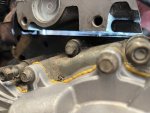
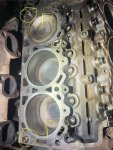
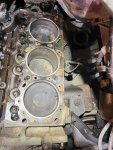
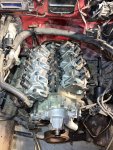
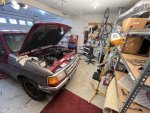
It has the 4L v6, but it has blown heads. I have been tearing into it for the past month and I am down to the block. But I may have made a grave mistake of assuming what engine is in the truck and ordered new cylinder heads from King Cylinder in a rash manner. I have deduced that my engine would be a 95TM,(according to King Cylinder site 95TM,98TM are years 1995-2000, and 90TM,93TM are years 1990-1994) So I ran with the 95TM. Now is the time to put on the new heads, but the heads are not wanting to sit flush by themself (see image three) Perhaps this is normal, and the tolerances for the two posts are very tight (see image seven with P1 and P2 highlighted to see what I'm refering too) and I need to just tighten them down, everything does seems to line up perfectly. If this is the case please advice.

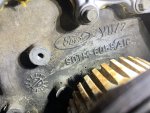
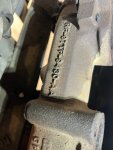
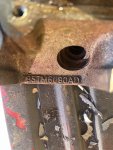
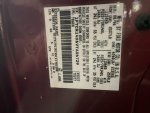
Question Given the photos provided, can you please help me identify my engine, there seems to me some contradictory information. Such as the passager cylinder head reads 95TM6090AD(see image six), but on the front of the engine it reads 90TM-6059-A1C(see image five) I have also included an image of the passanger exhaust manifold(see image four) door sticker(see image two) if that helps. Thanks in advance.
 

Attachments

  • five.JPG
    five.JPG
    301.8 KB · Views: 55
  • four.JPG
    four.JPG
    214 KB · Views: 53
  • one.JPG
    one.JPG
    339.6 KB · Views: 60
  • six.JPG
    six.JPG
    241.5 KB · Views: 67
  • three.JPG
    three.JPG
    197.3 KB · Views: 63
  • two.JPG
    two.JPG
    185.4 KB · Views: 56
  • seven.JPEG
    seven.JPEG
    305.2 KB · Views: 64
  • Like
Reactions: gaz
P1 & P2 are dowel pins for head to block alignment, they can be a tight fit. If those are new heads the holes should be clean, but doesn't hurt to check. Also make sure that there are no burrs or lip on the dowel or holes in the heads. Try using a mallet (a mallet, not a hammer) and see if you can bump them down into place. Even if that doesn't work they should pull down when you tighten and torque the head bolts.

90, 93, 95, and 98 are design codes, they give the year that the design was made or entered production, they did not change every year. Code on the front of the engine was for the block. Not uncommon for it to be an earlier casting design than the heads. Pure memory here, but I think that the 90 block was used until the 98 block came out.

Sounds like you've got the right stuff to me, just got to check it over and put it together. Good luck with it, should be a good little truck when you get finished. Don't care for the light bar on the hood, but the shell by it self was worth getting the truck for IMO.
 
Thanks for confirming for me Josh. I will proceed with installing the heads tomorrow. Ill keep you guys posted.

I agree with you with the light bar, but I can't help and wounder how bright it is. Might be useful with speeding down a forest road haha. According from the friend that got the truck from, that light bar is off a BNSF(local train company) maintenance truck. I'll keep it until I find a hood that I can replace it with.

I will also be getting new rims and tires for the truck when I know it is in good working order. Trying to see if I can get some BFGoodrich trail-terrian A/Ts with some black steeles. Im pretty confident that some 235/75R15 will fit without any modifications to the truck.
 
@PNWcossack
There is a top and bottom on those head gaskets. The heads and intakes are required to be installed and torqued simultaneously.

From the pic, it looks like your lower intake manifold may be sitting a little low; it is possible that it was milled to match a previously installed set of milled heads.

Wether you purchased new or reworked heads, they will benefit from a performance valve job. Those look like aftermarket wheels to me, what size rubber are on them?

Hello from Bremerton ..)
 
There is a top and bottom on those head gaskets. The heads and intakes are required to be installed and torqued simultaneously.
As Gaz said definitely pay attention to which direction the gaskets are facing.

Gaz, as many time as I've done 4.0L head gaskets, and as many times as I've read various instructions for installing them, I've never seen anything that said the heads and intake need to be installed and torqued simultaneously. Every set of instructions I've ever seen for building a 4.0L OHV has you install and torque the heads, then install and torque the intake. Any chance that you could share those instructions or where you found them? I'd just like to give it a read if possible.


From the pic, it looks like your lower intake manifold may be sitting a little low; it is possible that it was milled to match a previously installed set of milled heads.
Which pic? I'm not seeing a lower intake in any of them.
 
Intake and heads together is in my Haynes/Chilton manuals. I'll edit with a pic soon.
Edit: Here ya go.
vXxebxN.jpg
 
Last edited:
welcome!!

great looking truck for the best price!
 
If you are trying to put the head on with that front dowel not square to the block, then that is why you are struggling. The one you have marked as P2 is not fully seated and square to the block (at least when that pic was taken it wasn't) and is getting bound up on the head as you try to install it, as other mentioned tap it in flush (a soft mallet or dead blow is better than a hammer) and check for burs after tapping it into the block.

Oh, and Welcome to TRS from some random dude in Oregon...
 
Intake and heads together is in my Haynes/Chilton manuals. I'll edit with a pic soon.
Edit: Here ya go.
vXxebxN.jpg

Interesting, the Haynes manual (2005 printing) sitting open in front of me has your steps 1, 3 and 5, but not steps 2 and 4. Even the step by step for the head install procedure does not mention doing them together.

Maybe the bolt instructions themselves did, but it's been long enough that I can't recall or certain. New Felpro bolts every time I did them, and followed what ever instructions were with them, but it's been several years since the last set and I don't recall doing it that way.
 
The only reason I can think of for that is that someone thought it was necessary then found out it really wasn't. The book I took the picture of was apparently a 93 print Haynes. I have 92 book that is the same. This is a 99 Chilton:
HPHXt97.jpg
 
Looked up the Felpro bolt set instructions on their website and it says the same about alternating between the heads and intake. I guess I was doing it and just don't remember it. Or maybe dad did that portion of them. Most of it was done in his shop and he has a habbit of doing things while I'm at work instead of leaving it for me. Not complaining there, I'm happy that he feel like doing the stuff.

Okay...

So, what if only the lower intake needs to come off for what ever is being done? Not questioning you, just trying to make sense of the logic behind the instruction.

I'm not seeing any. If it were that critical, you'd have to remove and retorque the heads any time the lower intake was removed, but that isn't the case.
 
I'm guessing it's because the heads have a little bit of slop. You can move them around with the bolts loosely inserted. If you are just pulling the lower intake, the heads are still in the same place. Once tightened down they won't move.
 
Hey everyone!

I was able to get the truck running yesterday! I would have not been able to do so without you guys and the help of all the information throughout the forum.

This was the first time I have rebuilt an engine. Those cylinder heads fit like a glove after I started tightening down the head bolts. I really struggled mentally getting everything back together, I dreaded every step putting back the engine up until the install of the valve covers, but after that I was in a much better headspace. I had to redo the lower manifold gasket. It turns out there is a big difference between inch pounds and foot pounds SNAP! Felt like a complete idiot after that moment.

When I got the truck running there was a pinging sound coming from the engine. After looking into it, I think its water in the tank, the truck was sitting for 4 years before it got it running. Unfortunately I filled up the tank before I realized there was water in the tank. I'm going to put 2 bottles of HEET into the tank and hope for the best.

For whatever reason my coolant temperature sensor is not reading anything, I may have damaged the wire during install, which I think is unlikely since it was working fine before I took the engine part, but perhaps when I was cleaning the lower manifold some of the brake cleaner got on it and may have damaged it.

There seems to be an exhaust leak in the engine bay. I'm getting some exhaust into the cabin when I blow air, definitely something I'm gonna have to get fixed as soon as possible.

The transmission is shifting funny, I'll have to ask my friend who gave me the truck to see if he had any issues prior(it does have 194K miles) , hopefully it might be just the water affecting the engine and not the transmission itself.

Thanks again for all your help guys!
 

Attachments

  • IMG_3557.JPG
    IMG_3557.JPG
    191.9 KB · Views: 29
  • IMG_3631.JPG
    IMG_3631.JPG
    269 KB · Views: 30
  • IMG_3641.JPG
    IMG_3641.JPG
    283.2 KB · Views: 27
  • IMG_3711.JPG
    IMG_3711.JPG
    327 KB · Views: 25
  • IMG_3751.JPG
    IMG_3751.JPG
    263.5 KB · Views: 30
These engine are known for pinging on low grade gas. Often any 87 octane. If it runs acceptably. Try to run out everything in the tank and find somewhere to buy 91-93 pure gas. (No ethanol) I bet by the time your 1/4 way into a tank of that it'll be noticabley better.
 
Engine coolant temp sender... If its the single wire connector make sure you left some bare thread where it screws into the block. It needs metal to metal contact for ground.
There will be lots of oils and stuff burning off the engine for the first 15-30 minutes of running at full temperature. That's normal.
Make sure to check trans fluid level when fully warmed up.
 

Sponsored Ad


Sponsored Ad

TRS Events

Member & Vendor Upgrades

For a small yearly donation, you can support this forum and receive a 'Supporting Member' banner, or become a 'Supporting Vendor' and promote your products here. Click the banner to find out how.

Recently Featured

Want to see your truck here? Share your photos and details in the forum.

Ranger Adventure Video

TRS Merchandise

Follow TRS On Instagram

TRS Sponsors


Sponsored Ad


Sponsored Ad


Amazon Deals

Sponsored Ad

Back
Top