-
 Welcome Visitor! Please take a few seconds and Register
for our forum. Even if you don't want to post, you can still 'Like' and react to posts.
You are using an out of date browser. It may not display this or other websites correctly.
You should upgrade or use an alternative browser.
You should upgrade or use an alternative browser.
4.0 OHV top end redo
- Thread starter Dantheman1540
- Start date
RobbieD
2.9l Mafia
- Joined
- Aug 6, 2007
- Messages
- 4,943
- City
- Georgia
- Vehicle Year
- 1984,1990,1994
- Transmission
- Manual
- My credo
- Toonces drives a Ranger . . . . just not very well.
I've had to fill, run and drain 6 to 9 times before for a neglected cooling system that's really gunked up.
Are you draining it with the petcock on the radiator? That moves the coolant real slow. a higher drain flow works a lot better for flushing the crap out.
What I do to flush mine is to run the truck, then let it cool off and CONFIRM that the system isn't pressurized any more.
Start the engine, for just a few seconds (this freshly agitates the coolant).
Loosen or remove the radiator cap ( this lets air displace coolant, and verifies that the system isn't pressurized )
Then pop off the lower hose at the radiator.
The coolant will puke out, carrying a lot more crud out of the system versus the petcock.
It helps to break the lower hose loose beforehand, and treat the inside where it goes over the radiator outlet with silicone. The clamp will still hold it fine, and it'll be easy to pop off for the flush after you've loosened the clamp.
Just use common sense and be careful.
I've had to fill, run and drain 6 to 9 times before for a neglected cooling system that's really gunked up.
Are you draining it with the petcock on the radiator? That moves the coolant real slow. a higher drain flow works a lot better for flushing the crap out.
What I do to flush mine is to run the truck, then let it cool off and CONFIRM that the system isn't pressurized any more.
Start the engine, for just a few seconds (this freshly agitates the coolant).
Loosen or remove the radiator cap ( this lets air displace coolant, and verifies that the system isn't pressurized )
Then pop off the lower hose at the radiator.
The coolant will puke out, carrying a lot more crud out of the system versus the petcock.
It helps to break the lower hose loose beforehand, and treat the inside where it goes over the radiator outlet with silicone. The clamp will still hold it fine, and it'll be easy to pop off for the flush after you've loosened the clamp.
Just use common sense and be careful.
Ive just been using petcock because I’m lazy and don’t have an elec ratchet at the house to undo the hose clamp on the lower hose. Going to grab one tomorrow on my way to work tho so I can do that, I’m hoping some big chunks come out lol
rhekman
Well-Known Member
- Joined
- Aug 6, 2011
- Messages
- 85
- Vehicle Year
- 1995
- Engine
- 4.0 V6
- Transmission
- Manual
- Total Lift
- 2"
Ive just been using petcock because I’m lazy and don’t have an elec ratchet at the house to undo the hose clamp on the lower hose. Going to grab one tomorrow on my way to work tho so I can do that, I’m hoping some big chunks come out lol
This might be on the ambitious side, but if it were me I'd consider popping one or more freeze plugs to get at the block passages, given how much junk is coming out with multiple flushes. The middle plug on the passenger side is relatively accessible just by taking the wheel off.
This might be on the ambitious side, but if it were me I'd consider popping one or more freeze plugs to get at the block passages, given how much junk is coming out with multiple flushes. The middle plug on the passenger side is relatively accessible just by taking the wheel off.
Oh you talking wild stuff now.
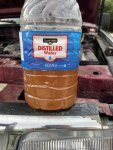
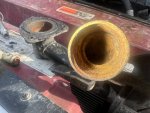
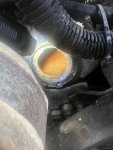
I flushed the heater core both directions a few times. Pulled the thermostat tested it and it passed, also shot water through the water pump until it came out the thermostat hole. Nothing crazy came out that I could see, and fresh water is flowing out now. There is just a ton of the orange slime buildup in everything, even the fairly new (1.5year old) radiator hoses and thermostat neck. I guess the only way to get that stuff clean is many more chemical flushes.
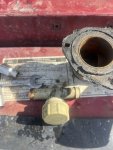
Also found this T fitting spliced into the heater core hose, I thought it was a shutoff valve but it appears to be a port to flush from or idk. This can’t be stock right?
Also found this T fitting spliced into the heater core hose, I thought it was a shutoff valve but it appears to be a port to flush from or idk. This can’t be stock right?
Attachments
- Joined
- Oct 1, 2021
- Messages
- 4,614
- State - Country
- TX - USA
- Other
- 2004 ford ranger
- Vehicle Year
- 2024
- Vehicle
- Ford Ranger
- Drive
- 2WD
- Engine
- 2.3 EcoBoost
- Transmission
- Automatic
- Total Lift
- 0
- Total Drop
- 0
- Tire Size
- Stock
- My credo
- drives a stick shift ranger
it definitely looks like one of those kit parts that you could get at walmart that lets you flush a system
it definitely looks like one of those kit parts that you could get at walmart that lets you flush a system
Probably gonna delete it, gotta see if I have enough 5/8 silicon line in my stash to replace them both.
Also gonna run no T stat for awhile just to help flow of chunks if there are any.
RobbieD
2.9l Mafia
- Joined
- Aug 6, 2007
- Messages
- 4,943
- City
- Georgia
- Vehicle Year
- 1984,1990,1994
- Transmission
- Manual
- My credo
- Toonces drives a Ranger . . . . just not very well.
I guess the only way to get that stuff clean is many more chemical flushes.
It may take weeks of multiple plain-water or light chemical flushes to get the coolant to look acceptably clear.
But go conservative on the harsh flushing chemicals. If you overdo the chemicals you could end up with leaking freeze plugs. They're not thick metal to begin with, they've pitted over the years, and nuking the motor with too much flushing chemical could open a pit into a pinhole.
It'll take multiple flushes. That's another reason I pop the lower radiator hose; it makes the flush process much faster.
Shran
Junk Collector
TRS Forum Moderator
Supporting Member
Article Contributor
Solid Axle Swap
Truck of Month
Maybe try this stuff:
My buddy that works at Ford mentioned something about Taurus and Escape engines having really bad issues with rust and people not changing the coolant. He said that Ford made some sort of cleaner and I'm assuming that's what he was talking about.
@19Walt93 do you have any experience with this Motorcraft stuff?
Shran
Junk Collector
TRS Forum Moderator
Supporting Member
Article Contributor
Solid Axle Swap
Truck of Month
$29.21 for a quart that works vs $21 for three that might not? Not much difference there....reviews on the motorcraft stuff are pretty promising.
Cooling system flush chemicals that actually work the first time are worth just about any price if you ask me.
Cooling system flush chemicals that actually work the first time are worth just about any price if you ask me.
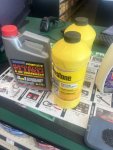
I was getting a good amount of junk out with the first two treatments with the Prestone. Figured the blue devil will be the last flush and then if it needs more I can try to motorcraft.
Uhg I somehow forgot this, but the top right thermostat housing bolt just spins and never gets tight, and the top left one goes in sideways as a mofo but does eventually get tight. It’s not leaking, despite putting the gasket but no thermostat in. After the flushes when I out the thermostat back in I’ll have to try to retap the holes, probably have to go bigger on both of them.
Similar threads
- Replies
- 5
- Views
- 750
- Replies
- 4
- Views
- 242
Sponsored Ad
Sponsored Ad
TRS Events
Latest posts
-
-
-
-
What did you do to your 2019 and up Ranger today?
- Latest: Robertmangrum.rm
-
-
-
-
-
-
2.3L ('02-'11) no engine oil on dipstick when buying used 2002 i4 ranger
- Latest: youngbuckwithapickuptruck

