
Audiotech80
New Member
- Joined
- Jan 15, 2019
- Messages
- 13
- Reaction score
- 0
- Points
- 0
- Location
- Michigan
- Vehicle Year
- 1994
- Make / Model
- Ford
- Transmission
- Manual
How to: Dash Fab project Double din install 4 hours total Gen 2 ranger/Explorer
This is basically a diy how to modification on the gen 2 1989-94 ranger/explorer dash for a double din install. I know there's a few historical posts on 1 or 2 previous attempts, maybe more but I didn't see any realistic explanations and everyone's is different I went for the clean install and duct work modification as possible and figured I'd offer what I know .
All you need to do this job is grab a saw zaw or or jigsaw even file out the entire opening clean.
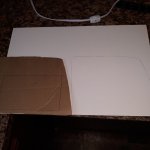
I made a template out of cardboard and transferred that to 1/4" thick pressboard you could use thinner if available.
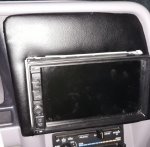
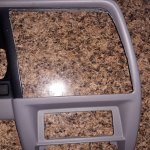
This ends up being your new face plate for your 4" x 7" Double din cage cutout. At That point before you epoxy it into the Bezel cutout from behind you can or should sand paint primer vinyl wrap or carpet the wooden template however you choose to doctor it up.
I have my faceplate put on from the front side of the entire bezel by choice .
"Center Heater vent mod"
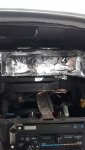
With a Saw zaw simply do it as you go... cut out the vent area that was once the center vent cut it back as far as you can leave some of the duct work because your going too create a Channel passage to keep the vent from loosing heat and it will allow the heat to continue over to the drivers side panel vent.
I left 2 inches or so at the back of the center duct work. I used aluminum heating @ cooling duct work tape to remake the passage as you can see in Photos Does good with heat and very sticky. I found it to disperse Heat at a even better flow to the remaining 3 panel vents and defrost/floor .
It's a relatively simple modification with a little enginuity and no real loss no matter how you slice it . I know people prefer single din.. or ask why not use a flip out player . To each and there own i say.
Best of luck if you want to give it a shot .
Finished up vinyl will probably change it to a gray vinyl and do a few things different . I'm going to do a second redesigned face with 1/8" board since the template was originally designed to be mounted behind the bezel and see if I get a cleaner look. The hard parts over.
Bonus tip on this install : Tons of extra room for Hdmi cables, av adapters , rca cables etc .....with room to spare, no more fussin with stuffing audio wires around.
Update :
Im remaking a new design that's more of a correct finish ,
I'll call the first illustrations the fundamentals of the Job/Modification.
Will update final results shortly !
This is basically a diy how to modification on the gen 2 1989-94 ranger/explorer dash for a double din install. I know there's a few historical posts on 1 or 2 previous attempts, maybe more but I didn't see any realistic explanations and everyone's is different I went for the clean install and duct work modification as possible and figured I'd offer what I know .
All you need to do this job is grab a saw zaw or or jigsaw even file out the entire opening clean.
I made a template out of cardboard and transferred that to 1/4" thick pressboard you could use thinner if available.
This ends up being your new face plate for your 4" x 7" Double din cage cutout. At That point before you epoxy it into the Bezel cutout from behind you can or should sand paint primer vinyl wrap or carpet the wooden template however you choose to doctor it up.
I have my faceplate put on from the front side of the entire bezel by choice .
"Center Heater vent mod"
With a Saw zaw simply do it as you go... cut out the vent area that was once the center vent cut it back as far as you can leave some of the duct work because your going too create a Channel passage to keep the vent from loosing heat and it will allow the heat to continue over to the drivers side panel vent.
I left 2 inches or so at the back of the center duct work. I used aluminum heating @ cooling duct work tape to remake the passage as you can see in Photos Does good with heat and very sticky. I found it to disperse Heat at a even better flow to the remaining 3 panel vents and defrost/floor .
It's a relatively simple modification with a little enginuity and no real loss no matter how you slice it . I know people prefer single din.. or ask why not use a flip out player . To each and there own i say.
Best of luck if you want to give it a shot .
Finished up vinyl will probably change it to a gray vinyl and do a few things different . I'm going to do a second redesigned face with 1/8" board since the template was originally designed to be mounted behind the bezel and see if I get a cleaner look. The hard parts over.
Bonus tip on this install : Tons of extra room for Hdmi cables, av adapters , rca cables etc .....with room to spare, no more fussin with stuffing audio wires around.
Update :
Im remaking a new design that's more of a correct finish ,
I'll call the first illustrations the fundamentals of the Job/Modification.
Will update final results shortly !
Attachments
-
 127.9 KB Views: 167
 -
 303 KB Views: 178
 -
 267.3 KB Views: 158
 -
 72.1 KB Views: 153
Last edited:


