
mc17eln
Member
- Joined
- Aug 8, 2021
- Messages
- 95
- Reaction score
- 33
- Points
- 18
- Location
- Diamond Bar, California
- Vehicle Year
- 2002
- Make / Model
- Ford Ranger XLT
- Engine Type
- 3.0 V6
- Transmission
- Automatic
- 2WD / 4WD
- 2WD
I was surprised to find no posting of this topic in the entire site, so let me write up how I did it.
This is based on the vise technique shown in this video (credit): How to easily remove piston bolt without a press. I am calling it piston pin (or wise pin) as it should be. Here is an alternative technique, which I opted not to use.
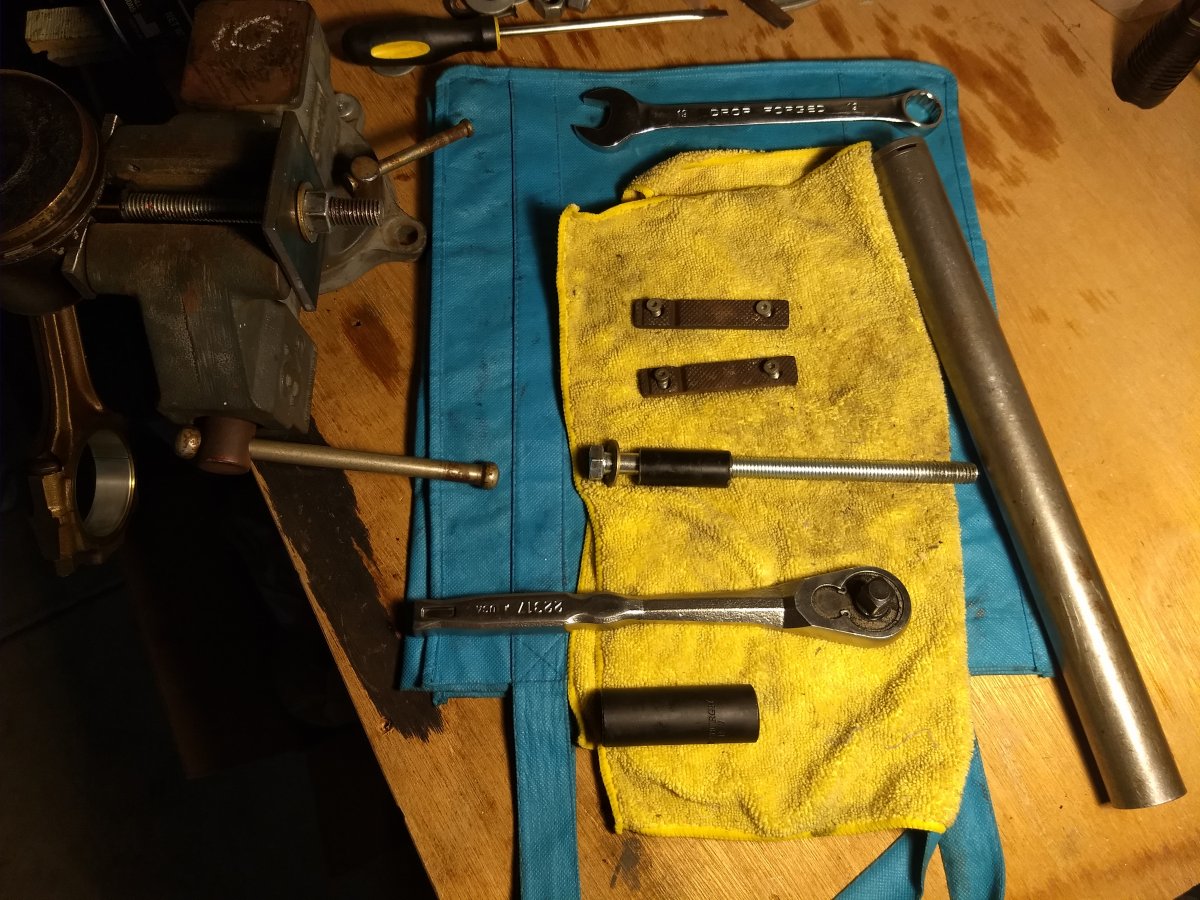
Required hardware:
- 1/2 inch x 7 inch Grade 5 bolt and nut
- 1/2 inch Grade 8 washers
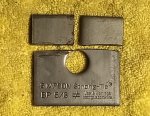
- 2.5 x 2.5 inch bearing plate with 5/8 inch hole on 1/4 steel
- 1/4 inch steel shim bits
- 3 inch or 3.5 inch vise
- 1/2 in (or 19mm) deep socket and combo wrench
- 1/2 ratchet and extension
- 1/2 inch x 8 inch Grade 5 bolt and nut
- 2 inch bit of 1/2 inch steel pipe (household plumbing)
Bolts:
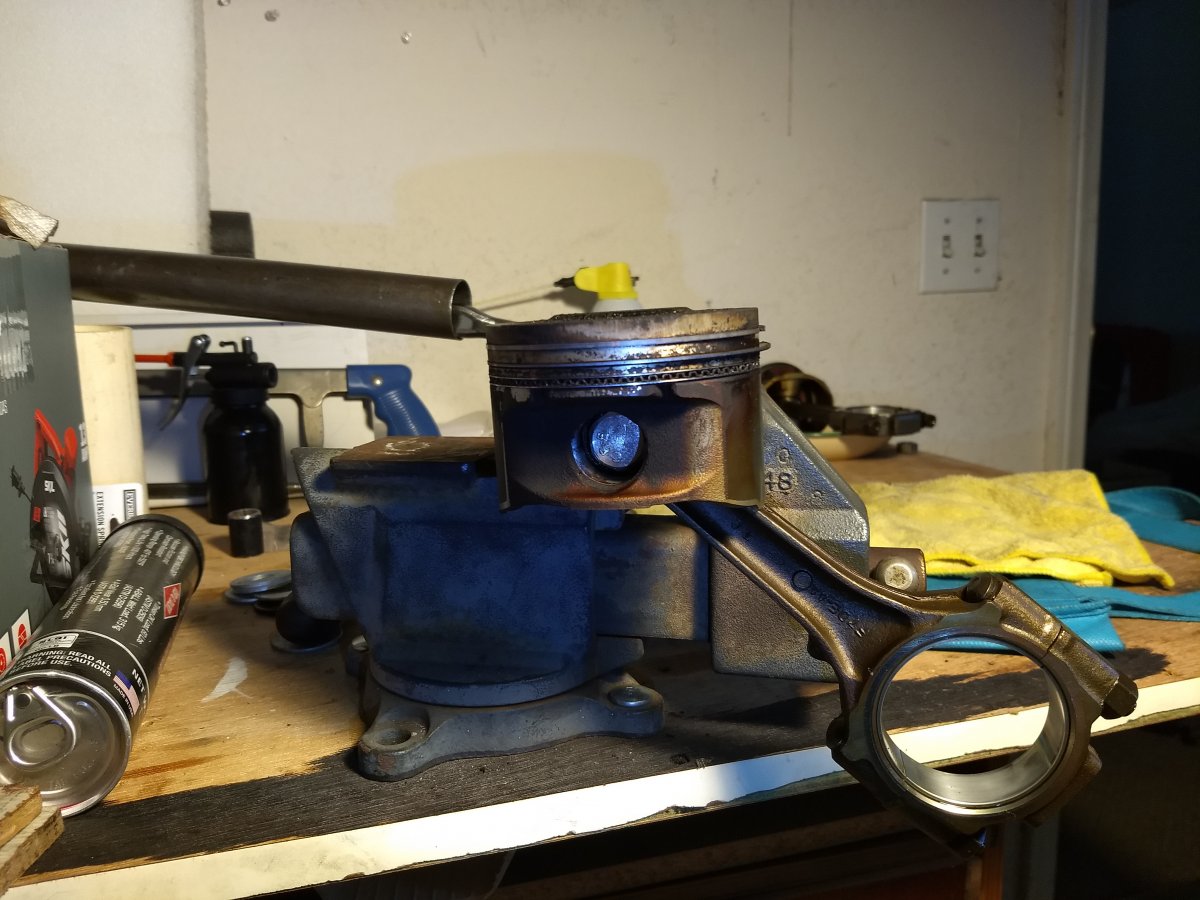
The 1/2 inch bolt fits the Vulcan piston pin perfectly. The bolt hex head is just a hair smaller than the outside diameter of the pin. I would've used Grade 8 or higher bolts, but they don't make them longer than 6 inches. The 7 inch Grade 5 bolt/nut will not last 6 piston pins, so buy 2 sets. A galvanized nut destroyed the threads of a non-galvanized (zinc) grade 5 bolt on first try, so just get the zinc nuts on the same shelf. I will explain the 8 inch bolt later.
Big Washer Replacement:
I commented on the video that the big washer is the critical piece but not easy to find. I came up with the idea of using the bearing plate on 1/4 inch steel (98 cents each), which proved to be wide enough and strong enough. The 1/2 inch Grade 8 washer helps the 1/2 inch nut turn better on the bearing plate's 5/8 hole. Bearing plates with 1/2 inch hole are smaller and thinner.
Shim bits:
The Vulcan piston skirt bottom flare out on both sides of the pin, which interferes with the vise. I cut another 2.5 x 2.5 inch bearing plate into 2 shim bits, about 1.25 inch x 0.9 inch each (right off its 5/8 hole). That size and its 1/4 inch thickness provide good contact surface to the vise.
Vise:
A 3-inch vise will give more head room to the nut. My 3.5 inch vise barely works with 7 inch bolt and nut. Don't use vise bigger than that. Most vises have a pair of jaws that is slightly wider than its main body. I removed both jaws to get a bigger contact surface on either side.
Doing it:
1. Open the vise slightly wider than the pin's outer diameter
2. Clean the inside of the pin before inserting the 7 inch bolt
3. Lubricate the first 2 inches of the bolt (I used red grease)
4. Lubricate then add the bearing plate, washer and nut
5. Add both shims on the other side and tighten the nut with the socket by hand
6. Adjust/check the shims and the vise, both to be wider than the pin
7. Steadily tighten the nut with ratchet and extension (power tools destroy threads quicker)
8. If you are lucky, the 7 inch bolt may finish the job.
9. Otherwise, when the pin clears one side of the piston, the 7 inch bolt may start to spin.
10. Disassemble and insert the 8 inch bolt with the 2 inch steel pipe bit (another perfect fit), which exposes the hex head for the combo wrench to counter-hold and finish it off.
11. Inspect thread condition of the bolt and nut between each pull.
Why not use the 8 or 10 inch bolt all the way? The first half of the pull is the toughest. I believe the Grade 5 bolt stretches, so further the nut away from the bolt head, stronger the force is needed, more likely to strip the bolt/nut threads. With that reasoning, a 3 inch vise with 7 inch bolt is more reliable.
Photos:


.
This is based on the vise technique shown in this video (credit): How to easily remove piston bolt without a press. I am calling it piston pin (or wise pin) as it should be. Here is an alternative technique, which I opted not to use.
Required hardware:
- 1/2 inch x 7 inch Grade 5 bolt and nut
- 1/2 inch Grade 8 washers
- 2.5 x 2.5 inch bearing plate with 5/8 inch hole on 1/4 steel
- 1/4 inch steel shim bits
- 3 inch or 3.5 inch vise
- 1/2 in (or 19mm) deep socket and combo wrench
- 1/2 ratchet and extension
- 1/2 inch x 8 inch Grade 5 bolt and nut
- 2 inch bit of 1/2 inch steel pipe (household plumbing)
Bolts:
The 1/2 inch bolt fits the Vulcan piston pin perfectly. The bolt hex head is just a hair smaller than the outside diameter of the pin. I would've used Grade 8 or higher bolts, but they don't make them longer than 6 inches. The 7 inch Grade 5 bolt/nut will not last 6 piston pins, so buy 2 sets. A galvanized nut destroyed the threads of a non-galvanized (zinc) grade 5 bolt on first try, so just get the zinc nuts on the same shelf. I will explain the 8 inch bolt later.
Big Washer Replacement:
I commented on the video that the big washer is the critical piece but not easy to find. I came up with the idea of using the bearing plate on 1/4 inch steel (98 cents each), which proved to be wide enough and strong enough. The 1/2 inch Grade 8 washer helps the 1/2 inch nut turn better on the bearing plate's 5/8 hole. Bearing plates with 1/2 inch hole are smaller and thinner.
Shim bits:
The Vulcan piston skirt bottom flare out on both sides of the pin, which interferes with the vise. I cut another 2.5 x 2.5 inch bearing plate into 2 shim bits, about 1.25 inch x 0.9 inch each (right off its 5/8 hole). That size and its 1/4 inch thickness provide good contact surface to the vise.
Vise:
A 3-inch vise will give more head room to the nut. My 3.5 inch vise barely works with 7 inch bolt and nut. Don't use vise bigger than that. Most vises have a pair of jaws that is slightly wider than its main body. I removed both jaws to get a bigger contact surface on either side.
Doing it:
1. Open the vise slightly wider than the pin's outer diameter
2. Clean the inside of the pin before inserting the 7 inch bolt
3. Lubricate the first 2 inches of the bolt (I used red grease)
4. Lubricate then add the bearing plate, washer and nut
5. Add both shims on the other side and tighten the nut with the socket by hand
6. Adjust/check the shims and the vise, both to be wider than the pin
7. Steadily tighten the nut with ratchet and extension (power tools destroy threads quicker)
8. If you are lucky, the 7 inch bolt may finish the job.
9. Otherwise, when the pin clears one side of the piston, the 7 inch bolt may start to spin.
10. Disassemble and insert the 8 inch bolt with the 2 inch steel pipe bit (another perfect fit), which exposes the hex head for the combo wrench to counter-hold and finish it off.
11. Inspect thread condition of the bolt and nut between each pull.
Why not use the 8 or 10 inch bolt all the way? The first half of the pull is the toughest. I believe the Grade 5 bolt stretches, so further the nut away from the bolt head, stronger the force is needed, more likely to strip the bolt/nut threads. With that reasoning, a 3 inch vise with 7 inch bolt is more reliable.
Photos:
.


