• Welcome Visitor! Please take a few seconds and Register for our forum. Even if you don't want to post, you can still 'Like' and react to posts.

Rough, High Idle, Ticking -> Head Disassembly & Update


DirtBronco

Member
Joined
Jul 28, 2020
Messages
67
Reaction score
25
Points
18
Location
Georgia
Vehicle Year
1989
Make / Model
Bronco II
I recently dumped some Seafoam in the tank and crankcase since the cars been sitting a while.
Since then, it's been idling at 2000 while occasionally yo-yoing while ticking from the right bank. Before, it was idling at 1500, obviously still too high.
For both cases, it's shaking pretty aggressively and smells rich.
It's also hesitating and surging while driving.

I unplugged the IAC and the revs dropped to around 1200 and the engine smoothed out somewhat but still not what I'd call stable.
There doesn't appear to be a vacuum leak but I also haven't performed a smoke test.
Any suggestions?


DirtBronco

Member
Joined
Jul 28, 2020
Messages
67
Reaction score
25
Points
18
Location
Georgia
Vehicle Year
1989
Make / Model
Bronco II
Update:
I changed the spark plugs to find a significant amount of oil on the threads.
After the engine cooled, I started it again and it idled at 1800 and came down to 1300 after 5 minutes of warming up, so progress.

The ticking noise is more prominent, I think it's electrical rather than a lifter. I'm gonna run a can of seafoam through the intake and see
I noticed a significant coolant leak. Maybe the high idle is partly due to the coolant sensor or something. I dont know.

Any input is appreciated
 

DirtBronco

Member
Joined
Jul 28, 2020
Messages
67
Reaction score
25
Points
18
Location
Georgia
Vehicle Year
1989
Make / Model
Bronco II
Another update:
Post intake seafoam, its idling at 1200 and significantly less rough but its still rumbling and smell like gas.
I'm going to replace the injectors and plug leads so see if that eliminates the ticking. They look like they need to be replaced anyway.
There's fuel pooling in the lip of the valve cover, but the pressure regulator is not wet, not is anything in the area.
 

rusty ol ranger

2.9 Mafia-Don
Supporting Member
Joined
Sep 22, 2007
Messages
12,396
Reaction score
7,491
Points
113
Location
Michigan
Vehicle Year
1987
Make / Model
Ford
Engine Type
2.9 V6
Engine Size
177 CID
Transmission
Manual
2WD / 4WD
2WD
My credo
A legend to the old man, a hero to the child...
Ticking could very well be the injectors
 

DirtBronco

Member
Joined
Jul 28, 2020
Messages
67
Reaction score
25
Points
18
Location
Georgia
Vehicle Year
1989
Make / Model
Bronco II
Injectors, cables, and gasket overhaul kit are on the way courtesy of Bezos.

After looking around the engine bay again, what I think is the vacuum line going from the lower air intake to the main air intake was unplugged and the hose was perforated. The attach point at the main intake was plugged with a screw. I hooked them up and as a quick fix, I electrical taped the line as a sealant. Why not?

Cold starting is at 2000, with 1800 after a few minutes. I got brave enough to take it out on the road. After shifting gears for a bit, idle dropped to 1200.

The power is intermittent, surging, hesitating and running rough. Also a burning smell, but the covid took my sharper senses to distinguish. Randomly the oil pressure will drop for a split second then come back up to nominal. After I got it back to the house, smoke was coming out of the recently re-attached lower intake. Last time I took it out, the smoke came from the valve cover/oil filter cap

My thought is clogged PCV valve, on the back of the passenger-side valve cover? The valve lifts out easily if you pull on it. The gasket is cooked into place.
The theory is the crank case builds pressure, then blows off through the gap under the clogged valve, which results in temporary improved drivability and blip in oil pressure gauge. Might even explain the high idle.

Also noticed the temp is taking forever to get up to the midband but I could attribute that to the coolant leak.
 

rusty ol ranger

2.9 Mafia-Don
Supporting Member
Joined
Sep 22, 2007
Messages
12,396
Reaction score
7,491
Points
113
Location
Michigan
Vehicle Year
1987
Make / Model
Ford
Engine Type
2.9 V6
Engine Size
177 CID
Transmission
Manual
2WD / 4WD
2WD
My credo
A legend to the old man, a hero to the child...
Run a compression check.

Sounds like you got some serious blowby. I mean...you could spend 5 bucks on a PCV valve...but i highly doubt thats it.
 

DirtBronco

Member
Joined
Jul 28, 2020
Messages
67
Reaction score
25
Points
18
Location
Georgia
Vehicle Year
1989
Make / Model
Bronco II
Rusty, I’m gonna go to autozone tomorrow and rent the tool. I do think this is something more serious than a defective part...
Just checked underneath. Whoever owned the car before completely CUT the lower intake hose to the engine. My guess was an uneducated attempt to bypass it for the aftermarket intake. At least that explains the uncontrollably high idle.

What was left of the intake neck was facing down and filled with dirt. I’m gonna guess I’ve got a crank case full of rocks...

what are the odds i need a new engine?
 
Last edited:

JerrySab

Active Member
Supporting Member
Joined
Jul 11, 2020
Messages
213
Reaction score
44
Points
28
Age
42
Location
Los Angeles
Vehicle Year
1988
Make / Model
Ford Ranger
Engine Type
2.9 V6
Transmission
Automatic
2WD / 4WD
2WD
Really appreciate the thread and your updates, I'm experiencing similar symptoms from my '88 ranger. Replaced some low-hanging-fruit type sensors to no avail. The truck definitely overheated pretty badly in the past, and I don't think the fallout from that has been well resolved.
 

DirtBronco

Member
Joined
Jul 28, 2020
Messages
67
Reaction score
25
Points
18
Location
Georgia
Vehicle Year
1989
Make / Model
Bronco II
That's what forums are for! I'm gonna move the vehicle closer to home where I can lift the engine and inspect the contents of the oil pan so stay tuned.
 

gaz

Well-Known Member
U.S. Military - Veteran
Joined
Sep 21, 2007
Messages
1,420
Reaction score
655
Points
113
Location
Wa, Bremerton 98310
Vehicle Year
1987
Make / Model
Ford
Engine Size
87Ranger Endrigo 2.9l, 87BII Endrigo 4.0l
2WD / 4WD
4WD
Total Lift
Ranger 5" (2" suspension), BII 4" suspension
Total Drop
Ranger 5sp, BII A4LD
Tire Size
Ranger 33"/4:10LS, BII 29"/3:73LS
My credo
Deengineer until it is how Blue Oval should have sold it!!
Dirtbronco:

You smell fuel and have fuel puddling on the valve cover??? This is where to start; stop driving it until you resolve the fuel leak on top of your engine!
 

sheep herder

Well-Known Member
U.S. Military - Veteran
Joined
Nov 7, 2019
Messages
1,403
Reaction score
1,024
Points
113
Location
sheep pen
Vehicle Year
2011
Make / Model
Ford Ranger
Engine Type
4.0 V6
Transmission
Automatic
2WD / 4WD
2WD
My credo
If it ain't broke, break it.
Or you can keep driving it until it catches on fire. That'll take care of the idle and ticking.
 

DirtBronco

Member
Joined
Jul 28, 2020
Messages
67
Reaction score
25
Points
18
Location
Georgia
Vehicle Year
1989
Make / Model
Bronco II
It's been a few weeks since I could make it out to the truck. It's on a friend's land a whiles away from where I live. Thankfully he accepts beer for rent...
Due to the newly found hole on the underside of my engine, I've decided to pull the engine in parts with the intent of rebuilding, and create an amateur collection of write ups of the processes.
It need many many gasket replacements anyway and I don't feel like being on my back for the infamous oil pan ordeal.
Today: Upper intake manifold
All you should need are 8, 10, 11 mm sockets, and a 6" extension.

For those having a bad day, here's a laugh. While removing the negative battery cable, I gave it a jiggle a tad too aggressive and boom. One more part to replace. To be fair, it was not in good condition to start... Also, don't forget to bleed your schrader valve. It does well to also drain your coolant but mine leaked out a cracked hose so lucky me! One less thing to do.
47442
47443


2 bolts will disconnect your idle control valve. I laid it to the side but if you're doing a teardown, it would be prudent to get some colored tape and start labeling the connectors off the bat.
47444


Two more bolts will get the fuel pressure regulator off the fuel rail. You'll have to peel the unit away from the engine to get the rubberized bottom portion out of its mounting point.
47445
47446


To remove the accelerator cable, first take the snow guard off. Mine was missing but I cant imagine it's very hard.
Take the metal pipe connected to the throttle body and pull it directly away from the plate while lifting either face of the pressure clamp.
If it's old, it'll take some convincing. You dont need to remove the plastic pipe, I just playing around with what I was seeing.
Removing the mounting plate is just 2 bolts. Keep both cables attached to the plate for simplicity.
47447
47448
47449


Vacuum hoses up next. Take pictures, label them, or do something or the vacuum system boogie man will get you.
As you can see, the top vacuum hose on the left side of the engine is cut. If anyone knows what that goes to, please chime in before I go digging.
I left the vacuum gauge hook up cap on, cause why not. One less thing to lose.
47451
47452

47454
47455


Disconnect what I can only assume is a temp gauge. Bottom left side of the upper intake.
Be careful, I snapped one of the mounting clips while taking it off.
47459


PCV lines next. Further proof of internal work by whats underneath.
47460
47461


Last little bit of electrics and one worm gear hose clamp by the intake hose on the throttle body
47462
47463


Ground on the plenum.
47464


Finally the meat of the subject. 6 bolts, I kept track of the order. I dont know if you need to but I felt I should.
47466


The spoils
47467


But oh dear
47468


What will batman do next? Find out next time.
 

Attachments

JerrySab

Active Member
Supporting Member
Joined
Jul 11, 2020
Messages
213
Reaction score
44
Points
28
Age
42
Location
Los Angeles
Vehicle Year
1988
Make / Model
Ford Ranger
Engine Type
2.9 V6
Transmission
Automatic
2WD / 4WD
2WD
Super awesome, grabbing popcorn for this.

Also, pretty sure the cut vac line runs back to MAP sensor.
 

DirtBronco

Member
Joined
Jul 28, 2020
Messages
67
Reaction score
25
Points
18
Location
Georgia
Vehicle Year
1989
Make / Model
Bronco II
And we're back! Finally found some time between class and work to get some bolts turned. Fair warning my mechanics vocabulary is poor.
I wasn't as good about recording the wrench sizes this time around but nearly everything bounces between 10-13 mm.
If anyone sees anything out of the ordinary that I didn't bring attention too, please point it out. I'm a novice to this so I don't have the trained eye.

Most would advise against this but I manually depressurized the AC system as I was betting on this having sit for so long that there was nothing left in it.
49102

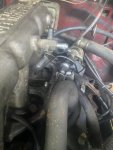
Distributor was a pain, removing the securing bolt wasn't easy as I don't have small ratchets. It didn't want to come out so I spent a solid 15 minutes twisting it. You should mark the spinner for timing purposes but since my cam and crank are coming out, I'll wait till reassembly and check the Chilton's. There's a nut securing the manifold just by the distributor as well as the front left instead of a bolt
49101
49099

49100
49104


All 6 lower manifold bolts were mysteriously easy to crack off.
49098


Thermostat off, definitely am gonna need a new one.
49103


Couple whacks with a rubber mallet and voila! More spoils.
49105

...gross...
49106
49107


Definitely have a wrench with a decent radius for the 6 rocker bolts or you'll hate yourself. Make sure to turn all of them uniformly as to not distribute pressure unevenly during removal.
49108


And they're off!
49109


More more spoils
49110


From here on, i'd say its necessary to remove the wheel/arch plastic and disconnect/pop off the wiring.
49111
49112
49113
49114


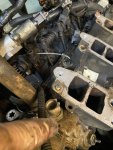
Passenger side exhaust manifold has a heat cover, 2 11mm bolts IIRC
49115


Many hidden bolts and connectors on the power steering/alternator brackets. Missing a few
49117
49118
49119
49120
49121
49122
49123
49124


The nut holding the power steering pump hose was stripped so I eventually took a bolt cutter to it. What's one more thing to replace...
I eventually got the remaining mount brackets off but I forgot to snap pictures of the bolts and use of the pulley puller.
49128


4 bolts connect the compressor
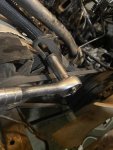
49125


Exhaust manifold...
6 13mm bolts that will make you hate your life. Stripped 2, broke 3.
Had to call in a few favors. Even after the engine was out, they're still rusted onto the pipes in the engine bay.
49126


I got kinda excited about getting the heads off so I didn't snap any pictures of the removal but they're T55 torx bits.
49129
49130


<shakes camera furiously>
49132


Many bolts snapped taking off the water pump so pardon the no pictures due to anger. But here's the front plate?
49133


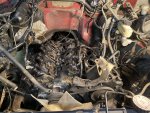
Was too cheap to rent a engine hoist so we went full backwater-India mode. Might as well have worn flip flops.
49134

49136


Once it was out, took the clutch off. Lovely cracks on the flywheel.
49135


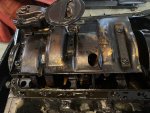
But hey! there's a short block!
49137


Anyone know what this on the side of the oil pan is for?
49138


To those who have done the oil pan gasket with the engine in the car and no lift... you are braver than I. Cant imagine how difficult that must be. Not TOO much crap in the pan, honestly better than I expected.
49139
49140


But then.... slapped the filter a few times and this shook out.
49141


13mm and T27's get the tray and pump off.
49143


Oil filter stem
49144


still cant get this b*****d off
49145


Note the muffler. Didn't even try to take it off. Just made up its mind to drop off on its own accord.
49146


Pulley wasn't as hard as I thought. Wedged a wrench between a flywheel and bellhousing bolt to isolate the spin and it popped right off.
49147


Thank you O'Reilly's free tool rentals. Couldn't have done it without you.
49148


13mm to get the front cover off, and there's the timing chain
49150
49149


10mm to get the tensioner off. Oh boy do I feel confident in my vehicle knowing that's made of plastic.
49151


Same torx size as the heads gets the chain off from the cam.
49152


Boom
49153


Got a little excited so no removal pics but...
49155
49154


Finally. despite the cam still being in due to the PB blaster still doing it's work on the plate bolts, I'd say part 1 of 100 of the car is done.
49156
49157


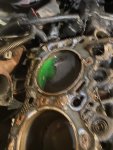
Upon inspection, there's some mild scoring going horizontal. Nothing to catch a fingernail but I can feel something. Any ideas? I read on a porsche forum this can be caused by a vehicle sitting too long, which it has for over a year prior to me getting it.
49160


Also, there's a noticeable ridge at the top of the cylinders. Is that normal?
49159

49158


Up next. DIY hot tank and a trip to the machinist for professional inspection.
 

Attachments

rusty ol ranger

2.9 Mafia-Don
Supporting Member
Joined
Sep 22, 2007
Messages
12,396
Reaction score
7,491
Points
113
Location
Michigan
Vehicle Year
1987
Make / Model
Ford
Engine Type
2.9 V6
Engine Size
177 CID
Transmission
Manual
2WD / 4WD
2WD
My credo
A legend to the old man, a hero to the child...
Great write up man!

The "thing" on the side of the pan is for the low oil level sensor
 

Sponsored Ad


Sponsored Ad

Members online

Member & Vendor Upgrades

For a small yearly donation, you can support this forum and receive a 'Supporting Member' banner, or become a 'Supporting Vendor' and promote your products here. Click the banner to find out how.

Truck of The Month


Shran
April Truck of The Month

Recently Featured

Want to see your truck here? Share your photos and details in the forum.

Follow TRS On Instagram

TRS Events

25th Anniversary Sponsors

Check Out The TRS Store


Sponsored Ad


Sponsored Ad

Sponsored Ad


Amazon Deals

Top