
- Joined
- Jul 31, 2021
- Messages
- 1,056
- Reaction score
- 672
- Points
- 113
- Location
- NW Florida
- Vehicle Year
- 1994
- Make / Model
- Ford Ranger XLT
- Engine Type
- 2.3 (4 Cylinder)
- Engine Size
- 2.3
- Transmission
- Manual
- 2WD / 4WD
- 2WD
- Total Drop
- 1.5” till I get these springs replaced
- Tire Size
- 225-70-R14
Original Poster: Chapap
Difficulty: 5 out of 10
Time to install: 3 hr *should* be plenty
Disclaimer: The Ranger Station.com, The Ranger Station.com Staff, nor the original poster are responsible for you doing this modification to your vehicle. By doing this modification and following this how-to you, the installer, take full responsibility if anything is damaged or messed up. If you have questions, feel free to PM the original poster or ask in the appropriate section of The Ranger Station.com forums.
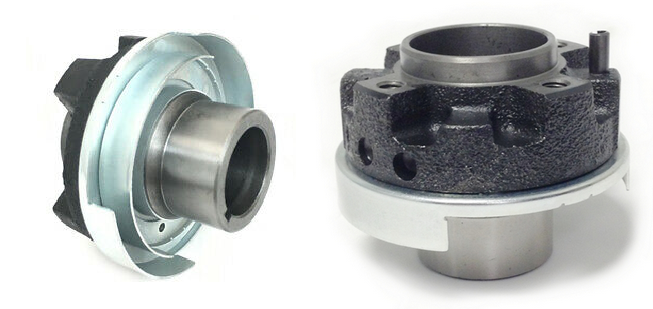
This is a fairly straight forward job. It's just unbolting stuff. Tough access is really the only thing that raises the dificulty. I could not find any info on how to do it, so I figured I'd write something. It took me 7 hr with 3 trips to the store and a few breaks to look up what to do. Be sure to know how to do your timing, cause the timing belt is coming off. This article is for the 2.3 Lima engine with the below pictured harmonic balancer... not a tone ring that looks like a sprocket.
Tools Needed:
- Harmonic balancer puller- Not required, but makes removing the sensor and timing belt easier. Without it you will have to turn engine to the correct position to free the sensor. It's also tough to get the timing belt out from behind the crank timing disc washer thing which can't be removed without removing the balancer
- Giant phillips screw driver for timing cover or stripped screw remover if its rusted beyond use. I couldn't get vice grips to work
- Dead-blow hammer and 3' beater extension (step 2, this is probably not the best method)
- Assortment of 1/4 and 1/2 ratchet extensions
- Plenty of sockets and crescents (I never remember sizes)
- small socket for the sensor (like 5.5 or 6mm)
- Big socket for the harmonic balancer bolt (19mm or larger)
Parts Needed:
- Crankshaft position sensor
- Teeny tiny zip tie (probably not needed, but OEM had on to keep the wire safe)
- Dielectric grease, or your choice of connector treatment
Parts you can change while you're there- basically stuff that needs/easier to be done with the fan removed
- Water pump
- Timing belt
- Thermostat
- Lower heater hose, lower radiator hose
- Ignition control module (supposed to use thermal paste on the back)
---------------------------------------------------------
Step 1: Remove timing belt
I'll keep this part brief since this isn't a timing belt article. The specifics of the sensor start in step 2.
- Remove fan and fan shroud.
- remove accessory belt, crankshaft pulley, water pump pulley.
- Remove harmonic balancer bolt. I got lucky and got it by putting the truck in 5th and pulling hard with a breaker bar. You can also brace a breaker bar against the frame (on the truck's left hand side) and bump the starter. I always pull an ignition fuse before using this method.
- Use puller to pull harmonic balancer (optional, but makes sensor and timing belt removal easier). Remove the crank timing disc washer thing so it doesn't decide to roll away.
- Remove outer timing belt cover. The only fastener is a giant phillips screw. The rest is molded clips along the edge. You may want to remove the A/C compressor first (see step 2) as the refrigerant hose is really in the way to get this thing out. This was a real headache step for me.
- Remove crank sensor from crank sensor mount.
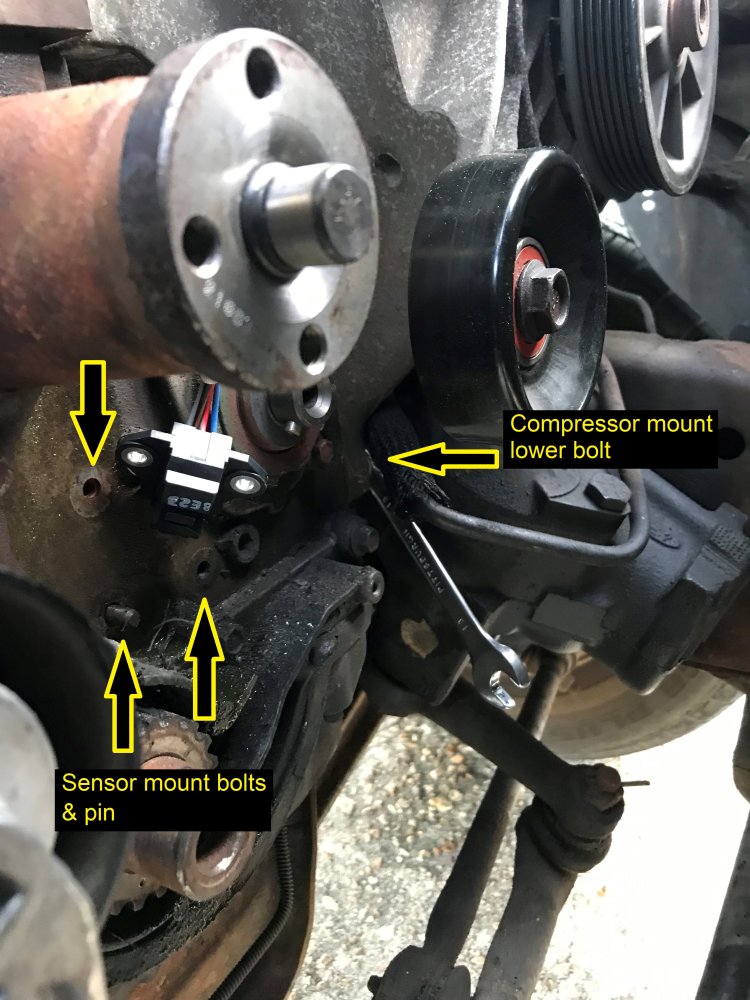
- Remove crank sensor mount from block. It's held in with two bolts on top left and right, and an alignment pin on bottom. See second picture in step 2.
- Remove timing belt.
---------------------------------------------------------
Step 2: Further removal
- Remove oil pump/accessory sprocket. I stuck an extension through a hole to hold it while I unscrewed the bolt. On second thought, you might try breaking this bolt free before removing the belt.
- Remove rear timing cover. It's held in by a bolt on top, bottom, and the crank sensor mount.
- There's no need to unhook the refrigerant lines to remove the compressor. Just unbolt the 4 bolts on top and pull forward and under top radiator hose to gain access to the mount underneath.
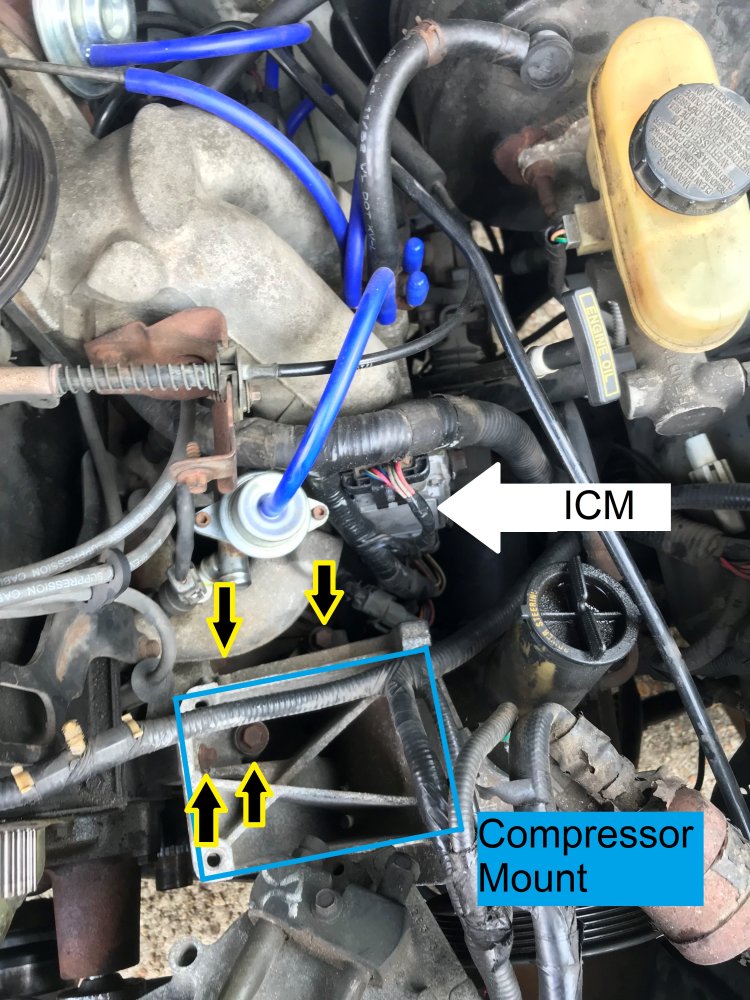
- Remove the top bolts holding the bracket in place. There are 2 large ones vertically and two smaller ones horizontally into the side of the block (marked below in yellow).
- Loosen (DO NO REMOVE) bottom mount bolt about one turn. I put a crescent wrench on it, braced my 3' long jack handle against the wrench, and beat on it with a dead blow hammer from up top. It's location is near the bottom of the block at crank shaft level. Access may be better from underneath.
---------------------------------------------------------
Step 3: Remove Sensor.
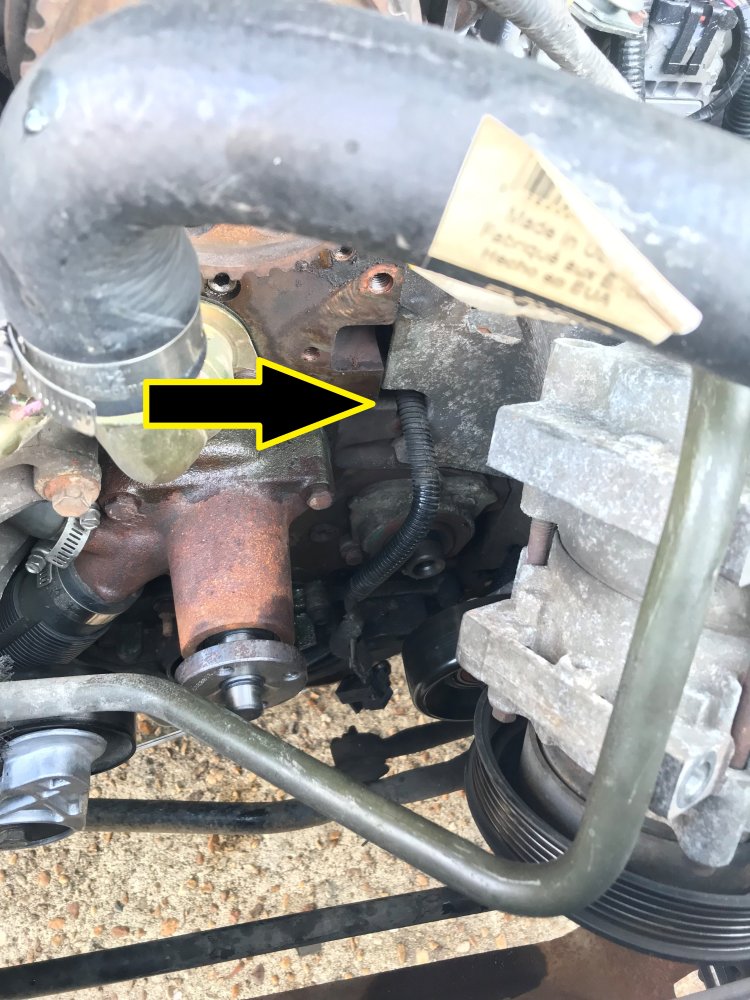
- This is the hole that the sensor passes through. Loosen the bottom bolt enough to allow enough movement from the compressor mount to get the sensor through the gap.
- Reach behind the compressor mount (under the intake manifold) and pull the crank sensor and harness out of the top. I removed the bottom ICM connector for better access to the connector. The crank sensor connector is on the same harness as bottom ICM connector.
---------------------------------------------------------
Step 4: Put back together.
- Hook up and thread the sensor through to front of engine. Guestimate how much harness needs to stick out through the front for now.
- Reinstall the 4 compressor mount bolts and tighten the bottom bolt.
- Bolt crank sensor to crank sensor mount loosely for now (with zip tie like OEM if you have it).
- Reinstall rear timing cover. Do a fit-up of crank sensor now to get length of harness right before bolting cover down. Do not bolt crank sensor mount to block yet.
- Reinstall oil pump/accessory sprocket and timing belt. Accessory sprocket will rub rear timing cover until the crank sensor mount is installed.
- Put crank timing disc washer thing on the crank shaft, THEN install crank sensor mount.
- Reinstall Harmonic Balancer. Take tremendous care when mating the balancer to the sensor. If your sensor didn't come with an alignment tool, put a business card between the inside of the outer sensor face and outside vein of the balancer to adjust clearance. Adjust so the sensor just holds the card in place. Test clearance through a full rotation. Tighten sensor to the mount.
- The rest is easy- outer timing cover, compressor, pulleys, belt, fan.
Difficulty: 5 out of 10
Time to install: 3 hr *should* be plenty
Disclaimer: The Ranger Station.com, The Ranger Station.com Staff, nor the original poster are responsible for you doing this modification to your vehicle. By doing this modification and following this how-to you, the installer, take full responsibility if anything is damaged or messed up. If you have questions, feel free to PM the original poster or ask in the appropriate section of The Ranger Station.com forums.
This is a fairly straight forward job. It's just unbolting stuff. Tough access is really the only thing that raises the dificulty. I could not find any info on how to do it, so I figured I'd write something. It took me 7 hr with 3 trips to the store and a few breaks to look up what to do. Be sure to know how to do your timing, cause the timing belt is coming off. This article is for the 2.3 Lima engine with the below pictured harmonic balancer... not a tone ring that looks like a sprocket.
Tools Needed:
- Harmonic balancer puller- Not required, but makes removing the sensor and timing belt easier. Without it you will have to turn engine to the correct position to free the sensor. It's also tough to get the timing belt out from behind the crank timing disc washer thing which can't be removed without removing the balancer
- Giant phillips screw driver for timing cover or stripped screw remover if its rusted beyond use. I couldn't get vice grips to work
- Dead-blow hammer and 3' beater extension (step 2, this is probably not the best method)
- Assortment of 1/4 and 1/2 ratchet extensions
- Plenty of sockets and crescents (I never remember sizes)
- small socket for the sensor (like 5.5 or 6mm)
- Big socket for the harmonic balancer bolt (19mm or larger)
Parts Needed:
- Crankshaft position sensor
- Teeny tiny zip tie (probably not needed, but OEM had on to keep the wire safe)
- Dielectric grease, or your choice of connector treatment
Parts you can change while you're there- basically stuff that needs/easier to be done with the fan removed
- Water pump
- Timing belt
- Thermostat
- Lower heater hose, lower radiator hose
- Ignition control module (supposed to use thermal paste on the back)
---------------------------------------------------------
Step 1: Remove timing belt
I'll keep this part brief since this isn't a timing belt article. The specifics of the sensor start in step 2.
- Remove fan and fan shroud.
- remove accessory belt, crankshaft pulley, water pump pulley.
- Remove harmonic balancer bolt. I got lucky and got it by putting the truck in 5th and pulling hard with a breaker bar. You can also brace a breaker bar against the frame (on the truck's left hand side) and bump the starter. I always pull an ignition fuse before using this method.
- Use puller to pull harmonic balancer (optional, but makes sensor and timing belt removal easier). Remove the crank timing disc washer thing so it doesn't decide to roll away.
- Remove outer timing belt cover. The only fastener is a giant phillips screw. The rest is molded clips along the edge. You may want to remove the A/C compressor first (see step 2) as the refrigerant hose is really in the way to get this thing out. This was a real headache step for me.
- Remove crank sensor from crank sensor mount.
- Remove crank sensor mount from block. It's held in with two bolts on top left and right, and an alignment pin on bottom. See second picture in step 2.
- Remove timing belt.
---------------------------------------------------------
Step 2: Further removal
- Remove oil pump/accessory sprocket. I stuck an extension through a hole to hold it while I unscrewed the bolt. On second thought, you might try breaking this bolt free before removing the belt.
- Remove rear timing cover. It's held in by a bolt on top, bottom, and the crank sensor mount.
- There's no need to unhook the refrigerant lines to remove the compressor. Just unbolt the 4 bolts on top and pull forward and under top radiator hose to gain access to the mount underneath.
- Remove the top bolts holding the bracket in place. There are 2 large ones vertically and two smaller ones horizontally into the side of the block (marked below in yellow).
- Loosen (DO NO REMOVE) bottom mount bolt about one turn. I put a crescent wrench on it, braced my 3' long jack handle against the wrench, and beat on it with a dead blow hammer from up top. It's location is near the bottom of the block at crank shaft level. Access may be better from underneath.
---------------------------------------------------------
Step 3: Remove Sensor.
- This is the hole that the sensor passes through. Loosen the bottom bolt enough to allow enough movement from the compressor mount to get the sensor through the gap.
- Reach behind the compressor mount (under the intake manifold) and pull the crank sensor and harness out of the top. I removed the bottom ICM connector for better access to the connector. The crank sensor connector is on the same harness as bottom ICM connector.
---------------------------------------------------------
Step 4: Put back together.
- Hook up and thread the sensor through to front of engine. Guestimate how much harness needs to stick out through the front for now.
- Reinstall the 4 compressor mount bolts and tighten the bottom bolt.
- Bolt crank sensor to crank sensor mount loosely for now (with zip tie like OEM if you have it).
- Reinstall rear timing cover. Do a fit-up of crank sensor now to get length of harness right before bolting cover down. Do not bolt crank sensor mount to block yet.
- Reinstall oil pump/accessory sprocket and timing belt. Accessory sprocket will rub rear timing cover until the crank sensor mount is installed.
- Put crank timing disc washer thing on the crank shaft, THEN install crank sensor mount.
- Reinstall Harmonic Balancer. Take tremendous care when mating the balancer to the sensor. If your sensor didn't come with an alignment tool, put a business card between the inside of the outer sensor face and outside vein of the balancer to adjust clearance. Adjust so the sensor just holds the card in place. Test clearance through a full rotation. Tighten sensor to the mount.
- The rest is easy- outer timing cover, compressor, pulleys, belt, fan.
Last edited:


