Well, you're right... but on Friday when I was trying to button this up, I hadn't yet thought of what you said there about cutting the ends and using the 6-point at the distribution block (on the old cyl I don't care, just trashing it along with the line). I'm pretty sure to do the wheel cyl - when I get the line - will be just take off the drum and release the two top springs, shouldn't have to do more dis-assembly of brakes than that. It won't stop passing inspection, pretty sure about that... but yes that line will be replaced. Looks like not expensive.
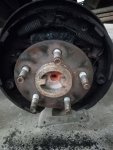
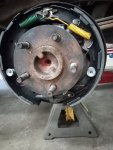
Pics of before/after attached. Was totally crudded up on left side. The bottom spring was broken, this would of course prevent shoes from retracting when p-brake is released, causing the dragging, seizing, and heating of wheel.
Other side bottom spring broke as I was taking it out. They break right where the hook goes in the hole in the shoe. Hopefully new one lasts a while; at least I know what causes those symptoms. Other springs are huge by comparison would probably never break.
Right side wasn't really very crudded up but of course cleaned and replaced all (less the cyl, yet).
Brakes now seem great, only about 1/2" pedal travel before they start engaging. Nice and smooth, and can feather or go hard on them, works nice - truck drives way better. Drove about 50 miles yesterday up and down Catawba and up into the Nat'l Forest a little.
Will check the fronts probably today. If I need pads, should be much easier than the rears.
As to taking the brakes apart, I can do that in probably under 5 minutes, once the drum is off. Putting together, I was much slower than the vid. Leaving aside cleaning of backing plates and parts and leaving aside swapping out the cylinders, which is easy once the line is off, assuming the 1/2" bolts that hold it aren't seized, technically putting them together is straightforward but took me a about an hour and a half but an hour of that was getting the spring-loaded cable back on the p-brake actuator. Maybe if you are really strong you can do this easily, but it was a nightmare for me. I ended up pulling the spring back a bit then getting a screwdriver in there and turning it to open up the gap, then try to hold that and get the actuator on there. Very difficult, and either I'm not doing it right, or, it might be an idea to put something in that gap as you are taking out the old one.
Also had a heck of a time even with the hook tool, to get the upper springs on, but it's doable, just have to pull them enough. Once they are hooked to the pins you can work the hook out while using a screwdriver to help pry the spring hook onto the pin.
I found putting the pins with the spring clips (ones in the middle of the shoes, that hold them to the back plate) hard, they are barely long enough so they have to be lined up. You have the p-brake adjuster and some other things flopping around. It can help, maybe, to clamp the shoe in place temporarily to help with holding things in place. At any rate, when that second spring goes on up top, all the stuff has to engage properly - spreader bar, cylinder rods, p-brake adjuster. I do double-check to make sure all this stuff is properly positioned.
Springs aren't mirror images, seems to not matter. Other stuff is of course, for instance, adjuster on p-brake is threaded opposite side-to-side. Of course do only one side at a time because the first time you do it, putting it back together is a puzzle, the second time, not at all puzzling.
Note the shoes come pkgd in pairs but not pairs side-to-side they are paired by type (rears have the pins where the p-brake parts go on).
I clean parts well and sil-glide the adjuster threads and star wheel. Otherwise the only place I lube is the dimpled areas on the back plate where the shoes rub. Oh, and the cylinder rods, I lightly sil-glide.
I wiped off the drums, especially the insides, with alcohol to get any oil off them. Looks like they decently oil them.
Putting back together, the adjuster had to be almost all the way in (short) to get the drums on without excessive effort.
Bleeding was odd. I put tubing on the bleed screw, got air of course (new cyl), but kept getting air for a long time (gravity bleed). I wonder if fluid in the tubing, being lower in height, sucks air in around the threads of the bleed screw so maybe air I was seeing (after a long time) wasn't from the line. You can only tighten up the bleed screw so much before of course it stops the flow. To me the threads should be tighter. Some people ever put thread tape on them? Seems you shouldn't have to do that. Anyway, I let a shitload of fluid run thru there until it seemed like I wasn't getting air with the bleeder almost closed and the fluid was nice and clear. Maybe there was a lot of air in the line, who knows. Obviously I can bleed without a tube on it, just messier. I wonder if anyone else has seen this (possibility of air being sucked in around the bleeder threads and making me think it's from the line...).
Anyway, at some point I decided that's enough bleeding, put the wheels on, backed up and down driveway a few times using the brake. Like I said, pedal travel is minimal before engaging, and they don't seem at all spongy, so I think it's good to go, except for the line/cyl on the right side, but that doesn't affect how it works, it doesn't leak, it's just smart to do it real soon otherwise the next time I (or someone) wants to do a bleed they will be shit out of luck. At the time I was thinking, ok, what if it's seized in the distribution block and I can't get it out, and end up replacing more stuff... but... yeah... I'll do it. Six-point ought to work.
Thanks for all the help. Now I just have to ship back the unmatched drum, will email them, see if they'll reimburse for the shipping I shouldn't have had to pay. Not that big a deal... all in all it could have been worse.
Was glad to have my old vintage NAPA 2-ton capacity jack stands.