-
 Welcome Visitor! Please take a few seconds and Register
for our forum. Even if you don't want to post, you can still 'Like' and react to posts.
Photos of Lifted RBV's With Different Lift & Tire Sizes
- Thread starter Jim Oaks
- Start date
- Joined
- Dec 8, 2009
- Messages
- 172
- Reaction score
- 1
- Points
- 0
- Location
- Central,IL
- Vehicle Year
- 1989
- Make / Model
- Ford
- Engine Size
- 2.9L
- Transmission
- Automatic
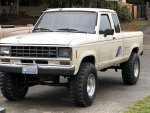
89 B2, 4" rough country, 31-10.50-15 on stock rims


Rear at 4", front probably around 6", 285-75-16 BFG at's, stock ranger rims

4" all around, same 285's


4", 33-12.50-15 Mudstar mt's, on 15x7 rims.


4", 36-12.50-15 TSL's, stock rims


Same as above but 15x7 rims


Same as above but front flare cut off and some trimming on rear


Sent from my iPhone using Tapatalk


Rear at 4", front probably around 6", 285-75-16 BFG at's, stock ranger rims

4" all around, same 285's


4", 33-12.50-15 Mudstar mt's, on 15x7 rims.


4", 36-12.50-15 TSL's, stock rims


Same as above but 15x7 rims


Same as above but front flare cut off and some trimming on rear


Sent from my iPhone using Tapatalk
Last edited:
88'long'bed'mex
New Member
- Joined
- Mar 1, 2013
- Messages
- 1
- Reaction score
- 0
- Points
- 1
- Vehicle Year
- 1988
- Make / Model
- ford
- Transmission
- Manual

Enviado desde mi RAZR HD mediante Tapatalk
CaliNickXLT
New Member
- Joined
- Sep 1, 2015
- Messages
- 49
- Reaction score
- 0
- Points
- 0
- Vehicle Year
- 1999
- Make / Model
- Xlt Ex. Cab
- Transmission
- Manual
spiff-d
New Member
- Joined
- Dec 13, 2010
- Messages
- 14
- Reaction score
- 3
- Points
- 3
- Location
- Beaumont Alberta Canada
- Vehicle Year
- 2009
- Make / Model
- Ford
- Engine Type
- 4.0 V6
- Engine Size
- 4.0L
- Transmission
- Automatic
- 2WD / 4WD
- 4WD
- Total Lift
- 2.5"
- Tire Size
- 33X12.50R15
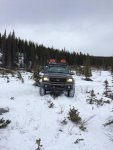
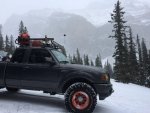
Here's my 2009 Sport 4x4 on 15x10 Diamond Racing Wheels, wearing 33x12.5 Goodyear Duratrac Wranglers. Belltech shackles in the back and prekey mod in the front.
Attachments
-
84.2 KB Views: 1,141
-
87.7 KB Views: 1,119
-
62.1 KB Views: 1,096
-
51.2 KB Views: 1,239
- Joined
- Feb 8, 2011
- Messages
- 260
- Reaction score
- 6
- Points
- 18
- Location
- Parkersburg WV
- Vehicle Year
- 1991
- Make / Model
- Ford
- Engine Type
- 4.0 V6
- Engine Size
- 4.0 for now
- Transmission
- Manual
- 2WD / 4WD
- 4WD
- Total Lift
- stock
- Tire Size
- 31s
- My credo
- if it aint broke dont fix it if it is broke upgrade
1987 ford ranger 3" bl 6 inch suspension with 37/12.50r20 tires
Attachments
-
110.1 KB Views: 862
-
19.9 KB Views: 807
rangerenthiusiast
New Member
- Joined
- Aug 26, 2016
- Messages
- 553
- Reaction score
- 2
- Points
- 0
- Location
- Hudson Valley, NY
- Vehicle Year
- 1992
- Make / Model
- Ford
- Engine Size
- 4.0
- Transmission
- Automatic
Really wish I could see what these look like. I have a ’92 with stock 15x7 steelies, which I hate. Never really thought I’d be able to get 31s on her just by swapping for rear Explorer springs and some 1” coil spacers. Gotta replace my tires (all kinds of tread, but dry rotted) and wouldn’t mind picking up a used combo that’s a little more fatty...1989 Ranger, 31x10.50 on 15x8 wheels, Explorer springs rear, 1" Coil spacers front, no body lift

Same Ranger, 33x12.50, 15x8 wheels, Explorer springs plus Belkin shackles in rear, Skyjacker 6" lift in front, no body lift.

- Joined
- Aug 14, 2007
- Messages
- 7,896
- Reaction score
- 982
- Points
- 113
- Location
- UT
- Vehicle Year
- 1989
- Make / Model
- Ford
- Engine Type
- 4.0 V6
- Transmission
- Manual
- 2WD / 4WD
- 4WD
- Total Lift
- 5
- Tire Size
- 33
Here's my truck with spacers, explorer leaf springs and 31x10.50 tires on 15x8 wheels with 3.75" backspacingReally wish I could see what these look like. I have a ’92 with stock 15x7 steelies, which I hate. Never really thought I’d be able to get 31s on her just by swapping for rear Explorer springs and some 1” coil spacers. Gotta replace my tires (all kinds of tread, but dry rotted) and wouldn’t mind picking up a used combo that’s a little more fatty...


rangerenthiusiast
New Member
- Joined
- Aug 26, 2016
- Messages
- 553
- Reaction score
- 2
- Points
- 0
- Location
- Hudson Valley, NY
- Vehicle Year
- 1992
- Make / Model
- Ford
- Engine Size
- 4.0
- Transmission
- Automatic
@BlackBII: Nice. Thanks, man!
curtis73
Member
- Joined
- Sep 1, 2018
- Messages
- 121
- Reaction score
- 6
- Points
- 18
- Location
- Harrisburg, PA
- Vehicle Year
- 1994
- Make / Model
- Mazda
- Engine Size
- 4.0
- Transmission
- Manual
94 B4000 4x4. Stock suspension, 16" wheels from 05 Ranger, 265/75-16 tires (31.6" diameter)
No rubbing.


No rubbing.


curtis73
Member
- Joined
- Sep 1, 2018
- Messages
- 121
- Reaction score
- 6
- Points
- 18
- Location
- Harrisburg, PA
- Vehicle Year
- 1994
- Make / Model
- Mazda
- Engine Size
- 4.0
- Transmission
- Manual
Here is a quick tutorial on using later style wheels on early trucks.
A quick background. Early trucks that use the manual or auto locking hubs need the centerbore big enough to let the hubs pass through. Later trucks don't have the big hub, so their center bore has a lip in it to hold a more traditional plastic center cap. In order to use late wheels on an early truck, that lip must be removed.
A photo of the center bore on the 94 wheel

A photo of the later (05) ranger wheel

Notice that the later wheel has a significant lip that reduces the diameter. This lip needs to be enlarged to about 2.75" (70mm approx.) I knew I could likely tackle it with a die grinder and an afternoon, but I called a few machine shops just in case I found one that would do it affordably. Instead what I found was that all three shops refused to touch them due to liability.
My first idea was to get a 2.75" bimetal hole saw and clamp the wheel on my drill press plate. I nixed this idea for two reasons; 1) I figured it would be difficult to prevent chatter, and 2) I had no real means of making sure it was centered. If you don't get it dead center, there will be difficulty balancing the finished assembly since most tire balancers use a tapered die on the outside.
For this same reason I decided against a die grinder. It would be easy to get the clearance I needed, but difficult to remove precise amounts of aluminum and make sure the hole was centered.
So, out came the router and a carbide flush cut bit. Carbide is important since it is much harder. Using a cheap bit you will likely get about an inch into cutting and it will just stop, get hot, and start chattering.
Warning: strong suggestion to use ear, eye, and hand protection. You're making millions of razor-sharp fragments of aluminum at 18,000 rpms. I still have a sliver in my left thumb. If you're not down with earmuffs, I found that a blanket wrapped around the wheel with a rope or ratchet strap keeps the "singing" to a minimum.
Step 1: Since the ridge we're removing is about 3/4" deep in the hole, I selected a 3/8" diameter x 1" long flush cut bit. Take the 3/8" guide bearing off and install a 1/2" bearing in its place. This will leave a 1/8" of material and (at least on my 05 Ranger wheels) left me with 2.726" (69.2mm) of ID which is perfect for the hub to fit. It also helps to use a scotch brite or wire wheel inside the bore below that ridge. Mine had years of crusty stuff in there and doing this step helps give the bearing a smooth circumference to guide the bit.

Step 2: Use lube (that's what she said). WD40 works well on aluminum, but my can of WD chose to be empty that day. Instead I used some cutting oil and put it around the lip of the hub bore.
Step 3: Start cutting. Keep in mind you are using a high-rpm machine on a much harder material than the wood it is supposed to be cutting. Be nice to it. Make multiple passes taking small amounts of material. Hold on tight, but I think you'll find that it's not much different than routing oak or bamboo. Tip.... keep a D/A or palm sander handy with some 60 grit on it. When you cut the aluminum, it leaves burrs at the lip making it hard to keep a smooth motion of the router. The plate on the router gets caught on the burrs. Pause occasionally to sand those burrs off.
Step 4: This is important. Check your guide bearing frequently. Mine decided to disintegrate and fall off but fortunately I noticed it before I went too far. Also important... I had trouble with the collet coming loose after a few cuts. I think the additional vibrations caused this, because that isn't something that usually happens with my router.
Finished cut

Step 5: If you want, you can stuff the factory rear center caps in the hole you just made, but in my opinion they don't look right. Instead I went to Amazon and searched for "75mm wheel center caps." It turned up a few hundred options of caps with an overall diameter of 75mm and a snap ring diameter of 70mm. Once they get here, I'll probably do one more cut on the wheels which I'll explain further. The depth of the 1/8" lip I left behind is 3/4" deep into the bore. The retainer clips on the center caps I got aren't that deep. After I measure how deep the clips are, I'll put the 3/8" guide bearing on the 3/8" flush cut bit and lower the bit further in the bore to increase the I.D. and leave a lip at the very outside that corresponds to the length of the clips. In truth, I bought a pack of 4 caps. What I will do first is stuff two caps in the holes without the additional cut to see if they stay in place. If they do, no more cutting is required. If they don't, I have two spares and I can hit it with the router again.


Important takeaways: Be safe, don't try this at home, no warranties expressed or implied, at your own risk, etc. Be careful with your cuts so that you end up with a concentric, clean cut. The most important part is that you maintain a hole that is centered. You'll have oops moments where the router tips out a bit and you gouge a little, but as long as the majority of the circumference is clean and accurate, the balancer machine will be able to hold the wheel straight. Mine balanced just fine. If you get yours "off," what will likely happen is that the machine will balance the tires, but you'll end up with a wobble on the highway. The balancer relies on the fact that the tapered dies hold the wheel on the machine at the same exact angle that the wheel mounting face will hold the wheel on the truck. If those angles are off by even just a wee bit, it might cause headaches. The nice part about using a flush cut bit is that you greatly increase your chances of an accurate cut since you are using the factory's machined bore as your guide.
…. and don't expect to ever use that flush cut bit on wood again unless you really like the smell of wood smoke.

A quick background. Early trucks that use the manual or auto locking hubs need the centerbore big enough to let the hubs pass through. Later trucks don't have the big hub, so their center bore has a lip in it to hold a more traditional plastic center cap. In order to use late wheels on an early truck, that lip must be removed.
A photo of the center bore on the 94 wheel

A photo of the later (05) ranger wheel

Notice that the later wheel has a significant lip that reduces the diameter. This lip needs to be enlarged to about 2.75" (70mm approx.) I knew I could likely tackle it with a die grinder and an afternoon, but I called a few machine shops just in case I found one that would do it affordably. Instead what I found was that all three shops refused to touch them due to liability.
My first idea was to get a 2.75" bimetal hole saw and clamp the wheel on my drill press plate. I nixed this idea for two reasons; 1) I figured it would be difficult to prevent chatter, and 2) I had no real means of making sure it was centered. If you don't get it dead center, there will be difficulty balancing the finished assembly since most tire balancers use a tapered die on the outside.
For this same reason I decided against a die grinder. It would be easy to get the clearance I needed, but difficult to remove precise amounts of aluminum and make sure the hole was centered.
So, out came the router and a carbide flush cut bit. Carbide is important since it is much harder. Using a cheap bit you will likely get about an inch into cutting and it will just stop, get hot, and start chattering.
Warning: strong suggestion to use ear, eye, and hand protection. You're making millions of razor-sharp fragments of aluminum at 18,000 rpms. I still have a sliver in my left thumb. If you're not down with earmuffs, I found that a blanket wrapped around the wheel with a rope or ratchet strap keeps the "singing" to a minimum.
Step 1: Since the ridge we're removing is about 3/4" deep in the hole, I selected a 3/8" diameter x 1" long flush cut bit. Take the 3/8" guide bearing off and install a 1/2" bearing in its place. This will leave a 1/8" of material and (at least on my 05 Ranger wheels) left me with 2.726" (69.2mm) of ID which is perfect for the hub to fit. It also helps to use a scotch brite or wire wheel inside the bore below that ridge. Mine had years of crusty stuff in there and doing this step helps give the bearing a smooth circumference to guide the bit.

Step 2: Use lube (that's what she said). WD40 works well on aluminum, but my can of WD chose to be empty that day. Instead I used some cutting oil and put it around the lip of the hub bore.
Step 3: Start cutting. Keep in mind you are using a high-rpm machine on a much harder material than the wood it is supposed to be cutting. Be nice to it. Make multiple passes taking small amounts of material. Hold on tight, but I think you'll find that it's not much different than routing oak or bamboo. Tip.... keep a D/A or palm sander handy with some 60 grit on it. When you cut the aluminum, it leaves burrs at the lip making it hard to keep a smooth motion of the router. The plate on the router gets caught on the burrs. Pause occasionally to sand those burrs off.
Step 4: This is important. Check your guide bearing frequently. Mine decided to disintegrate and fall off but fortunately I noticed it before I went too far. Also important... I had trouble with the collet coming loose after a few cuts. I think the additional vibrations caused this, because that isn't something that usually happens with my router.
Finished cut

Step 5: If you want, you can stuff the factory rear center caps in the hole you just made, but in my opinion they don't look right. Instead I went to Amazon and searched for "75mm wheel center caps." It turned up a few hundred options of caps with an overall diameter of 75mm and a snap ring diameter of 70mm. Once they get here, I'll probably do one more cut on the wheels which I'll explain further. The depth of the 1/8" lip I left behind is 3/4" deep into the bore. The retainer clips on the center caps I got aren't that deep. After I measure how deep the clips are, I'll put the 3/8" guide bearing on the 3/8" flush cut bit and lower the bit further in the bore to increase the I.D. and leave a lip at the very outside that corresponds to the length of the clips. In truth, I bought a pack of 4 caps. What I will do first is stuff two caps in the holes without the additional cut to see if they stay in place. If they do, no more cutting is required. If they don't, I have two spares and I can hit it with the router again.


Important takeaways: Be safe, don't try this at home, no warranties expressed or implied, at your own risk, etc. Be careful with your cuts so that you end up with a concentric, clean cut. The most important part is that you maintain a hole that is centered. You'll have oops moments where the router tips out a bit and you gouge a little, but as long as the majority of the circumference is clean and accurate, the balancer machine will be able to hold the wheel straight. Mine balanced just fine. If you get yours "off," what will likely happen is that the machine will balance the tires, but you'll end up with a wobble on the highway. The balancer relies on the fact that the tapered dies hold the wheel on the machine at the same exact angle that the wheel mounting face will hold the wheel on the truck. If those angles are off by even just a wee bit, it might cause headaches. The nice part about using a flush cut bit is that you greatly increase your chances of an accurate cut since you are using the factory's machined bore as your guide.
…. and don't expect to ever use that flush cut bit on wood again unless you really like the smell of wood smoke.

Last edited:
adsm08
Senior Master Grease Monkey
Supporting Member
Article Contributor
Ford Technician
TRS 20th Anniversary
- Joined
- Sep 20, 2009
- Messages
- 34,623
- Reaction score
- 3,613
- Points
- 113
- Location
- Dillsburg PA
- Vehicle Year
- 1987
- Make / Model
- Ford
- Engine Type
- 4.0 V6
- Engine Size
- 4.0
- Transmission
- Manual
- 2WD / 4WD
- 4WD
- Tire Size
- 31X10.50X15
HAHA, now I can find you.
curtis73
Member
- Joined
- Sep 1, 2018
- Messages
- 121
- Reaction score
- 6
- Points
- 18
- Location
- Harrisburg, PA
- Vehicle Year
- 1994
- Make / Model
- Mazda
- Engine Size
- 4.0
- Transmission
- Manual
Now I'll be going around to every tan colored Ranger and B-truck in town and spray painting their wheels to confuse you.HAHA, now I can find you.
Danno1985
Active Member
- Joined
- Nov 20, 2018
- Messages
- 175
- Reaction score
- 97
- Points
- 28
- Location
- MKE, WI
- Vehicle Year
- 2011
- Make / Model
- Ford
- Engine Type
- 2.3 (4 Cylinder)
- Transmission
- Manual
- 2WD / 4WD
- 2WD
- Total Lift
- stock
- Total Drop
- stock
- Tire Size
- stock
235/75r15s with a 3" body lift on a 2010 2wd XLT. Hoping to add a limited slip and 4.10s and upgrade to 31s next time.

John94
New Member
- Joined
- Nov 6, 2019
- Messages
- 25
- Reaction score
- 3
- Points
- 3
- Location
- Sequim washington
- Vehicle Year
- 1988
- Make / Model
- Ford ranger
- Transmission
- Manual
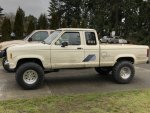
88 rwd ranger. 6” skyjacker stage 2 lift. 33 12.5 swamper radials 15by10 wheels. 3” body lift 2” wheel spacers and bulge fenders going on in the next few wks. I’ll post more pics when it’s all together.
Attachments
-
276.9 KB Views: 238
-
213.2 KB Views: 245
Sponsored Ad
Sponsored Ad
Staff online
-
alwaysFlOoReDForum Staff Member
-
fastpakrForum Staff Member
-
85_Ranger4x4Forum Staff Member
Members online
Total: 798 (members: 11, guests: 787)


