• Welcome Visitor! Please take a few seconds and Register for our forum. Even if you don't want to post, you can still 'Like' and react to posts.

Paint prep


professor229

Active Member
Joined
Dec 24, 2021
Messages
129
Reaction score
77
Points
28
Location
Minnesota
Vehicle Year
2004
Make / Model
Ford Ranger
Transmission
Automatic
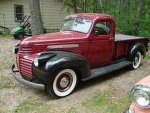
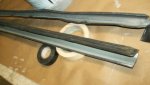
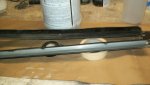
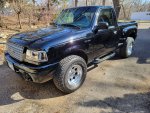
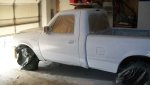
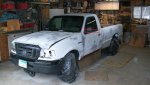
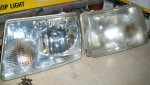
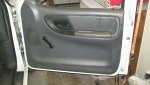
Good morning...... I am nearing the end of the paint prep (wish the MN weather would cooperate!!!!) and have removed as many peripheral items as I can... headlights and tail lights, cyclops light and there isn't much else.... all in an effort to avoid taping...... The one item I would like to remove is the door window trim black piece... I watched a "how to" video and although I learned a lot, the guy essentially destroyed the trim piece to remove it with a plumber's slip lock plier (grab and yank!)..... In the discussion below the video, he listed the link to new pieces... $85...Another guy listed $23 from the dealer.... .. and that is not going to happen on a $500 truck.... So I am interested in ideas of how to remove those two trim pieces (see attachment red square) and salvaging them to put them back on after paint..... I am toying with the idea of using my thin bladed paint scraper putty knife.... and sliding that up and then tapping this trim piece up as everyone suggests..... Does anybody else have another idea or should I just try to tape these two molding off carefully, leave them on, and paint around them which I am also going to do on the Ranger logos and the door handles..... It is a concession I am willing to make but thought I would run this by everyone to get a second opinion...... suggestions welcome and appreciated..... PS... The local U Pull It Parts had a 50% off sale a little over a week ago... last one of the winter.... so I paid my $2 and went for a walk with a wheelbarrow to look at the five Rangers they had in stock, two of them were new to the lot that I had never seen before... Got two wheels with nice all weather radials, a like new plastic door panel for the passenger side, a new tool set to lower the spare tire unit, and two decent enough headlight assemblies ($$$$) all for $80.... and spun the wheel of fortune for a free gift and got 15 free entries to the yard good for a year...... Demounted the tires.... prepped and painted the rims..... mounted and balanced the tires and slapped them on the Ranger and also removed the two bald tires and mounted two decent enough tires from my Kia Forte.... installed the plastic door panel with a little argument (I won but still don't know how or why) and had to use a headlight restore system on the lenses of the two used headlights and will have to splice these wires in place when the time comes...... but it sure saves on buying all new sockets... (the old ones were cracked and/or broken/or corroded) pricey devils.....

Any help with the removal of those window trim pieces so they can be re-used would be appreciated..... Thanks again... Dennis
 

Attachments


RobbieD

2.9l Mafia
Joined
Aug 6, 2007
Messages
3,865
Reaction score
3,434
Points
113
Location
Georgia
Vehicle Year
1984,1990,1994
Make / Model
Ford
Transmission
Manual
2WD / 4WD
2WD
My credo
Toonces drives a Ranger . . . . just not very well.
I don't know for sure on your model truck, but on my older trucks the putty knife inside the door, at the clips and lightly tapping upwards, works the best.

Suggestion, is to practice first in the junkyard (you don't have to buy them, just pop 'em off and back on). Or, maybe somebody with a 2004 shop manual can post that page for the factory procedure.

That cleaned up headlight looks good! (y)
 

rumblecloud

Well-Known Member
Supporting Member
Joined
Mar 6, 2020
Messages
1,389
Reaction score
1,114
Points
113
Location
48022
Vehicle Year
1994
Make / Model
Ranger Splash
Engine Type
4.0 V6
Transmission
Automatic
2WD / 4WD
4WD
Total Lift
1-1/2 inch front leveling
Total Drop
Stock
Tire Size
31/10.50/15
My credo
What's the worst that could happen?
The window scraper seal (Rock Auto reference) on my 94 was rusted at the back end and crumbling. The easiest and safest way to remove them without damage is - yes- with a putty knife. Work along the base on the outside. There are several clips - maybe five - so just take your time. The spring clips fit inside the channel so you really can't bend them using this method - but you can mess up the shape of the seal.

Just don't pry outward and only tap up.

window scraper seal1.png window scraper seal2.png
 

Eddo Rogue

Well-Known Member
Joined
May 18, 2020
Messages
3,981
Reaction score
2,499
Points
113
Location
Burbank,CA
Vehicle Year
1993
Make / Model
Ranger 4x4
Engine Type
4.0 V6
Engine Size
OHV
Transmission
Manual
2WD / 4WD
4WD
Total Lift
skyjacker front leveling kit
Tire Size
31-10.50R15
My credo
Crossed threads are tight threads.
Maybe instead of a putty knife, try a painters tool. I would suggest a 5 in 1 or 7 in 1. Both have a recurved sharpened hook on one side.
 

professor229

Active Member
Joined
Dec 24, 2021
Messages
129
Reaction score
77
Points
28
Location
Minnesota
Vehicle Year
2004
Make / Model
Ford Ranger
Transmission
Automatic
I am a little paranoid about this but thanks for the info and the pictures..... I do have access to a junk yard but it is several miles north of me and I rarely if ever go that way.... but it is an option.... I do have a plan B though that I might try... If I can get a putty knife under these and slide a piece of thin plastic behind them to hold the lip out... then use tape over the lip to protect it from primer/paint while the plastic (even though about using dimes) holds it out... then use a light primer that might shoot under the plastic and eventually a couple shots of white spray paint... when cured, remove the plastic or dimes to let the piece revert back to the door metal.... but.... I still think I want to try the putty knife and pound up... The kid in the video that used the plumbers slip pipe wrench, grabbed it and really jerked up hard (destroying it)... but once he got the first little bit to release, the entire plastic piece released and came off.... My goal is obviously not to throw in my billfold on this project and so far, without going to any swap meets, I have been lucky.... I am hoping to have the paint prep/taping all done by April first and then hopefully it will be warm enough in my garage (yes I have a heater) to paint this... I will be using the high density roller method to do this with color sanding on the tail end... I have done quite a few projects this way with more than amazing results... have attached two of them..... thanks again.... will post if I am successful.... Ps... on the headlight assemblies, I pulled them, and they cleaned up well.... but I have to splice in the wires to the original wires and the colors on the wires are not the same... however, the "plugs" are the same so I am just going to match them up... there are three thin wires to the main bulb.... and the clips on both the original and replacements are brown with the clip on top.... I will try to use the original clip and not splice them, but the plastic in this 2004 Ranger has become VERY brittle for some reason..... hmmmm maybe... because it is plastic??? Thanks again...
 

Attachments

professor229

Active Member
Joined
Dec 24, 2021
Messages
129
Reaction score
77
Points
28
Location
Minnesota
Vehicle Year
2004
Make / Model
Ford Ranger
Transmission
Automatic
PS.... After looking at the clips one more time.... I am trying to figure out how they work.... Do they just "wedge" in to hold the piece in place? or do they hook on something?
 

rumblecloud

Well-Known Member
Supporting Member
Joined
Mar 6, 2020
Messages
1,389
Reaction score
1,114
Points
113
Location
48022
Vehicle Year
1994
Make / Model
Ranger Splash
Engine Type
4.0 V6
Transmission
Automatic
2WD / 4WD
4WD
Total Lift
1-1/2 inch front leveling
Total Drop
Stock
Tire Size
31/10.50/15
My credo
What's the worst that could happen?
I'll see if I have a better image of how they fit -- or go take one. They wedge in. The spring clips face downward and curve out on one side creating the pressure that holds them in place. More later.
 

professor229

Active Member
Joined
Dec 24, 2021
Messages
129
Reaction score
77
Points
28
Location
Minnesota
Vehicle Year
2004
Make / Model
Ford Ranger
Transmission
Automatic
I took a minute yesterday to use my two inch thin putty knife and I was going to try to tap the molding up to get it removed... The putty knife slid under and all the way up but then looked and the molding was so flexible that I could slide something under it... like a series of pennies or some kind of shim..... That would hold it out far enough for me to light sand under it and then tape it off and shoot some primer under it from a rattle can.... and then a couple coats of the rattle can white enamel and let that set for a couple of day, remove the pennies or shims... and let the molding fall back in place.... There is no risk of breaking it by removing it.... It should work fine....... Love viable alternatives.....!!!!!!
 

professor229

Active Member
Joined
Dec 24, 2021
Messages
129
Reaction score
77
Points
28
Location
Minnesota
Vehicle Year
2004
Make / Model
Ford Ranger
Transmission
Automatic
The trim on the driver's side was loose... I suspect it had been removed by the previous owner for some repairs.... the wedges on the inside of the trim pieces were loose... and it pulled right off... the passenger side argued... but there was some "give" near the mirror and about three of the wedges just were not totally tight by the two near the lock didn't move much and after I finally got it removed (pounder the putty knife harder!!!!) the two wedges bent the wrong way, allowing them to slide..... I had to use a pliers to bend them back but they are good enough to go back in place.... It was a good day when I got them removed without damaging the.... Today I continued the body work.... I have about 50 hours into it.... actually more... and I have now started the final prep work from the top down like the procedure you use to wash a car.... I got most of the cab and doors done today.... tomorrow, I start by taping off all the glass trim....and also taping off the new front bumper area..... and then completing the front fenders... Tomorrow? hopefully I will keep working on the worst body work.... the box...... but it is not far away from being finished because I lowered my standards.... How good does a Ranger have to be that is going to pull a fishing boat? Check out the attachments of the window trim and you can see the wedges..... which are basically punched out metal...... PS.... also is a picture of my Lund boat that I restored/rebuilt for the third time.... best boat I have every owned....
 

Attachments

Lefty

Well-Known Member
Joined
Feb 8, 2022
Messages
1,671
Reaction score
1,837
Points
113
Location
Saint Paul, MN
Vehicle Year
2003
Make / Model
Ranger Edge
Transmission
Automatic
Hey Professor.

Some wonderful projects!

I bet we both go to U-Pull-R-Parts in Rosemont or East Bethel. I'm in the process of restoring my '03 Ranger Edge. I had mine repainted at Hueppner's Auto Body. I told them to pull out all the stops and do the job just right. They did!

They removed the doors, the bed, the bumpers, everything. They even removed the front and rear windows too. They said that rust often begins there. I'm glad they did. They found rust along the windshield line, but they broke the windshield trying to get it out. For what it's worth anyway.

Whenever I'm not exactly sure about trim and stuff, I use trial and error on the very same piece at the U-Pull yard.

Say hi someday. Let's keep in touch!
 

Attachments

professor229

Active Member
Joined
Dec 24, 2021
Messages
129
Reaction score
77
Points
28
Location
Minnesota
Vehicle Year
2004
Make / Model
Ford Ranger
Transmission
Automatic
Hi Lefty.... I restored so many vehicles over the years and only kept one.... selling the others financed my next fiasco... but we moved to the metro area in 2015 and I left behind my workshop that had room for three projects..... at a time... Now I am older than dirt with arthritis so since we moved here, since I don't have a ton of room (two car garage and a Menards shed) I just quit restoring stuff because I had enough projects to do.... I did restore a couple boats and trailers as "small" projects and that kept me busy... but with covid I had the time so I expanded the Menards shed to 16 feet so my Sterling would fit inside it, and sold the enclosed four place snowmobile trailer that housed the Sterling kit car..... where it remains today..... But I got bored last year and my neighbor had a 2004 Ranger plain jane with a V6..... mechanically fine, but it had a salvage title.... and they bought it that way and drove it for 60,000 miles.... It now has 110,000 miles but was banged up from being in the ditch on its side.... the body work cost was the reason it was totaled out.... They were getting a new Toyota for the wife to drive so wanted to sell the Ranger... it was a mess but they only wanted $500 for it.... what's $500 these days? My goal was to restore it for $1000 including the cost of the Ranger... I missed... I will be closer to $1500 total... I paint them myself using a variety of methods.... this time it will be a high density roller.... I am getting lazy.... The prep on this was overwhelming and it grew from a project into a nightmare.... but East Bethel had their 50% off sale a month? ago??? last one.... and I found almost everything I needed for $80..... I also ordered a new bumper/valence and bought a used passenger fender from the salvage yard in Big Lake..... so it pretty much has a new front end.... but I document the work done everyday (digital camera) and there are now over 50 folders... each folder represents at least four hours of work on average meaning 200 hours of work..... and this morning, I rolled on the second coat of primer..... tomorrow I use a rattle can to paint the door jambs and places a roller can't reach and on Monday I break out the gallon of single state enamel white paint and each day for the next 9-10 days it will get a coat of paint.... then the fun begins with color sanding.... and I have a new technique I want to try there too.... the bumper is off.... etc. otherwise I just did a tape job on the windows and door handles etc.... old school.... and when it is done, I will have a whole $75 into the paint job (no labor of course)... The GMC pickup attached are before/after pictures of the truck I wish I still owned...... but that truck was painted with this high density roller technique I first read about years ago in Hot Rod Magazine... I also used Valspar Restoration Series paints but they have discontinued that so now I use Rustoleum's Farm Implement paint (Menards) for about $30 a gallon..... but the color choices are limited.... Enough? Love the look of your truck.... This is only the second Ford I have done over the years..... The first was a 1951 shoebox.... many many years ago now.... Anyway.... This WILL BE my last project because the arthritis just hurts too much..... but it has been fun and will pull my little Lund boat/trailer this summer..... PS... I also spun the wheel at East Bethel and now have 15 free passes to the yard that I won.... and who knows.... It is a nice place and not too far..... Have a good one.......
 

Attachments

alwaysFlOoReD

Forum Staff Member
TRS Forum Moderator
TRS Banner 2012-2015
TRS 20th Anniversary
Joined
Apr 13, 2009
Messages
13,933
Reaction score
5,086
Points
113
Location
Calgary, Canada
Vehicle Year
'91, '80, '06
Make / Model
Ford, GMC,Dodge
Engine Size
4.0,4.0,5.7
Transmission
Manual
2WD / 4WD
4WD
The blue swoopy one.... based on a bug?
 

Lefty

Well-Known Member
Joined
Feb 8, 2022
Messages
1,671
Reaction score
1,837
Points
113
Location
Saint Paul, MN
Vehicle Year
2003
Make / Model
Ranger Edge
Transmission
Automatic
Hi Lefty.... I restored so many vehicles over the years and only kept one.... selling the others financed my next fiasco... but we moved to the metro area in 2015 and I left behind my workshop that had room for three projects..... at a time... Now I am older than dirt with arthritis so since we moved here, since I don't have a ton of room (two car garage and a Menards shed) I just quit restoring stuff because I had enough projects to do.... I did restore a couple boats and trailers as "small" projects and that kept me busy... but with covid I had the time so I expanded the Menards shed to 16 feet so my Sterling would fit inside it, and sold the enclosed four place snowmobile trailer that housed the Sterling kit car..... where it remains today..... But I got bored last year and my neighbor had a 2004 Ranger plain jane with a V6..... mechanically fine, but it had a salvage title.... and they bought it that way and drove it for 60,000 miles.... It now has 110,000 miles but was banged up from being in the ditch on its side.... the body work cost was the reason it was totaled out.... They were getting a new Toyota for the wife to drive so wanted to sell the Ranger... it was a mess but they only wanted $500 for it.... what's $500 these days? My goal was to restore it for $1000 including the cost of the Ranger... I missed... I will be closer to $1500 total... I paint them myself using a variety of methods.... this time it will be a high density roller.... I am getting lazy.... The prep on this was overwhelming and it grew from a project into a nightmare.... but East Bethel had their 50% off sale a month? ago??? last one.... and I found almost everything I needed for $80..... I also ordered a new bumper/valence and bought a used passenger fender from the salvage yard in Big Lake..... so it pretty much has a new front end.... but I document the work done everyday (digital camera) and there are now over 50 folders... each folder represents at least four hours of work on average meaning 200 hours of work..... and this morning, I rolled on the second coat of primer..... tomorrow I use a rattle can to paint the door jambs and places a roller can't reach and on Monday I break out the gallon of single state enamel white paint and each day for the next 9-10 days it will get a coat of paint.... then the fun begins with color sanding.... and I have a new technique I want to try there too.... the bumper is off.... etc. otherwise I just did a tape job on the windows and door handles etc.... old school.... and when it is done, I will have a whole $75 into the paint job (no labor of course)... The GMC pickup attached are before/after pictures of the truck I wish I still owned...... but that truck was painted with this high density roller technique I first read about years ago in Hot Rod Magazine... I also used Valspar Restoration Series paints but they have discontinued that so now I use Rustoleum's Farm Implement paint (Menards) for about $30 a gallon..... but the color choices are limited.... Enough? Love the look of your truck.... This is only the second Ford I have done over the years..... The first was a 1951 shoebox.... many many years ago now.... Anyway.... This WILL BE my last project because the arthritis just hurts too much..... but it has been fun and will pull my little Lund boat/trailer this summer..... PS... I also spun the wheel at East Bethel and now have 15 free passes to the yard that I won.... and who knows.... It is a nice place and not too far..... Have a good one.......
Keep up the good work, professor! BTW, I am an old guy too. Farm implement paint is pretty nice! I've painted a truck with some also way back when. It's the same stuff they painted cars with before the day of catalyzed paints.
 

professor229

Active Member
Joined
Dec 24, 2021
Messages
129
Reaction score
77
Points
28
Location
Minnesota
Vehicle Year
2004
Make / Model
Ford Ranger
Transmission
Automatic
The blue swoopy one.... based on a bug?
This is the car that I kept and always will keep... rare... not made anymore... took four years to restore.... It is really getting dated now and considered "an older restoration" and that description of being dated and somewhat worn out fits me too... Yesterday I put the first coat of paint on the 2004 Ranger.... and it took an hour and a half to get it done... traditionally, I have less than one hour of time into each application coat..... so that is my goal today.... concrete floors are starting to get to me a bit... Some of the rattle can paint I initially used, lifted in four spots so I had to sand those mistakes but the first coat seemed to go on well.... and the only "run" was one from one of the two primer coats that I simply did not see... and that will be my one concession today... sanding down that run before applying a second coat of enamel..... I forgot how demanding this work can be... but it has been a long winter of work.... something to do....
 

Attachments


Sponsored Ad


Sponsored Ad

Today's birthdays

Member & Vendor Upgrades

For a small yearly donation, you can support this forum and receive a 'Supporting Member' banner, or become a 'Supporting Vendor' and promote your products here. Click the banner to find out how.

Latest posts

Truck of The Month


Shran
April Truck of The Month

Recently Featured

Want to see your truck here? Share your photos and details in the forum.

Follow TRS On Instagram

TRS Events

25th Anniversary Sponsors

Check Out The TRS Store


Sponsored Ad


Sponsored Ad

Sponsored Ad


Amazon Deals

Top