• Welcome Visitor! Please take a few seconds and Register for our forum. Even if you don't want to post, you can still 'Like' and react to posts.

Headlight Connector Wiring 1st Gen VS 2nd Gen


eightynine4x4

Active Member
Joined
Oct 15, 2020
Messages
673
Reaction score
178
Points
43
Location
New York
Vehicle Year
1989
Make / Model
Ford Ranger
Engine Type
2.9 V6
Transmission
Automatic
2WD / 4WD
4WD
Total Lift
2.5" Suspension
Tire Size
31 x 10.5 x 15
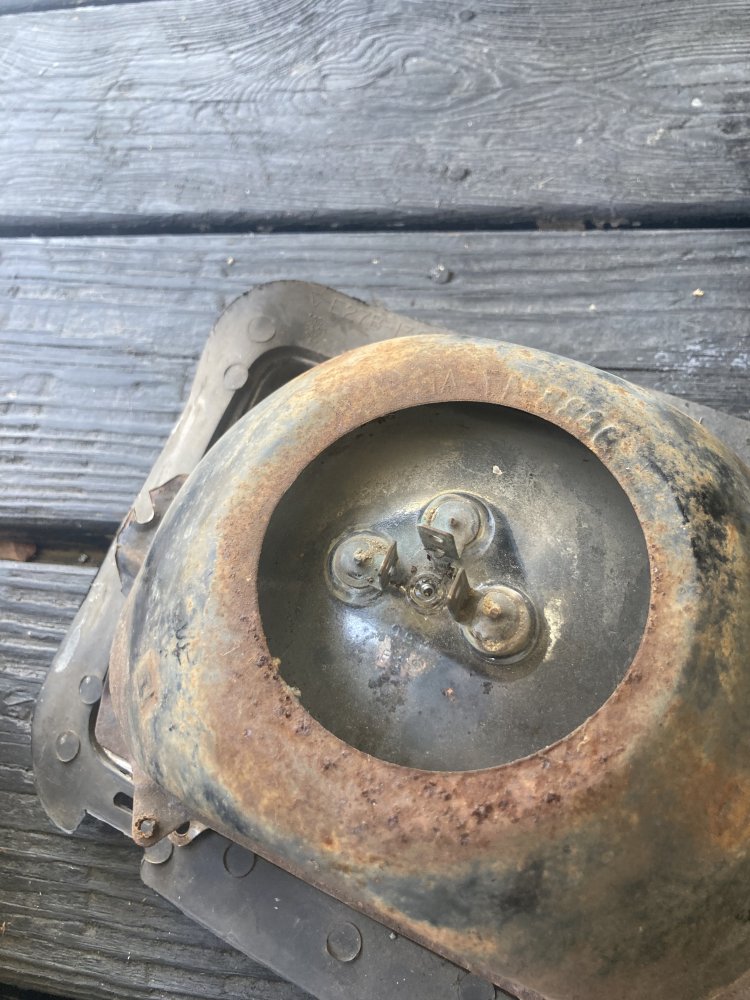
So I’m installing a 1st gen nose onto my 2nd gen truck.
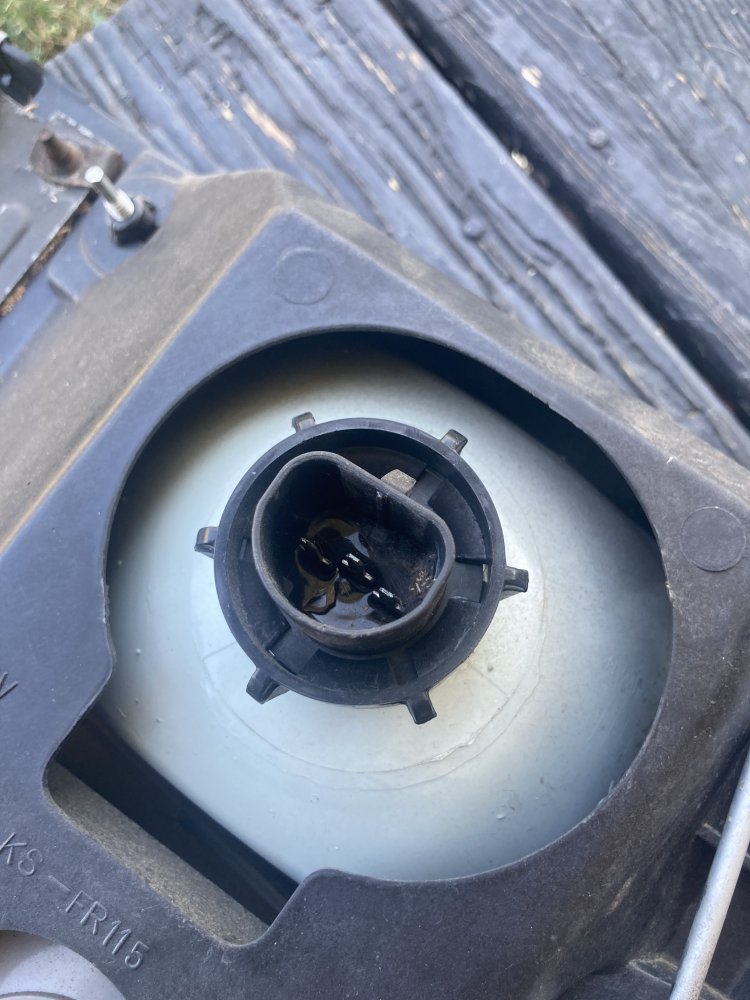
Two of the three front light connectors mate up by design, but the primary headlight has a different kind of connection.
Anybody know the pinout for each?
I might try beeping each light/connection with a multimeter.
1st Gen first, 2nd gen second:

55F60892-EFD8-4479-B1FB-DB3AB77CBC89.jpeg


228B6E1F-E2CD-4980-AD11-33D16688EAA6.jpeg


franklin2

Well-Known Member
Joined
Dec 24, 2019
Messages
3,425
Reaction score
1,758
Points
113
Location
Virginia
Vehicle Year
1984
Make / Model
Bronco II
Transmission
Manual
On your later model wiring, red/black is the lowbeam, purple is the highbeam, black is ground. On the early light bulb you can try the pinout below.


eightynine4x4

Active Member
Joined
Oct 15, 2020
Messages
673
Reaction score
178
Points
43
Location
New York
Vehicle Year
1989
Make / Model
Ford Ranger
Engine Type
2.9 V6
Transmission
Automatic
2WD / 4WD
4WD
Total Lift
2.5" Suspension
Tire Size
31 x 10.5 x 15
On your later model wiring, red/black is the lowbeam, purple is the highbeam, black is ground. On the early light bulb you can try the pinout below.

Thank you!
 

eightynine4x4

Active Member
Joined
Oct 15, 2020
Messages
673
Reaction score
178
Points
43
Location
New York
Vehicle Year
1989
Make / Model
Ford Ranger
Engine Type
2.9 V6
Transmission
Automatic
2WD / 4WD
4WD
Total Lift
2.5" Suspension
Tire Size
31 x 10.5 x 15
I would like to know what all you had to do and how you did it cause I wanna do that same thing soon... also I wanna install gen1 dash in a
Gen2
So far I’ve got the grill mounted, headlights mounted, and the hood in place and the fenders in a good enough spot. Hood is easiest obviously. The grill is easy too, I just tapped a bunch of 8-32 threaded holes in the radiator support/wall and am able to mount it just fine using all the original points. The headlights are pretty complicated to adapt and I’m 50% done although it would be ok for a while as I have it… so far for each light I have one hefty 5/16-18 stud that I’ve created coming 3 inches out from the wall and lines up with the outer side hole on each light’s bucket. It’s really sturdy and at the moment I’ve got a couple stainless steel zip ties latching each light to other hang points that are each a coupe inches away. Next step for them will be to choose one of those zip tied points and create an extended mount bracket or something, then apply it to both lights and then each light will have two hard mounts and probably be good enough. The grill aids in holding the buckets in place so even with just one stud in each and various steel ties I would call it secure enough to drive on roads for some time. Not off-roading though.
The main headlights need their connector chopped off. The two sets of blinkers/yellow lights already connect so no mod needed to those harnesses, they mount right in. As for the headlight connectors, once you chop the connector you can slap crimp terminals on each wire and be done. I used the 3/8” female 10-12 gauge crimp terminals from autozone since it was down the street. They slide perfectly and securely onto the 3 1st gen headlight pins.

https://www.autozone.com/miscellaneous-non-automotive/electrical-wire-connector/p/dorman-conduct-tite-yellow-3-8in-12-10-gauge-female-disconnect/600320_0_0

When I’m confident I have the high/low pinout correct I will add heat shrink to protect each one from external contact.
I used aftermarket fenders so they have slight mount alignment issues but otherwise look pretty good. The mounting is a pain though, so you should use OEM fenders if you can find a pair of good ones. I couldn’t, and j found a pair of aftermarket ones in new condition (never used) for a hundred bucks so went for that. Ordering new aftermarket ones will be like 600 total do I’d advise against that route. For me it’s worth the effort since it was cheap.
I haven’t yet mounted the valance because it’s still on its way shipping to me. As far as I understand it, once the valance is mounted the front blinkers mount right into it, and that’s the end of the project except for the bumper. I haven’t yet held up the 1st gen bumper to the 2nd gen frame because my frame has bumper lifts on it that I need to remove first. Previous owner had a body lift that I removed. I’m hoping that when I hold the 1st gen bumper to normal 2nd gen frame that something somewhere lines up or at least looks navigable. That’s the heaviest piece in this equation and could turn into a lot of work if mounting isn’t nearby bumper holes.
 

franklin2

Well-Known Member
Joined
Dec 24, 2019
Messages
3,425
Reaction score
1,758
Points
113
Location
Virginia
Vehicle Year
1984
Make / Model
Bronco II
Transmission
Manual
I have never converted one of these rangers, but several other cars i have done, the frontend comes off in one piece with a bolt down low on the rear of each fender, one up high on the rear of each fender, and two in the front center under the radiator. Besides the wiring and a bolt or two through the inner fenders, its just lifts off in one piece once you get the hood out of the way. I wonder if you found a first gen ranger, could you lift the whole frontend off in one piece and sit it on the later frame and it would all bolt up. If it would work, there would be no little pieces to fit up like grilles and headlights, they would already be factory mounted in the older frontend.
 

alwaysFlOoReD

Forum Staff Member
TRS Forum Moderator
TRS Banner 2012-2015
TRS 20th Anniversary
Joined
Apr 13, 2009
Messages
13,946
Reaction score
5,091
Points
113
Location
Calgary, Canada
Vehicle Year
'91, '80, '06
Make / Model
Ford, GMC,Dodge
Engine Size
4.0,4.0,5.7
Transmission
Manual
2WD / 4WD
4WD
Nope. The radiator support and inner fenders are spot welded to the cab. Iirc there are 27 spot welds on each side of the cab to be drilled and the 2 front body mount bolts and you can remove the front clip in one piece. You can also remove the spot welds at the front to remove only the rad support. I'm not sure how many welds there are for that.
 

eightynine4x4

Active Member
Joined
Oct 15, 2020
Messages
673
Reaction score
178
Points
43
Location
New York
Vehicle Year
1989
Make / Model
Ford Ranger
Engine Type
2.9 V6
Transmission
Automatic
2WD / 4WD
4WD
Total Lift
2.5" Suspension
Tire Size
31 x 10.5 x 15
Nope. The radiator support and inner fenders are spot welded to the cab. Iirc there are 27 spot welds on each side of the cab to be drilled and the 2 front body mount bolts and you can remove the front clip in one piece. You can also remove the spot welds at the front to remove only the rad support. I'm not sure how many welds there are for that.
Yep. I chose to just figure out DIY mounts for everything and see if it could turn out strong enough, so that i don't have to swap radiator supports via drilling out and welding and also sourcing a 1st gen one. It's going fine enough for me to feel like it'll be alright, maybe just a little unprofessional looking!
I looked at the bumper situation today and I have no idea what's what. Haha. Doesn't look like it'll be an easy solve. But I'm almost ready to start figuring out a custom bumper/winch anyways so maybe i'll just never install the 1st gen bumper.
 

alwaysFlOoReD

Forum Staff Member
TRS Forum Moderator
TRS Banner 2012-2015
TRS 20th Anniversary
Joined
Apr 13, 2009
Messages
13,946
Reaction score
5,091
Points
113
Location
Calgary, Canada
Vehicle Year
'91, '80, '06
Make / Model
Ford, GMC,Dodge
Engine Size
4.0,4.0,5.7
Transmission
Manual
2WD / 4WD
4WD
Iirc the first gen bumper mounts directly to the frame horns, which are rounded to fit the bumper. The next gen has a plate that mounts to the frame, and the bumper mounts to the plate. I think I cut the front horns off a first gen and welded plates to it to fit a second gen. Or maybe it was the other way around...its been awhile since I did it. Its somewhere in my low buck race truck build thread.
 

eightynine4x4

Active Member
Joined
Oct 15, 2020
Messages
673
Reaction score
178
Points
43
Location
New York
Vehicle Year
1989
Make / Model
Ford Ranger
Engine Type
2.9 V6
Transmission
Automatic
2WD / 4WD
4WD
Total Lift
2.5" Suspension
Tire Size
31 x 10.5 x 15
Iirc the first gen bumper mounts directly to the frame horns, which are rounded to fit the bumper. The next gen has a plate that mounts to the frame, and the bumper mounts to the plate. I think I cut the front horns off a first gen and welded plates to it to fit a second gen. Or maybe it was the other way around...its been awhile since I did it. Its somewhere in my low buck race truck build thread.
Here’s a few pics of the bracket attached to the front of each frame rail. In one of the pics I drew a blue line that outlines the frame so you can see what is part of the bracket. The brackets are pretty complex and have two separate layers welded together, so maybe they are DIY or maybe this was some aftermarket design for bumper lift. In any case, the bolt that holds it to frame is removed from both, and all that’s holding it on is some spot welding which i will need to cut.

But if what you’re saying is true about the 1st gen bumper lining right up with frame, I don’t see how that could happen here but maybe my truck is missing some pieces that used to connect to frame and offered up some direct mounting to 1st gen bumper.

I still have my 2nd gen bumper that I believe has some mount pieces inside of it too, which attaches to this stuff of course. It came on the truck like this. Maybe there’s a way for me to remove that from 2nd gen bumper, install inside 1st gen bumper, and also delete the lift brackets from frame, and maybe it will mount up as if OEM. The trick would be how to mount the pieces inside 2nd gen bumper to inside the 1st gen bumper.


7A4082A1-D053-4FE7-B5FD-51B4F68C41DC.jpeg

4CF37FD6-CE97-40F8-AE68-3A4057BFE8DE.jpeg


EA2A66C1-6F38-4ED2-AB07-09D898BD8CAC.jpeg
 

Northidahotrailblazer

Well-Known Member
Joined
Feb 21, 2012
Messages
402
Reaction score
457
Points
63
Location
Northern Idaho
Vehicle Year
1992
Make / Model
Ford Ranger
Engine Type
4.0 V6
Transmission
Manual
2WD / 4WD
Solid Axle Swap 4x4
Total Lift
8 inches
Tire Size
37"
Did it come with a body lift on it? it looks like thats the brackets to raise the bumper up so it matched the body lines again.
 

eightynine4x4

Active Member
Joined
Oct 15, 2020
Messages
673
Reaction score
178
Points
43
Location
New York
Vehicle Year
1989
Make / Model
Ford Ranger
Engine Type
2.9 V6
Transmission
Automatic
2WD / 4WD
4WD
Total Lift
2.5" Suspension
Tire Size
31 x 10.5 x 15
Did it come with a body lift on it? it looks like thats the brackets to raise the bumper up so it matched the body lines again.
Yep it’s a lift to match bumper body. I deleted the body lift.
Just can’t tell if by removing them I’m returning the front of frame rails to 2nd gen OEM or if something is missing that they had removed to install these brackets.
Today I’m going to be pulling out the 2nd gen bumper that came on it and try to figure out if it has something inside it that actually belongs on the frame to make it OEM again.
 

Northidahotrailblazer

Well-Known Member
Joined
Feb 21, 2012
Messages
402
Reaction score
457
Points
63
Location
Northern Idaho
Vehicle Year
1992
Make / Model
Ford Ranger
Engine Type
4.0 V6
Transmission
Manual
2WD / 4WD
Solid Axle Swap 4x4
Total Lift
8 inches
Tire Size
37"
O I gotcha. Yours right now have been notched a little but nothing really removed. The 1 gen bumper mount is different. This picture shows on LMC pretty good how its suppose to go.

1658163191559.png
 

Northidahotrailblazer

Well-Known Member
Joined
Feb 21, 2012
Messages
402
Reaction score
457
Points
63
Location
Northern Idaho
Vehicle Year
1992
Make / Model
Ford Ranger
Engine Type
4.0 V6
Transmission
Manual
2WD / 4WD
Solid Axle Swap 4x4
Total Lift
8 inches
Tire Size
37"
Second gen bolts on the side like yours (from the sides). Besides yours being notched its pretty much there. They didn't make second gens round like the first gens.
 

eightynine4x4

Active Member
Joined
Oct 15, 2020
Messages
673
Reaction score
178
Points
43
Location
New York
Vehicle Year
1989
Make / Model
Ford Ranger
Engine Type
2.9 V6
Transmission
Automatic
2WD / 4WD
4WD
Total Lift
2.5" Suspension
Tire Size
31 x 10.5 x 15
O I gotcha. Yours right now have been notched a little but nothing really removed. The 1 gen bumper mount is different. This picture shows on LMC pretty good how its suppose to go.

View attachment 79168
Nice. Thank you for this! Helps big time.
Looking at that, it seems the issue is that my frame rails don't terminate like how i see there in diagram, with that bendy solid front face with two holes.
My frame rail just ends open faced like a I-beam, so I'd need to develop that pair of holes for each end. You can see from the pics i posted that the rail has no front face once the blue outlined bracket is removed.
Looking at my 1st gen bumper I have in hand, sure enough it has two pairs of vertical holes that mount to those pictured in diagram, so if I had those holes in front of my frame i'd be done and ready once the bracket were pulled.
It's interesting that the diagram kinda also shows that there might be two pieces that can be fixed to the front end of frame and thus provide the holes. I suppose i could try searching for bumper mounts to see if those pop up anywhere.

Here's the pic of my 1st gen and 2nd gen bumper interiors.

IMG_9519.JPG
 

Dustin_89BII

Member
Joined
Jun 5, 2022
Messages
46
Reaction score
23
Points
8
Location
Oregon
Vehicle Year
1989
Make / Model
Bronco II
Engine Type
2.9 V6
Transmission
Manual
2WD / 4WD
4WD
Nice. Thank you for this! Helps big time.
Looking at that, it seems the issue is that my frame rails don't terminate like how i see there in diagram, with that bendy solid front face with two holes.
My frame rail just ends open faced like a I-beam, so I'd need to develop that pair of holes for each end. You can see from the pics i posted that the rail has no front face once the blue outlined bracket is removed.
Looking at my 1st gen bumper I have in hand, sure enough it has two pairs of vertical holes that mount to those pictured in diagram, so if I had those holes in front of my frame i'd be done and ready once the bracket were pulled.
It's interesting that the diagram kinda also shows that there might be two pieces that can be fixed to the front end of frame and thus provide the holes. I suppose i could try searching for bumper mounts to see if those pop up anywhere.

Here's the pic of my 1st gen and 2nd gen bumper interiors.

View attachment 79169
I was reading through this thread with such anticipation! Did you find a solution for mounting the gen 1 bumper? Just fabricating up a bracket or something?
I have an 89’ bronco II that I’m considering doing a front clip swap on.
 

Sponsored Ad


Sponsored Ad

Staff online

Member & Vendor Upgrades

For a small yearly donation, you can support this forum and receive a 'Supporting Member' banner, or become a 'Supporting Vendor' and promote your products here. Click the banner to find out how.

Truck of The Month


Shran
April Truck of The Month

Recently Featured

Want to see your truck here? Share your photos and details in the forum.

Follow TRS On Instagram

TRS Events

25th Anniversary Sponsors

Check Out The TRS Store


Sponsored Ad


Sponsored Ad

Sponsored Ad


Amazon Deals

Top