
adsm08
Senior Master Grease Monkey
Supporting Member
Article Contributor
Ford Technician
TRS 20th Anniversary
- Joined
- Sep 20, 2009
- Messages
- 34,623
- Reaction score
- 3,613
- Points
- 113
- Location
- Dillsburg PA
- Vehicle Year
- 1987
- Make / Model
- Ford
- Engine Type
- 4.0 V6
- Engine Size
- 4.0
- Transmission
- Manual
- 2WD / 4WD
- 4WD
- Tire Size
- 31X10.50X15
First Gen M5OD Transmission Swap
By
Eric Gearhart
Original Poster:
Difficulty: 6.5 out of 10
Time to install: 25-30 working hours, varies by skill level
Disclaimer: The Ranger Station.com, The Ranger Station.com Staff, nor the original poster is responsible for you doing this modification to your vehicle. By doing this modification and following this how-to you, the installer, take full responsibility if anything is damaged or messed up. If you have questions, feel free to PM the original poster or ask in the appropriate section of The Ranger Station.com forums.
Brief Explanation: This article is intended to give a guide to those of you who want to swap out their FM145 5 speed for the M5OD. It explains the parts and procedures needed to do the job correctly and easily.
I apologize for the lack of pictures. My camera wasn't working when I did this job.
Tools Needed:
- Basic set of wrenches/ratchets
- Air Chisel
- Grinder
- 17mm Stubby wrench (only if upgrading to 4.0 clutch)
Parts Needed:
- Transmission
- 6x 12mmx10mm bolts
- 6x Nylon stop nuts to match the bolts
- 12x8 piece of sheet metal
- Wire, 6 inches, 10-12 gauge (I used an old cruise control jumper harness)
- Shifter boots and bezels
If 1st Gen Ranger
- 98+ 1-piece rear driveshaft from donor with same wheelbase
- Front flange for 98-01 rear driveshaft
If 4x4:
-Transfer case from donor vehicle.
- Front drive-shaft from donor vehicle
NOTE: The transfer case and front drive shaft from your truck can be reused, but it becomes much easier if you have the ones from the donor. This will prevent the need for driveshaft modifications and customized 4x4 shift linkage with manual shift transfer cases. While not necessary, getting the parts from the donor make this almost bolt in.
Steps:
DISASSEMBLY:
NOTE: I also took the transfer case off my donor. This is not necessary but my understanding is that it make this job much easier as the linkages for the 1350 t-case don’t line up quite right and must be customized. If you take the 1354 case the linkages drop right into place.
This swap is 90% bolt in, and should net you some better mileage on the highway. My donor vehicle was a 91 Explorer 4x4; my recipient was an 87 Ranger 4x4. I also took this opportunity to do the 10 in clutch upgrade, well worth it, love the feel of the new clutch.
I have found that the best way go about any job is to do all the interior disassembly first. Take your shifters out, and then hop under your dash and using a flat-blade screw driver pop your master cylinder rod off of your clutch pedal. When getting your donor parts don’t worry about the wires for the neutral safety switch, the ones on the first gen are completely different and don’t even mount on the push rod. To remove the switch from the rod, pinch the tabs on the white piece and pull forward, the just pop it off the rod. The switch on your truck is on the pedal so it doesn’t come into play in this swap. The other thing to remember is that the way the hydraulic lines connect is different. You can unhook the slave from the M5 and not need to bleed it afterwards if you don’t replace the slave (mine was just replaced not long before the donor was wrecked) so don’t worry about fishing lines around so you don’t have to bleed. You should still replace it at the time of this swap.
When you remove the shifters inside, pull the carpet back a little further in the front and back and find the four 8 mm bolts that are in the plate the shifter was screwed to. This will be in the way of the new shifter. If you can get one from an 89+ RBV that can be used, I was not able to get one and so I am still trying to find a way to patch the gaping hole in my floor. I will make a follow up to this when I get it figured out. You will also need to cut about an inch worth of carpet off at the front of the shifter hole. Don’t put the lower plate back in until the very end, some material has to be take off of it.
NOTE: You must remove the Y-pipe from the manifolds or the transmission will not clear the front of the tunnel. This is much easier to do while the transmission is still in its normal position. I forgot until I couldn’t get it out, huge PITA trying to work around the transmission.
Once the exhaust is down and the transmission is out set the two units next to each other and note the difference in length, this difference is only about 2 inches will be critical in a few places later on. It will cause your original drive shaft (if converting from an FM145) to be too long. It will also cause your transmission mount to just over shoot the support cross-member and sit just behind it. This is the first place that custom fabrication will be needed.
TRANSMISSION MOUNT RELOCATION:
The transmission mount cross member will not line up now. The ears will have to be moved to the rear holes. Grind a slot through each of the six rivets holding the brackets to the frame so they look like flat blade screws, then using an air chisel pop the heads off. Once the heads are off put the chisel between the bottom of the bracket and the frame and chisel them out. I took this opportunity to put some fresh paint on mine.
Next you will need to punch the rivet out of the upper rear hole as it is now the new upper front hole. The others can stay, they aren’t hurting anything. Leave the bottom one on the driver’s side. If you try to punch it out you risk damaging a brake line. Using your grad 9 12x10mm bolts and your stop nuts bolt them back onto the frame in the rear holes. This will make the transmission mount line up properly with the cross member. Be sure to tighten the nuts down good and check them again after 500 miles.
Transmission mount brackets after relocation:
DS

PS
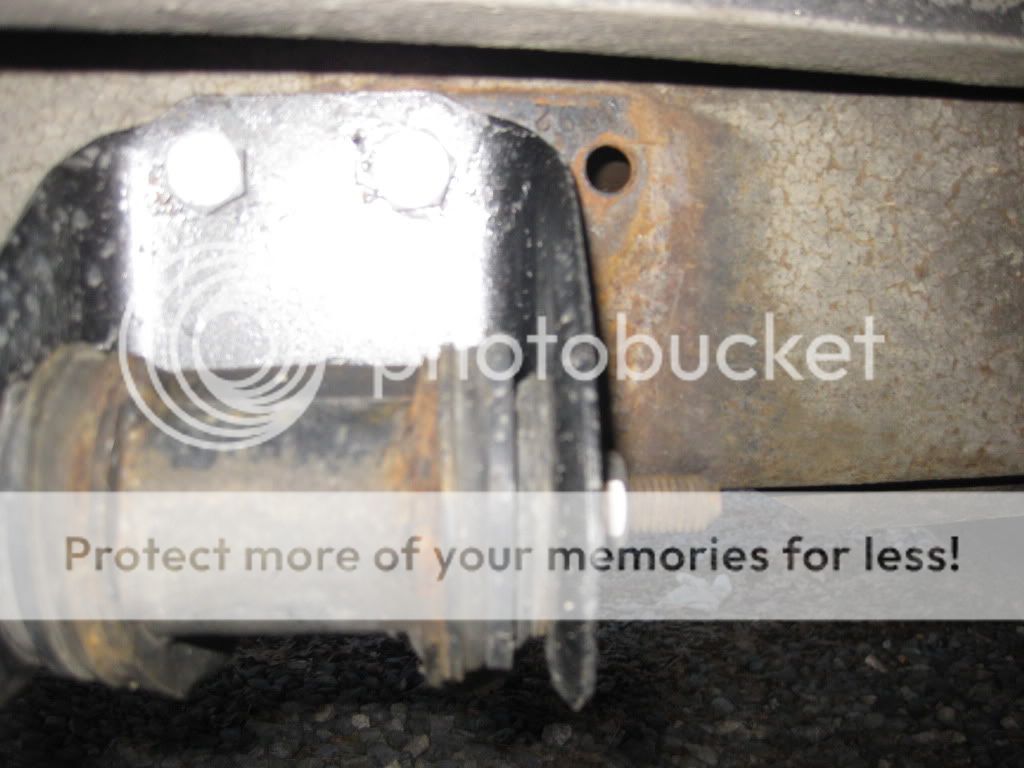
I don't have any before pics of these, but you can see where the surface rust is a brighter shade of orange around where the edge of the brackets used to be.
RE-INSTALLING THE TRANSMISSION
This is not hard, but there are a few things to know to make it easier. First, on the front sway bar cross-piece, remove the two centermost rear bolts, they aren’t in the way, and can be left in, it’s just easier to get the bell up over sway bar if those bolts are out.
Second, remove the shifter. No, not the big black one that the ball sits on. Make sure the transmission is in neutral and then remove the 3 torx screws holding the shifter base in, there is a clearance issue with the body and while it’s not impossible to get in with that part on, this makes it 100% easier. Shove a shop rag in the hole to keep dirt out and be careful not to lose any of the bushings or washers and to not get them out of order. If you do drop them, see the article about replacing the shifter bushings for the proper order.
Once you have the transmission in and bolted up remove the rag and replace the shifter base. The flat spot goes at 3:00 as viewed from the driver’s seat. If you get it in and can’t shift for some reason, take the base back off and look at the rods. They should all be flush with each other, if one isn’t, take a flat blade screwdriver and pop is back in place, which will put the transmission back in neutral.
HYDRAULICS
Master Cylinder
The master cylinders themselves from the FM145 and the M5OD are the same. I used the one off the donor vehicle originally because it had the quick connect fitting and I figured that it would last longer being as it was newer. Unfortunately it failed about 20 miles into my inaugural run. I was able to swap the lower line onto the original master which I just happened to be carrying in the bed at the time and bleed it in a parking lot, no problems since.
To swap lines if you wish to reuse your old master, just punch the roll pins out of the bottom where the lower line enters the cylinder and then pull the line out. Make sure to not double seal it as your roll pin won’t fit back in if you do.
Slave Cylinder
The slave from the FM145 will not fit the M5OD. Also, change the darn thing while you have the transmission out, no matter what you were told by the guy who sold it to you about how old it is.
Bleeding
Go read the article on clutch bleeding in the TRS Tech Library.
BACK-UP LIGHTS
This is another issue. The switches for the back-up lights are on different sides of the transmissions and the harness doesn’t give you a lot of extra wire to play with. I unplugged the switch, spliced in about a foot of extra wire, and plugged it back in, worked like a charm. The order of the wires shouldn’t be important, the switch is a simple open/closed type and either wire configuration should work properly.
4X4
There are apparently differences in the front drive shaft depending on the type and wheelbase of the donor vehicle. I know that mine was a 91 Explorer, I don’t know the wheelbase. I do know that the 87 Ranger 4x4 has 29 inches from the pinion flange to the front of the t-case with the FM145 installed. The 91 Explorer 2-door has a length of 31 ½ inches end to end with the front driveshaft installed. The Ranger had a length of 32 inches flange to flange with the M5 and 1354 installed. I was able to extend my donor front driveshaft to 33 ½ inches (about the limit of the slip joint’s boot) and still have lots of spline left in before it could slip loose. This means that the driveshaft from the donor can be used, and in my case at least, gives the added advantage of a double-cardan joint on the t-case. The 4x4 tell-tale plug from the 1350 goes right into the 1354 sensor. The speedometer gear should work as well. Mine fell apart and got stuck in the case. I’m still trying to figure out how to get it out.
I was able to repair and use the front drive shaft from the donor vehicle. Once I got the right bolts for the t-case end of it, it bolted right in and works like a charm, doesn’t even vibrate.
NEUTRAL SAFETY SWITCH
The neutral safety switches used on the FM145 and the M5OD are different. The older one mounts to the firewall and the newer to the master cylinder push rod. Just squeeze the tabs on the white piece of the switch on the new master and slide it back, once it pops off you can just pry the switch off the rod and not need to worry about it if you are using the new master.
NEUTRAL SENSE
The neutral sense switch is located in different spots, but can be swapped from one unit to the other and no wire work is needed. The one on my donor was actually damaged, so I just pulled my old one out and put it in the new transmission.
REAR DRIVE SHAFT
The rear driveshaft from the 87 will be too long. Your transmission has now moved back 2 inches, and so your driveshaft will be 2 inches too long. You now have a couple options: You can take the one from a vehicle with the M5 and the same wheel base, you can get your existing one chopped, or you can try the 1-piece conversion. The biggest problem with the 1-piece conversion on the 1st gen Rangers is that cross-member for the carrier bearing is in the way, if you examine the pictures in the conversion article, however, the 90+ piece appears to be the same as the 89 back, just flipped. I ground the press rivets out of the cross-member and just removed it. To get it out you need to have someone push up and over while you punch the tab on one side out of the slot on the frame. I know of several other TRS members who have run their rigs for years without this piece in and haven’t had any problems because of it.
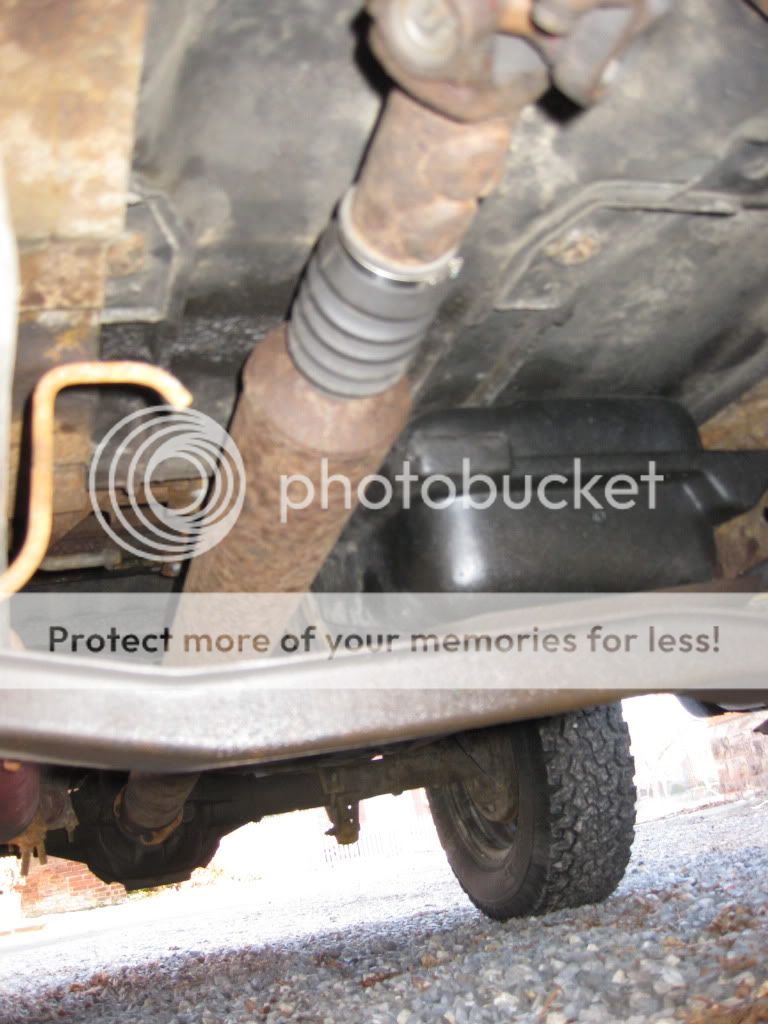
Here is what my new 1-piece looks like:
HOLE IN THE FLOOR
This has one little drawback. The shifter on the M5OD sits about 3 inches farther forward than on the FM145. This means that you have a hole in your floor now. Most state’s won’t allow that for safety inspection, so we need to fix that.
Take the piece that your old shifter boot bolted to and trace it out on your piece of sheet metal. If you stick to the side you will have enough for two attempts, in case you screw it up the first time.
Trace the outside edge, and the inside of the hole. Then cut out the outer line from the piece of sheet metal. Now you will need to make three more cuts, one for the 4x4 shifter, and two for the 5 speed shifter.
First Cut: Remember that lower plate that you took off the floor pan way back at the beginning? Flip it over and look at the foam on the underside. Now using a grinder, cut everything that is not covered by the foam away from the front of it.
Second cut: This is to accommodate the 4x4 shifter if you don’t have push-button. If you do, skip this step. If you don’t, the idea is to remove as little as possible. I had the foam block that sits around the shifter, so I just traced around it and cut out a piece that size and set the foam in. If you don’t have that, try to make a cut that roughly follows the gates in the shifter block plate, remember, the slanted corner of the plate is going to sit closest to the driver’s seat.
Third Cut: This is the second cut for the 5 speed shifter. It will take the shape of a half circle at the front of the new plate you are making, and will be just off center. I eye-balled it, but if you line it up with the lower plate and cut at the back of your first cut for this step you should be positioned well. I took out a piece about twice the size of half a golf ball. To get the best results just cut and test fit and then trim until it fits snugly and properly. I didn’t bolt this down, just tucked it under the carpet and that seems to be holding it just fine.
There will be an exposed area of the sheet metal that you will probably want to set something on, rubber, a cup holder, some foam tape, etc, so that it doesn’t vibrate and make noise going down the road. Your shifter boots can also be attached to the plate with screws of some sort if you won’t have the bezels like I didn’t.
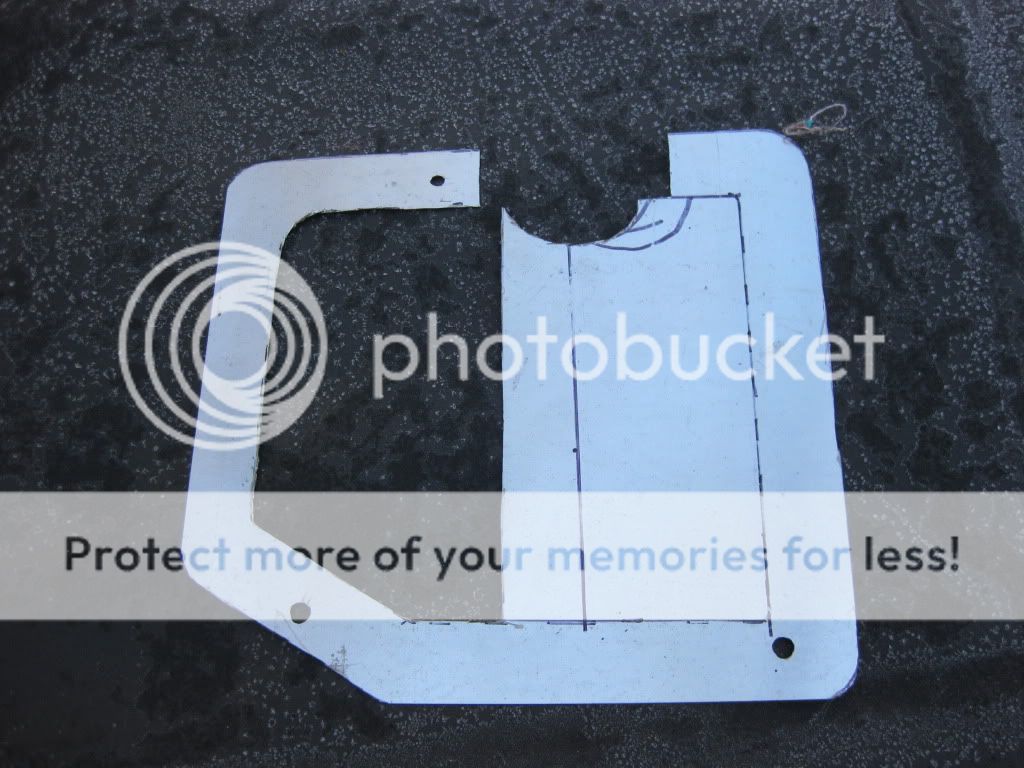
Here are pictures of what your new plate should look like. To give you a size reference, the holes around the outside edge were drilled from the holes on the original with the intent of eventually bolting it in place. That should help you figure out how big things are.
by itself:
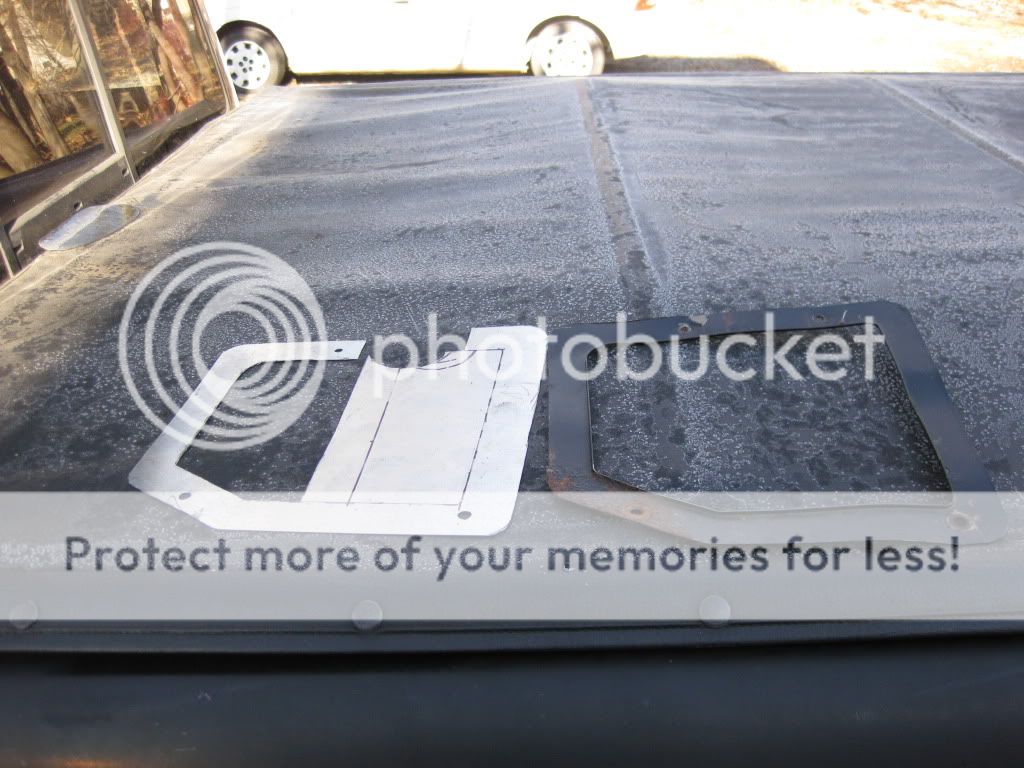
With the old one overlaid:

side by side comparison:
By
Eric Gearhart
Original Poster:
Difficulty: 6.5 out of 10
Time to install: 25-30 working hours, varies by skill level
Disclaimer: The Ranger Station.com, The Ranger Station.com Staff, nor the original poster is responsible for you doing this modification to your vehicle. By doing this modification and following this how-to you, the installer, take full responsibility if anything is damaged or messed up. If you have questions, feel free to PM the original poster or ask in the appropriate section of The Ranger Station.com forums.
Brief Explanation: This article is intended to give a guide to those of you who want to swap out their FM145 5 speed for the M5OD. It explains the parts and procedures needed to do the job correctly and easily.
I apologize for the lack of pictures. My camera wasn't working when I did this job.
Tools Needed:
- Basic set of wrenches/ratchets
- Air Chisel
- Grinder
- 17mm Stubby wrench (only if upgrading to 4.0 clutch)
Parts Needed:
- Transmission
- 6x 12mmx10mm bolts
- 6x Nylon stop nuts to match the bolts
- 12x8 piece of sheet metal
- Wire, 6 inches, 10-12 gauge (I used an old cruise control jumper harness)
- Shifter boots and bezels
If 1st Gen Ranger
- 98+ 1-piece rear driveshaft from donor with same wheelbase
- Front flange for 98-01 rear driveshaft
If 4x4:
-Transfer case from donor vehicle.
- Front drive-shaft from donor vehicle
NOTE: The transfer case and front drive shaft from your truck can be reused, but it becomes much easier if you have the ones from the donor. This will prevent the need for driveshaft modifications and customized 4x4 shift linkage with manual shift transfer cases. While not necessary, getting the parts from the donor make this almost bolt in.
Steps:
DISASSEMBLY:
NOTE: I also took the transfer case off my donor. This is not necessary but my understanding is that it make this job much easier as the linkages for the 1350 t-case don’t line up quite right and must be customized. If you take the 1354 case the linkages drop right into place.
This swap is 90% bolt in, and should net you some better mileage on the highway. My donor vehicle was a 91 Explorer 4x4; my recipient was an 87 Ranger 4x4. I also took this opportunity to do the 10 in clutch upgrade, well worth it, love the feel of the new clutch.
I have found that the best way go about any job is to do all the interior disassembly first. Take your shifters out, and then hop under your dash and using a flat-blade screw driver pop your master cylinder rod off of your clutch pedal. When getting your donor parts don’t worry about the wires for the neutral safety switch, the ones on the first gen are completely different and don’t even mount on the push rod. To remove the switch from the rod, pinch the tabs on the white piece and pull forward, the just pop it off the rod. The switch on your truck is on the pedal so it doesn’t come into play in this swap. The other thing to remember is that the way the hydraulic lines connect is different. You can unhook the slave from the M5 and not need to bleed it afterwards if you don’t replace the slave (mine was just replaced not long before the donor was wrecked) so don’t worry about fishing lines around so you don’t have to bleed. You should still replace it at the time of this swap.
When you remove the shifters inside, pull the carpet back a little further in the front and back and find the four 8 mm bolts that are in the plate the shifter was screwed to. This will be in the way of the new shifter. If you can get one from an 89+ RBV that can be used, I was not able to get one and so I am still trying to find a way to patch the gaping hole in my floor. I will make a follow up to this when I get it figured out. You will also need to cut about an inch worth of carpet off at the front of the shifter hole. Don’t put the lower plate back in until the very end, some material has to be take off of it.
NOTE: You must remove the Y-pipe from the manifolds or the transmission will not clear the front of the tunnel. This is much easier to do while the transmission is still in its normal position. I forgot until I couldn’t get it out, huge PITA trying to work around the transmission.
Once the exhaust is down and the transmission is out set the two units next to each other and note the difference in length, this difference is only about 2 inches will be critical in a few places later on. It will cause your original drive shaft (if converting from an FM145) to be too long. It will also cause your transmission mount to just over shoot the support cross-member and sit just behind it. This is the first place that custom fabrication will be needed.
TRANSMISSION MOUNT RELOCATION:
The transmission mount cross member will not line up now. The ears will have to be moved to the rear holes. Grind a slot through each of the six rivets holding the brackets to the frame so they look like flat blade screws, then using an air chisel pop the heads off. Once the heads are off put the chisel between the bottom of the bracket and the frame and chisel them out. I took this opportunity to put some fresh paint on mine.
Next you will need to punch the rivet out of the upper rear hole as it is now the new upper front hole. The others can stay, they aren’t hurting anything. Leave the bottom one on the driver’s side. If you try to punch it out you risk damaging a brake line. Using your grad 9 12x10mm bolts and your stop nuts bolt them back onto the frame in the rear holes. This will make the transmission mount line up properly with the cross member. Be sure to tighten the nuts down good and check them again after 500 miles.
Transmission mount brackets after relocation:
DS
PS
I don't have any before pics of these, but you can see where the surface rust is a brighter shade of orange around where the edge of the brackets used to be.
RE-INSTALLING THE TRANSMISSION
This is not hard, but there are a few things to know to make it easier. First, on the front sway bar cross-piece, remove the two centermost rear bolts, they aren’t in the way, and can be left in, it’s just easier to get the bell up over sway bar if those bolts are out.
Second, remove the shifter. No, not the big black one that the ball sits on. Make sure the transmission is in neutral and then remove the 3 torx screws holding the shifter base in, there is a clearance issue with the body and while it’s not impossible to get in with that part on, this makes it 100% easier. Shove a shop rag in the hole to keep dirt out and be careful not to lose any of the bushings or washers and to not get them out of order. If you do drop them, see the article about replacing the shifter bushings for the proper order.
Once you have the transmission in and bolted up remove the rag and replace the shifter base. The flat spot goes at 3:00 as viewed from the driver’s seat. If you get it in and can’t shift for some reason, take the base back off and look at the rods. They should all be flush with each other, if one isn’t, take a flat blade screwdriver and pop is back in place, which will put the transmission back in neutral.
HYDRAULICS
Master Cylinder
The master cylinders themselves from the FM145 and the M5OD are the same. I used the one off the donor vehicle originally because it had the quick connect fitting and I figured that it would last longer being as it was newer. Unfortunately it failed about 20 miles into my inaugural run. I was able to swap the lower line onto the original master which I just happened to be carrying in the bed at the time and bleed it in a parking lot, no problems since.
To swap lines if you wish to reuse your old master, just punch the roll pins out of the bottom where the lower line enters the cylinder and then pull the line out. Make sure to not double seal it as your roll pin won’t fit back in if you do.
Slave Cylinder
The slave from the FM145 will not fit the M5OD. Also, change the darn thing while you have the transmission out, no matter what you were told by the guy who sold it to you about how old it is.
Bleeding
Go read the article on clutch bleeding in the TRS Tech Library.
BACK-UP LIGHTS
This is another issue. The switches for the back-up lights are on different sides of the transmissions and the harness doesn’t give you a lot of extra wire to play with. I unplugged the switch, spliced in about a foot of extra wire, and plugged it back in, worked like a charm. The order of the wires shouldn’t be important, the switch is a simple open/closed type and either wire configuration should work properly.
4X4
There are apparently differences in the front drive shaft depending on the type and wheelbase of the donor vehicle. I know that mine was a 91 Explorer, I don’t know the wheelbase. I do know that the 87 Ranger 4x4 has 29 inches from the pinion flange to the front of the t-case with the FM145 installed. The 91 Explorer 2-door has a length of 31 ½ inches end to end with the front driveshaft installed. The Ranger had a length of 32 inches flange to flange with the M5 and 1354 installed. I was able to extend my donor front driveshaft to 33 ½ inches (about the limit of the slip joint’s boot) and still have lots of spline left in before it could slip loose. This means that the driveshaft from the donor can be used, and in my case at least, gives the added advantage of a double-cardan joint on the t-case. The 4x4 tell-tale plug from the 1350 goes right into the 1354 sensor. The speedometer gear should work as well. Mine fell apart and got stuck in the case. I’m still trying to figure out how to get it out.
I was able to repair and use the front drive shaft from the donor vehicle. Once I got the right bolts for the t-case end of it, it bolted right in and works like a charm, doesn’t even vibrate.
NEUTRAL SAFETY SWITCH
The neutral safety switches used on the FM145 and the M5OD are different. The older one mounts to the firewall and the newer to the master cylinder push rod. Just squeeze the tabs on the white piece of the switch on the new master and slide it back, once it pops off you can just pry the switch off the rod and not need to worry about it if you are using the new master.
NEUTRAL SENSE
The neutral sense switch is located in different spots, but can be swapped from one unit to the other and no wire work is needed. The one on my donor was actually damaged, so I just pulled my old one out and put it in the new transmission.
REAR DRIVE SHAFT
The rear driveshaft from the 87 will be too long. Your transmission has now moved back 2 inches, and so your driveshaft will be 2 inches too long. You now have a couple options: You can take the one from a vehicle with the M5 and the same wheel base, you can get your existing one chopped, or you can try the 1-piece conversion. The biggest problem with the 1-piece conversion on the 1st gen Rangers is that cross-member for the carrier bearing is in the way, if you examine the pictures in the conversion article, however, the 90+ piece appears to be the same as the 89 back, just flipped. I ground the press rivets out of the cross-member and just removed it. To get it out you need to have someone push up and over while you punch the tab on one side out of the slot on the frame. I know of several other TRS members who have run their rigs for years without this piece in and haven’t had any problems because of it.
Here is what my new 1-piece looks like:
HOLE IN THE FLOOR
This has one little drawback. The shifter on the M5OD sits about 3 inches farther forward than on the FM145. This means that you have a hole in your floor now. Most state’s won’t allow that for safety inspection, so we need to fix that.
Take the piece that your old shifter boot bolted to and trace it out on your piece of sheet metal. If you stick to the side you will have enough for two attempts, in case you screw it up the first time.
Trace the outside edge, and the inside of the hole. Then cut out the outer line from the piece of sheet metal. Now you will need to make three more cuts, one for the 4x4 shifter, and two for the 5 speed shifter.
First Cut: Remember that lower plate that you took off the floor pan way back at the beginning? Flip it over and look at the foam on the underside. Now using a grinder, cut everything that is not covered by the foam away from the front of it.
Second cut: This is to accommodate the 4x4 shifter if you don’t have push-button. If you do, skip this step. If you don’t, the idea is to remove as little as possible. I had the foam block that sits around the shifter, so I just traced around it and cut out a piece that size and set the foam in. If you don’t have that, try to make a cut that roughly follows the gates in the shifter block plate, remember, the slanted corner of the plate is going to sit closest to the driver’s seat.
Third Cut: This is the second cut for the 5 speed shifter. It will take the shape of a half circle at the front of the new plate you are making, and will be just off center. I eye-balled it, but if you line it up with the lower plate and cut at the back of your first cut for this step you should be positioned well. I took out a piece about twice the size of half a golf ball. To get the best results just cut and test fit and then trim until it fits snugly and properly. I didn’t bolt this down, just tucked it under the carpet and that seems to be holding it just fine.
There will be an exposed area of the sheet metal that you will probably want to set something on, rubber, a cup holder, some foam tape, etc, so that it doesn’t vibrate and make noise going down the road. Your shifter boots can also be attached to the plate with screws of some sort if you won’t have the bezels like I didn’t.
Here are pictures of what your new plate should look like. To give you a size reference, the holes around the outside edge were drilled from the holes on the original with the intent of eventually bolting it in place. That should help you figure out how big things are.
by itself:
With the old one overlaid:
side by side comparison:
Last edited:


