
- Joined
- Mar 4, 2010
- Messages
- 1,921
- Reaction score
- 17
- Points
- 38
- Location
- Omaha, Ne
- Vehicle Year
- 1985 1987
- Make / Model
- Duh
- Engine Size
- 5.0L, 2.9L
- Transmission
- Manual
Difficulty:2/10 This is really simple, just removing items and putting them back in the exact location they came from.
Time to install: 15-20 min, depends on who you are. I work slow so i took me a little longer, plus my steering wheel nut was stripped so i had to go buy a new one. But for the average person, it shouldn't take long.
Disclaimer: The Ranger Station.com, The Ranger Station.com Staff, nor the original poster are responsible for you doing this modification to your vehicle. By doing this modification and following this how-to you, the installer, take full responsibility if anything is damaged or messed up. If you have questions, feel free to PM the original poster or ask in the appropriate section of The Ranger Station.com forums.
Brief Explanation:
When i bought my 1985 Bronco II back in 2009, i didn't even know it had a tilt column. Poking around i found it did. The steering wheel has always been loose, i just attributed it to being old. But it came to my attention after a little searching that the reason it is loose is because of two bolts hidden with in the column, and all i had to do was find them and tighten them.
Tools Needs:
Pulley Puller/Steering Wheel puller
Long #2 Philips head Screw Driver
24mm, 13mm and 14mm socket (I used a 1/2", as the only 24mm socket i had was for a 1/2" drive ratchet)
1/2" ratchet (see above for reason for large ratchet)
Red Loctite
Paper Tower and Degreaser or some other type of spray cleaner.
1. Remover the front cover of the steering wheel. There are two philips head screws on the back of the steering wheel.
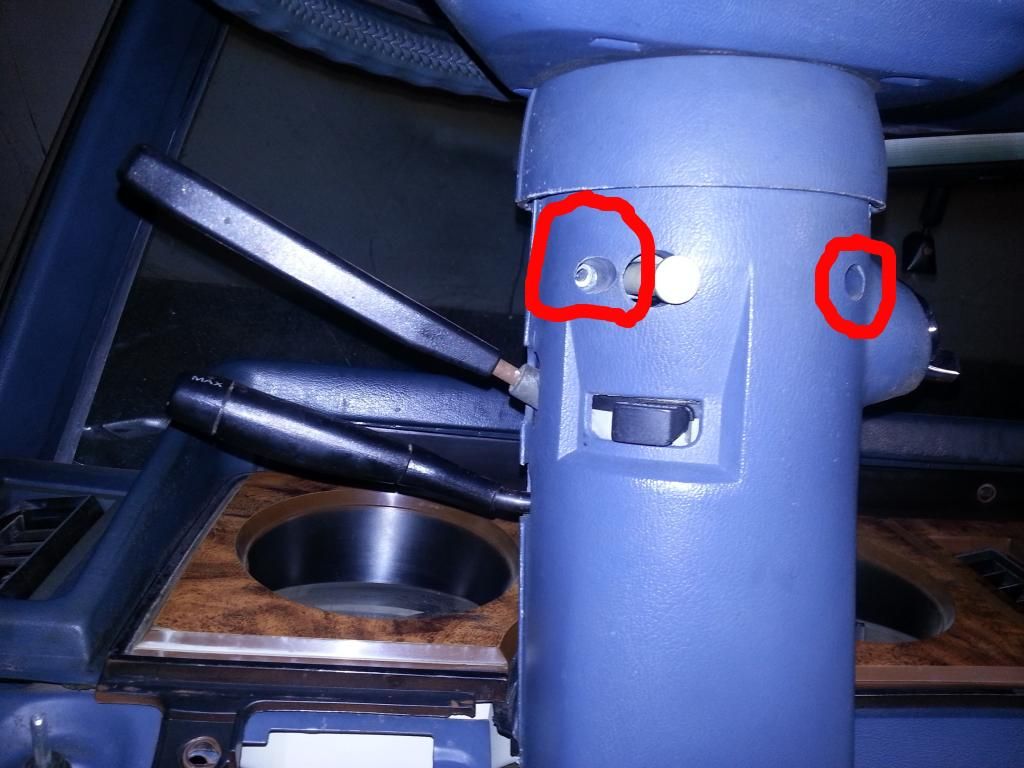
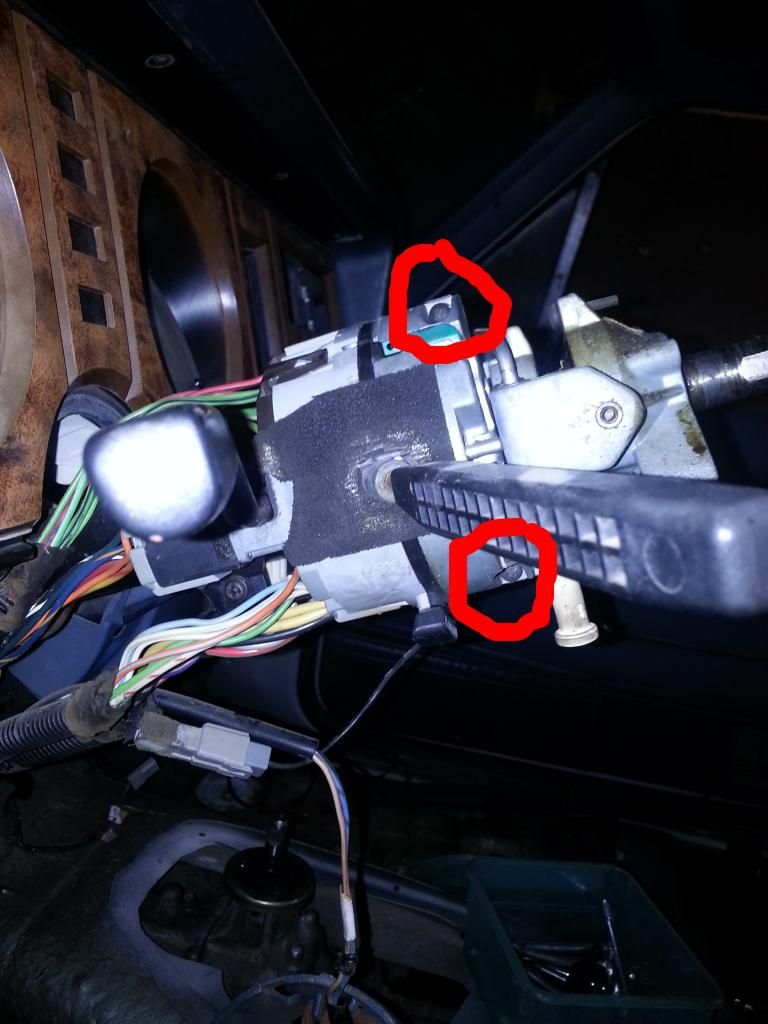
2. Remove the two Philips head screws on the bottom of the steering column. This is where you need the long screw driver as they are recessed quite a bit. They are in the whole circled in red in the picture below.
3. Flip the front of the steering wheel over the back, no need to remove any of the wires.
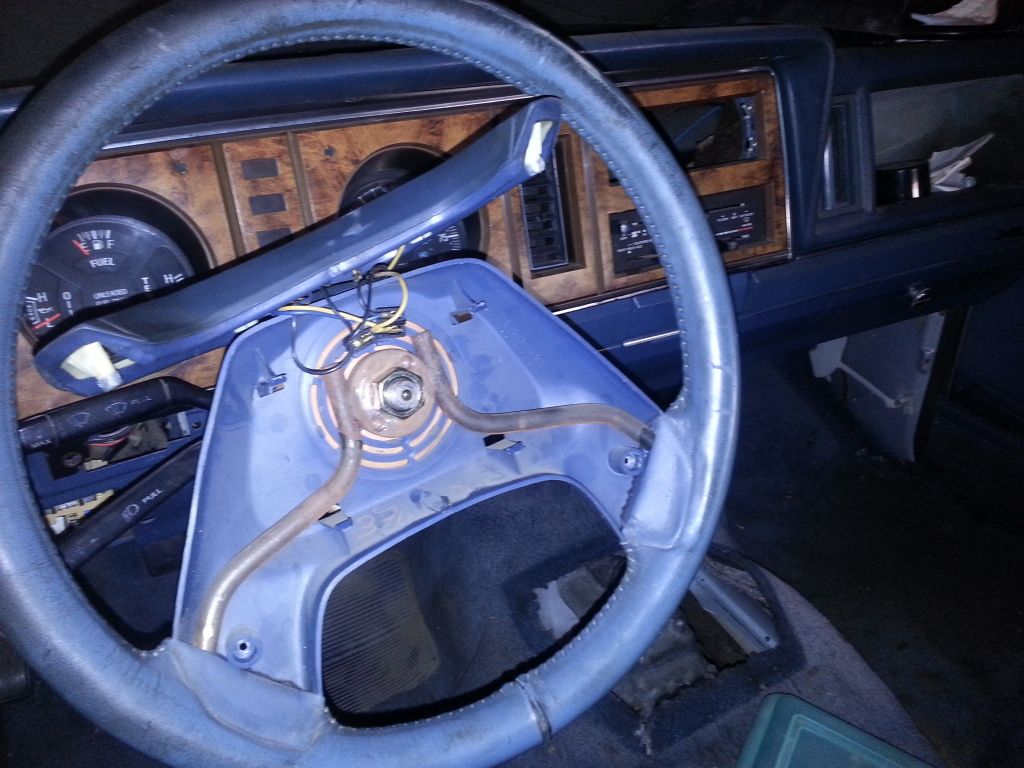
Use the 24mm socket on the ratchet to remove the nut holding the steering wheel on, mine was quite loose but other might be tight still from the factory, and attach you puller and use it to remove the steering wheel.

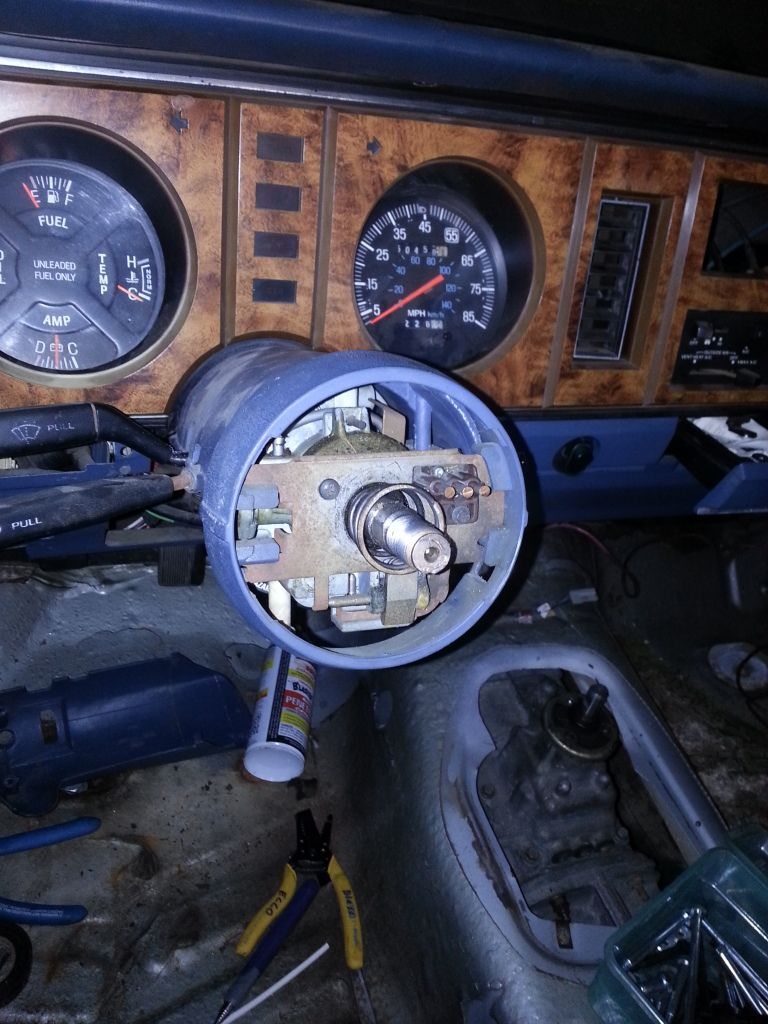
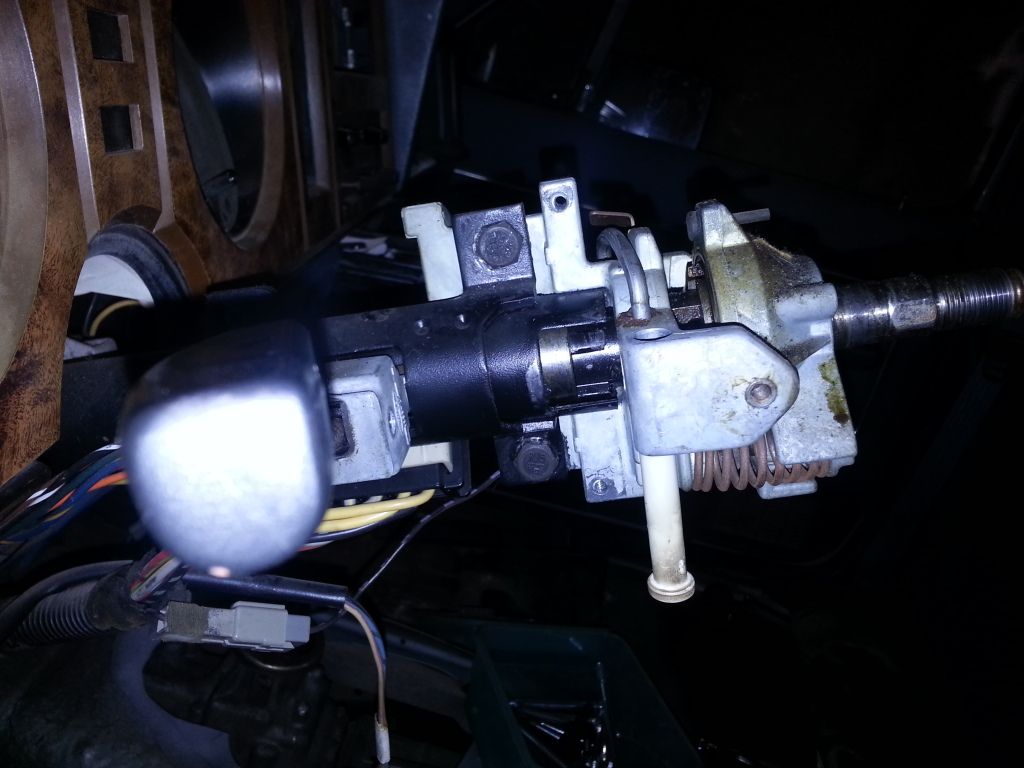
You should be left with this after the steering wheel has come off.
4. Remove the two philips head screws on the metal plate after removing the steering wheel. With them removed the top and bottom covering of the steering column should come right off. Next, there is 3 wires coming off the small brown fixture on the metal plate, the wires are pushed into a metal prong with a grommet around the wires. This need to be undone to get the blue collar off the steering shaft (don't think this is necessary to do, but it give you more space).
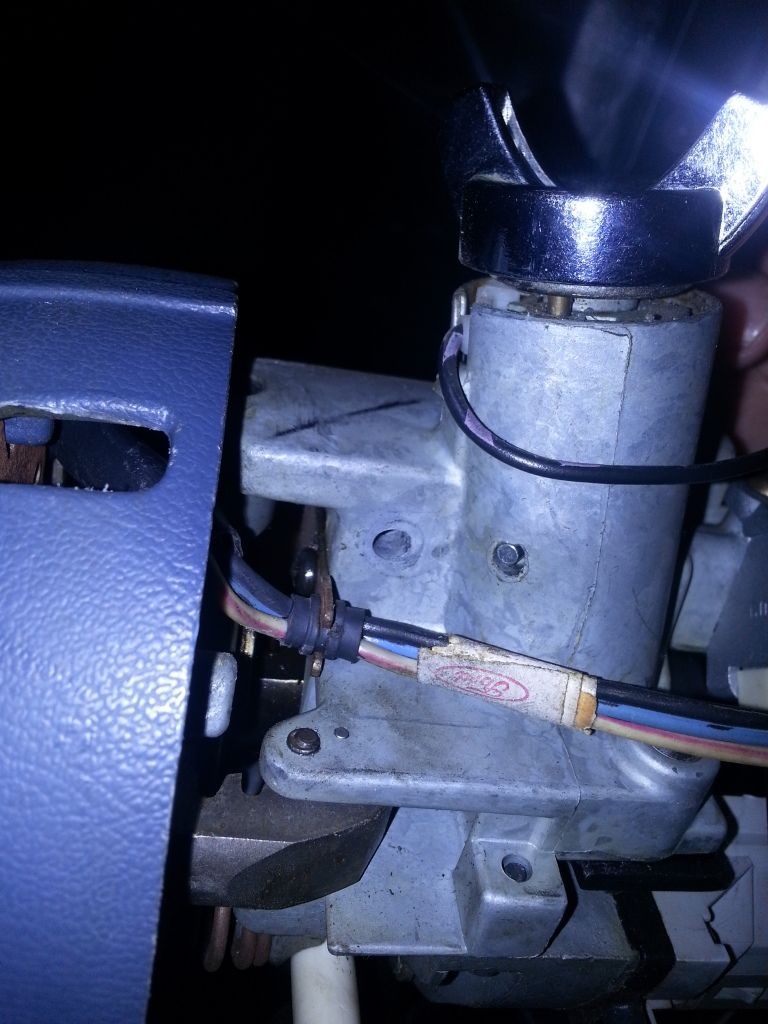

5. With all that removed, we next need to take of the multi function switch. This was held on by 2 philips head screws (circled in red in picture below). When removed it come right off. I unplugged the top plug to get more room, you don't have to.
6. The two bolts in the last picture is what we are after. They will become loose over time and cause you column to jiggle. Use the 13mm socket, tighten them both just slightly snug. Then remove one at a time. Using the paper towels and cleaner, clean the bolt, apply red loctite and put it back in and tighten tight. Repeat with other bolt. DO NOT REMOVE BOTH AT THE SAME TIME, IT CAN MESS UP THE ALIGNMENT!
7. Put it back together the way it came apart, and enjoy your non wiggly steering wheel/column
I hope this is helpful, i know it seems like a simple thing to do, but there are lots of people on here that don't do serious wrenching and are just looking for simple fixes to common problems. Also seems quite helpful to those passerbys.
Time to install: 15-20 min, depends on who you are. I work slow so i took me a little longer, plus my steering wheel nut was stripped so i had to go buy a new one. But for the average person, it shouldn't take long.
Disclaimer: The Ranger Station.com, The Ranger Station.com Staff, nor the original poster are responsible for you doing this modification to your vehicle. By doing this modification and following this how-to you, the installer, take full responsibility if anything is damaged or messed up. If you have questions, feel free to PM the original poster or ask in the appropriate section of The Ranger Station.com forums.
Brief Explanation:
When i bought my 1985 Bronco II back in 2009, i didn't even know it had a tilt column. Poking around i found it did. The steering wheel has always been loose, i just attributed it to being old. But it came to my attention after a little searching that the reason it is loose is because of two bolts hidden with in the column, and all i had to do was find them and tighten them.
Tools Needs:
Pulley Puller/Steering Wheel puller
Long #2 Philips head Screw Driver
24mm, 13mm and 14mm socket (I used a 1/2", as the only 24mm socket i had was for a 1/2" drive ratchet)
1/2" ratchet (see above for reason for large ratchet)
Red Loctite
Paper Tower and Degreaser or some other type of spray cleaner.
1. Remover the front cover of the steering wheel. There are two philips head screws on the back of the steering wheel.
2. Remove the two Philips head screws on the bottom of the steering column. This is where you need the long screw driver as they are recessed quite a bit. They are in the whole circled in red in the picture below.

3. Flip the front of the steering wheel over the back, no need to remove any of the wires.

Use the 24mm socket on the ratchet to remove the nut holding the steering wheel on, mine was quite loose but other might be tight still from the factory, and attach you puller and use it to remove the steering wheel.

You should be left with this after the steering wheel has come off.

4. Remove the two philips head screws on the metal plate after removing the steering wheel. With them removed the top and bottom covering of the steering column should come right off. Next, there is 3 wires coming off the small brown fixture on the metal plate, the wires are pushed into a metal prong with a grommet around the wires. This need to be undone to get the blue collar off the steering shaft (don't think this is necessary to do, but it give you more space).


5. With all that removed, we next need to take of the multi function switch. This was held on by 2 philips head screws (circled in red in picture below). When removed it come right off. I unplugged the top plug to get more room, you don't have to.


6. The two bolts in the last picture is what we are after. They will become loose over time and cause you column to jiggle. Use the 13mm socket, tighten them both just slightly snug. Then remove one at a time. Using the paper towels and cleaner, clean the bolt, apply red loctite and put it back in and tighten tight. Repeat with other bolt. DO NOT REMOVE BOTH AT THE SAME TIME, IT CAN MESS UP THE ALIGNMENT!
7. Put it back together the way it came apart, and enjoy your non wiggly steering wheel/column
I hope this is helpful, i know it seems like a simple thing to do, but there are lots of people on here that don't do serious wrenching and are just looking for simple fixes to common problems. Also seems quite helpful to those passerbys.
Last edited:


