
sealsareus
New Member
- Joined
- Jul 12, 2016
- Messages
- 2
- Reaction score
- 0
- Points
- 0
- Location
- Glendale, AZ
- Vehicle Year
- 1994
- Make / Model
- Ranger
- Engine Size
- V6 3.0
- Transmission
- Manual
- My credo
- Walk softly, but carry a big stick.
Original Poster: Sealsareus
Difficulty: 2 out of 10
Time to install:30 minutes take out,install. Laser cut was about 5 minutes for the set probably less. paint time depending on the heat and coat.
Disclaimer: The Ranger Station.com, The Ranger Station.com Staff, nor the original poster are responsible for you doing this modification to your vehicle. By doing this modification and following this how-to you, the installer, take full responsibility if anything is damaged or messed up. If you have questions, feel free to PM the original poster or ask in the appropriate section of The Ranger Station.com forums.
Brief Explanation: Hello I wanted to give back to the ranger station community for all the help I have received just viewing your threads, So after I did a custom 2 inch body lift on my 94 ranger XL v6 3.0L I needed to raise my front bumper brackets 2 inches as well. I looked around and couldn't find anything for sale and very few diagrams for new brackets and didn't like the designs from kits. So being a fabricator and working with an Amada CNC laser I decided I'd just make new factory replicas ones with the lift I need. I am providing this so you can take it to a fabrication shop and do the same or at least have measurements to make your own.
Tools Needed:
- 1/2 Ratchet w/ 21mm Socket
- spray paint, ( I bought black primer)
-tape measure, and marker
- PB blaster WD 40
Parts Needed:
-Factory bracket
-The Gcode I'm providing
-about 18x11 sheet of 1/4 inch plate
---------------------------------------------------------
Steps 1:
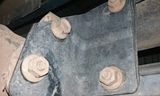
Well first we need to take the old brackets off the bumper. So grab a can of wd 40 or pb blaster and spray the 8 bolts. 4 on the bumper itself and 2 on each side of the brackets to frame. If they are really rusty you might try using a wire brush on them first.
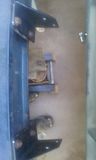
Now you should put something a little below the bumper on each side to support it when you take it off. Now these bumpers aren't that heavy but they are steel and have some weight to them. If you need to use 2 chairs on each side worked for me just set them at 45's under the lights I used these on reassembly originally. I would mark the bottom of the 2 sets of bolts the go to the frame so you know what angle the bumper sits at.
Now after that's done lets loosen those nuts. They should come off relatively easy. you can choose to loosen them all while still on the truck, just take the brackets off with the bumper, or just the bumper. the bolts themselves are coupled together in the back by a rectangular bracket but they are easy to get to and slide out.
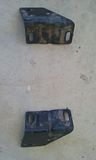
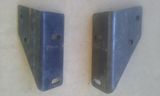
Factory Brackets:
---------------------------------------------------------
Steps 2:
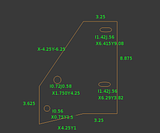
Print or write down the G Code below and take it to a fabrication shop with a CNC cutting machine, be it laser, plasma, or water jet they will all work great for this application and should be able to use my G code. the G112 commands are for Amada laser machines specifically, they are hard codes for circles and oblongs. (I) being the diameter and (J)being the width.
Take at least one of the brackets and bolt sets with you to make sure everything fits when you are done. it helps the fabrication company to check before cutting and make sure everything will line up as expected. even more important to make proper bends. I bent my pieces at 90 degrees and they fit great but the factory are not right on 90.
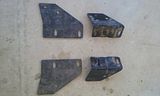
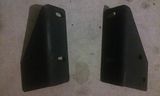
Before Bend:
Now if you wanted to fabricate these parts some other way I also have a diagram of the G code. the measurements are in inches
G Code:
I cut my pieces out of 1/4 in plate the factory looks to be 3/16 with stress bends for strength. If you can get a hold of your own material I would think that would be cheaper than the fabrication company's price, but either way steel is very cheap atm.
Speaking of price I am honestly not sure what a company would charge to have this done. For me the material was scrap and I had downtime to run a project. Considering the program only took about 5 minutes for both pieces I wouldn't think they would charge too much. especially with the program code ready to go.
Then the piece was taken to a press and bent 3.25 inches from the tall side in at 90 degrees.
After bend

---------------------------------------------------------
Steps 3:
After I got home the first thing I did was placed the brackets on the vehicle and mounted them back on. I made sure they fit perfect and I had no clearance issues with my radiator support. I still had plenty of room so it took the brackets back off and got ready to paint.
First I laid down some old cardboard so I didn't make a mess then I grabbed a can of Rustoleum black primer and painted both brackets, let one side dry for a while then stood it up and painted the other side. after that I waited for everything to dry and was ready to go.
Step 4:
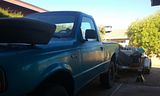
And Finally, I put the bumper on both chairs like above, set the brackets according to my marks. I bolted the bracket to the trucks frame first then to the bumper. I pushed the bumper up and got one hole in then i started a thread and got the other on. I pulled the bumper in and hand tightened the bolts. then I checked the angle of the bumper and adjusted for any differences and made sure it was lined up with the body. It came out perfect, my bumper is strong and looks like factory.
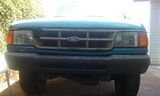
I hope this helps someone and I apologize that I don't know much about the fabrication price. they were honestly very simple to make, not much material and quick. Now on to a new front grille. Pesky turkeys.
Thank you for your time and for the help you have given me.
---------------------------------------------------------
Difficulty: 2 out of 10
Time to install:30 minutes take out,install. Laser cut was about 5 minutes for the set probably less. paint time depending on the heat and coat.
Disclaimer: The Ranger Station.com, The Ranger Station.com Staff, nor the original poster are responsible for you doing this modification to your vehicle. By doing this modification and following this how-to you, the installer, take full responsibility if anything is damaged or messed up. If you have questions, feel free to PM the original poster or ask in the appropriate section of The Ranger Station.com forums.
Brief Explanation: Hello I wanted to give back to the ranger station community for all the help I have received just viewing your threads, So after I did a custom 2 inch body lift on my 94 ranger XL v6 3.0L I needed to raise my front bumper brackets 2 inches as well. I looked around and couldn't find anything for sale and very few diagrams for new brackets and didn't like the designs from kits. So being a fabricator and working with an Amada CNC laser I decided I'd just make new factory replicas ones with the lift I need. I am providing this so you can take it to a fabrication shop and do the same or at least have measurements to make your own.
Tools Needed:
- 1/2 Ratchet w/ 21mm Socket
- spray paint, ( I bought black primer)
-tape measure, and marker
- PB blaster WD 40
Parts Needed:
-Factory bracket
-The Gcode I'm providing
-about 18x11 sheet of 1/4 inch plate
---------------------------------------------------------
Steps 1:

Well first we need to take the old brackets off the bumper. So grab a can of wd 40 or pb blaster and spray the 8 bolts. 4 on the bumper itself and 2 on each side of the brackets to frame. If they are really rusty you might try using a wire brush on them first.

Now you should put something a little below the bumper on each side to support it when you take it off. Now these bumpers aren't that heavy but they are steel and have some weight to them. If you need to use 2 chairs on each side worked for me just set them at 45's under the lights I used these on reassembly originally. I would mark the bottom of the 2 sets of bolts the go to the frame so you know what angle the bumper sits at.
Now after that's done lets loosen those nuts. They should come off relatively easy. you can choose to loosen them all while still on the truck, just take the brackets off with the bumper, or just the bumper. the bolts themselves are coupled together in the back by a rectangular bracket but they are easy to get to and slide out.
Factory Brackets:

---------------------------------------------------------
Steps 2:
Print or write down the G Code below and take it to a fabrication shop with a CNC cutting machine, be it laser, plasma, or water jet they will all work great for this application and should be able to use my G code. the G112 commands are for Amada laser machines specifically, they are hard codes for circles and oblongs. (I) being the diameter and (J)being the width.
Take at least one of the brackets and bolt sets with you to make sure everything fits when you are done. it helps the fabrication company to check before cutting and make sure everything will line up as expected. even more important to make proper bends. I bent my pieces at 90 degrees and they fit great but the factory are not right on 90.
Before Bend:

Now if you wanted to fabricate these parts some other way I also have a diagram of the G code. the measurements are in inches

G Code:
Code:
M102(HRS.250)
G90G92X120Y61
M100
G90G00X0Y0
M103
G112 X.75Y1.5I.56
G112 X1.75Y4.25I.72J.58
G112 X6.29Y3.82 I1.42J.56
G112 X6.415Y9.08I1.42J.56
G00G40
G90G00X0Y0
M103
E4
G91G01X4.25Y1
G91G01X3.25Y0
G91G01X0Y8.875
G91G01X-3.25Y0
G91G01X-4.25Y-6.25
G91G01X0Y-3.625
M104
G00G40
M101
G50Speaking of price I am honestly not sure what a company would charge to have this done. For me the material was scrap and I had downtime to run a project. Considering the program only took about 5 minutes for both pieces I wouldn't think they would charge too much. especially with the program code ready to go.
Then the piece was taken to a press and bent 3.25 inches from the tall side in at 90 degrees.
After bend

---------------------------------------------------------
Steps 3:

After I got home the first thing I did was placed the brackets on the vehicle and mounted them back on. I made sure they fit perfect and I had no clearance issues with my radiator support. I still had plenty of room so it took the brackets back off and got ready to paint.

First I laid down some old cardboard so I didn't make a mess then I grabbed a can of Rustoleum black primer and painted both brackets, let one side dry for a while then stood it up and painted the other side. after that I waited for everything to dry and was ready to go.

Step 4:
And Finally, I put the bumper on both chairs like above, set the brackets according to my marks. I bolted the bracket to the trucks frame first then to the bumper. I pushed the bumper up and got one hole in then i started a thread and got the other on. I pulled the bumper in and hand tightened the bolts. then I checked the angle of the bumper and adjusted for any differences and made sure it was lined up with the body. It came out perfect, my bumper is strong and looks like factory.

I hope this helps someone and I apologize that I don't know much about the fabrication price. they were honestly very simple to make, not much material and quick. Now on to a new front grille. Pesky turkeys.
Thank you for your time and for the help you have given me.
---------------------------------------------------------


