
Boost Bucket
Member
- Joined
- Mar 18, 2022
- Messages
- 36
- Reaction score
- 46
- Points
- 18
- Location
- Midwest
- Engine Type
- 2.3 EcoBoost
Welcome to my build thread!
First, some background:
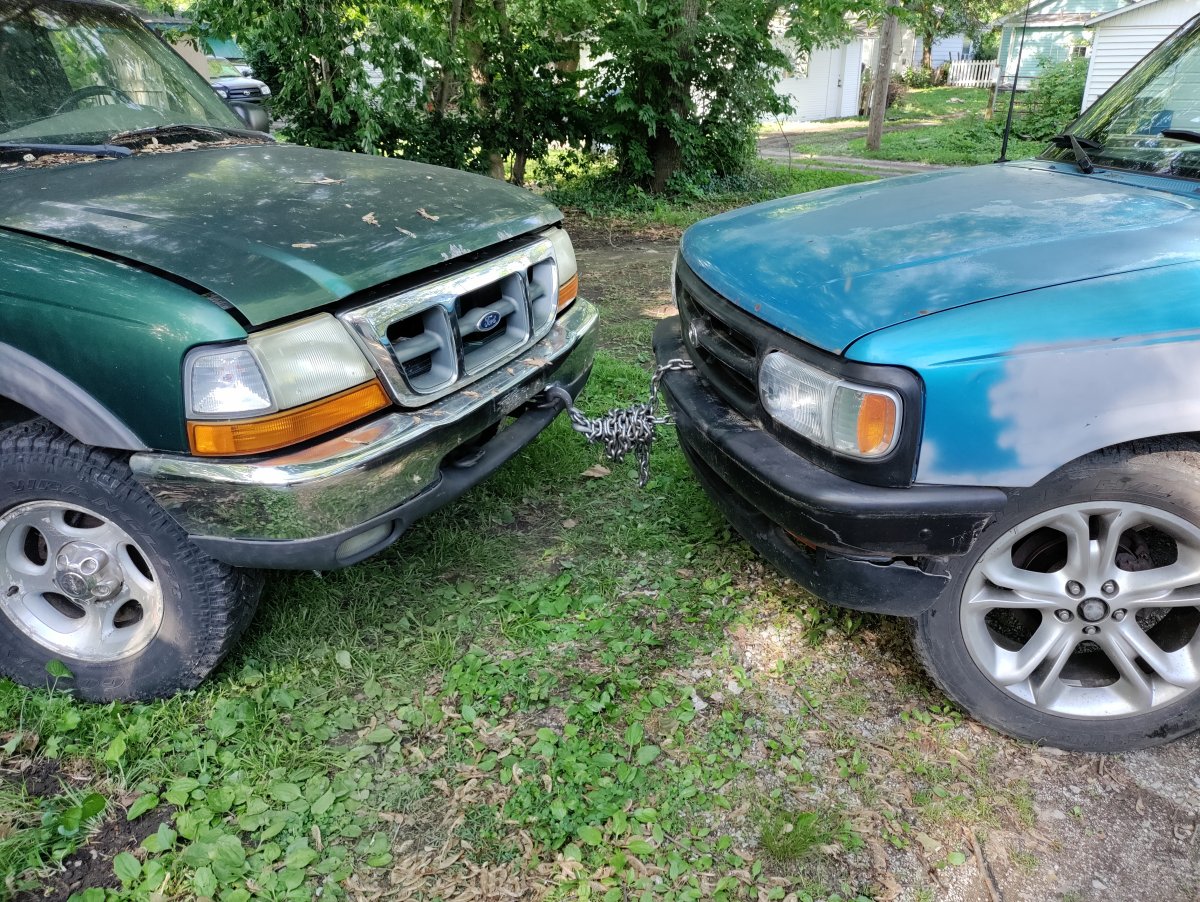
Project Truck: 2000 Ranger XLT 4.0L 4x4 automatic with 210,569 miles
Donor Truck: (wrecked) 2020 Ranger Lariat 2.3L Ecoboost 4x4 automatic with 36,554 miles
Project Goals: 320hp, functioning 4x4, functioning AC, 23MPG
Background and disclaimer: I’ve never done a swap before or turned wrenches professionally. My only academic background is a single IC class at university years ago. I do have a degree in Computer Engineering which I’m hoping will help me out when it comes time for getting the ECU to play nice with all the systems that are missing. My biggest projects to date include an engine rebuild on a ’94 Mazda B3000 and a timing belt on an ‘08 GTI. I don’t have a car lift, many professional tools, or the skills to make up for either, but I do have enough things laying around the garage to get me by in most cases. I’ve also never welded before, so I plan to pick that skill up along the way. If you know a better way to do something, please let me know!
I’m hoping this thread can be to others what I was looking for myself when I was trying to plan this build. As of writing, there is a lot of talk about the 2.3 Ecoboost in the Ranger but exact measurements and anything past theory is hard to find. I plan to take measurements and make observations to make future swaps easier to plan.
Reasons for this build:
The build truck:
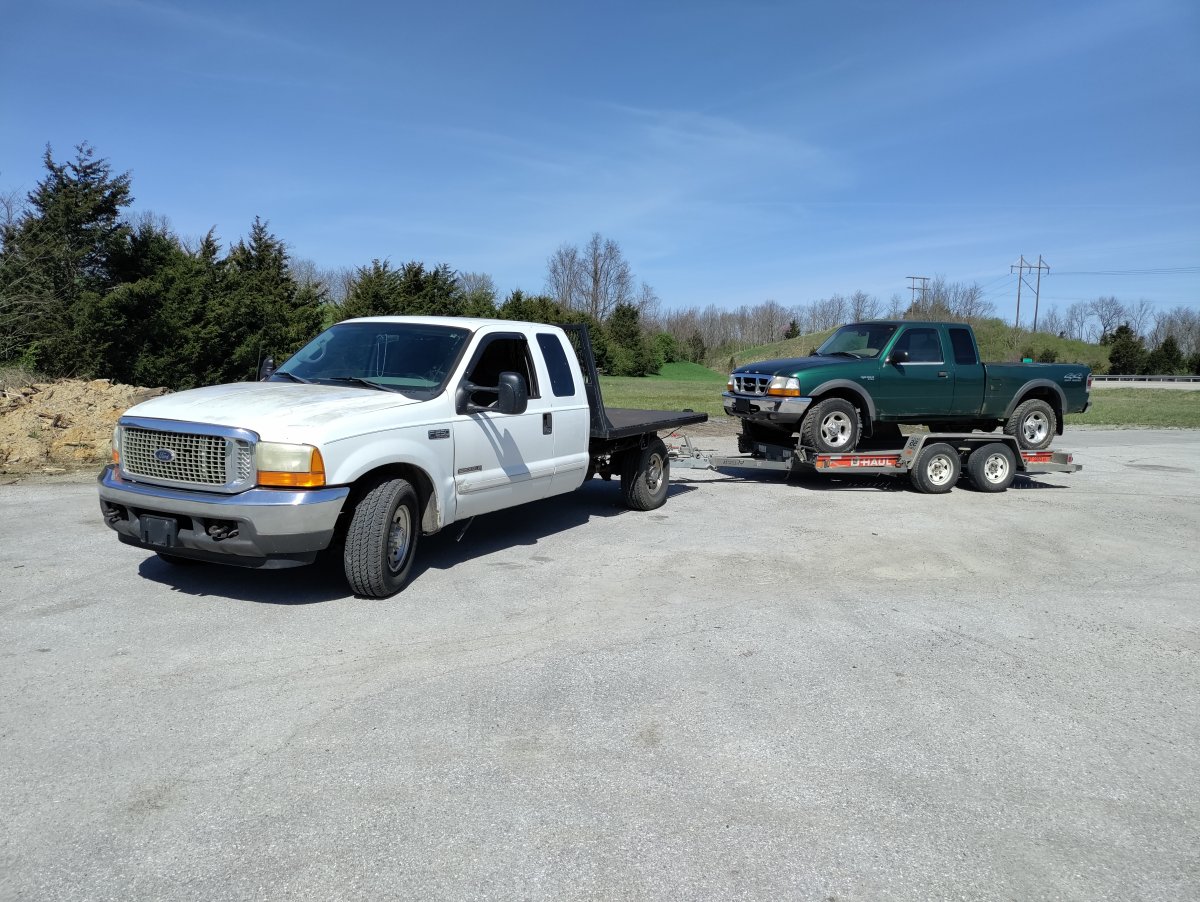
The truck was non-running when I bought it and had parts all over inside the cab from previous attempts to get it running. The seller was kind enough to push it up onto the trailer for me with his tractor so I could get it home.
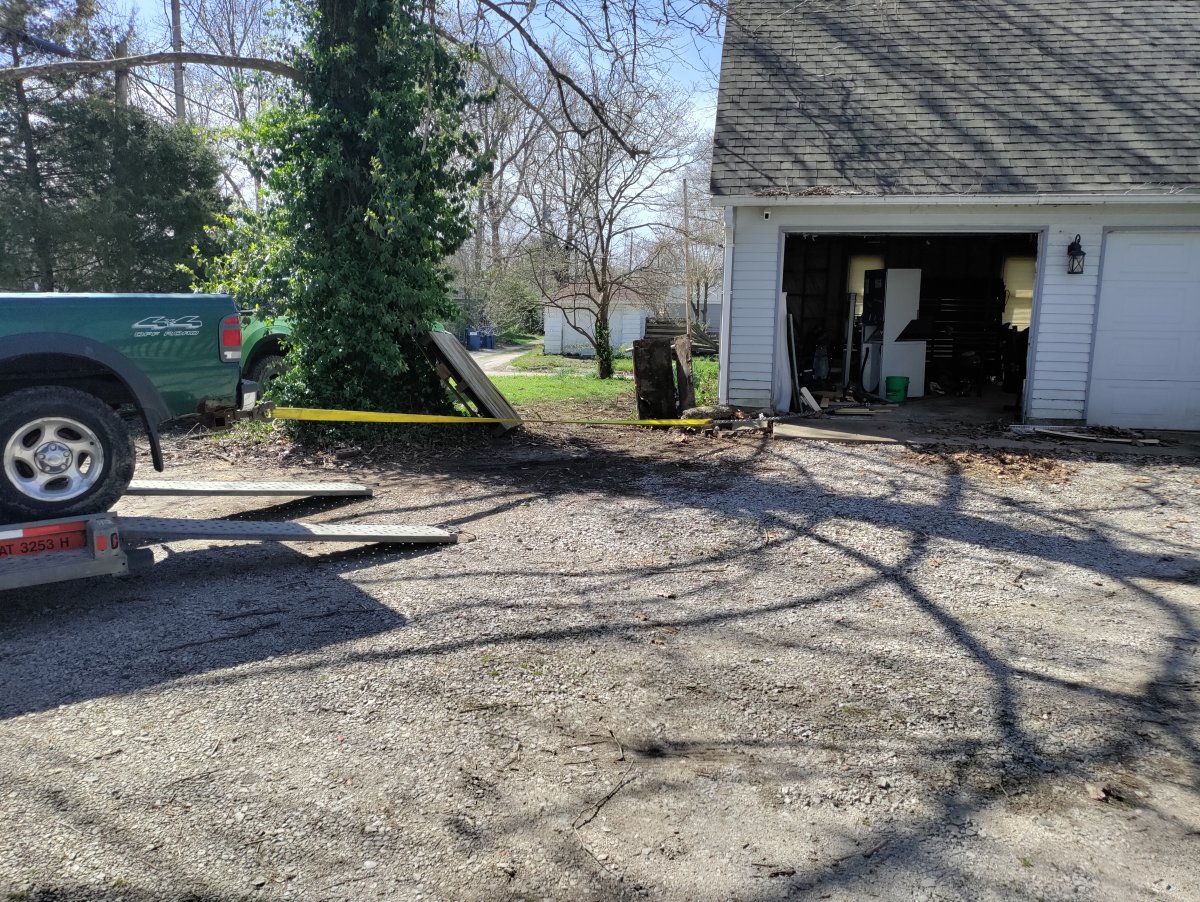
I tried some troubleshooting with the truck still on the trailer but ultimately I had to return the trailer before I could get it going. To get it off the trailer then I put in a pintle hitch I found in the street one day and tow strap/chained it to a D ring I have mounted to the concrete in the garage for pulling dead Rangers in. I don't have a winch or anything so hand cranking with a comealong did the trick for me.
A few days later I determined that the truck had a dead computer. I replaced it with one from Ebay and used Forscan to reprogram the keys. I was only given one with the truck so I had second made at the local Walmart to be able to complete the programming steps. With the keys reprogrammed I found that it also had a dead fuel pump. Next step was to pull the bed.
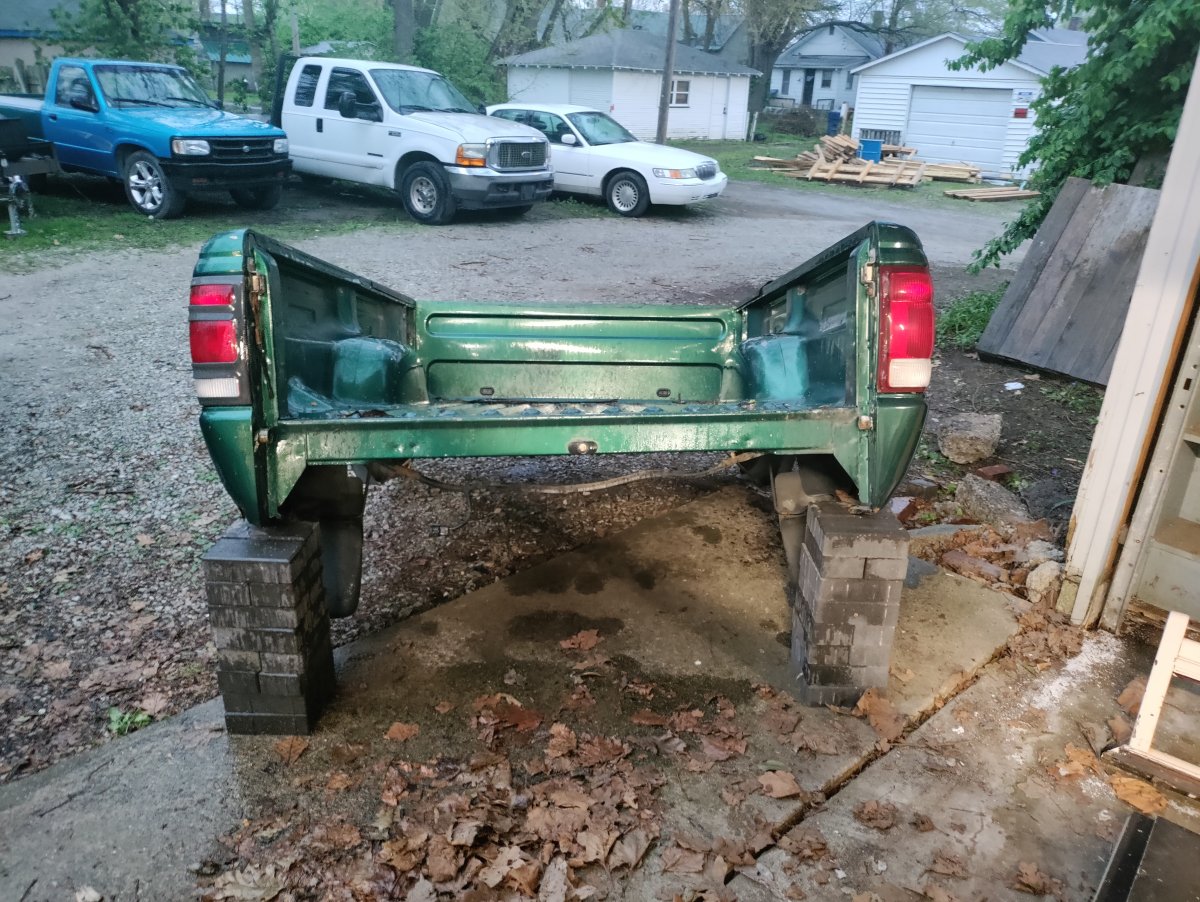
Since I didn't have a helper that day I used the engine crane to lift the back to clear the bumper. I lifted the front half myself and pushed it backwards. The plastic mudflap hardware was hopelessly rusted together and with the crazy amount of rust and mud underneath I wasn't in the mood to deal with it so I propped the back with bricks. I doubt I will reuse the bed anyway.
With the fuel pump fixed, the truck was finally running. I wanted to get it running before the swap so I could move it around the yard easier and check as many features as possible before the swap. Without the baseline I wouldn't know what was broken as a result of the swap or what was already broken. I'm sure someone else out there can use a good 4.0!
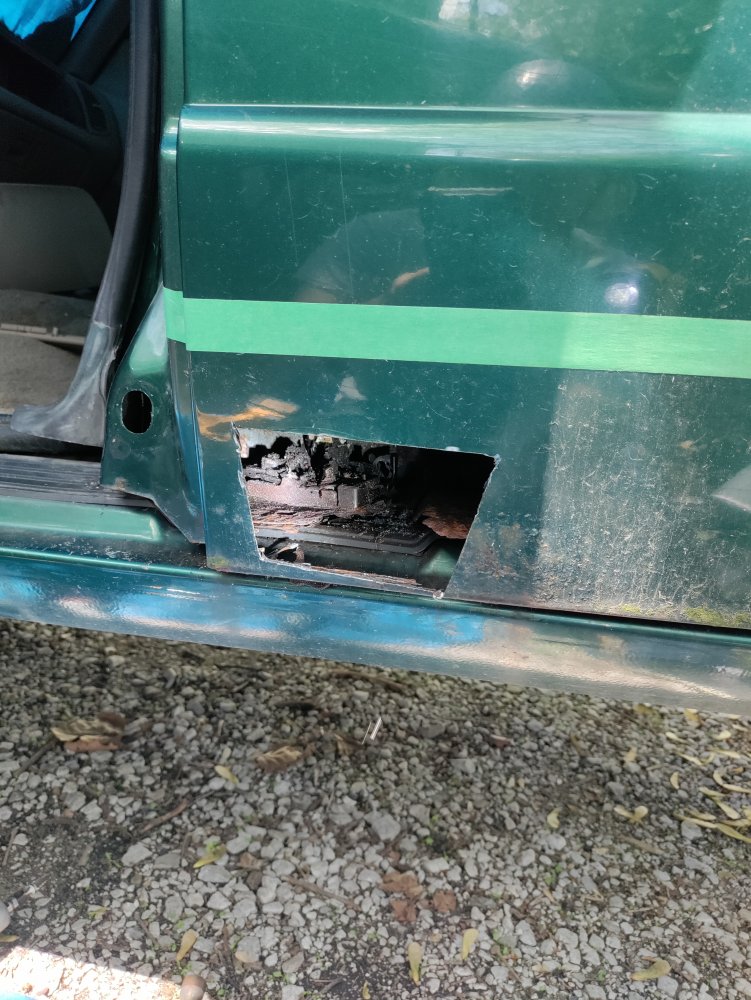
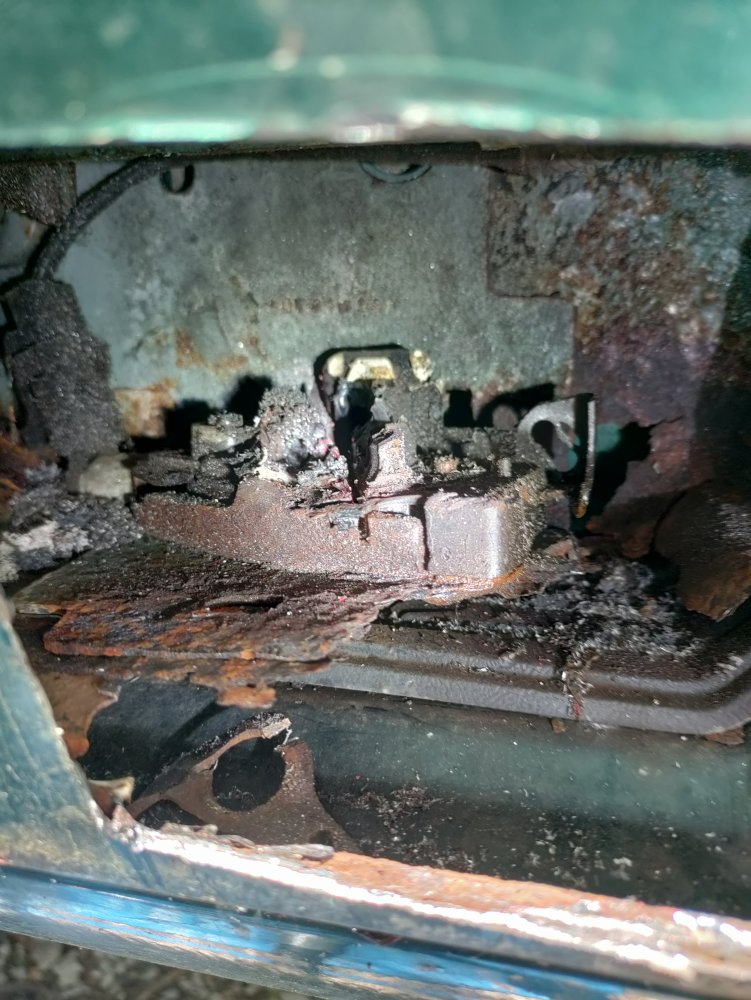
Next, I started on the back doors. With the truck not in great condition to start with and then having sat for probably years, I wasn't surprised the bottom latch on both sides was seized. Believe me when I say I tried everything I could think of and then some to get them free. The last time I handled one of these, some PB Blaster and a mini sledge did the trick, but no luck this time. After hours of searching around online for any hints that applied here I ended up deciding that caveman brain was the solution. Since the bottoms of the doors were already shot, I decided to just cut the hole bigger on each side with an angle grinder and then sawzall through the entire latch assembly, including the bolt. It ended up being so seized that the bolt was stuck in the clasp even after it had been sawed completely out of the door. I did this for both sides.
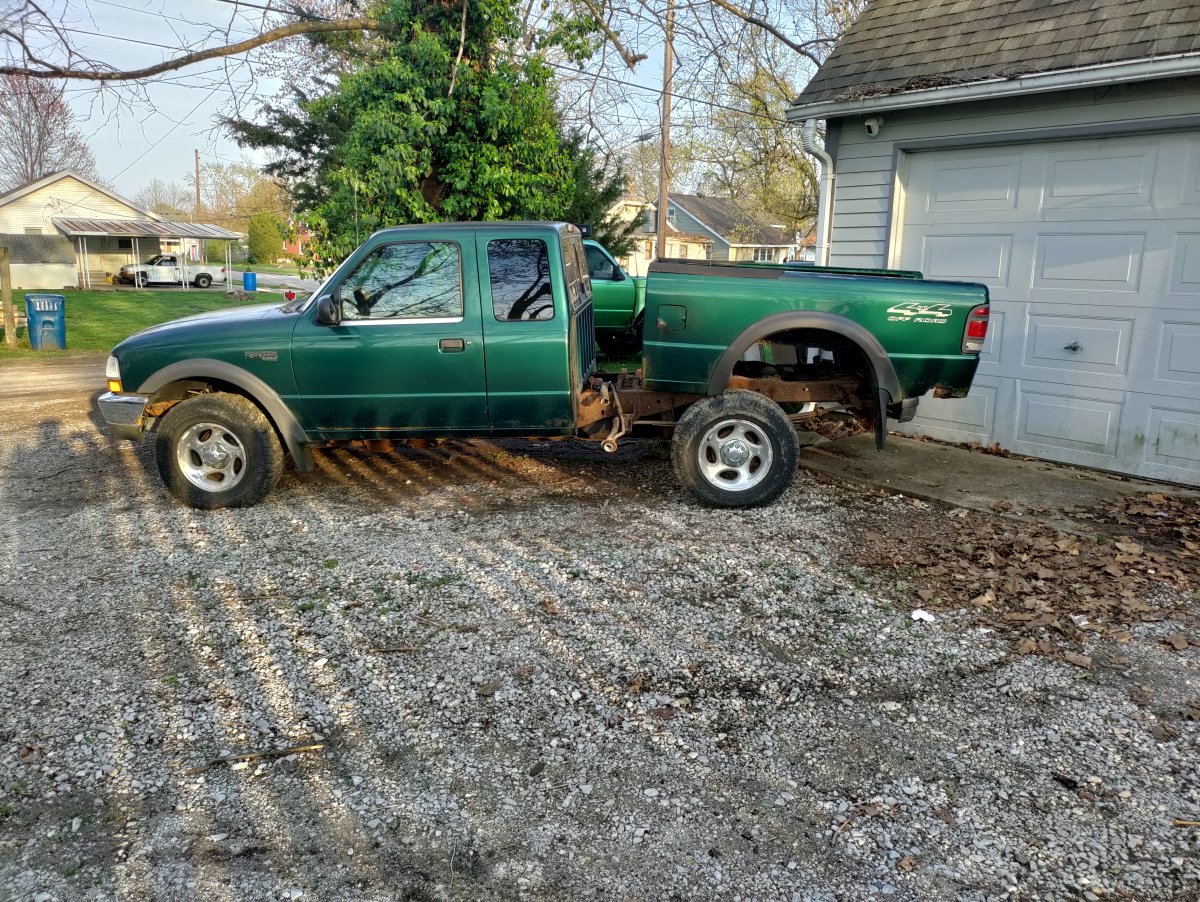
Next step for me was to pull the engine out. I was still on the fence at this point whether I was going to just do the swap and be done with it or if I wanted to pull the whole body off and do it right. For me the decision was made when my breaker bar rounded off the final exhaust bolt I needed to get the engine lose and simultaneously drew blood and peppered my face shield with rust. Since I had the engine disconnected at this point I used a chain and steel bumpers to drag it across the yard to a better position.
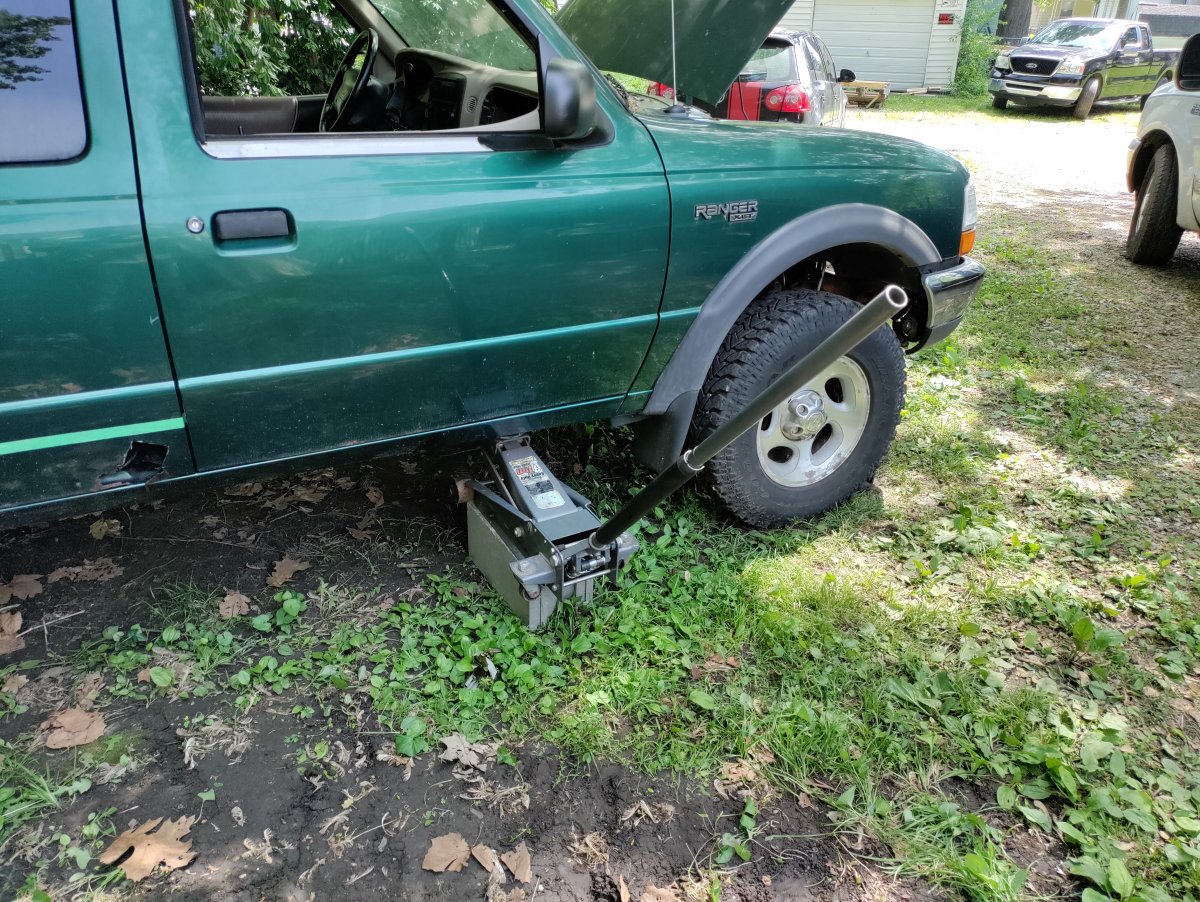
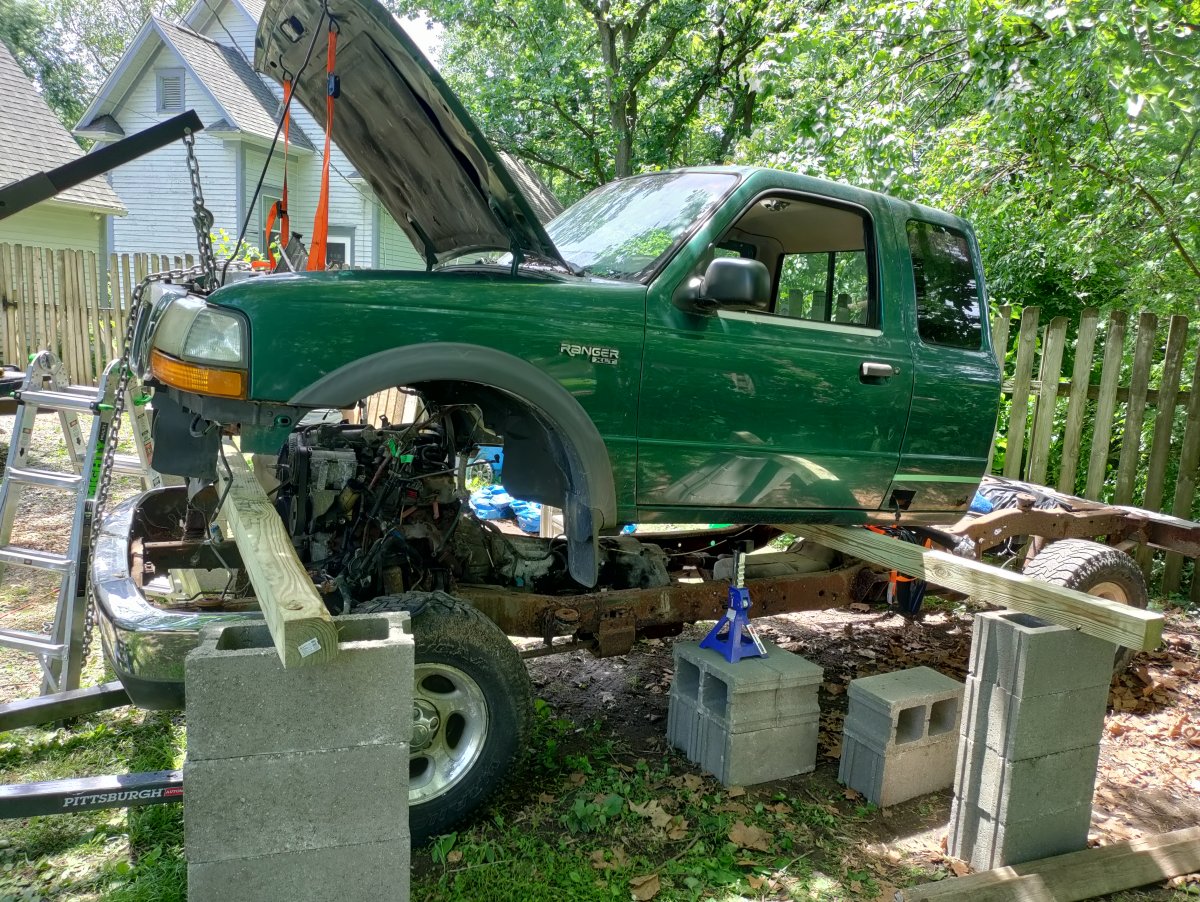
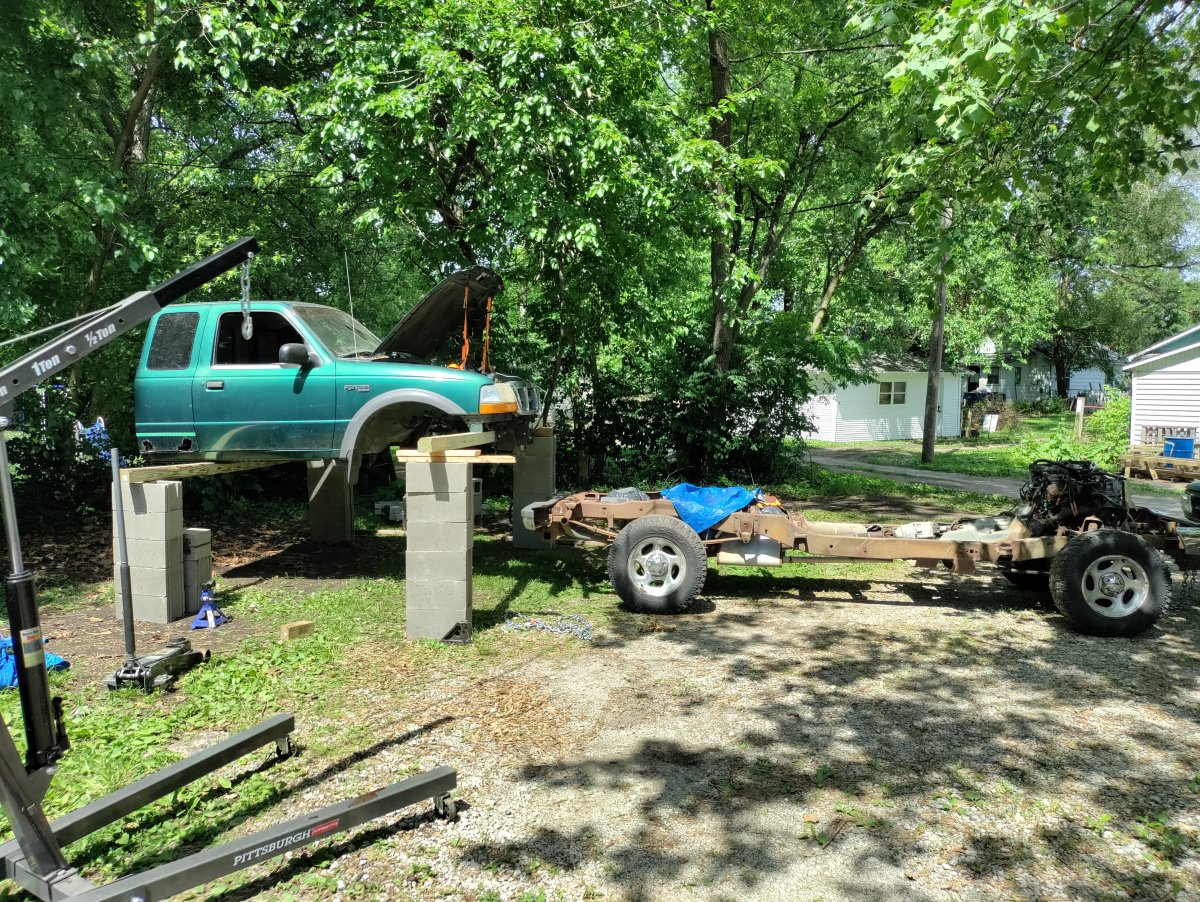
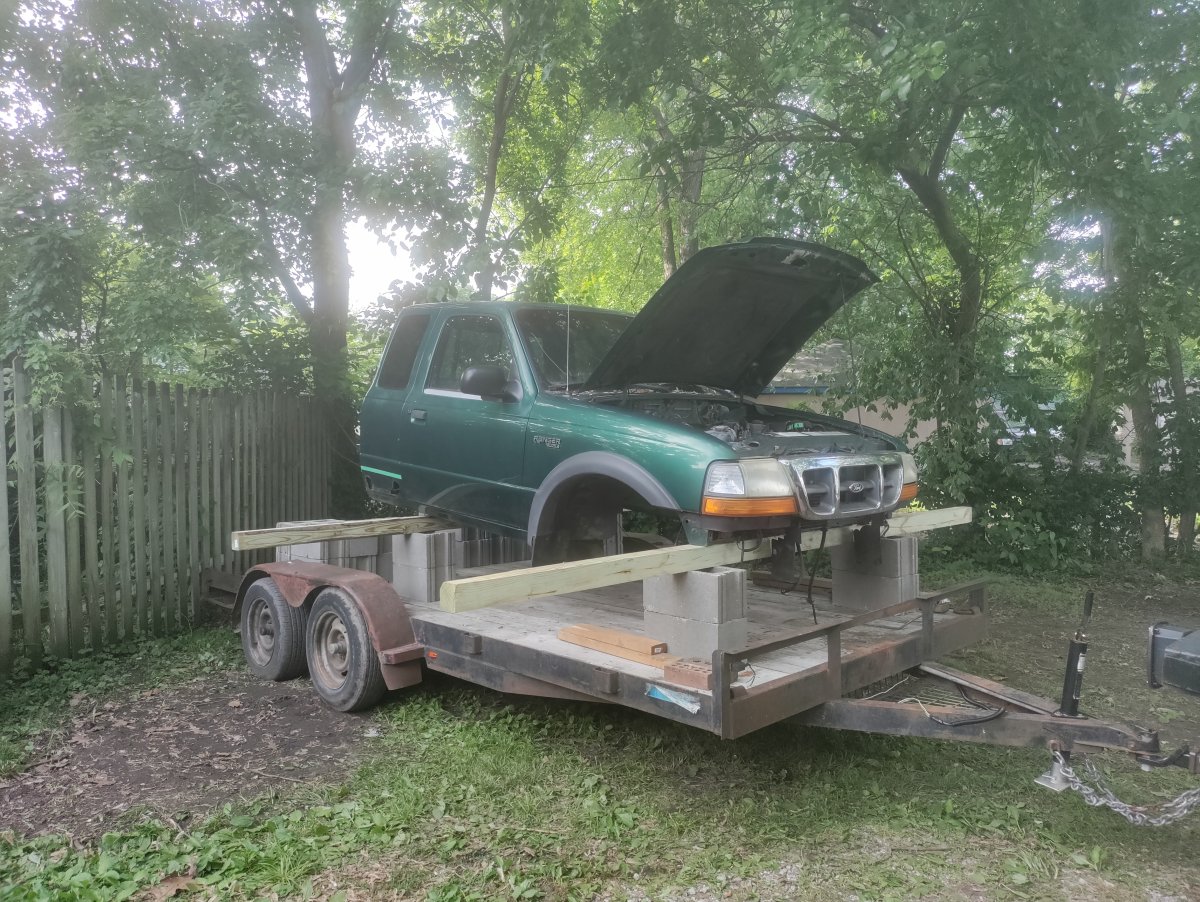
For the next party trick I did some careful planning and found the I would need to raise the cab about 4 feet if I wanted to get the frame with the engine still in it out from under the body. Since I don't have access to a lift or really any upward room in the garage, I decided to do things a little differently. I spent about $95 on 2 12 foot 4x4s (AC2 Green Treated were the cheapest they had) and 30 concrete blocks at the local Menards. I decided that now was the time to finally invest in a farm jack since it goes more straight up and down than a floor jack that wants to roll. I went with 12 foot 4x4s because I wanted to clear the fenders on my trailer and set the body down on it later.
After I unbolted 3 body mount bolts and cut the other 3 in half, I used a floor jack on a concrete block to being to raise the back half of the cab. With the extended cab it did seem to be pretty front heavy with the center of gravity being close to the dash. I did remove the whole interior except for the dash before I started to reduce weight.
Once I got up too high for the jack, I added more blocks.
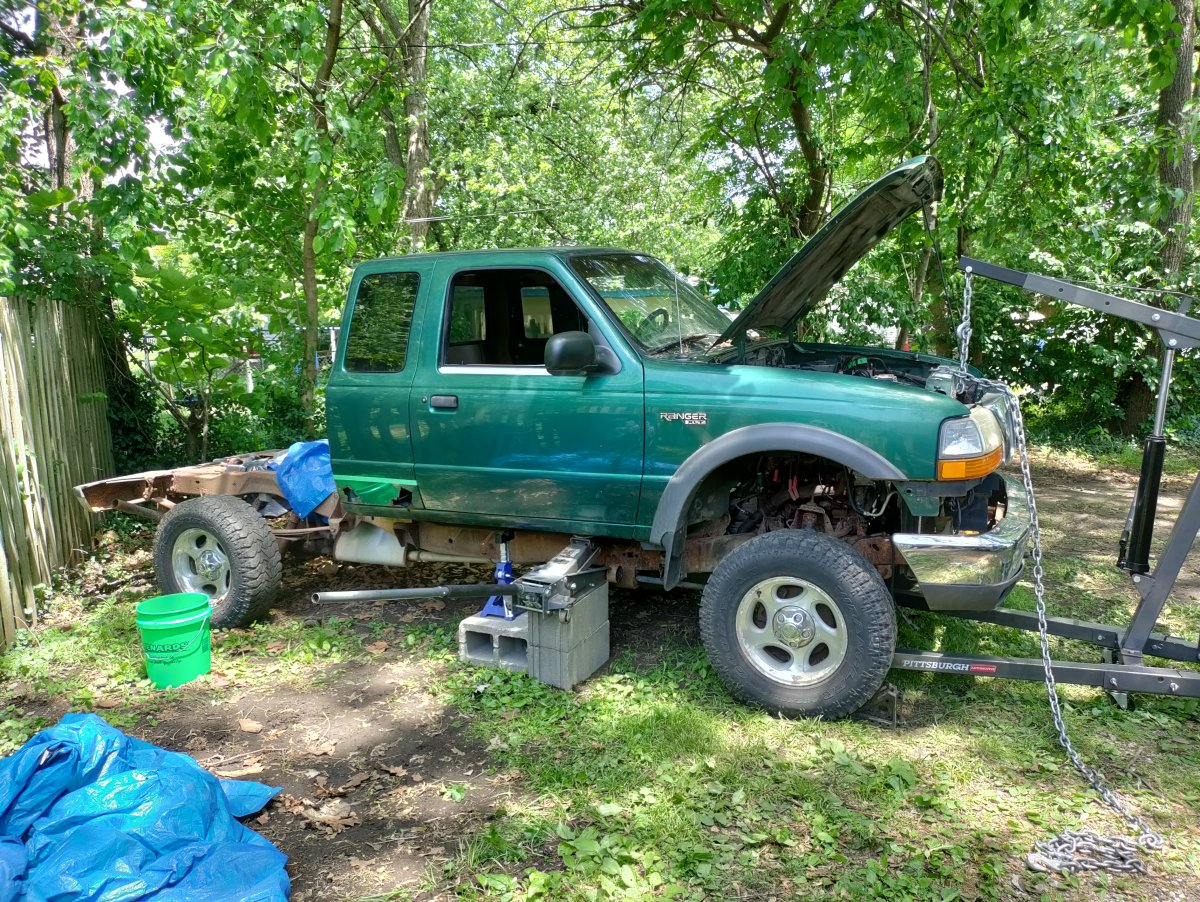
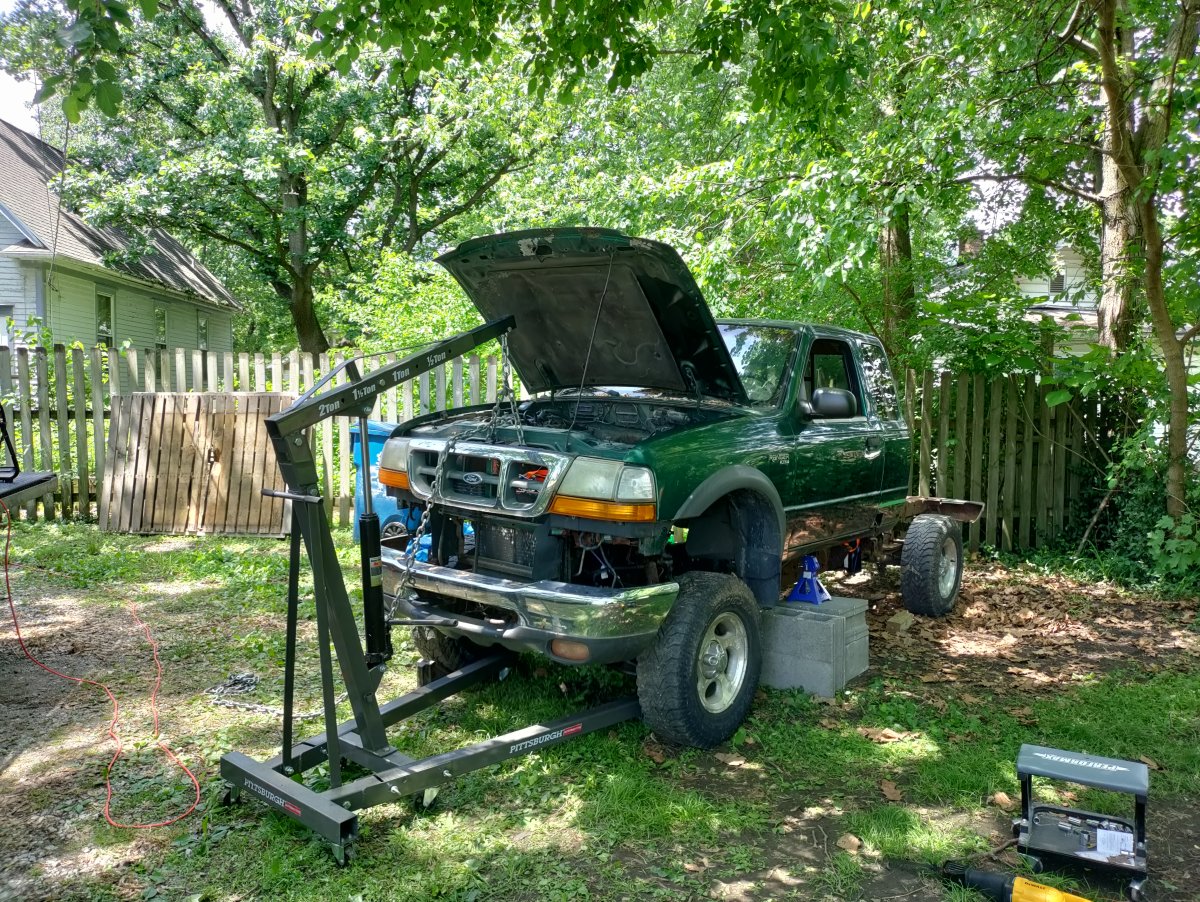
This is about the time I realized that if I used the engine crane on the front end it would stabilize the load a lot better and mean I only have to manually lift the left and right side of the back of the cab instead of all four corners. I wrapped a chain around the hood latch area and used that to lift. In my case it was a little sketchy because that whole front piece is pretty rusty so your mileage may vary. I wouldn't recommend getting under the cab when it's lifted for any reason so I made doubly sure everything was disconnected before I started lifting. Also, if you're rednecking it like me and have to use the engine crane in the dirt, I recommend putting it on a sheet of plywood if you have it or planning carefully so that it doesn't need to roll as you go up.
Keep checking for anything you missed before and for clearance and keep going up!
Eventually you'll make enough room to slide one of the 4x4s underneath. Again I used 12 foot and spaced the blocks wide enough to get my trailer under it later. The wood did bow a decent amount but it didn't seem close to failure. I definitely wouldn't try this with anything heavier at this length. This is also the point where I was able to switch from floor jack to farm jack to go up straighter and faster. The "lip" of the jack cradles the 4x4 perfectly like it was meant to be.
Then lift the front a little higher and do the same. It isn't strictly necessary in this setup to have the front 4x4 in place yet but it's a little piece of mind if the chain wants to slip for whatever reason.

Eventually it is high enough to clear the engine.

I did use a die grinder to grind off the head of the bolts holding the front support since those were also rusted in place. This reduces the amount of required lift significantly.
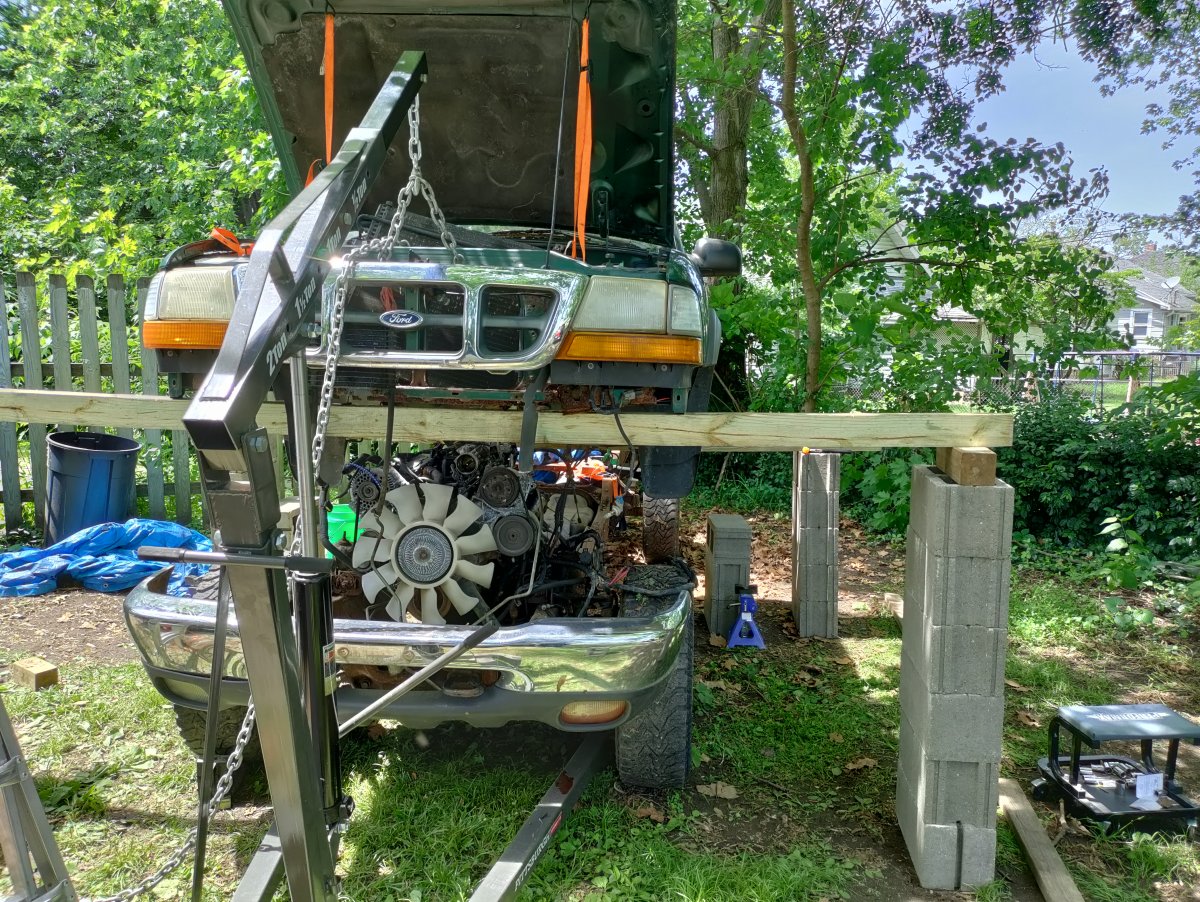

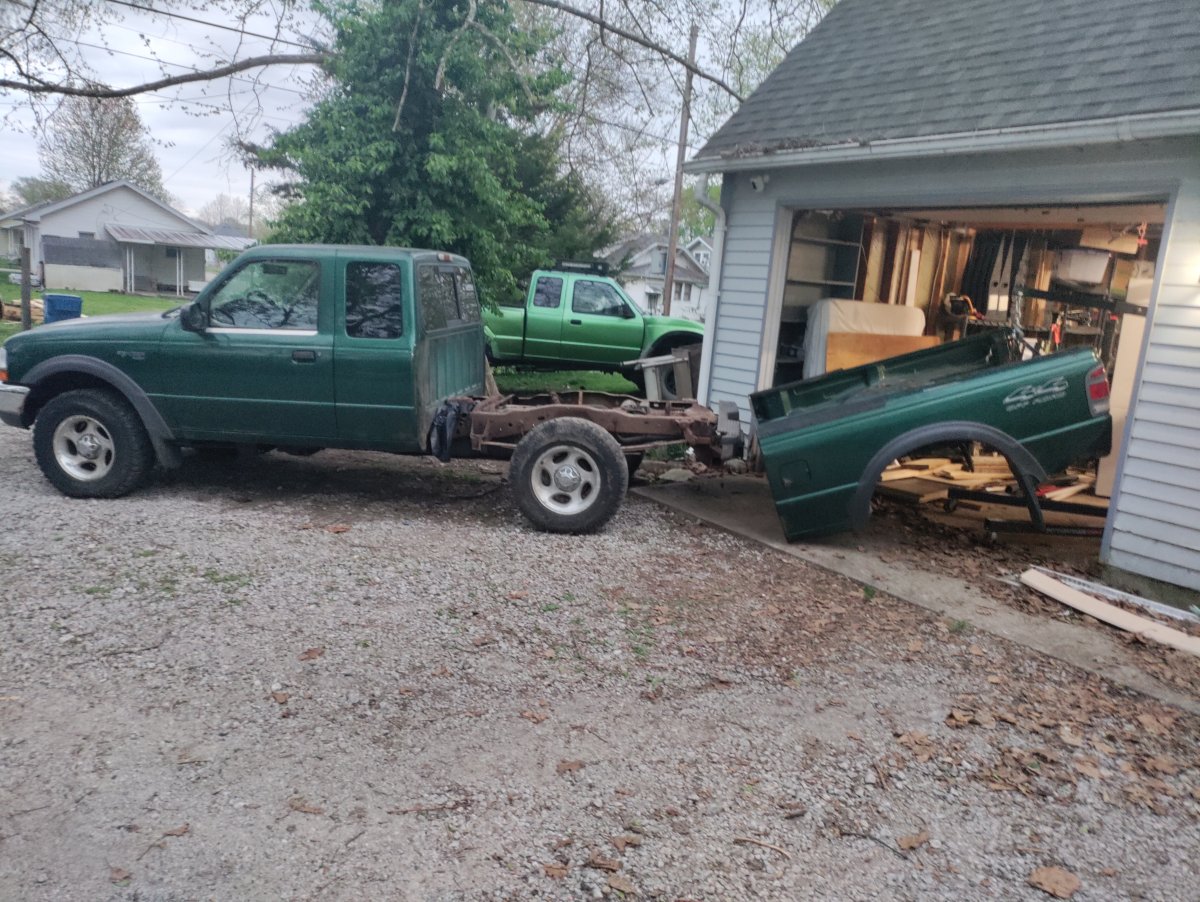
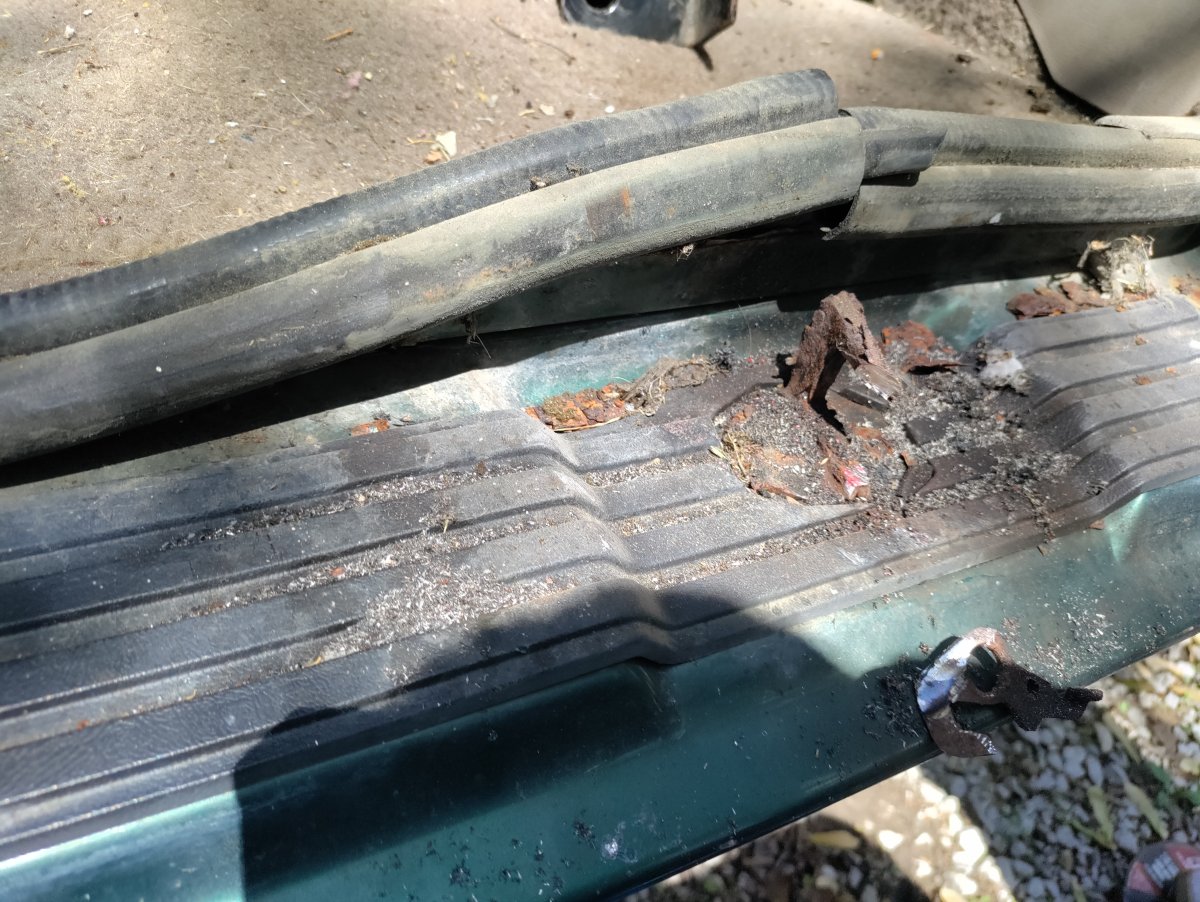
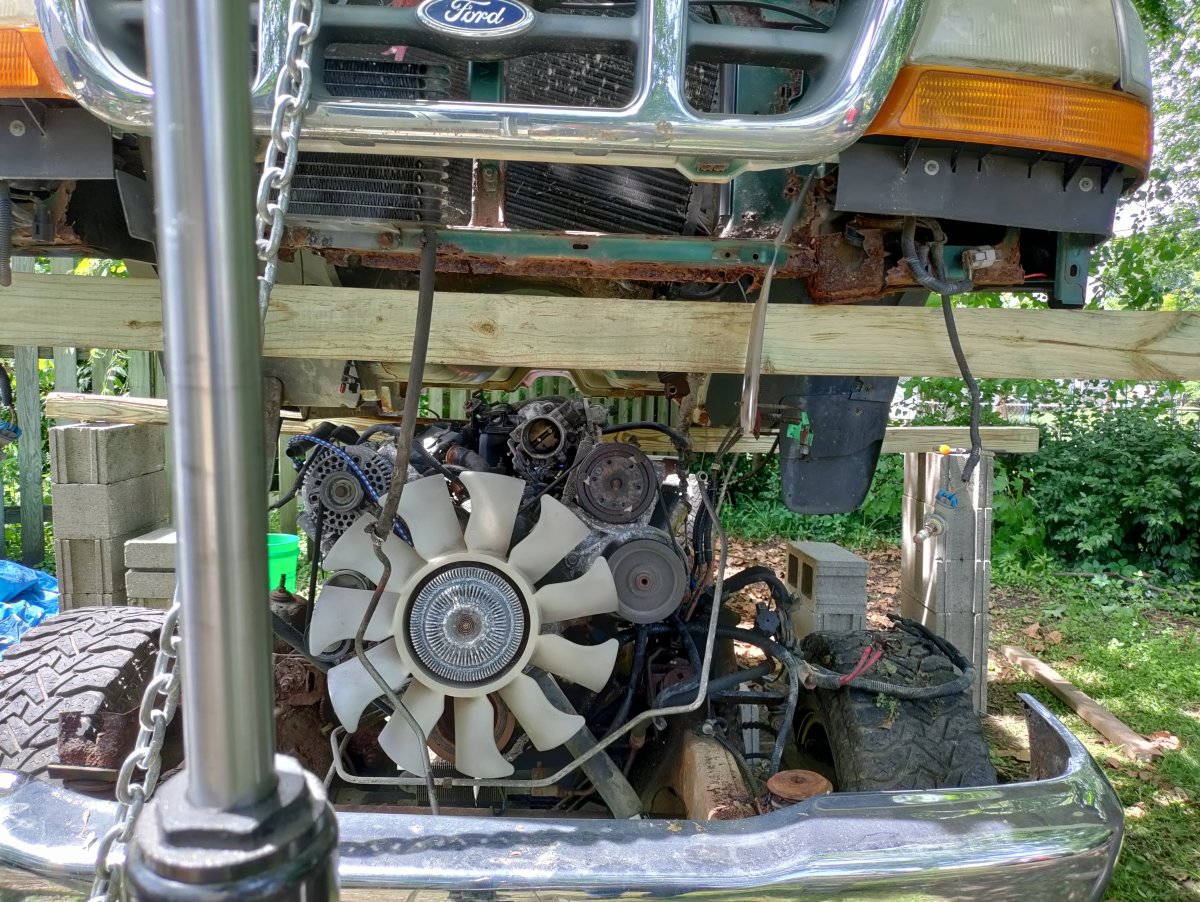
Since I would be pulling the frame forward, I made sure there was enough space even with the wood bowing to clear the throttle body. I think it goes without saying but I would not recommend doing this on a windy day. You can get a good look at how rusty the front end is from the shot below. I didn't even have to remove the two body mounts because the mounts had already rusted off of the cab itself.
Then it is just a matter of pulling the frame out with a chain again! I should also mention at this point the transmission was in park. My plan was to disconnect the driveshaft and then pull. Turns out I only had a 6 point 12mm and this required a 12 point so that idea was out. I didn't feel too keen about getting under this disgrace of an operation at this point anyway. This may make some laugh but even with the transmission right in front of me I didn't know how to manually shift it into a given gear. Google wasn't my friend in this case either because who really takes the time to explain something like that? I ended up grabbing where I remembered the linkage connects to the transmission and clicked it one click to the left as I was looking at it. I could see the wheels immediately release tension and knew I had put it in neutral.
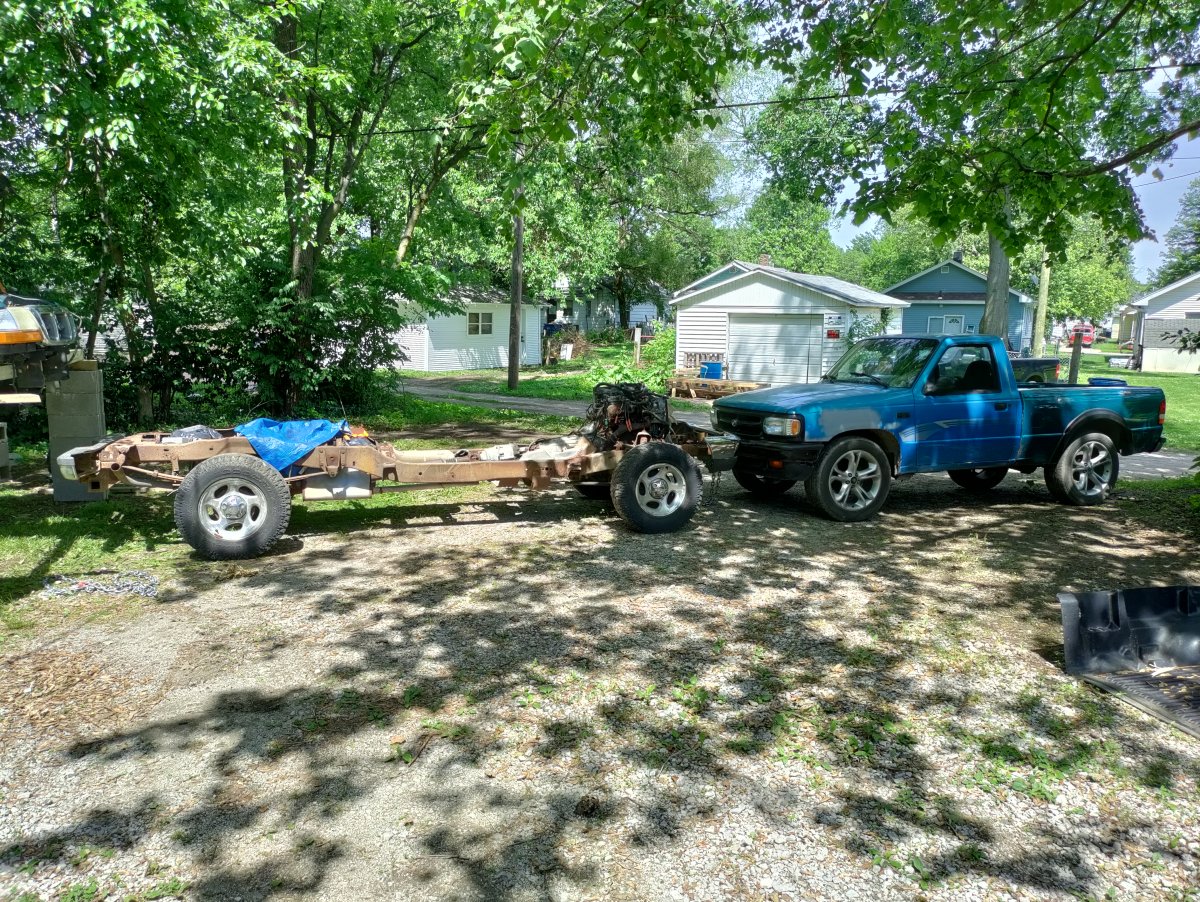
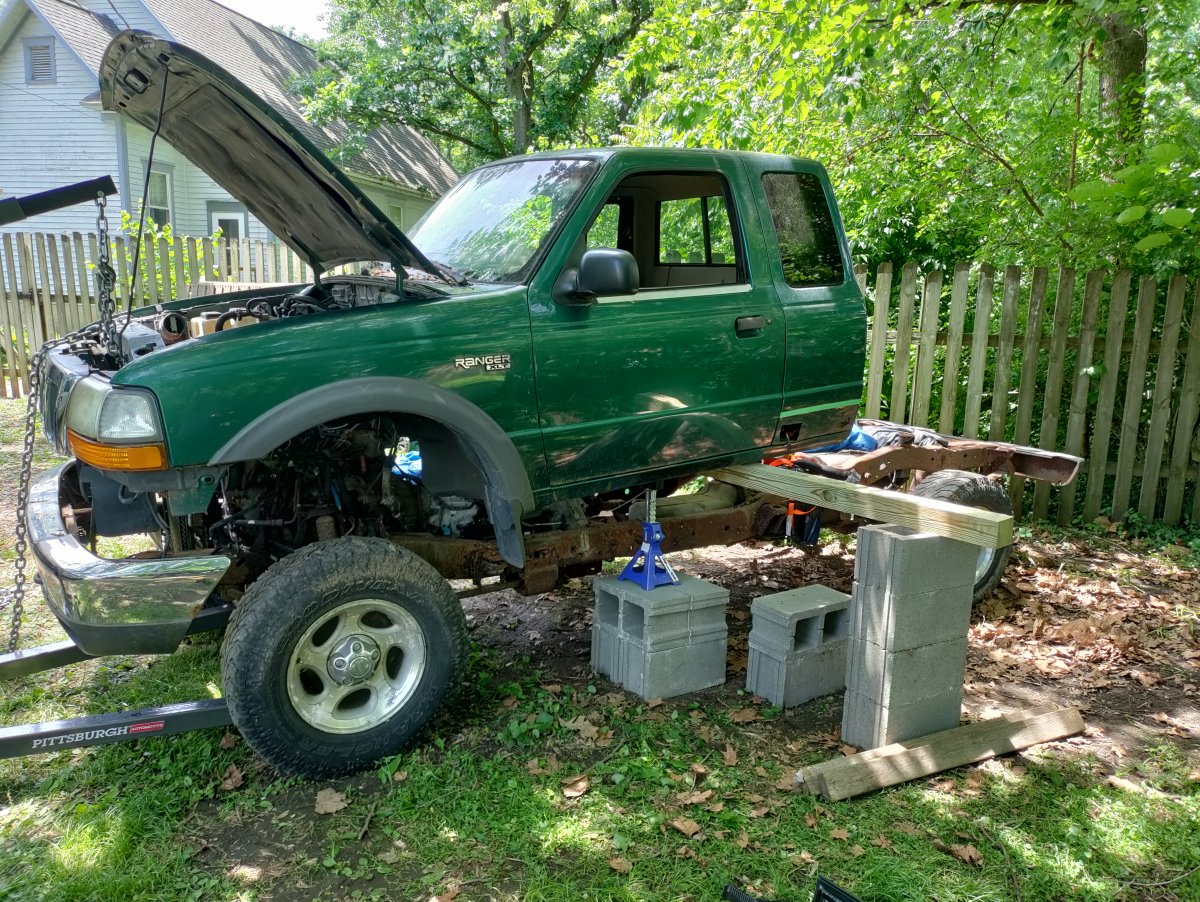
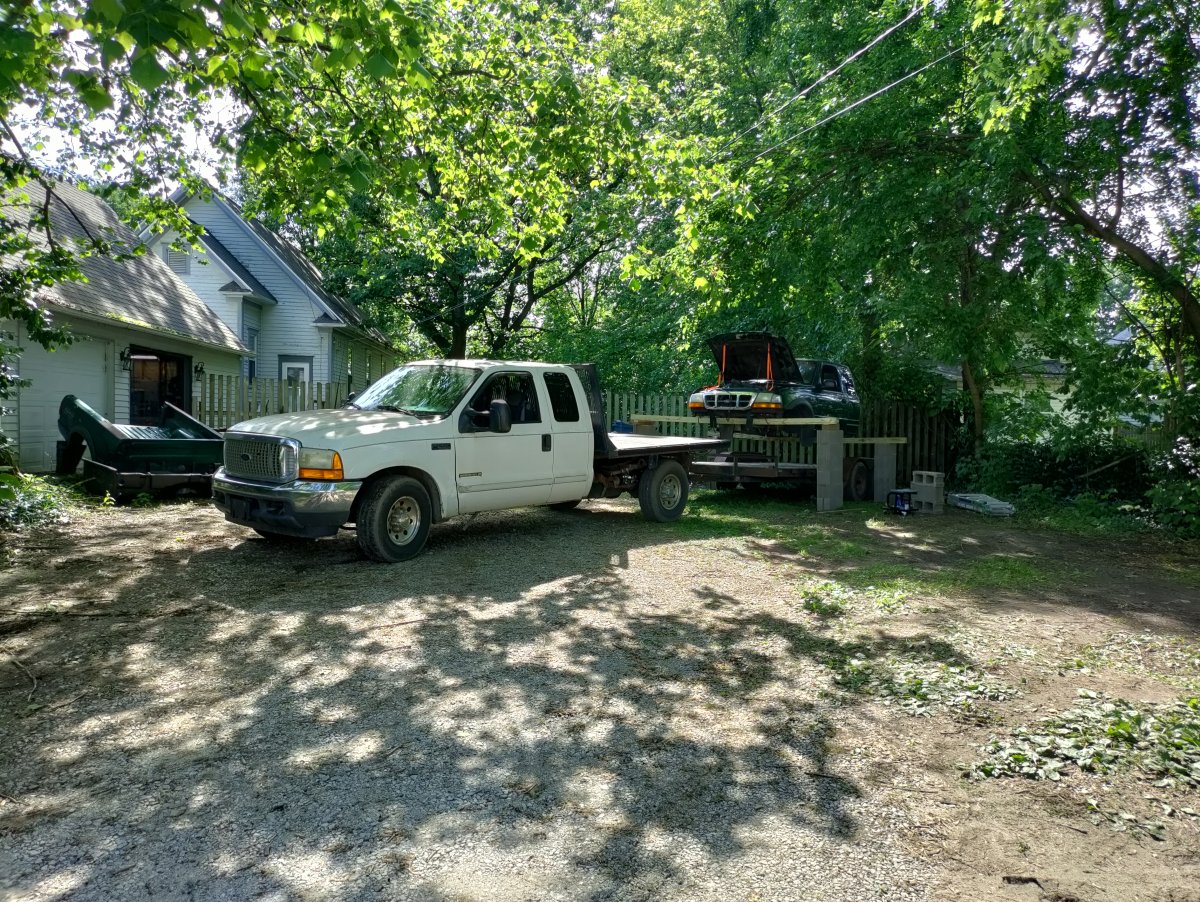
The next hurdle for me was how to get the chassis to steer. I figured I could just stick a socket on the steering box and turn it with a breaker bar. Turns out with the frame pulled out I could get a good look at the shaft shape and it was essentially a triangle. Again I've never welded before so I couldn't just make something that shape on the fly. To my surprise nobody seems to make a 1/2" socket for this shape! What we ended up doing then is using the Mazda as a wall so it didn't roll down the hill and picked up the rear end with the engine crane with the pintle hitch again. We rolled the crane as far away as we could perpendicular with the bumper and then lifted. This pulled the back end toward the crane as it went up. Then once it was fully in the air we set it back down, moved the crane slightly, and did it again.
About a half hour later the back end was where I wanted it and since the front stayed in place, the wheels had turned themselves. I imagine this is probably hell on the steering box but I didn't have much of a choice in the moment. Then I just pushed it back up the hill with the Mazda. Steel bumpers made this a breeze.
Finally, I backed my trailer under the body and set it down so that it's not just hanging out in space. I'm not sure what I'm going to do with the body while I work on the frame but this makes it easy for me to move around if I have to. I set the concrete blocks directly under the body so that the wood is not doing any free standing support while it sits. If you're in a windy area you may consider strapping the body all the way down even if you don't plan on moving it.
That's the build so far! I've separated the truck into 3 pieces and now I'm taking measurements as I have time to try to plan how I'm going to do engine mounts and get it to fit in the bay. I don't want to bother with cleaning up the frame until I have the locations planned out. If anyone has any hot fitment tips or would like to ask any measurement questions about the old engine or the new, now would be the time!
First, some background:
Project Truck: 2000 Ranger XLT 4.0L 4x4 automatic with 210,569 miles
Donor Truck: (wrecked) 2020 Ranger Lariat 2.3L Ecoboost 4x4 automatic with 36,554 miles
Project Goals: 320hp, functioning 4x4, functioning AC, 23MPG
Background and disclaimer: I’ve never done a swap before or turned wrenches professionally. My only academic background is a single IC class at university years ago. I do have a degree in Computer Engineering which I’m hoping will help me out when it comes time for getting the ECU to play nice with all the systems that are missing. My biggest projects to date include an engine rebuild on a ’94 Mazda B3000 and a timing belt on an ‘08 GTI. I don’t have a car lift, many professional tools, or the skills to make up for either, but I do have enough things laying around the garage to get me by in most cases. I’ve also never welded before, so I plan to pick that skill up along the way. If you know a better way to do something, please let me know!
I’m hoping this thread can be to others what I was looking for myself when I was trying to plan this build. As of writing, there is a lot of talk about the 2.3 Ecoboost in the Ranger but exact measurements and anything past theory is hard to find. I plan to take measurements and make observations to make future swaps easier to plan.
Reasons for this build:
- Working on Rangers is my hobby. I want to learn more about the EcoBoost platform and traditionally Rangers are SLOW. I’d like to have a fun daily driver than can also put down some serious work when I need it to.
- Efficiency! It is fascinating that I can potentially double the power output of the old 4.0 with nearly half the displacement AND get better MPG while doing it.
- I test drove a 4th gen Ranger at the dealer a while back and had to hold back a tear when I saw the $40,000 price tag, and I also felt it was too large anyway.
- My current puller is an ’02 F250 with the 7.3L. It’s never given me one bit of trouble, but I simply hate driving big trucks. I’m hoping I can use the build Ranger as my puller and trade the 7.3 for an aluminum trailer. I specifically chose the build Ranger because it has one of the highest (legally) rated tow capacities for the year based on its configuration.
- After the two most recent winters without 4x4, I’m no longer willing to compromise for a 2wd for this build which is why I went with the 4x4 Ranger donor instead of a more common Mustang donor.
- Pure luck! I can’t afford an entire donor Ranger, but while I was in the planning stages of the build, a full pullout Ranger platform became available on Ebay that is as close to turnkey as I was ever going to find. The listing even included a video of the donor vehicle running, the VIN, mileage, and no dash warning lights. To me this was far more valuable than finding each of the pieces individually. At least I know that it all worked together nicely once! I just need make it work nicely inside a new body.
- I started to price a build to go fully electric based on the Mach-E technology and the cost is out of this world still.
- Turbo noises!
The build truck:
The truck was non-running when I bought it and had parts all over inside the cab from previous attempts to get it running. The seller was kind enough to push it up onto the trailer for me with his tractor so I could get it home.
I tried some troubleshooting with the truck still on the trailer but ultimately I had to return the trailer before I could get it going. To get it off the trailer then I put in a pintle hitch I found in the street one day and tow strap/chained it to a D ring I have mounted to the concrete in the garage for pulling dead Rangers in. I don't have a winch or anything so hand cranking with a comealong did the trick for me.
A few days later I determined that the truck had a dead computer. I replaced it with one from Ebay and used Forscan to reprogram the keys. I was only given one with the truck so I had second made at the local Walmart to be able to complete the programming steps. With the keys reprogrammed I found that it also had a dead fuel pump. Next step was to pull the bed.
Since I didn't have a helper that day I used the engine crane to lift the back to clear the bumper. I lifted the front half myself and pushed it backwards. The plastic mudflap hardware was hopelessly rusted together and with the crazy amount of rust and mud underneath I wasn't in the mood to deal with it so I propped the back with bricks. I doubt I will reuse the bed anyway.
With the fuel pump fixed, the truck was finally running. I wanted to get it running before the swap so I could move it around the yard easier and check as many features as possible before the swap. Without the baseline I wouldn't know what was broken as a result of the swap or what was already broken. I'm sure someone else out there can use a good 4.0!
Next, I started on the back doors. With the truck not in great condition to start with and then having sat for probably years, I wasn't surprised the bottom latch on both sides was seized. Believe me when I say I tried everything I could think of and then some to get them free. The last time I handled one of these, some PB Blaster and a mini sledge did the trick, but no luck this time. After hours of searching around online for any hints that applied here I ended up deciding that caveman brain was the solution. Since the bottoms of the doors were already shot, I decided to just cut the hole bigger on each side with an angle grinder and then sawzall through the entire latch assembly, including the bolt. It ended up being so seized that the bolt was stuck in the clasp even after it had been sawed completely out of the door. I did this for both sides.
Next step for me was to pull the engine out. I was still on the fence at this point whether I was going to just do the swap and be done with it or if I wanted to pull the whole body off and do it right. For me the decision was made when my breaker bar rounded off the final exhaust bolt I needed to get the engine lose and simultaneously drew blood and peppered my face shield with rust. Since I had the engine disconnected at this point I used a chain and steel bumpers to drag it across the yard to a better position.
For the next party trick I did some careful planning and found the I would need to raise the cab about 4 feet if I wanted to get the frame with the engine still in it out from under the body. Since I don't have access to a lift or really any upward room in the garage, I decided to do things a little differently. I spent about $95 on 2 12 foot 4x4s (AC2 Green Treated were the cheapest they had) and 30 concrete blocks at the local Menards. I decided that now was the time to finally invest in a farm jack since it goes more straight up and down than a floor jack that wants to roll. I went with 12 foot 4x4s because I wanted to clear the fenders on my trailer and set the body down on it later.
After I unbolted 3 body mount bolts and cut the other 3 in half, I used a floor jack on a concrete block to being to raise the back half of the cab. With the extended cab it did seem to be pretty front heavy with the center of gravity being close to the dash. I did remove the whole interior except for the dash before I started to reduce weight.
Once I got up too high for the jack, I added more blocks.
This is about the time I realized that if I used the engine crane on the front end it would stabilize the load a lot better and mean I only have to manually lift the left and right side of the back of the cab instead of all four corners. I wrapped a chain around the hood latch area and used that to lift. In my case it was a little sketchy because that whole front piece is pretty rusty so your mileage may vary. I wouldn't recommend getting under the cab when it's lifted for any reason so I made doubly sure everything was disconnected before I started lifting. Also, if you're rednecking it like me and have to use the engine crane in the dirt, I recommend putting it on a sheet of plywood if you have it or planning carefully so that it doesn't need to roll as you go up.
Keep checking for anything you missed before and for clearance and keep going up!
Eventually you'll make enough room to slide one of the 4x4s underneath. Again I used 12 foot and spaced the blocks wide enough to get my trailer under it later. The wood did bow a decent amount but it didn't seem close to failure. I definitely wouldn't try this with anything heavier at this length. This is also the point where I was able to switch from floor jack to farm jack to go up straighter and faster. The "lip" of the jack cradles the 4x4 perfectly like it was meant to be.
Then lift the front a little higher and do the same. It isn't strictly necessary in this setup to have the front 4x4 in place yet but it's a little piece of mind if the chain wants to slip for whatever reason.
Eventually it is high enough to clear the engine.
I did use a die grinder to grind off the head of the bolts holding the front support since those were also rusted in place. This reduces the amount of required lift significantly.
Since I would be pulling the frame forward, I made sure there was enough space even with the wood bowing to clear the throttle body. I think it goes without saying but I would not recommend doing this on a windy day. You can get a good look at how rusty the front end is from the shot below. I didn't even have to remove the two body mounts because the mounts had already rusted off of the cab itself.
Then it is just a matter of pulling the frame out with a chain again! I should also mention at this point the transmission was in park. My plan was to disconnect the driveshaft and then pull. Turns out I only had a 6 point 12mm and this required a 12 point so that idea was out. I didn't feel too keen about getting under this disgrace of an operation at this point anyway. This may make some laugh but even with the transmission right in front of me I didn't know how to manually shift it into a given gear. Google wasn't my friend in this case either because who really takes the time to explain something like that? I ended up grabbing where I remembered the linkage connects to the transmission and clicked it one click to the left as I was looking at it. I could see the wheels immediately release tension and knew I had put it in neutral.
The next hurdle for me was how to get the chassis to steer. I figured I could just stick a socket on the steering box and turn it with a breaker bar. Turns out with the frame pulled out I could get a good look at the shaft shape and it was essentially a triangle. Again I've never welded before so I couldn't just make something that shape on the fly. To my surprise nobody seems to make a 1/2" socket for this shape! What we ended up doing then is using the Mazda as a wall so it didn't roll down the hill and picked up the rear end with the engine crane with the pintle hitch again. We rolled the crane as far away as we could perpendicular with the bumper and then lifted. This pulled the back end toward the crane as it went up. Then once it was fully in the air we set it back down, moved the crane slightly, and did it again.
About a half hour later the back end was where I wanted it and since the front stayed in place, the wheels had turned themselves. I imagine this is probably hell on the steering box but I didn't have much of a choice in the moment. Then I just pushed it back up the hill with the Mazda. Steel bumpers made this a breeze.
Finally, I backed my trailer under the body and set it down so that it's not just hanging out in space. I'm not sure what I'm going to do with the body while I work on the frame but this makes it easy for me to move around if I have to. I set the concrete blocks directly under the body so that the wood is not doing any free standing support while it sits. If you're in a windy area you may consider strapping the body all the way down even if you don't plan on moving it.
That's the build so far! I've separated the truck into 3 pieces and now I'm taking measurements as I have time to try to plan how I'm going to do engine mounts and get it to fit in the bay. I don't want to bother with cleaning up the frame until I have the locations planned out. If anyone has any hot fitment tips or would like to ask any measurement questions about the old engine or the new, now would be the time!
Last edited:


