• Welcome Visitor! Please take a few seconds and Register for our forum. Even if you don't want to post, you can still 'Like' and react to posts.

2.3 Ecoboost Swap, 1990 Ranger


Munts77

Member
Joined
Nov 23, 2011
Messages
11
Reaction score
37
Points
13
Location
Sweet Home OR
Vehicle Year
1984
Make / Model
Ford
Engine Size
2.3T
Transmission
Manual
I attempted to install the engine in the truck with the transmission still attached but I couldn't get it snaked into the truck. I opted for splitting the engine and transmission and just installing the engine by itself but this to proved to be a challenge.

70081
70082


luckily for me I like to keep extra parts laying around, I had a frame from a 94 ranger I parted out so I decided to roll the truck out and bring it the frame so that I could check fitment of the motor mounts and trans crossmember. This is where I ran into issues with the oil pan and oil filter.

70083
70084

70085


in the previous photos, the engine was resting on the oil pan, also there was interference with the right side traction beam, it wanted to share the same space as the oil pan.

70087


I marked up the oil pan to what would make good clearance and did test cuts with my old broken one.

70088
70089


This will require modifying the oil pick up as it is now outside of the oil pan. this provides just enough clearance for the suspension.

70090
70091


Once the clearance was confirmed I transferred the measurements to my good oil pan and did a rough cut using a cut off wheel. I then switched over to a milling machine and cut it to the final dimensions so that I would have clean surface to weld to that was also perfectly flat/perpendicular.

70092
70093


70094
70095


Next step was to cut out some sheet aluminum to fill in the hole, pretty straight forward sheet metal fab. Tacked it in place and then bolted it back on the ranger to confirm fitment/ clearance.

70096
70097


70098


That all looked good so I took it back to the shop and finished welding it.

70099


Unfortunately I don't have any photos of the oil pick up modification but I extended it about an inch and modified the support bracket. I also had to modify the oil pan again because there was a dimple inside that was preventing me from moving the pickup back more so I machined it out and filled the hole with some plate aluminum. With that done it was time to bolt the pan on for the last time and seal it up.

70100
70103

70104


Next will be pulling the body of the Ranger and bolting this in to the frame.
 

Attachments

bobbywalter

TRS Technical Staff
TRS Event Staff
V8 Engine Swap
TRS Technical Advisor
TRS Banner 2012-2015
TRS 20th Anniversary
Ugly Truck of Month
TRS Event Participant
Joined
Aug 9, 2007
Messages
23,470
Reaction score
4,668
Points
113
Location
woodhaven mi
Vehicle Year
1988
Make / Model
FORD mostly
Engine Type
V8
Engine Size
BIGGER
Transmission
Automatic
2WD / 4WD
4WD
Total Lift
sawzall?
Tire Size
33-44
My credo
it is easier to fix and understand than "her"
So it looks like you are running as far forward as possible.


That pan is similar to the ranger pan.

On backset measurement ...from trans rear face of block to the 2wd tib suspension/k member I had 10.5 ish inches.....the 4x4 ttb was real bad, wanting a remote sump.

With sas it's a non issue with 4 in suspension and 3 in body lift. Can place the engine where it wants to be.

2wd trucks are much more work. Hats off to the work your doing with documentation...thank you.

Are the mount details plotted possibly in your cad side of things?
 

bobbywalter

TRS Technical Staff
TRS Event Staff
V8 Engine Swap
TRS Technical Advisor
TRS Banner 2012-2015
TRS 20th Anniversary
Ugly Truck of Month
TRS Event Participant
Joined
Aug 9, 2007
Messages
23,470
Reaction score
4,668
Points
113
Location
woodhaven mi
Vehicle Year
1988
Make / Model
FORD mostly
Engine Type
V8
Engine Size
BIGGER
Transmission
Automatic
2WD / 4WD
4WD
Total Lift
sawzall?
Tire Size
33-44
My credo
it is easier to fix and understand than "her"
Here is standard Mazda L longitudinal block ...not sure it it would help... Still looks like it needs the pan cut .... The oil pans can potentially swap. I don't remember if the timing covers can .. I know the oil pump setup changed though.. so maybe not. The timing chain setup is different iirc as well.


KIMG1016.JPG
KIMG1015.JPG
KIMG1014.JPG
KIMG1012.JPG
 

Attachments

Munts77

Member
Joined
Nov 23, 2011
Messages
11
Reaction score
37
Points
13
Location
Sweet Home OR
Vehicle Year
1984
Make / Model
Ford
Engine Size
2.3T
Transmission
Manual
Now that the engine fit in the test frame, it was time to put it in the project truck. This meant pulling the entire body off the frame, it's not to bad of a job. The bed is an easy 6 bolt along with the cab, only challenge with the cab besides lifting it is remembering everything you forgot to disconnect. My brother and I lifted the bed off by hand, used a boom truck to lift the cab off.

70455
70456


70457
70458


70459


With that out of the way it was really easy to fit the engine and trans in to the frame.

70460


While waiting on a few things I decided it would be a good time to swap out the rear axle. From experience I know the 7.5 wouldn't last one week in this truck so I sourced an 8.8 from an Explore with disk brakes. I made sure to find one with 4.10 gears.
I also decided to weld the axle tubes as they are prone to twisting from high power. There is a lot of info out there on welding them but a few tips: the center section is cast iron not cast steel, it requires Nickel welding rod, make sure to constantly preheat it between welds, I did one inch beads alternating sides.
There is a lot of info out there for 8.8 swaps but the general idea is that it's simple, just need to weld on new perches. This is the second one I have done, the first being in my 84 Bronco 2.

70461
70462


Now on to getting the cab to fit. Knowing it would be on and off multiple times, I decided to suspend it from an engine hoist. This allowed me to lower it down on to the frame and find where it was going to hit and then cut for clearance. I put 2x4s between the cab mounts to suspend the cab higher than normal to make it easier to see where it would be hitting.

70463
70464


70465


The main spots I found to have issues were the heater box and rain gutter/ wiper transmission valley, marked with yellow paint pen. The heater box could be left alone if modifications were made to the water outlet on the back of the engine. There was also some trimming required in the transmission tunnel.

70466
70467


70468
70469


70470
70471


With the clearance hole cut and hammered out for the High Pressure Fuel Pump, I filled it in with sheet metal, welded, sealed, and painted it. The Heater box hole was filled in with plastic that I cut out of an interior trim panel from a Ford Superduty, it was glued in place with 2 part epoxy.


70480
70484


70489
70490


Next will be the wiring harness layout and exhaust
 

bobbywalter

TRS Technical Staff
TRS Event Staff
V8 Engine Swap
TRS Technical Advisor
TRS Banner 2012-2015
TRS 20th Anniversary
Ugly Truck of Month
TRS Event Participant
Joined
Aug 9, 2007
Messages
23,470
Reaction score
4,668
Points
113
Location
woodhaven mi
Vehicle Year
1988
Make / Model
FORD mostly
Engine Type
V8
Engine Size
BIGGER
Transmission
Automatic
2WD / 4WD
4WD
Total Lift
sawzall?
Tire Size
33-44
My credo
it is easier to fix and understand than "her"
Nice work .

Definitely will be able to run ac in a normal truck too.

Sweet.
 

bobbywalter

TRS Technical Staff
TRS Event Staff
V8 Engine Swap
TRS Technical Advisor
TRS Banner 2012-2015
TRS 20th Anniversary
Ugly Truck of Month
TRS Event Participant
Joined
Aug 9, 2007
Messages
23,470
Reaction score
4,668
Points
113
Location
woodhaven mi
Vehicle Year
1988
Make / Model
FORD mostly
Engine Type
V8
Engine Size
BIGGER
Transmission
Automatic
2WD / 4WD
4WD
Total Lift
sawzall?
Tire Size
33-44
My credo
it is easier to fix and understand than "her"
Did you get to look at the ranger pans at all?
 

Munts77

Member
Joined
Nov 23, 2011
Messages
11
Reaction score
37
Points
13
Location
Sweet Home OR
Vehicle Year
1984
Make / Model
Ford
Engine Size
2.3T
Transmission
Manual
Did you get to look at the ranger pans at all?
I have not looked in to the Ranger pan, Esslinger is starting to make custom oil pans for these, that would be my route if I did it again.
 

Munts77

Member
Joined
Nov 23, 2011
Messages
11
Reaction score
37
Points
13
Location
Sweet Home OR
Vehicle Year
1984
Make / Model
Ford
Engine Size
2.3T
Transmission
Manual
With the cab and engine fitting around each other it was time to lay out the wiring harness. I purchased the Ford Performance Control Pack for the 2.3L ecoboost ( M-6017-23T). I found that this was going to be the easiest route to go. I could have striped down the mustang harness and had the PATS deleted on the computer but that was going to take more time than I wanted to put in to it. This kit comes with a bunch of extra intake ducts and parts that I won't use so they will be sold on ebay to recoup costs.

The Ford harness is well labeled and comes with basic instructions to install it, the Ecu is a specific one from Ford for this set up. The best part is that COBB tuning supports this setup with their tuner so it will be easy to plug and play and install custom tunes.

I played with several different layout options but settled on having the ecu on the passenger fender well , running the main harness across the firewall and having the fuse box on the driver fender. This would work out well as I plan to move the battery to the driver side to make room for an air box on the passenger fender well.

71321
71322
71323
71324


The Harness will take a bit more work to integrate in to the ranger but for now I have a basic layout and can start planing how to hook everything up.

Up next is to take the cab back off the ranger and work on the exhaust system and a few other components. I utilised part up the mustang downpipe and grafted it in to 3in pipe after the o2 sensor. This went in to a flex joint and then an electric exhaust dump/cut out. I wanted the truck to still be quiet for normal driving so I sourced a new muffler for a 1994 F250 with a 460, this has a 3in inlet and two 2 1/8 outlets, this should allow for plenty of flow and to tame the noise down to a factory sound.

71325
71326


71327

71328
71329


The exhaust still needs the tailpipe section which can be done later with the cab on, I switched gears to the other side of the engine by installing a remote oil filter set up.
The factory ecoboost oil filter location was interfering with the motor mounts so I purchased a Mountune remote oil filter plate for the 2.3 ecoboost and a Wix oil filter base that uses the standard ford 51515 filter ( about twice the size of the original EB filter). I mounted the filter to the frame so that it would be easy to access under the truck.

71330
71331


I plumbed the lines with Earls Untrapro hose, I then realised that I would still need to modify the motor mount to clear the fittings on the take off plate. a few cuts and some angle iron solved the problem.

71332
71333


71334


71335


that's it for now, up next I will have more details on the 8.8 install and more wiring.
 

Blmpkn

Toilet enthusiast
Supporting Member
Joined
Feb 15, 2020
Messages
5,503
Reaction score
6,359
Points
113
Location
Southern maine
Vehicle Year
2023
Make / Model
Ford Bronco
Engine Type
2.3 EcoBoost
Engine Size
2.3
Transmission
Automatic
2WD / 4WD
4WD
Total Lift
2.5"
Tire Size
285/75/18
My credo
Its probably better to be self deprecating than self defecating.
To steal PJ's saying.... I love you.
 

Munts77

Member
Joined
Nov 23, 2011
Messages
11
Reaction score
37
Points
13
Location
Sweet Home OR
Vehicle Year
1984
Make / Model
Ford
Engine Size
2.3T
Transmission
Manual
Sorry for the delay in posting more on this project, have been busy with a lot of things.

I got the cab back on the truck, I think this is the final time...

It was time to do the final installation of the rear axle assembly. I did a bunch of measuring and figured out the layout for the new axle perches ( bought them from Barnes Offroad) .
I don't have a good photo of it but i had to get the truck at ride height to set the pinion angle so I put an engine block and some other weight on the back to get the truck to set correctly without a bed on it. I set the pinion angle so that the pinion would be parallel with the transmission output. Once that was set I welded the perches to the axle, also installed new shock mounts that I styled off the original mounts from the 7.5, alot easier than trying to reuse them.
74477
74478


74479
74480


With everything welded I took some time to paint the axle so that it would look good, bolted it into the truck with new unbolts and a spring plate I designed to work as a mount for my axle wrap setup I will be building later. also had to ad a few mounting tabs for the brake lines.

74481
74482


74483
74484


With that done I moved to hooking up the hydraulic clutch, Earls fittings sells an adapter to go from the Ford clutch master to a -4 AN fitting ( Part # LS641001ERL ), then ran a stainless clutch line down to the transmission and used another adapter to connect to the mustang transmission. with a bit of gravity bleeding it all worked perfectly.

74485


Now it is time to dive in to some wiring, using a Ford wiring diagram manual I was able to create a jumper harness that connected to the 2.3 standalone harness and plugged in to the factory ranger harness without cutting or splicing the main harness of the truck. I used an engine wiring harness to get the plugs I needed, I tapped into the circuits for key on/run and starter power. I go in to a little more detail on my videos i post to Youtube.

74488
74489


Up next for the wiring was the main power distribution, to start this off I had to mount my new battery box and air intake box. I relocated the battery to the driver side so that I could have the airbox on the passenger fender right next to the turbo. I designed a custom airbox and battery tray then had a local shop cut and bend them for me.

74490
74491


74492
74493


With those in place, I built and routed my power cables. I ran a 4 gauge wire from the original under hood fuse box to a 250 amp maxi fuse that was included with the wiring harness. I used 2 gauge wire for the main battery cables, ran the ground cable to the frame and to the engine block, a little overkill but I don't like to have issues with it later on. Used an old red top for mock up.

74494
74495


I think that's enough for this post, next will be the shifter, driveshaft , and custom instrument cluster. A lot of the big things are out of the way.
 

Munts77

Member
Joined
Nov 23, 2011
Messages
11
Reaction score
37
Points
13
Location
Sweet Home OR
Vehicle Year
1984
Make / Model
Ford
Engine Size
2.3T
Transmission
Manual
On to more progress.

the MT82 trans from the Mustang has a remote shifter that sets pretty far back, fortunately there is a company called MGW that makes custom shifters for these specifically for swaps. The main benefit is moving the shifter forward 6-8 inches from factory mustang location, the second benefit is that it bolts solely to the transmission and improves the shifting issues that the mt82 is known for.
I had to do some extra cutting in the trans tunnel to make it fit but it turned out good and is in a comfortable position, this is their 4.5 in version.
IMG_20211117_110028642.jpg
IMG_20211205_161500796.jpg


IMG_20220328_150840480.jpg
IMG_20220404_144641776.jpg


IMG_20220404_154041621.jpg
IMG_20220404_163323464.jpg


With the shifter and transmission tunnel finished, it's on to the drive shaft. Having used the front half of the Mustang drive shaft I needed a custom shaft for the rear. I went with Tom Woods drives shafts and pleased with the results.

IMG_20220303_125454771.jpg
IMG_20220303_140302147.jpg


Next step is the Custom instrument cluster, I wanted a factory look but had to go with aftermarket tachometer and speedometer to make everything work. I purchased Autometer gauges and proceeded to cut up the factory cluster so that it would fit. the only factory gauge I would be using is the fuel gauge, temp and oil pressure will be monitored using the COBB tuner.

IMG_20220228_200552584_HDR.jpg
IMG_20220301_105510800_HDR.jpg

IMG_20220301_134126226_HDR.jpg
IMG_20220301_134114841_HDR.jpg

IMG_20220301_142008411.jpg
IMG_20220301_153913004.jpg

IMG_20220301_154612688.jpg


This also require modifying the wiring on the cluster and ranger, the tachometer eliminated one of the main plugs so I had to attach some wires to the printed circuit board and use Deutsch connectors for the new plug.

IMG_20220302_162639524_HDR.jpg
IMG_20220302_162311097.jpg


IMG_20220302_171357906.jpg
IMG_20220302_172447755.jpg


I am Super happy with how the cluster turned out, has the exact look I was going for in my head.


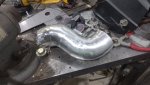
With the interior mostly finished its on to the engine bay to work on some of the intake routing. There is a tight fitment between the air box and turbo so it required me to make a custom pipe from a bunch of pie cuts out of a 3.5in aluminum tube. I cut a bunch out on the band saw and then stacked them up to make a tight compound bend. I then proceeded to fully weld all the joints, grind the welds down and polish the aluminum.

IMG_20220328_182953225.jpg
IMG_20220329_105814435.jpg

IMG_20220329_122338311.jpg
IMG_20220329_135939294.jpg

IMG_20220329_140756362.jpg
IMG_20220329_185725587.jpg


I also had to make a custom sensor block for the air intake temp sensor, just used some scrap aluminum and the drill press.

IMG_20220330_100626019.jpg
IMG_20220330_100636199.jpg

IMG_20220403_121908629_HDR.jpg
IMG_20220403_122041000.jpg


With that completed I moved to installing the custom alternator relocation bracket, my second revision as the first had some dimensional issues.
this locates the alternator to the same position as the ac pump as the alternator interfered with the steering box.

IMG_20220404_110843785.jpg
IMG_20220404_174814820.jpg
IMG_20220404_174806110.jpg


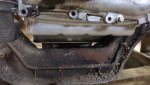
And the last thing for this Post is the Custom traction bar, I didn't like the options currently on the market so I designed my own traction bar set up. Pretty basic, attaches to top of axle leaf mount and runs forward to the frame above the front pivot of the leaf spring. Its up and out of the way and prevents any axle wrap.
To locate the front mount I set the suspension at ride height with a ratchet strap and used a laser level to line it up.

IMG_20220408_113334577.jpg
IMG_20220408_122533711.jpg


I positioned the front bracket over the top of the leaf spring pivot point in order to reduce any binding in the suspension travel. With it tacked in place I set up my bushings and cut the tube to length. Once I was happy with the results I welded it all up and gave everything a shot of black paint.

IMG_20220413_103734275.jpg
IMG_20220413_140535812.jpg

IMG_20220413_144334226.jpg
IMG_20220413_144755747.jpg

IMG_20220413_164639877.jpg


So that is it for this update. I am currently waiting for a custom radiator to be built and some parts to show up so that I can start on the intercooler. Truck is really close to being done, I plan on having it on the road by mid June.
 

Attachments

Blmpkn

Toilet enthusiast
Supporting Member
Joined
Feb 15, 2020
Messages
5,503
Reaction score
6,359
Points
113
Location
Southern maine
Vehicle Year
2023
Make / Model
Ford Bronco
Engine Type
2.3 EcoBoost
Engine Size
2.3
Transmission
Automatic
2WD / 4WD
4WD
Total Lift
2.5"
Tire Size
285/75/18
My credo
Its probably better to be self deprecating than self defecating.
Coming along nicely, good use for the laser level too!
 

bobbywalter

TRS Technical Staff
TRS Event Staff
V8 Engine Swap
TRS Technical Advisor
TRS Banner 2012-2015
TRS 20th Anniversary
Ugly Truck of Month
TRS Event Participant
Joined
Aug 9, 2007
Messages
23,470
Reaction score
4,668
Points
113
Location
woodhaven mi
Vehicle Year
1988
Make / Model
FORD mostly
Engine Type
V8
Engine Size
BIGGER
Transmission
Automatic
2WD / 4WD
4WD
Total Lift
sawzall?
Tire Size
33-44
My credo
it is easier to fix and understand than "her"

zenish

New Member
Joined
May 29, 2023
Messages
1
Reaction score
0
Points
1
Location
matthews nc
Vehicle Year
1991
Make / Model
ford aerostar
Transmission
Automatic
The next step on this project was to load both engines in the back of the truck and haul them to my work so that I can take measurements using a CMM, then I can import in to CAD and design the engine and transmission mounts.

View attachment 69875

I decided to weight the engines before I started, the Ecoboost with transmission with no oil in engine was 500 lbs the Lima engine/transmission with no oil, no alternator was 480

View attachment 69876View attachment 69877

View attachment 69879View attachment 69880


Next I moved on to the measurements, I measured the crank centerline, engine mount locations and transmission mount location on both engines, also measure oil pan and bell housing locations on the EB.

View attachment 69881View attachment 69882


Next was measurements on the truck. I measured points in the engine bay: motor mounts, cross member, firewall, and radiator mounts.

View attachment 69883View attachment 69884


After collecting the data, I imported it into CAD and overlaid the EB engine on top of the Lima engine. locating based on crank center line and front of crankshaft. The Eb engine is within an inch vertical and forward/ backward of the Lima engine location. The goal was to minimize firewall modifications. at this point I started to design the engine mounts and transmission crossmember. The engine mounts bolt to the EB engine and utilize the Lima isolators, the crossmember utilizes the factory cradle mounts on the outside of the frame rail.

View attachment 69885

A local fab shop lazer cut and formed the parts and I welded them up. these are the engine mounts and crossmember I designed.

View attachment 69886View attachment 69887
View attachment 69888

I will post later about the oil pan modifications and the struggle to get it to fit in the truck.
i realize that the 1990 and 2015 2.3 are VERY different but did you at least try to use the ranger engine mounts with the mustang engine?i have an areostar id like to do this to.i watched all your you tube vids on this.
 

Sponsored Ad


Sponsored Ad

Staff online

Today's birthdays

Member & Vendor Upgrades

For a small yearly donation, you can support this forum and receive a 'Supporting Member' banner, or become a 'Supporting Vendor' and promote your products here. Click the banner to find out how.

Truck of The Month


Shran
April Truck of The Month

Recently Featured

Want to see your truck here? Share your photos and details in the forum.

Follow TRS On Instagram

TRS Events

25th Anniversary Sponsors

Check Out The TRS Store


Sponsored Ad


Sponsored Ad

Sponsored Ad


Amazon Deals

Top