
RamblerRyGuy
New Member
- Joined
- Sep 9, 2019
- Messages
- 19
- Reaction score
- 4
- Points
- 3
- Location
- Ohio
- Vehicle Year
- 1995
- Make / Model
- Ford Ranger
- Engine Size
- 1.9 TDI
- Transmission
- Manual
- 2WD / 4WD
- 4WD
- Total Lift
- 3 inch
- Tire Size
- 33’s
- My credo
- Graduated one of the top in my class for automotive technology at Sinclair College, Ohio.
Things started out for me before I owned my Ranger. I followed BleepinJeep on youtube and Nate on that channel has a PD TDI in his Jeep Wrangler TJ. He has a series of videos that go into details on TDI swaps both specifically about Jeeps and also in general. Nate left and made his own channel, doing the same great content. Jon from BleepinJeep also started a build series of his 2001 Jeep Cherokee, and it has been the biggest inspiration for me to do my own swap.
I then bought my third Ford Ranger. (I know it looks like a B4000, but it is technically a Ranger. It had a body swap when the original rusted out. I'll be calling it a Ranger from now on...also I like Rangers a smidge better.)
Having read Greengeeker's and Honeybadger's TDI Ranger builds about two years ago, I decided to build my own Ranger, and the opportunity came not long after I bought my 1995 Ranger. I bought the truck in early 2019 and when summer came I found that there were a few things that the previous owner had let go and this resulted in it pinging for a long period of time. There was a problem with the EGR that I believe was the original cause of the pinging, but the previous owner didn't do anything about it. Unfortunately, I found out about it later since, of course, the 4.0 didn't really ping with a cold engine during a test drive.
I got to thinking about it and although there are a decent amount of Jeep TDI swap videos, there aren't really any of a Ranger TDI swap except for a couple short videos by Greengeeker on youtube. So I decided I will add my swap to my youtube channel to help others in the TDI and Ford communities with some good quality info and video. Unfortunately, I got a new computer and lost my video Adobe software so I can't edit my videos. The video series has been put on hold for a bit. I'll add a link to the video series once I get it uploaded. For now, I'm more worried about getting the swap done.
Well anyway, I found a heck of a deal on a fully dressed 1999 Beetle ALH TDI that included the wiring harness, ECU, throttle pedal, and the engine stand it was on. The country feller I bought it from daily drove the Beetle and took everything out in order to put it in a Samurai he had. I guess things fell through when he had to sell the Samurai for some reason I don't recall, and he had to get rid of the TDI he had already pulled.
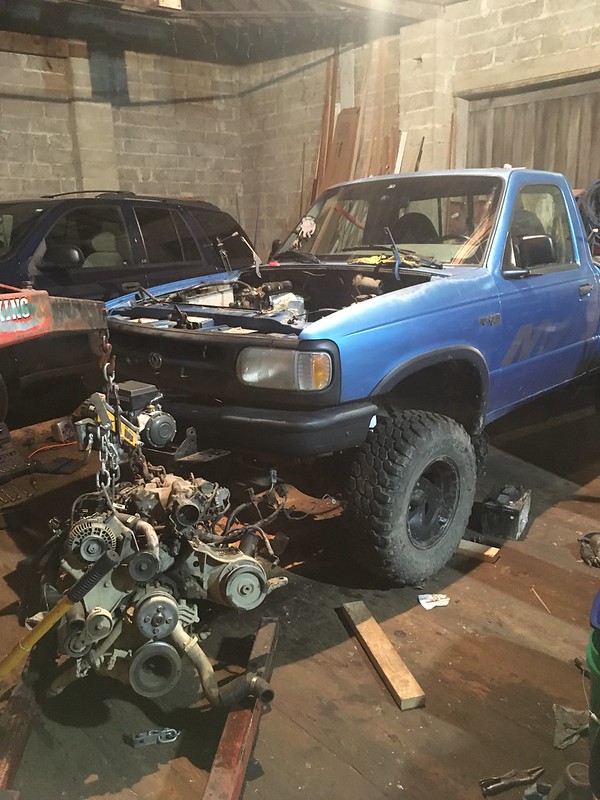
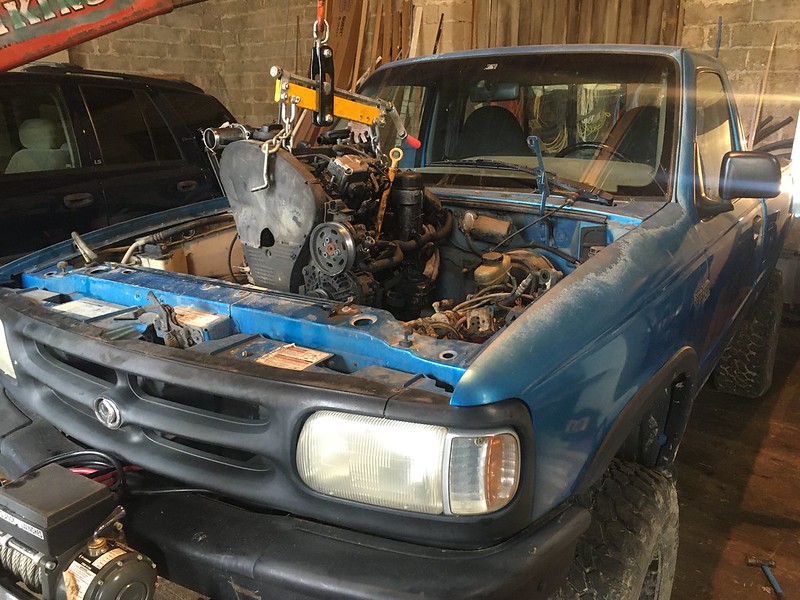
I started pulling the 4.0 V6 out of the Ranger in early April of this year with the help of a good friend. We removed the engine, trans, transfer case, and driveshafts removed in 4 hours flat. I was glad to have that part out of the way quickly so I could get started on the swap quicker.
Since I had been gathering parts for about 6 months and had been preparing for this, I wasted no time starting the swap process. I also miss the truck already. I got the engine up to the barn from my garage and started tearing things off I knew I didn't need.
Anyone who is considering a swap like this, study as many swaps into a vehicle like yours like I did with Greengeeker's and Honeybadger's swaps, but also study other types of swaps because you'll learn extra things you may not get from other build threads.
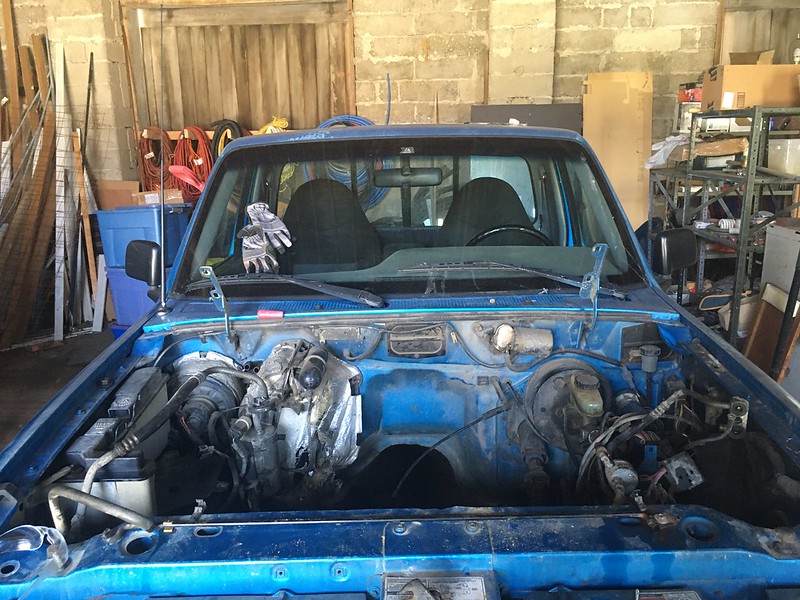
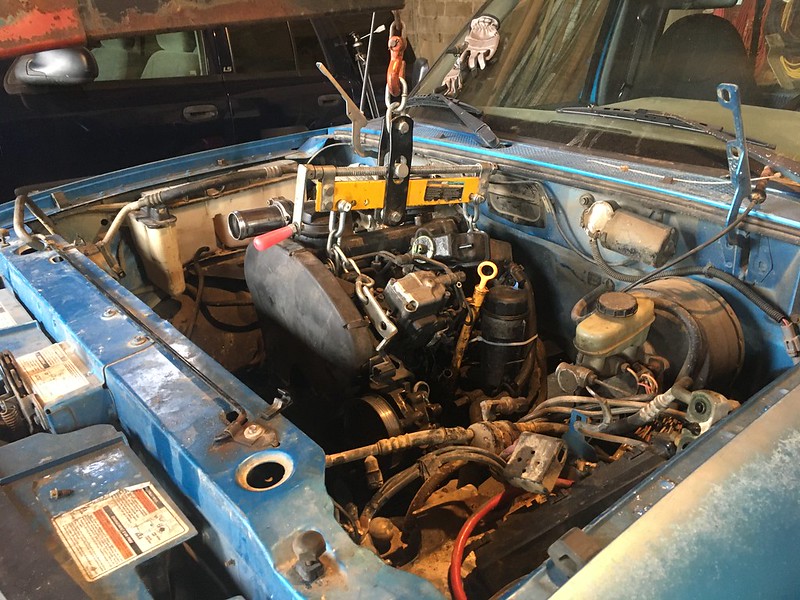
The next day I immediately jumped into mocking the engine up in the engine bay, seeing what would fit and what would need to be fiddled with.
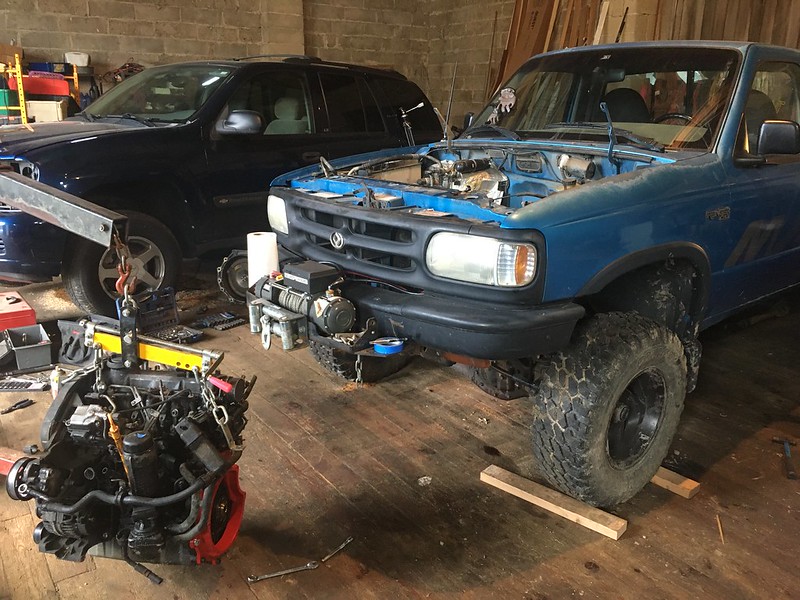
Thankfully, Honeybadger has done a lot of figuring out for this gen of Ranger already. I knew I needed to remove the a/c compressor and cut the portion of the bracket off that holds the a/c compressor and alternator. This is needed in order to clear the steering box on the Ranger. This is different from the 1998-2012 Ranger because that year of Ranger has a steering rack and it's a whole other can of worms. A lot of what I have to say about initial fitment of the engine is repeating of what Honeybadger has done in his build swap. Chances are, if you're considering this swap, you've read as many forums as possible, but if you haven't already, you should check out his swap. https://forums.tdiclub.com/showthread.php?t=455909
The 1990-1997 year-span of Ranger has some sticky spots. I didn't find it to be horribly hard in retrospect, but it will really help you out if you see what others have done, from my experience. Also, read Greengeeker's forum. It's loaded with technical info that is quite helpful, even though his Ranger is a 2001 and isn't 4x4.
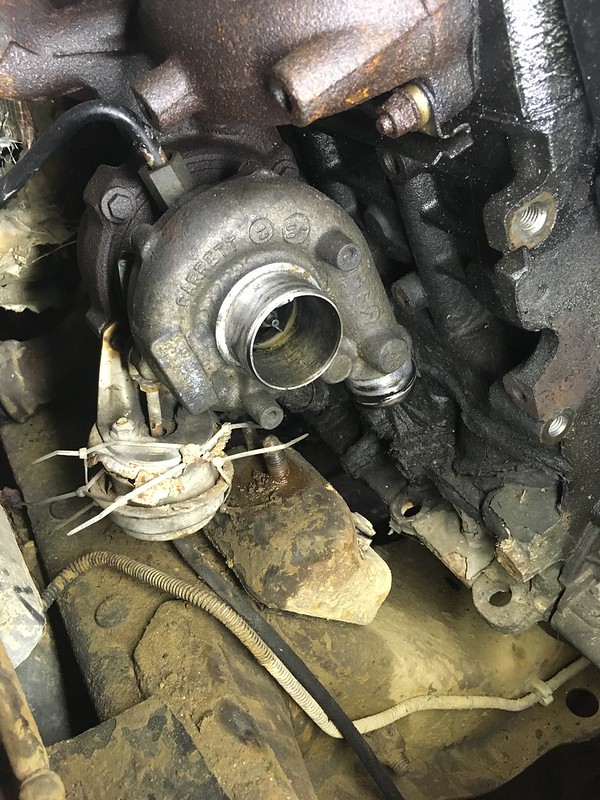
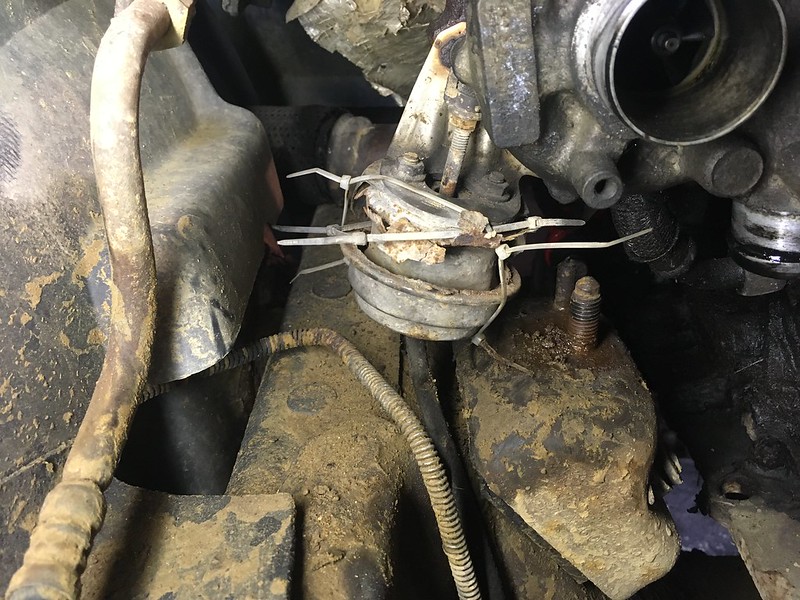
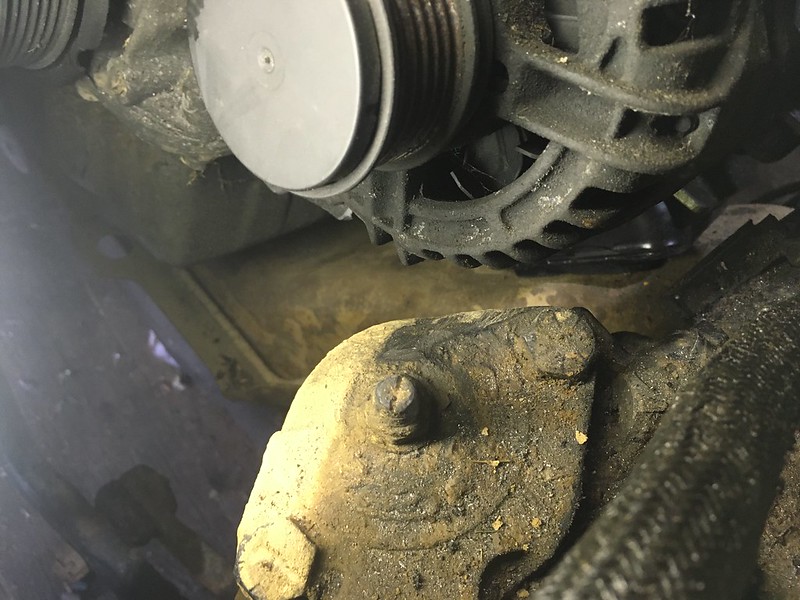
Shown in the pictures below, your biggest fight will be for clearance between the turbo actuator valve and your engine mount, and between your alternator and steering box. The clearance between the turbo actuator valve and engine mount, in my case, was determined by how low you make the engine sit, how far back you put the engine in the truck, and the clocking of the engine in relation to the trans.
That's the rough set up. Please bear with my photo setup. Still getting used to TRS since I haven't posted a thread on here before.
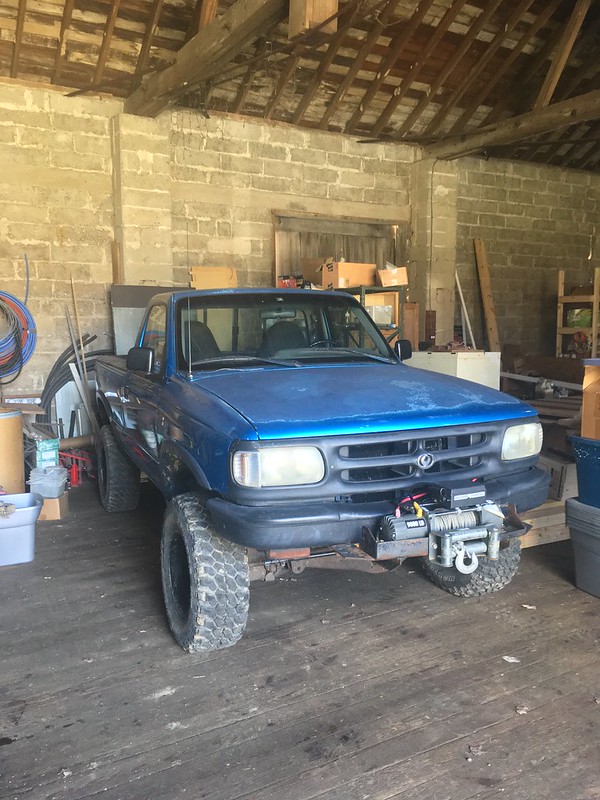
I then bought my third Ford Ranger. (I know it looks like a B4000, but it is technically a Ranger. It had a body swap when the original rusted out. I'll be calling it a Ranger from now on...also I like Rangers a smidge better.)
Having read Greengeeker's and Honeybadger's TDI Ranger builds about two years ago, I decided to build my own Ranger, and the opportunity came not long after I bought my 1995 Ranger. I bought the truck in early 2019 and when summer came I found that there were a few things that the previous owner had let go and this resulted in it pinging for a long period of time. There was a problem with the EGR that I believe was the original cause of the pinging, but the previous owner didn't do anything about it. Unfortunately, I found out about it later since, of course, the 4.0 didn't really ping with a cold engine during a test drive.
I got to thinking about it and although there are a decent amount of Jeep TDI swap videos, there aren't really any of a Ranger TDI swap except for a couple short videos by Greengeeker on youtube. So I decided I will add my swap to my youtube channel to help others in the TDI and Ford communities with some good quality info and video. Unfortunately, I got a new computer and lost my video Adobe software so I can't edit my videos. The video series has been put on hold for a bit. I'll add a link to the video series once I get it uploaded. For now, I'm more worried about getting the swap done.
Well anyway, I found a heck of a deal on a fully dressed 1999 Beetle ALH TDI that included the wiring harness, ECU, throttle pedal, and the engine stand it was on. The country feller I bought it from daily drove the Beetle and took everything out in order to put it in a Samurai he had. I guess things fell through when he had to sell the Samurai for some reason I don't recall, and he had to get rid of the TDI he had already pulled.
I started pulling the 4.0 V6 out of the Ranger in early April of this year with the help of a good friend. We removed the engine, trans, transfer case, and driveshafts removed in 4 hours flat. I was glad to have that part out of the way quickly so I could get started on the swap quicker.
Since I had been gathering parts for about 6 months and had been preparing for this, I wasted no time starting the swap process. I also miss the truck already. I got the engine up to the barn from my garage and started tearing things off I knew I didn't need.
Anyone who is considering a swap like this, study as many swaps into a vehicle like yours like I did with Greengeeker's and Honeybadger's swaps, but also study other types of swaps because you'll learn extra things you may not get from other build threads.
The next day I immediately jumped into mocking the engine up in the engine bay, seeing what would fit and what would need to be fiddled with.
Thankfully, Honeybadger has done a lot of figuring out for this gen of Ranger already. I knew I needed to remove the a/c compressor and cut the portion of the bracket off that holds the a/c compressor and alternator. This is needed in order to clear the steering box on the Ranger. This is different from the 1998-2012 Ranger because that year of Ranger has a steering rack and it's a whole other can of worms. A lot of what I have to say about initial fitment of the engine is repeating of what Honeybadger has done in his build swap. Chances are, if you're considering this swap, you've read as many forums as possible, but if you haven't already, you should check out his swap. https://forums.tdiclub.com/showthread.php?t=455909
The 1990-1997 year-span of Ranger has some sticky spots. I didn't find it to be horribly hard in retrospect, but it will really help you out if you see what others have done, from my experience. Also, read Greengeeker's forum. It's loaded with technical info that is quite helpful, even though his Ranger is a 2001 and isn't 4x4.
Shown in the pictures below, your biggest fight will be for clearance between the turbo actuator valve and your engine mount, and between your alternator and steering box. The clearance between the turbo actuator valve and engine mount, in my case, was determined by how low you make the engine sit, how far back you put the engine in the truck, and the clocking of the engine in relation to the trans.
That's the rough set up. Please bear with my photo setup. Still getting used to TRS since I haven't posted a thread on here before.
 6CE935FB-C783-4227-9F4F-1884A951B960
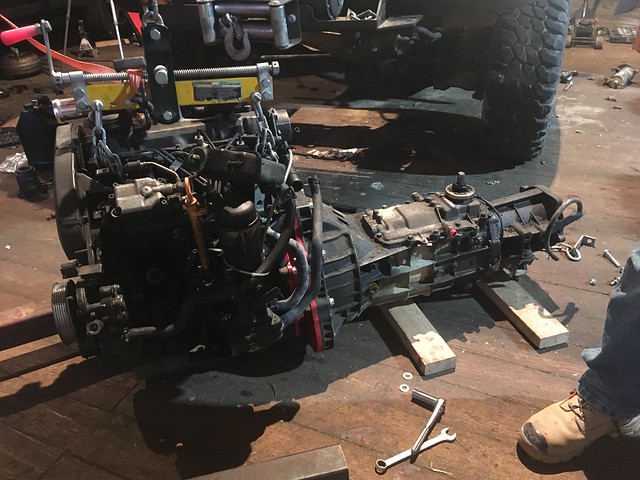 AC509110-D62E-4E13-8F6F-75ABA59B64EB
 9759B20A-7104-4240-8059-366B208B3C20
 84E0BD75-C6F2-44D1-B44B-2AB567CB7BFC
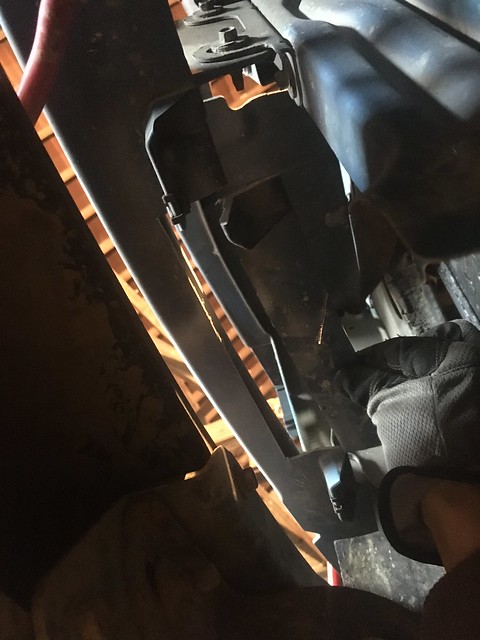 3C11AE8A-49D7-4903-902A-7676C4036944
 D9022E6A-FC15-459E-88B8-A1380908101F
 C31295EA-E570-450B-BE61-88C029F45FCB
 5FBF36DB-999B-460B-B1C5-9378A3FFC88C
 35A7224A-6808-46A7-803F-39255E3ED6A8
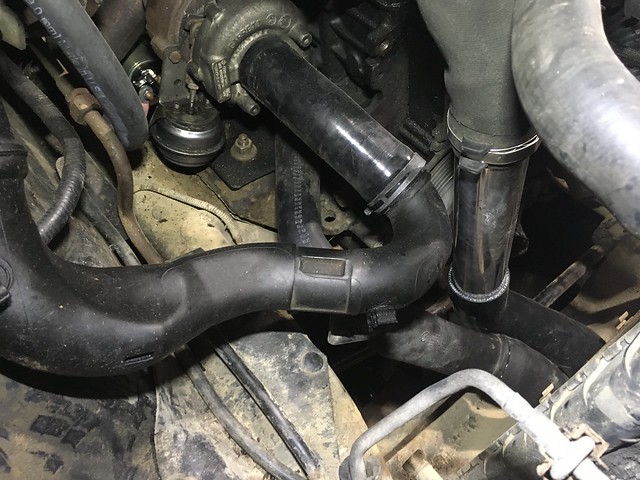 978FDADC-B96B-433C-931F-018DFB271390
 E3AA6ADA-DEE7-42CE-8B96-3EA254450C48
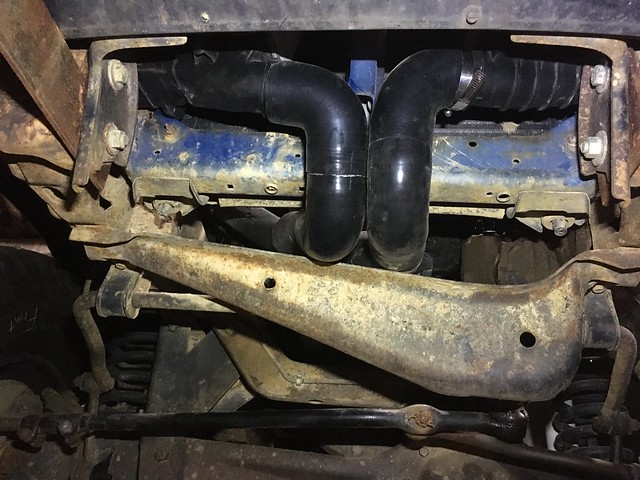 EE97ECF4-9315-4BC7-938C-3FC6A7459371
 E93715DF-21BC-4D33-9256-E393A1FA3182


