• Welcome Visitor! Please take a few seconds and Register for our forum. Even if you don't want to post, you can still 'Like' and react to posts.

Hi from Pa.


"behind the left hand cowl panel", I believe, is down by your feet, near the parking brake pedal assembly.

can you post picture of the page showing you that ground connection?
Here's the location page from the Wiring Diagram manual-
 

Attachments

  • Ground Positions G200 - Copy.jpg
    Ground Positions G200 - Copy.jpg
    221.7 KB · Views: 24
To Lil Blue Ford- I'm 18 minutes into your video "Disaster Strikes the Green Ford Ranger Project" and I'm so sorry that happened. It has happened to me before, as I'm sure it has happened to many others at one point or another.
At least you weren't under it when it happened.
I knew I was flirting with disaster, but it was the way things worked out. I couldn’t work fast enough back then.
 
Here's the location page from the Wiring Diagram manual-
And here are the ground locations both in the book, and on the vehicle. I got this from a site called Operation Charm which has a lot of Official info and diagrams. It's a free site and has as much, if not more, than
Alldata DIY.
 

Attachments

  • Ground Locations from Operation Charm.JPG
    Ground Locations from Operation Charm.JPG
    268 KB · Views: 25
I knew I was flirting with disaster, but it was the way things worked out. I couldn’t work fast enough back then.
It still sucks.
When mine slipped off the jack I was under it, getting one of the 12 ton stands in place. I didn't have time to do anything but shake my head after it happened. That jack stand kept the truck from hitting me.
If I had been 30 seconds slower putting it in place, it would have made for a pretty bad day. Luckily I was working in the rear but it still would have busted me up a bit.
I saw in the video you bolted a new rad support in rather than spot welding it. How has that held up? Did you red loctite the bolts? I thought about doing that to mine but wasn't sure it would pass inspection.
Also, the first minute of the video showed the back of your truck full of tools and parts and it reminded me of my living room lol. I have all my tools and parts in the living room. I tell people it's not clutter, "It's nick knacks for men"
 
Last edited:
It still sucks.
When mine slipped off the jack I was under it, getting one of the 12 ton stands in place. I didn't have time to do anything but shake my head after it happened. That jack stand kept the truck from hitting me.
If I had been 30 seconds slower putting it in place, it would have made for a pretty bad day. Luckily I was working in the rear but it still would have busted me up a bit.
I saw in the video you bolted a new rad support in rather than spot welding it. How has that held up? Did you red loctite the bolts? I thought about doing that to mine but wasn't sure it would pass inspection.
Also, the first minute of the video showed the back of you truck full of tools and parts and it reminded me of my living room lol. I have all my tools and parts in the living room. I tell people it's not clutter, "It's nick nacks for men"
I never get under a truck until jackstands are solidly in place. General rule of thumb. Lol

I used 1/4” diameter stainless button head bolts 5/8” long with stainless serrated flange nuts. I put one every place there was a spot weld. No locktite. Worked like a charm. I also did it on dad’s one Ranger.

Whatever truck I‘m working on was traditionally my “workshop” but I finally got smart and turned a shed of mine into a mini workshop. That’s coming on my channel but it’s gonna be a bit, I’ve got old videos scheduled out into June. Trying to clear my backlog of videos because I got behind on everything.
Your arms must be longer than mine lol. I don't work on a vehicle without stands, but I have to get under it to place the stands. It's just the way it is.
Have you had either truck inspected with the bolted rad support?
 
Your arms must be longer than mine lol. I don't work on a vehicle without stands, but I have to get under it to place the stands. It's just the way it is.
Have you had either truck inspected with the bolted rad support?
I do have long arms, lol

Dad’s truck isn’t back together yet, but mine has been inspected twice with the bolted rad support with the only question being how legal the 5.0 is. Federally, it’s legal because I went like year emissions and that was good enough for my inspection station.
 
I do have long arms, lol

Dad’s truck isn’t back together yet, but mine has been inspected twice with the bolted rad support with the only question being how legal the 5.0 is. Federally, it’s legal because I went like year emissions and that was good enough for my inspection station.
I've always thought there might be an inspection issue with the rad support due to the chance of loosening bolts/nuts. I forgot to ask you about the 5.0 swap. That could have been a whole video series.
I see a lot of people are doing that with their Rangers. It's a nice thought, but not practical for me. I don't have the equipment or money to do something like that. I'd love to hear about it though.
My lil 4 banger does okay for me, as long as I don't need the AC lol.
I honestly never gave inspection a thought when I bolted it in. I wanted to make it bolt-in for convenience. If that 5.0 has to come back out at any time, it’s going to be a lot easier if I can remove the rad support. I could have welded it in, I do have welders, but stainless bolts are easier to remove than welds.

The 2.3 EcoBoost is probably the best performance swap for a Ranger these days, the 5.0 isn’t really a significant bump in performance without a bunch of parts thrown at an engine design that hasn’t been in a production vehicle for over 20 years at this point. But I wanted a 5.0 Ranger since I was about 15. So that’s what I built. Once I get caught up on a few projects, I may start planning a built 2.3 EcoBoost Ranger.

I did video some of my swap but not enough. When I started the swap, I wasn’t really thinking of filming. I recorded a little, but not much. Then I had some health issues and started to think of recording stuff but progress was painfully slow and a lot of times I just didn’t think to pull out a camera plus it’s typically just me working on it so you need to set the camera up somewhere and try to make sure it’s stable but out of the way yet can still see what’s happening and with my issues it was just a lot to handle. I’m doing better with both recording stuff and health-wise at this point but I couldn’t bring myself to just trash all of my video attempts. I also couldn’t process all of the videos at once so I figured if I drop one or two a week until I’m caught up, it will buy me time to get everything done. The current videos dropping on my YouTube are from last year.

I have collected a lot of tooling but my work is done outside on gravel and until this year, I never had a shop space, just play Captain Cavepig and sit on the ground or work on a tailgate like a real man. That is horribly inefficient. But it’s what I’ve done forever.
 
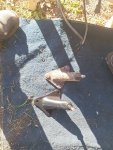
So it turned out to be the fuel pump after all. I put the new one in a week ago and it's been running ever since.
I also changed the fuel filter and the Fuel Tank Pressure sensor, since I snapped the old one in half trying to transfer it to the new pump. It was totally my fault, not gonna lie.

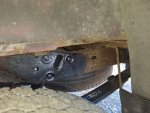
I got it running Thursday 4/24 since I had to wait for the new FTP sensor to get here from Rock Auto. I treated the new sensor like it was a priceless Faberge egg lol, and I had a hell of a time getting it seated into the new fuel pump. After about an hour of trying to push down and turn at the same time with no luck I did what any man would do when something doesn't want to go in...I spit on it, a lot. It went right in after that.
I was nervous the whole time, it was my first time after all ( First FTP sensor, umm, insertion :ROFLMAO:). The OEM sensor through the Ford Dealer next door was $130, the aftermarket sensor (SMP) was $61.25 so it was RA for the win. Even at $61 I didn't want to buy it twice lol.

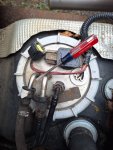
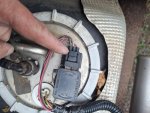
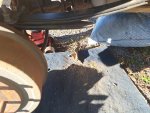
It also took quite awhile to get the FTP connector to disengage from the old sensor since it was caked with dirt and debris that turned into a kind of cement. But my trusty old Craftsman pocket screwdriver made short work of it after I realized the issue.
It was a good feeling to finally get that connector to pop loose, but not near as good as that new FTP sensor finally seating into the pump.
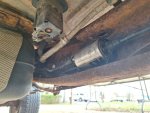
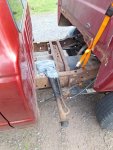
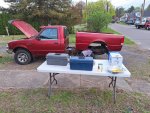
I took some pics to send to my daughter so I reckon I could post them here-
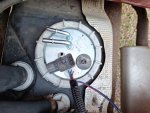
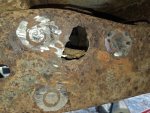
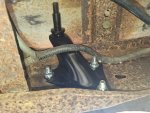
Note- I'm pointing at the FTP sensor connector in the one pic to show her what it is and what was stuck in place when I was trying to get it loose. I've been trying to spark an interest in her about mechanics and how things work since she was little although I haven't gotten much of a spark at all. But I'll keep trying.
And the pictures are in no particular order.

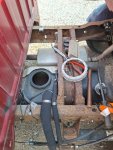
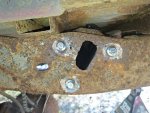
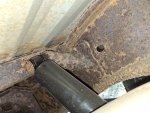
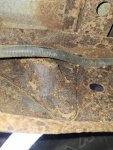
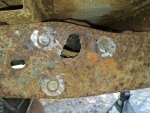
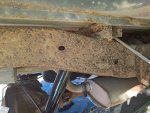
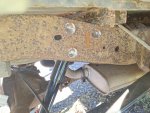
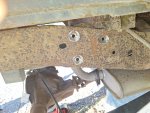
The oddball pic of the hole in the frame is a cautionary tale for anyone who has an old Ranger. That hole opened up while I was beating out the 3 factory rivets to replace the rear shock mounts.
Ford engineers designed the rear shock mount like a cup, or vase if you will. Over time it fills up with dirt, rust, other debris, and moisture and if not cleaned out will slowly eat through the frame in the perfect shape of the mount. I had no idea, until this hole opened up right before my eyes. The frame seemed fine right up to the point I was hammering on the one rivet and was visually checked by both me and the two mechanics I take it to for inspection multiple times prior, we never saw anything that looked like it was getting thin or rusting through.
The mounts themselves can and do rust out and break over time, mine did on the driver side, which is why I had to remove the rivets in the first place.
I changed both sides but the drinker side frame was okay, and the mount popped right off the frame after the second hit on one rivet. I learned some things from the driver side which made the other mount a lot easier to remove.
So anyway- check your frames and rear shock mounts once in awhile lest you end up with a frame hole like mine.
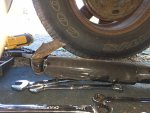
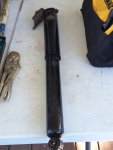
I have more pictures of the shock mount job, as well as the leaf spring and 4 wheel brake replacement if anyone is interested. Just let me know.
 

Attachments

  • 3e3f741e-66d4-4775-b03c-d65c5e0bdede.jpg
    3e3f741e-66d4-4775-b03c-d65c5e0bdede.jpg
    228.7 KB · Views: 22
  • 59d8fccf-6f60-4e0c-980f-0f6caf1f5470.jpg
    59d8fccf-6f60-4e0c-980f-0f6caf1f5470.jpg
    269.6 KB · Views: 26
  • 20241005_141353.jpg
    20241005_141353.jpg
    294.6 KB · Views: 24
  • 20250421_150855.jpg
    20250421_150855.jpg
    202.1 KB · Views: 28
  • 20250421_155322.jpg
    20250421_155322.jpg
    211.9 KB · Views: 24
  • 20250421_180704.jpg
    20250421_180704.jpg
    315.8 KB · Views: 27
  • 20250421_180729.jpg
    20250421_180729.jpg
    486.1 KB · Views: 26
  • 40249978-b21c-443b-9074-cad294e732ed.jpg
    40249978-b21c-443b-9074-cad294e732ed.jpg
    215.2 KB · Views: 25
Last edited:
That frame hole is easily patched. IIRC, I drilled a 1/4” drain hole in my shock mounts to at least try and drain out any water, then I coated the frame and back of the mount in grease before assembly
 
Just in case they might help someone replace their own rear shock mounts; I've gone through my pictures and here are a few of each side. They're not necessarily in order since I was working on it different days/months but they might make things a little easier for someone like myself who never did these before.
The pics are in semi order, at least as well as I could by naming them.
Some notes-
The right side was a bear to remove, taking well over an hour ( maybe 2, I can't remember) of highly motivated hammering, and cussing that would make Gunny R. Lee Ermey proud.
The reason for all the extra effort was my fault since I didn't use my air chisel to peel off the residual rivet heads after grinding as much as I could. On the other side the air chisel cleaned the remaining head material so there were only the rivet shafts to deal with. The drinker side mount literally flew off the frame after two hits to the first rivet, man that felt good after the driver side.
Live and learn.

The hole in my hand resulted from a slip of my left elbow, which was resting on the u-bolts as I was grinding the heads. When my elbow slipped the grinder, which was locked full on, caught me before I could blink.
When I was young I had cat like reflexes, now I like to say I have cat-erpillar like reflexes.
I even tried to mount the shield before grinding but as it turned out, it wasn't for this grinder, which was given to me already well used.
It doesn't show in the picture, but I removed a good chunk of knuckle along with the skin and meat. I just dumped some iodine on it, tossed on a 12-15 year old band aid and got back to grinding, 'cause those rivets weren't going to remove themselves.
It healed up nicely but the DIY bone reduction surgery still causes a lot of pain through my hand but, I can still use it so that's okay.

Regarding the mounts- I didn't think to snap a shot of the back side showing the shape of the mount and why they tend to fill up with crud, mud, and moisture. But hopefully it shows well enough in these pics.
 

Attachments

  • Dr Side Mount Pre Break.jpg
    Dr Side Mount Pre Break.jpg
    309.4 KB · Views: 27
  • Dr Side Shock Mount 1.jpg
    Dr Side Shock Mount 1.jpg
    237.6 KB · Views: 20
  • Dr Side Shock Mount 2.jpg
    Dr Side Shock Mount 2.jpg
    297.9 KB · Views: 22
  • Dr Side Mount-Shock Damage.jpg
    Dr Side Mount-Shock Damage.jpg
    175.2 KB · Views: 21
  • Dr Side Frame 1.jpg
    Dr Side Frame 1.jpg
    325.1 KB · Views: 22
  • Driver Side frame 2.jpg
    Driver Side frame 2.jpg
    276.7 KB · Views: 23
  • Dr Side New.jpg
    Dr Side New.jpg
    278.1 KB · Views: 26
  • Driver Side Frame 3.jpg
    Driver Side Frame 3.jpg
    261 KB · Views: 25
  • New vs Old.jpg
    New vs Old.jpg
    346.2 KB · Views: 25
  • Hurt a Bit.jpg
    Hurt a Bit.jpg
    146.3 KB · Views: 21
  • Pass Side Pre Grind.jpg
    Pass Side Pre Grind.jpg
    322 KB · Views: 19
  • Pass Side Grd -Chiseled.jpg
    Pass Side Grd -Chiseled.jpg
    319.1 KB · Views: 22
  • Pass Side 2 Hits-Too Easy.jpg
    Pass Side 2 Hits-Too Easy.jpg
    329.1 KB · Views: 26
  • Pass Side Mount Removed.jpg
    Pass Side Mount Removed.jpg
    308.1 KB · Views: 26
  • Some of the Gear.jpg
    Some of the Gear.jpg
    514.8 KB · Views: 21
Last edited:
That frame hole is easily patched. IIRC, I drilled a 1/4” drain hole in my shock mounts to at least try and drain out any water, then I coated the frame and back of the mount in grease before assembly
Yea I talked to the two mechanics that inspect it for me every year and they said they'll get it done for me before inspection runs out at the end of June. I don't have the equipment to do it myself, and they're the only ones I trust around here. They didn't set an appointment yet since it was end of day and they were trying to finish up two vehicles before closing up for the night. Once they do get it in, I'll probably have them do the other side too, just to be consistent. I like to do things in pairs, or 4s, depending on the job and parts that need to be replaced.
Did you drill the holes near the bottom of your mounts? Maybe you could post a couple pictures for others to reference.
I wonder if an oval slot near the base ( Like in a rear drum backing plate but smaller) would weaken them too much. That way they could be cleaned out periodically, as long as it didn't weaken the mount of course.
I guess hitting them from above once in awhile with an air nozzle would work too. I didn't even think to check mine while I had the bed pulled back. My hindsight is 20/20, but my foresight seems to be going blind lately lol.
That’s good you have someone to take it to. I have welders so I just take care of it myself, lol.

I did drill near the bottom of the pocket. Don’t think I have any pics though. I’m not sure that a small slot would weaken it substantially unless you’re using load carrier shocks, then it might be more questionable
Just normal Monroe OE Spectrum replacements, and so far I've never hauled anything more than my tool boxes when I need to work on a family member's or friend's car and they can't bring it to me.
For now the box is cleaned out except for my 3 ton floor jack, 3 ton jack stands and two bread baskets with the usual cans/jugs, bottles but it probably won't stay clear for long.
But I never have it loaded down enough to strain the shock mounts, although I can't say it won't happen at some point. I'll just hit them with air once in awhile, they should be fine. They're new and seem pretty sturdy for being Chinesium so hopefully they last awhile.
 

Sponsored Ad


Sponsored Ad

TRS Events

Member & Vendor Upgrades

For a small yearly donation, you can support this forum and receive a 'Supporting Member' banner, or become a 'Supporting Vendor' and promote your products here. Click the banner to find out how.

Recently Featured

Want to see your truck here? Share your photos and details in the forum.

Ranger Adventure Video

TRS Merchandise

Follow TRS On Instagram

TRS Sponsors


Sponsored Ad


Sponsored Ad


Amazon Deals

Sponsored Ad

Back
Top