• Welcome Visitor! Please take a few seconds and Register for our forum. Even if you don't want to post, you can still 'Like' and react to posts.

1990 2.3 Turbo Ranger Build


Nice work, everything is looking good.
 
Just saw this, looks like you're getting somewhere! On the airbox, look at mine, I think I posted a pic in one of your posts, it's a simple setup that I did with junkyard parts, you might be able to do it with your stock leftovers...

I have to say that it looks like you took my advice and went with it, with less detailed instructions than most people take, so you're above average in the mechanically inclined aspect :), it looks good and I'm sure you'll be happy with the results, I know my truck would be a DOG with the stock engine with it's current setup, but now you punch it and it just flat goes... bit of turbo lag but hey...

Have any issues with my instructions on the crank sensor mounting? Did you have to extend the coil pack bracket like I did?

The crank sensor went really smooth. Just patterned it, drilled and tapped like you said and it lined up fine. I did have to move the coil pack, modify the mount, thermostat housing and the steel coolant lines so the hoses would fit nicely. I like what you did with the air box, and am trying to take a similar approach. The VAM isn't here yet; I'll get to that later this week. Some guy on another forum claimed a fella could do this project in a long weekend!!!:bsflag: I really want to see how that one came out. LOL! I lost track of how much time I've already got into this long ago, and I still have a long way to go. I am being very thorough and trying to make it look right, but a long weekend??? I don't think so.
 
You sure that wasn't me? when I first started my build I had the engine mostly set up and thought I had everything figured out (I didn't) and thought I could do everything in a 4 day weekend (thanksgiving), I finished January 1 I think... If I was to do it again I think I could now as long as I had the engine mostly ready to drop in beforehand, it would be a full weekend but it could probably be done... Neither time I dropped my engine in was it detailed like you did to yours, it could stay leak free which the chances are much better with a truck like yours than a truck like mine but mine leaks oil from places... Oil leaks on these are more from staying in the boost too long, or half of mine are from working the power steering pump too hard it starts puking out the vent :). Your truck shouldn't need to be at 0 vacuum/boost to cruise 55-60 like mine...
 
No Scott; it wasn't you. I was lurking on another forum trying to see what some other folks experienced. I've put in 3 long days while waiting impatiently for my parts to arrive, and completely restored/painted the frame/undercarriage, replaced all 4 shocks, replaced both rear wheel cylinders/brake shoes and finished detailing the engine bay. I decided to try a water based rust converter from NAPA on the frame and all the other rusty spots, and man; the stuff is great!!! It looks almost new up under there again. I also fixed the spare tire hanger that seems to have never been taken off the truck. Had to grind all the rusty, frozen bolts out...what a project. My EEC/harness arrived today, and a bunch more stuff should come tomorrow I hope before I find some other crazy project to add to the list.:icon_twisted: At least the weather has been cooperating. 55 and sunny. Nice!!!
 
Parts arrived today.:D 
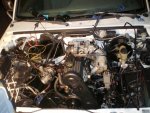
New motor mounts are in and the motor is finished ready to move from the stand to the hoist where I'll replace the rear main seal and put back the flywheel. Clutch kit has not arrived yet, but no biggie. Pretty sure I'm dropping the motor in tomorrow. Been waiting for this day since November!
 
Nice, good luck! It's a royal pain in the rear to do yourself, I've done it a couple times and usually it's required a fair amount of cussing... When dropping the engine down the drivers side motor mount stud has a tendency of getting in the way of the oil filter, and at one point I had cut the stud shorter on the passenger side motor mount... getting the engine lined up and cooperating with the transmission and the two motor mounts is much easier with another set of hands, one below and one above but it can be done with some patience. Last time I had mine apart I I had the engine and transmission out, dropped the engine in first then borrowed a tranny jack to jack that in place, was easier to do myself that way.
 
Thanks Scott. Well, I got only as far as getting the motor finished up and sitting in the hoist. The lack of a proper socket to get the dive shaft off brought the project to a screaming halt, and I spent the rest of the evening trying to track down a spline socket set in N.E. TN. :icon_twisted: Why in the world Ford had to use spline head bolts on the drive shaft end only is beyond me.:icon_confused: (Perhaps a conspiracy to discourage non-authorized, d.i.y er's from performing self-maintenance. LOL) I'm tired and tomorrow's another day. Things should go much better then.
 

Attachments

  • CIMG0165.JPG
    CIMG0165.JPG
    58.7 KB · Views: 428
It's just a 12 point 12mm socket or you can even use a 12 point 12mm box end wrench for the drive shaft bolts. I use a 12 point 12mm Snap On impact 3/8'' drive wobble socket so I can use my impact on the bolts. For a one time deal the box end wrench would probably be the cheapest way for you to go.
 
It's just a 12 point 12mm socket or you can even use a 12 point 12mm box end wrench for the drive shaft bolts. I use a 12 point 12mm Snap On impact 3/8'' drive wobble socket so I can use my impact on the bolts. For a one time deal the box end wrench would probably be the cheapest way for you to go.

I wish I would have tried that. It never crossed my mind. Eventually, I found a set of 3/8" drive universal metric sockets at Sears. They're supposed to fit all those other stupid "non-hex" bolt heads too, so they may come in handy for $14.99. My Harley has some weird bolts too, but they're probably imperial. lol. (will not be buying that set!) Years ago I rebuilt two pre-unit Triumph motorcycles; a 59' Trophy and a 60' Bonneville. They use "Whitworth" wrenches; neither metric or imperial. Bought the whole set, (bummer) but sold them with the bikes (awesome) :D and swore off vintage Triumphs.
 
Finally! The moment I've been waiting for. Engine and tranny in place. Now that the bull work is done I can focus on wiring up the LA3 and all that other fun stuff. No more jacks, grease/dirt/rust, crawling around under the truck...Ahhh. :yahoo: 
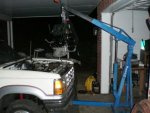
Luckily the weather has been really mild while I did that work, but colder temps and snow are in the forecast. I think I'll try to move this project indoors if I can make enough room.
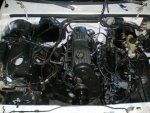
 

Attachments

  • CIMG0166.JPG
    CIMG0166.JPG
    72.3 KB · Views: 474
Looking good in there. It's nice to have the hard work done and be onto the fun stuff. I like the Turbo Coupe valve cover. I put one on my 2.3L Mustang and was thinking about putting on on my Ranger until I removed the stock steel valve cover and saw how tight of a fit it is in my 97 getting the valve cover off and on. I was worried the thicker aluminum cover just wouldn't fit with the 97 upper intake and EGR tube.
It's kind of strange that Ford started using 12 point nuts and bolts instead of 6 point. The older 2.3Ls have 12 point head bolts and carb. mounting nuts.
Yeah, those darn bolts really threw me for a loop. I tried some of my sockets and they didn't fit...(six point of course) so I assumed they were "special" ones that needed "special wrenches.:icon_twisted: lol Oh well. At least I'll know better in the future. Re-pinned the computer today, and started hooking up the intake, put the starter in and finished up a few odds n' ends. I'm REALLY glad I got a TC wiring harness with the LA3 (ebay guy threw it in for free with the LA3 for $95.00 total. I see harnesses going for $200.00 Got lucky for a change) It's great to have it handy to scavenge "pig tails" to hook up to this motor. Finding pig tails for this swap would have been time consuming and expensive if not impossible. Hope to have all the wiring done tomorrow. Gaining on it now!:icon_thumby:
 
Just finished re-pinning and wiring the EEC. It's bolted back in place and covered up, but I am uneasy. I hate complicated things that don't have moving parts. No way of knowing if everything is right and working till I try to crank er' up. it's coming along; I hope to have the manifolds hooked up and back in place by the end of the day.
 
Another long day on the truck. Manifolds in position and ready to start hooking everything up/ tightening bots etc. tomorrow. I still have to figure out the fuel line situation, but after everything I've done already it seems like small potatoes. I felt pretty good when I saw that I only started this thread on 11/19/2014. It usually takes me forever to finish a project the size of this one, but I really can't brag; I've been unemployed, and I sold the only other car I owned to pay bills and fund this project. I have plenty of time, and 25 degree rides on the Harley to go to the store and stuff are great motivators. Nothing like a little pressure to move things along.
 

Attachments

  • CIMG0166.jpg
    CIMG0166.jpg
    99.6 KB · Views: 320
Lookin good, if you have too much trouble with the fuel lines use the Ranger fuel rail... I of course gook the less classy looking approach and just made new lines from the fuel filter forward, and just double clamped around the barbs on the fuel rail...
 

Sponsored Ad


Sponsored Ad

TRS Events

Member & Vendor Upgrades

For a small yearly donation, you can support this forum and receive a 'Supporting Member' banner, or become a 'Supporting Vendor' and promote your products here. Click the banner to find out how.

Recently Featured

Want to see your truck here? Share your photos and details in the forum.

Ranger Adventure Video

TRS Merchandise

Follow TRS On Instagram

TRS Sponsors


Sponsored Ad


Sponsored Ad


Amazon Deals

Sponsored Ad

Back
Top