|
|
||||||||||||||
|
|
||||||||||||||
|
|
|
By colinrmitchell Doing a minor rebuild on the steering box of a 1997 Ford Ranger.
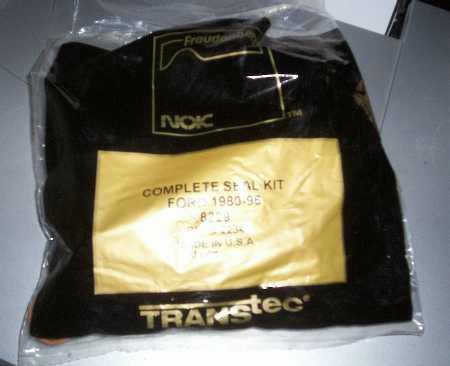
So a little while ago, my steering box started leaking at the pitman arm. I looked at new and remanufactured steering boxes, but I was hoping for a solution for less than the prices of $180-$250. So I did some looking online and found a company that sells complete rebuild kits for Ranger steering boxes. The site is http://www.prosteering.com, and their number is 503-289-7899. The guy on the line was nice and and helpful. I ordered a kit for about $17 and got it in the mail quickly. The part number is 8229. After installing the kit, my steering has been a lot more smooth and less shaky, and the leak was fixed.
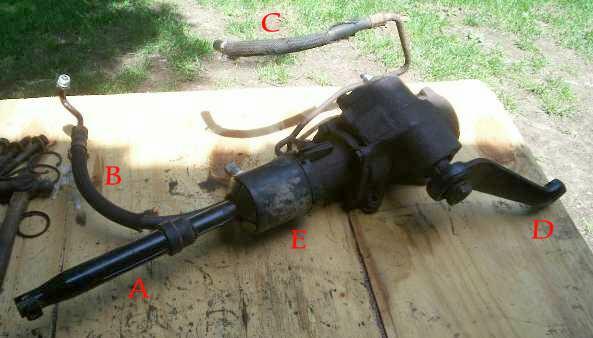
Here is the complete kit. It comes with everything to rebuild the steering box, but in this article, we are only concerned with the sector and piston seals. First, you will need to remove the steering box from the truck: 1. Put a spill pan underneath the steering box. 2. Remove the two hoses that connect the steering box to the steering pump. One hose is on the side with a threaded connection, and the other is on the back of the pump, which has a hose clamp. I found it easier to remove these than at the box while the pump is in the truck. 3. Disconnect the steering shaft from the steering box. There is a bolt on the steering shaft, near the master cylinder. Loosen and remove this, and the shaft will slide off. 4. Remove the castle nut on the tie-rod end attached to the pitman arm. Remove the drag link from the pitman arm. 5. There is an electrical connector attached to one of the hydraulic lines. This needs to be disconnected. 6. There are three bolts that go through the frame and attached to the steering box. Remove these, and then slide the steering box gently out of the bottom of the truck. Once removed, it will look like this:
In this photo: A:
Steering Shaft. The next step is to disassemble the steering box. 1: Remove both hydraulic lines. The fittings on my box were rusted together, so it was easier to remove them, without destroying them, once the box was out of the truck. 2: Remove the steering shaft cover. 3: Remove the steering shaft. There is a bolt that goes through the splined connection. Unbolt this, and slide the shaft off. 4: Remove the pitman arm nut, and then the pitman arm. Now, we need to take the box apart to get to the seals.
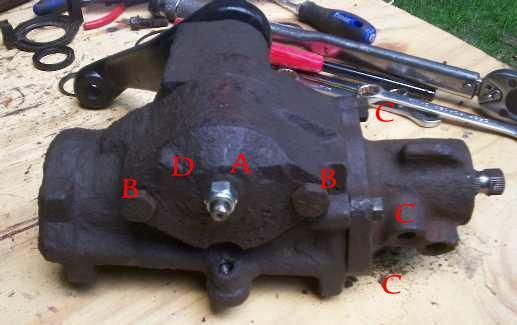
A:
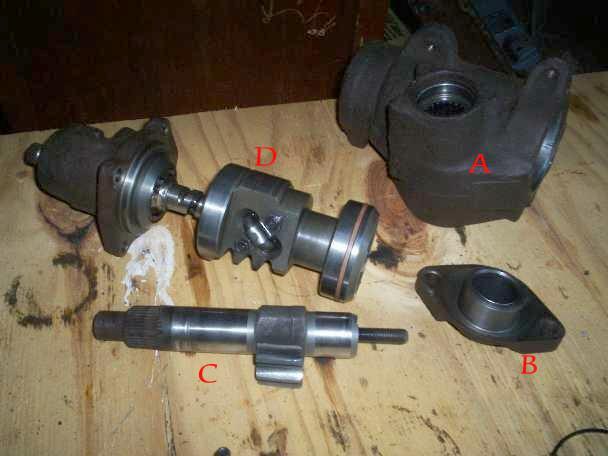
Sector shaft stud and nut. 1: Remove the sector shaft nut (A). 2: Remove the sector shaft retaining bolts (B). 3: Using a soft hammer, hit the sector shaft cap (D) counterclockwise to loosen it. Then, continue to loosen it until it is removed. 4: Remove the piston cap bolts (C). 5: Put the box upside down in a vice. Use a soft hammer to hit the sector shaft at the pitman arm end so that it can be removed where the cap was. Make sure that the sector shaft is centered in the gear teeth so that it slides out, and does not hit the box. 6: Remove the piston by gently pulling on piston cap. Now that the sector shaft is removed, you can removed the dust seal, C-clip, oil seal, and washer from the sector shaft race. The bearing will remain since a new one is not supplied. You will have these parts:
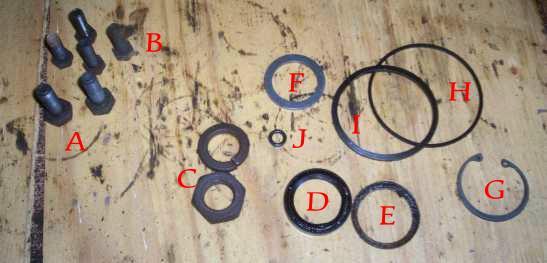
A:
Sector shaft cover bolts. We will be reusing parts A, B, and C. The rest are included in the kit and may be discarded. Now, you will be left with:
A:
Steering box. Now we will replace the old seals. Before putting anything back together, clean everything well with brake parts cleaner or solvent, and a clean rag. Make sure no rust or dirt falls into the box while reassembling. 1: Remove the Teflon seal at the end of the piston. Also remove the O-ring that lies underneath it. Replace both of these. 2: Clean the sector shaft bearing with a solvent, and then coat with some power steering fluid. 3: Replace the parts for the sector shaft in this order: oil seal, washer, C-clip, dust seal. 4. Replace the small hydraulic bypass O-ring that lies in the faces between the box on the piston cap. 5: Replace the piston into the box, replacing the sealing O-ring. Make sure the piston teeth are centered. Replace the bolts. 6. Replace the sector shaft into the box, making sure its teeth are centered on the teeth of the piston. 7: Install a new seal on the sector shaft cap, and replace the cap. 8: Replace the sector shaft nut, and then replace the cover bolts. Reinstall everything onto the box in reverse order. Place the box back into the truck, and then reconnect everything as disconnected. Fill the power steering pump reservoir with fluid. Leave the truck off and the pitman arm disconnected. Turn the steering wheel lock-to-lock at least ten times. Replace fluid as necessary to keep the reservoir properly filled. Then, start the truck and and turn the wheel lock-to-lock again at least twenty times. Reconnect the drag link to the pitman arm, and then test the truck in a private area. Make sure the fluid is at an adequate level.
|
|
|