|
|
||||||||||||||
|
|
||||||||||||||
|
|
|
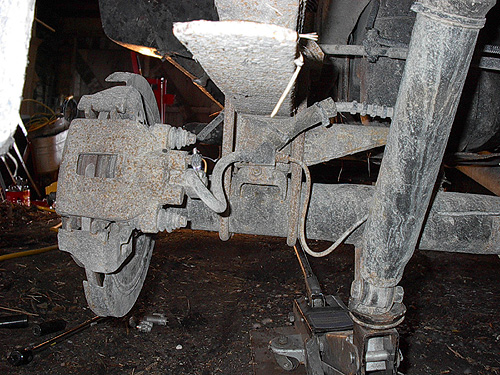
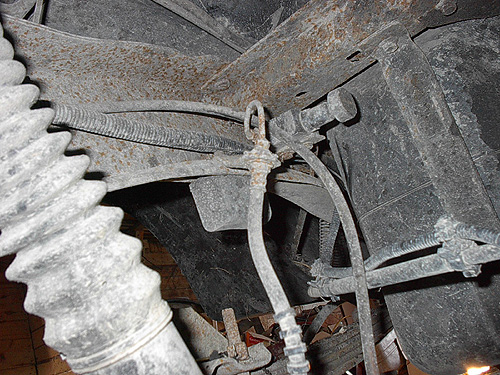
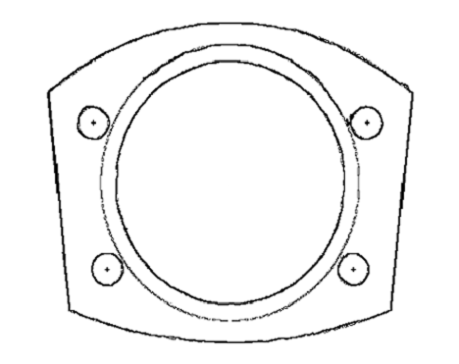
By Joel Haywood There is a lot of controversy about disc brakes actually making a difference, let me ask you this... Why are Mountain bike manufactures putting disc brakes on the bikes? Why do motorcycles have disc brakes? Why do all the F1 race cars have disc brakes? I’ll tell you! They perform much better than the drums. Granted there are better kits out there, but you have to go out and get calipers from another make of vehicle to make it work. I was fighting with the drums to get them to stop the 33’s on steel rims. I was going through pads and springs were breaking. I was able to get a brake job down to 5 minutes per side, that’s including removing the wheel. I should have been in the NASCAR pits. I chose ’96 Explorer parts because it keeps everything Ford and you don’t have to go looking around for parts that may work at another car dealer. I was able to pick up the complete system with master cylinder at a wrecking yard for $250 Cdn, already removed. Try to get as much as you can, every little bit helps. I even got the flexible lines and the Junction block they mount to. Get the E-brake cables if they are good. Cut the hard lines if you can, they will have to be replaced on your axle anyway. I got the rotors cleaned up after I got them and ordered new pads and emergency brake shoes. The ones I got with the parts were ok as spares, if I needed them. To be honest the master cylinder is not needed if you have RABS. The part numbers are the same. I did not know this until the time came around to converting it over. I got a Wildwood proportioning valve to get a bit more tunability to the rear brakes. This is not needed but it is nice to have. Extra cost to the tune of $125. The next part can be done by you if you have good fabrication skills. Remember these are your brakes you’re talking about. I have been running this system for the past 3 years with no problems. What you may know now is that the bearings in the Explorer 8.8 are larger to accommodate the 31 spline shafts. The Ranger is a 28 spline unit. The mounting flanges for the brakes are a different pattern. What I did to the caliper brackets is I got the holes filled by TIG welding. The backing plates are cast so you want to apply the least amount of heat on them. Once the holes were filled I ground the surfaces down flat. I spent a lot of time under my truck to make a template for the bolt pattern, which I have included in this article. It is a .bmp but if printed out, I have scaled it to be a 1:1 scale. Use that as a template to mark your holes on the clean caliper bracket. I would suggest clocking the caliper a bit to clear where the welded holes are. Drilling a weld, as some may know, is a real PITA. Get the drill bit hot, and it’ll start to squeak, then you’re in big trouble. Use a lot of drilling or tapping fluid to keep it cool. Another note is that the center hole on the caliper brackets is larger than the Ranger one. I found that if I slotted the holes inward I was able to get a better hole. The bit will walk to the center. Even if you start small and drill larger. The pilot will not stay. Makes the new bracket a bit cleaner looking. With the bracket this way you will need to make a clamp plate for the bolts when mounting the caliper bracket. Again you should be able to use the template to make a plate. The hole I have included in the pattern is the same as the Ranger. Should have lots of material. I suggest making it out of either 3/16 or 1/4 steel. This will require you to get new bolts that are longer, to accommodate the caliper bracket and plate thickness. With all these modifications done it is time to mount these things to the truck. The 8.8 is a C-clip design so there is no way around it except to pull the axles to get the drum backing plate off and the new caliper bracket on. Start buy jacking the truck up and supporting the axle with sturdy jack stands and remove the wheels. I would suggest using the torch and cut everything off at the shock mount……Just kidding. Start removing parts from the drum set up and toss the parts in the bed or in a pail. Try to salvage anything you can. If this is your daily driver then your going to cross your fingers you can get this done on the weekend. Otherwise you’ll be re-installing the drums. Another thing is you can also salvage the parts you pull off and sell them if they are in good shape. May pay for some of the expense in the disc parts. Leave the hard lines on the axle till the calipers are installed. Remove the diff cover and drain the fluid. Pull the C-clips out as per your manual and slide the axles out. Unbolt the backing plate and E-brake lines. I suggest unbolting the hard lines at the wheel cylinder junction and move them out of the way. Keep the lines on the axle housing. I would recommend making a new one instead of trying to adapt it to fit. Bolt up the caliper brackets with fingers crossed that I got the template correct…….lol. I made the template and YOU drilled the holes, which is going to be off? Once the brakes are installed and the axles re-installed, close up the diff and fill it. Now on to making new lines. I installed the flexible lines to the spring perch. Which keeps things close. The flexible line from the Chassis will now come down from the Drivers side, Make sure you get one (If you get new) that will be adequate length. Flare and bend your lines to the axle and the end at the chassis. At the chassis mount is where I put the proportioning valve, it served as a junction block. I mounted it right on the frame with the dial in a location I could get to to adjust it if I needed. Bleed the brakes and adjust your valve if you installed one. The E-brake cables are a different story. This is my only beef with this system is getting them to function properly. I have enclosed a picture of what I did to make it work but your results may vary. If you have gotten this far then making the E-brake cables work is no harder than the rest, ok well I lied. There are universal kits out there to replace those cables; the dumb thing is that Ford changed the design of how the cable mounts to the e-brake drum system, so finding cable might be somewhat of a chore. If you have any other questions feel free to PM me, as I have talked to a lot of people who are interested in this. Good luck. I have done some testing of the new brakes; I was able to stop my 4700 lb truck from 60-0 in about 150 feet, if I remember correctly. (Truck was weighed before test, with 33 x 12.5 AT’s). I don’t know what the factory drums are capable of; no one can give me a comparison. I was not able to test it before I switched over. If any one wants to load their truck up to 4700 lbs and test it out then let me know the numbers. That way we can tell if the disc makes a difference. JH
|
|
|