
Submitted By: Captain Ledd
I had meant to do a write-up on this for a while now (original thread was over a year ago) but never got around to it. Lately I had some PM’s concerning this process so I decided it was time to put an actual how-to together.
Difficulty:
1 out of 10
Time to install:
Tubes and hoses – maybe 10 minutes. Time to finish bleeding varies and may take longer (which it probably will).
Disclaimer:
The Ranger Station.com, The Ranger Station.com Staff, nor the original poster are responsible for you doing this modification to your vehicle. By doing this modification and following this how-to you, the installer, take full responsibility if anything is damaged or messed up. If you have questions, feel free to PM the original poster or ask in the appropriate section of The Ranger Station.com forums.
Brief Explanation:
A good mechanic friend of mine was in a automotive class at college and being one of the more competent students, was tasked by his professor to solve a whiny steering pump on his focus (or some other small Ford, it was years ago now) on his vehicle. The car had been in and out of warranty work several times, not being fixed. So my friend started pouring through books at the automotive library at the college.
In a dusty old book in the corner, he stumbled across a interesting section that specifically called for bleeding Ford Power Steering pumps under VACUUM.
Thankfully said book also included a picture of the device. It was a square piece of clear plastic with a flat rubber o-ring gasket and a hose barb fitted inside the gasket hooked to a hand vacuum pump. The assembly simply sat on top of the pump fill tube.
We had most of this laying around, so we decided to give it a shot. We ended up using a spare P/S pump cap and just drilled a hole in it for the hose barb instead of a plastic flat piece. We also decided to use the vehicles vacuum and that a hand pump was too much work, and besides, if an inch or two of vacuum works, 20 must be better right?!
My 1997 Ranger also had a very loud P/S pump and provided an excellent test platform.
Tools Needed:
– Almost none, a drill and maybe something to help screw in the hose barb would help.
Parts Needed:
– 1/8″ hose barb (or whatever fits your vacuum hose size)
– Vacuum line
– a “T” fitting
– A catch reservoir
– Vacuum Gage (Optional)
For Bleeding:
The first few rounds we started the truck up and let it run just a minute or two, turning the wheel from lock to lock a few times and let it sit.
The reason for this is because it turned my fluid into a froth. And frothy fluid means it’s sending air filled fluid back into the system.
we did this off and on for maybe 2-3 hours, taking 15-20 minutes in between to let things settle down. We were doing other stuff in the yard anyways.
Once things got mostly under control we just drove around with it over the weekend. We maybe only spent 2 hours total on the road, but it just kept getting quieter and quieter. We checked how it was doing intermittently by replacing the proper cap and vacuum line for a bit until we were satisfied with the noise level.
THE PUMP WILL BE LOUDER WHEN IT’S UNDER VACUUM. THIS IS NORMAL.
The Apparatus:
There really isn’t much for assembly. It’s all pretty straight forward as you’ll see in the photos, but I’ll break down what’s happening and why.
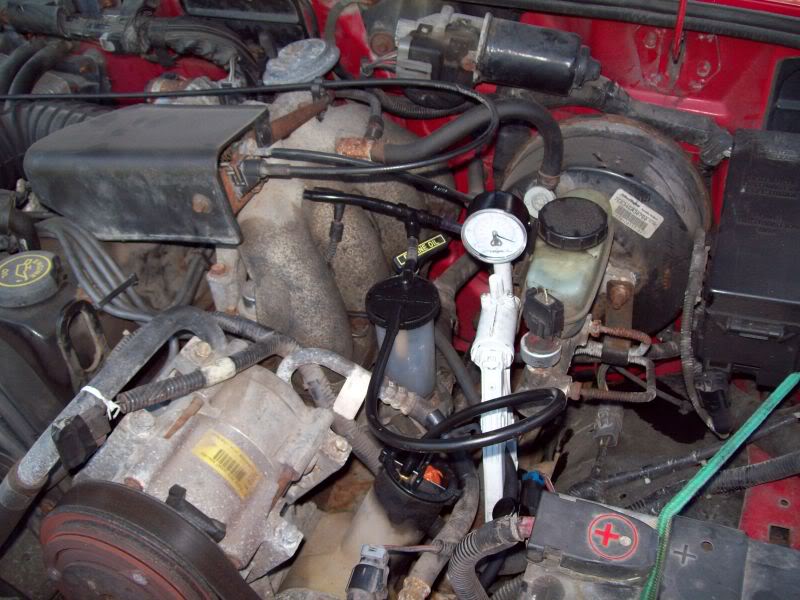
1st picture:
This setup is on a 1997 Ford Ranger 4-cylinder.
This is the initial setup before we really did much. We had a vacuum gage (a hand pump actually, but it did have a gage on it), just to make sure we were getting good vacuum and didn’t have a major leak.
Which vacuum port you choose to tap into really isn’t important. We used a “T” adapter to hook the appropriated port back up (as seen in the 2nd photo). In this case we used the fuel pressure regulator port.
You can see the catch reservoir in line with the pump, this is so no fluid gets sucked not only into the engine, but into whatever port you commandeered. I can’t imagine filling the fuel pressure regulator with P/S fluid would be good for it. It actually did suck up some fluid, so it is rather important.
In case you’re wondering, the orange glob on the cap is simply gasket goo over a mis-drilled hole. These 2 super geniuses drilled it too close to the webbing and couldn’t screw the barb in.
—————————————–
2nd picture:
This is the more road ready version. We removed the gage as it was unnecessary and replaced that barb opening with the fuel pressure regulator hose. The keen observer will also note we rearranged the hose order a bit too. The fuel pressure regulator wasn’t actually hooked up in the first photo.
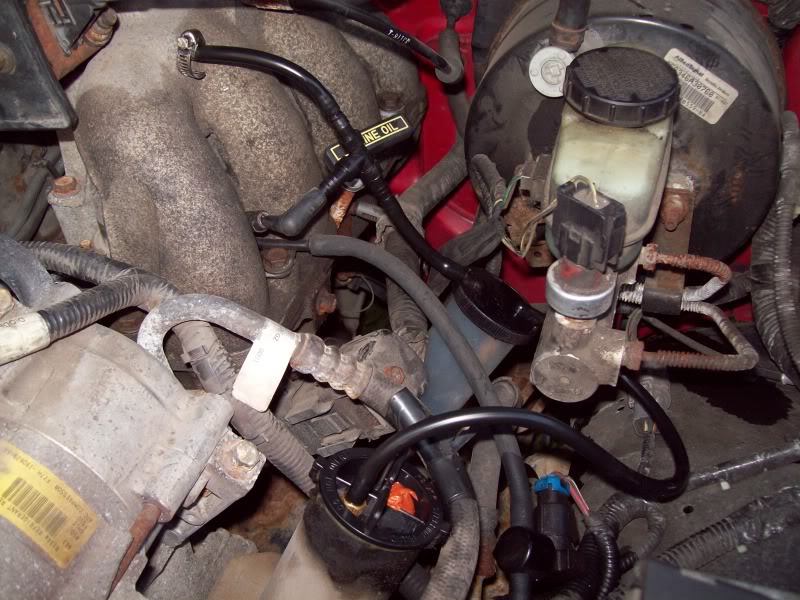
And there you have it! Pretty simple really.
Link to the original discussion:
http://www.therangerstation.com/forums/showthread.php?t=76958
Some others have reported success with it as well.
We also did this to his girlfriends Mercury Sable, and achieved similar results.
**ALSO, keep in mind that Ford P/S systems usually require ATF, not regular power steering fluid.** HOWEVER, I used regular power steering fluid in mine and it’s been fine. Supposedly it will run louder, but it doesn’t bother me much because mine is actually quiet.
And because I like doing things like this, I also dropped a magnet into the pump fill tube. It’s about the size of an office eraser (1.25″x.75″x.5″ – roughly). There is a screen there so it won’t fall in, you can use any size or shape so long as it won’t fit through the screen. That actually did pull quite a bit of shrapnel out of the fluid.