
1990 Ford Ranger / Bronco II
By truckerdawg
My plastic shaft bushing (E69Z 7526 A) got to the point of never staying on the male shaft so I knew it was time for a fix. It took me all day (trying to figure it out) from start to finish-some people will find it easier than I did. Well worth the fix knowing there is no more plastic. Less than $7.00.
Difficulty Rating: 5 and according to how big you are doing the job.
Supplies:
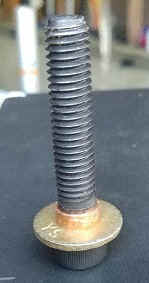
1. 3/8×1/2×5/8×1 Bronze Flange Bushing/Bearing
2. 3/8x16x2 Cap Screw Allen Head Bolt with shoulder
3. 3/8 Locking Nut (I used 2)
4. 5/16 Washer (2)
5. 1/4 Copper Coupling
Preparations:
1. I measured the width of my clutch pedal metal rod to be .24 in. and cut the 1/4 copper bushing to this size. It will act as a bushing in the hole left by removing the male shaft from the clutch rod. Take the 3/8 Allen head bolt, slide on the 5/16 washer, and probably will need to thread/twist/turn the 1/4 copper coupling onto the Allen bolt next-it was a tight fit until it reached the shoulder-I added anti-seize to the shoulder.
2. 
3. I measured the width of the clutch rod at .285 in. and therefore cut the bronze flange bushing to a width of .375 in. (not counting the flange lip). You do not want the 3/8 nut tight against the clutch master cylinder rod end in the final product. This bushing will fit in the clutch master cylinder rod end just as the plastic bushing did. You will probably need to take a dremel and stone or sanding roll to increase the hole size just a tad in the master cylinder clutch rod hole to get the bronze bushing to fit.

4. I ground it level, as you can see there is an angle right now.
Instructions:
1. Remove front seat. Four bolts that hold the seat down and 1 bolt that ties the seat into the seat belt harness. This will give you room to contort yourself under the dash.
2. Undo negative on battery just for safety and problems.
3. Remove front plastic cover below steering column- two 7mm bolts.
4. Remove 10mm bolt in engine bay cannon plug (large white plug on driver firewall with all the wires) and pull the plug out.
5. Pull the cannon plug (interior) away from the firewall-little clips on its side holds it tight against the firewall-push them in to release. You are doing this to get to the emergency brake and its 3 bolts that need removed and to be able to slide the clutch rod out.
6. Remove the little white sensor on the emergency brake pedal assembly so it will not get broken, which it will very easily.
7. 
8. Remove the three 10mm bolts on the emergency brake assembly and the one at the handle. Two of these are not easy. Slide the assembly straight down. You will need this room for the clutch rod to slide out.
9. Disconnect the brake pedal sensor. Pay attention. You have 2 bushings here. Note their orientation. This step may not be necessary but a precaution to get wiring out of the way.

10. Remove/slide the master cylinder clutch rod from the plastic clip and metal shaft. Note the orientation of the white plastic bushing-the bronze bushing will have the same orientation.
11.The clutch rod is attached from the clutch pedal to the other side of the brake pedal assembly where it is held in by an e-clip that needs removed. Once removed you can pull the clutch rod toward the emergency brake, getting the cannon plug wiring out of the way by moving it toward the dash (back of the vehicle). Pay attention again very closely as there are several some black bushings and wavy rings to need to go back in their original places.


12. Now that you have the clutch rod/pedal removed you can tap out the male shaft that the plastic bushing used to fit onto. Check the fit of the Allen bolt with the 1/4 copper coupling in this hole. The bolt, washer, then the coupling- it should fit. The bolt goes in the same direction as the previous male shaft did with the thread side toward the emergency brake.
13. Re-assemble the clutch pedal/rod and brake pedal back into its cradle-remember all those bushings and wavy rings. Don’t forget the e-clip. You do not need the Allen bolt in at this time.
14. Attach the emergency brake assembly back in place and the little white sensor.
15. Attach the cannon plug back into the firewall. Go back to the engine bay and plug back in cannon plug and screw back in the 10mm bolt gently.
16. Take the shortened bronze flange and insert it into the master cylinder clutch rod end. I lubricated with anti-seize both inside and outside. Add the Allen bolt with washer and 1/4 copper coupling. The bolt first goes through the clutch pedal then the master cylinder rod and bronze bushing. Add the second washer and 3/8 locking nut (I added a second locking nut). No, the Allen head is not touching.

19. Reassemble the brake pedal sensor assembly onto its shaft and attach the sensor.
20. Replace the front cover.
21. Replace your seat and seatbelt bolt.
22. Reconnect battery.
The bronze and copper bushings will now do a much better job. They will not wear out the steel clutch pedal rod or master cylinder clutch rod. And you do not have to worry about the clutch rod ever slipping off.